![]()
![]()
STEM CEILINGCEILING MICROPHONE ARRAYUSER GUIDE
© 2021 Midas Technology, Inc. Printed in China
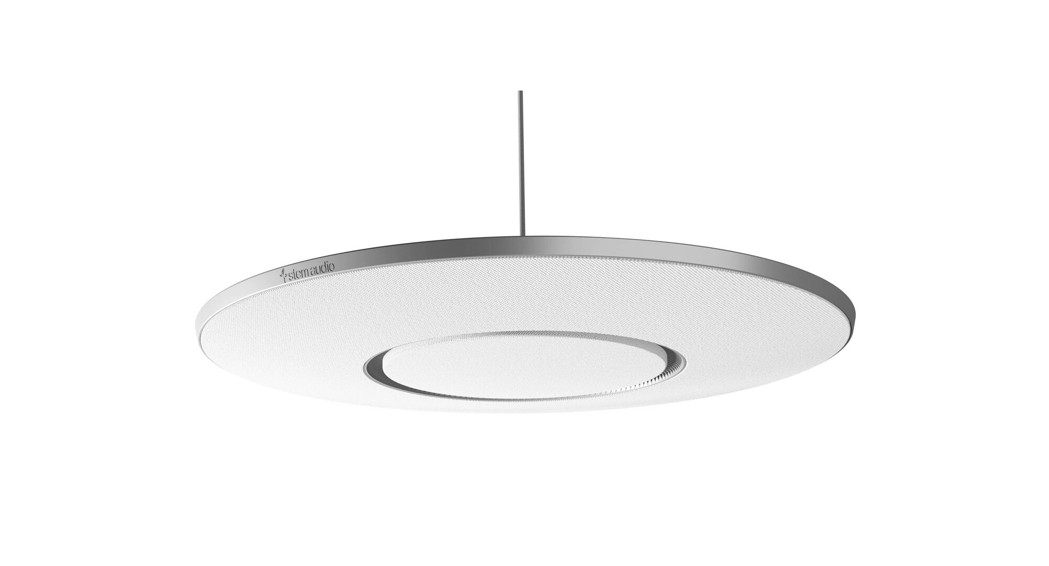
OVERVIEW
Stem Ceiling Microphone Array mounts above a conferencing space either as a low profile element of a drop ceiling or suspended like a chandelier. It features 100 built-in microphones, three beam options (wide, medium, and narrow), and audio fencing. With the aesthetics needed to blend with any environment and uncompromising audio performance, Stem Ceiling eliminates the distractions so you can keep focused on the conversation.
![]()
![]()
INSTALLATION
Suspended “Chandelier” Mounting
![]()
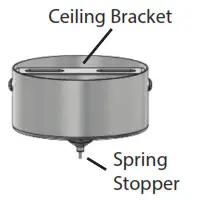 Metal Ceiling Cap (Detail)
- Make all the appropriate cable connections to the device.
- Secure the suspension wire to the device using the screw at the bottom of the wire.
- Slide the connector cover and the cover cap over the suspension wire.
- Align the plastic connector cover with the indents and gently click into place, then apply the cover cap.
- Remove the ceiling bracket from the metal ceiling cap and connect it to a weight-bearing structure.
- Feed all of the cables through the cable hole on the metal ceiling cap and connect the suspension wire by pressing up on the spring stopper while feeding it through.
- Set the desired suspended elevation then screw the metal ceiling cap into the ceiling bracket.
Low Profile Mounting
- Make all the appropriate cable connections on the device.
- Secure the straight bracket to the device using the provided center screw.
- Insert the device, with bracket, into the provided square mount.
- Aligning the holes on the side, secure the square mount to the bracket with the provided screws.
- Drop the assembly into the suspended ceiling.
- Important: Use the wire holes on the square mount corners to secure it to the structure of the ceiling.
- That’s it! Ceiling is now low profile mounted!
SETTING UP
This device can be installed as a standalone unit or networked with other Stem EcosystemTM devices using Stem Hub. With either setup option, this device must be connected to a network port that supports PoE+. This connection provides the device with power, data, and other IoT and SIP capabilities.Note: If your network doesn’t support PoE+, you should purchase a separate PoE+ injector or PoE+ enabled switch. For more information on setting up your room, visit stemaudio.com/manuals or stemaudio.com/videos.
Standalone Setup
- Place or mount the device in the desired location.
- Connect the device to a network port that supports PoE+ using an Ethernet cable.
- For video conferencing, connect the device to your PC using a USB Type B cable.
- That’s it! Your device is all set up to work as a standalone unit.
Stem Ecosystem SetupWith a multi-device setup, Stem Hub is required. Hub enables all endpoints to communicate with each other and provides a single point of connection to external loudspeakers, Dante® networks, and other conferencing interfaces for all devices.
- Place or mount the device in the desired location.
- Connect the device to a network port that supports PoE+ using an Ethernet cable.
- Install all other Stem devices, including Hub, to the same network.
- Access the Stem Ecosystem Platform to configure your devices.
- That’s it! The device is now part of a Stem Ecosystem network.
Stem Ecosystem PlatformWe recommend using the Stem Ecosystem Platform for all installations. Access the Stem Ecosystem Platform using Stem Control, through the apps available for iOS, Windows, and Android, or by typing in the product’s IP address in a web browser.
LIGHT INDICATOR
| Light Activity | Device Function |
| Slow red pulsing | Muted |
| Rapid red pulsing (~2 seconds) | Receiving ping |
| Solid red ring | Error |
| Slow blue pulsing | Booting up |
| Slow blue pulsing then off | Restarting |
| Blue flashing | Testing and adapting to the environment |
| Dim solid blue | Power on |
| Rapid blue pulse | Boot up completed |
CEILING1 SPECIFICATIONS
- Frequency Response: 50Hz 16KHz
- Built-in Digital Signal Processing:
- Noise cancellation: >15dB (without pumping noise)
- Acoustic echo cancellation: >40dB with conversion speed of 40dB/sec Residual echo is suppressed to the environment noise level, preventing artifi-cial ducking of signal
- Automatic voice-level adjustment (AGC)
- 100% full duplex no attenuation (in either direction) during full-duplex
- High-end performance: Conforms to ITU-T G.167.
- Weight: · Microphone: 9lbs. (4.1 kg)
- Square Mount: 7.5 lbs. (3.4 kg)
- Dimensions:
- Microphone: 21.5 x 1.75 in (54.6 x 4.4 cm) D x H at center; H at edge: 0.5 in (1.8cm) · Ceiling Tile: 23.5 x 23.5 x 1.25 in. (59.7 x 59.7 x 3.2 cm) L x W x H
- Power Consumption: PoE+ 802.3 at Type 2
- Operating Systems: Windows 98 and up / Linux / macOS.
Connections
- USB: USB Type B
- Ethernet: RJ45 connector (requires PoE+)What’s In The Box
- USB Type-A to USB Type B Cable: 12 ft. (3.7 m)
- CAT 6 Ethernet Cable: 15 ft. (4.6 m)
- Square Mount
- Suspension Kit
CertificationsThis Class A digital apparatus complies with Canadian ICES-003. Cet appareil numérique de la classe A est conforme à la norme NMB-003 du Canada. Industry Canada ICES-003 Compliance Label: CAN ICES-3 (A)/NMB-3(A)
IMPORTANT PRODUCT INFORMATION
This device complies with Part 15 of the FCC Rules. Operation is subject to the following two conditions: (1) this device may not cause harmful interference, and (2) this device must accept any interference received, including interference that may cause undesired operation.This equipment has been tested and found to comply with the limits for a Class A digital device, pursuant to Part 15 of the FCC Rules. These limits are designed to provide reasonable protection against harmful interference when the equipment is operated in a commercial environment. This equipment generates, uses, and can radiate radio frequency energy and, if not installed and used in accordance with the instruction manual, may cause harmful interference to radio communications. Operation of this equipment in a residential area is likely to cause harmful interference in which case the user will be required to correct the interference at his own expense.Please consider the environment, electric products and packaging are part of regional recycling schemes and do not belong to regular household waste.
WARRANTY
The following warranty statement is effective for all Stem Audio products as of May 1st, 2019. Stem Audio (“the Manufacturer”) warrants that this product is free of defects in both materials and workmanship. Should any part of this product be defective, the Manufacturer agrees, at its option, to repair or replace with a like-new replacement any defective part(s) free of charge (except transportation charges) for a period of two years for all products. This warranty period begins on the date the end-user is invoiced for the product, provided the end-user provides proof of purchase that the product is still within the warranty period and returns the product within the warranty period to Stem Audio or an authorized Stem Audio dealer according to the Product Return and Repair Policy listed below. All inbound shipping costs are the responsibility of the end-user, Stem Audio will be responsible for all outbound shipping costs.Product Return and Repair Policy
- If purchased directly from Manufacturer (Stem Audio):An RMA (Return Merchandise Authorization) number must be obtained by the end user from Stem Audio. Product serial number and proof of purchase must be presented in order to request an RMA number for a warranty claim. The end-user must return the product to Stem Audio and must display the RMA number of outside of the shipping package.
- If purchased through an authorized dealer, return to seller:End-users should refer to the seller’s return policy. Seller may, at its discretion, provide an immediate exchange or may return the product to the manufacturer for repair.
THIS WARRANTY IS VOID IF: The product has been damaged by negligence, accident, an act of God, or mishandling, or has not been operated in accordance with the procedures described in the operating and technical instructions; or; The product has been altered or repaired by other than the manufacturer or an authorized service representative of the Manufacturer; or; Adaptations or accessories other than those manufactured or provided by the Manufacturer have been made or attached to the product which, in the determination of the Manufacturer, shall have affected the performance, safety or reliability of the product; or; The product’s original serial number has been modified or removed.NO OTHER WARRANTY, EXPRESS OR IMPLIED, INCLUDING WARRANTIES OF MERCHANTABILITY OR FITNESS FOR ANY PARTICULAR USE, APPLIES TO THE PRODUCT. THE MANUFACTURER’S MAXIMUM LIABILITY HEREUNDER SHALL BE THE AMOUNT PAID BY THE END-USER FOR THE PRODUCT.The Manufacturer shall not be liable for punitive, consequential, or incidental damages, expenses, or loss of revenue or property, inconvenience, or interruption in operation experienced by the end-user due to a malfunction in the purchased product. No warranty service performed on any product shall extend the applicable warranty period. This warranty extends only to the original end-user and is not assignable or transferable. This warranty is governed by the laws of the State of California.For more information or technical support please refer to our website www.stemaudio.com, email us at [email protected], or call (949) 877-7836.
NEED SOME HELP?
Website: stemaudio.comEmail: [email protected]Telephone: (949) 877-STEM (7836)Product Guides: stemaudio.com/manualsSetup Videos: stemaudio.com/videos Additional InstallationResources: stemaudio.com
report this ad
https://www.stemaudio.com/installation-resources/
References
[xyz-ips snippet=”download-snippet”]