
ShurePlus PLAY Mobile Listening
App User Guide
General Description
The ShurePlus PLAY Mobile Listening App is a high-resolution music player with advanced EQ controls. Play uncompressed audio files with your iOS or Android mobile device using the music tab. Use built-in Shure EQ presets to customize the sound, or create your own EQ presets in the settings tab. Unlock environment mode and ANC features by connecting to Shure wire less and True Wireless products in the device tab.
Features
- Import and play multiple, high-resolution and standard file types
- Customize presets with the parametric graphic EQ
- Adjust your volume with the full-screen fader
- Create playlists and organize your music library by playlist, artist, album title, song title, genre, or composer
- Quickly dial in your sound with EQ preset modes for a variety of listening situations.
The Music Tab
View and sort your music library with categories like playlist, artist, album, song, genre, composer or compilation in the Music tab.
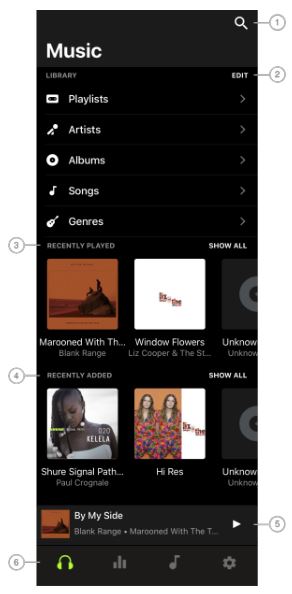
- SearchTap the icon and search your music library by artist, album, playlist, or song title. Tap Clear to remove saved searches.
- EditTap Edit to add or remove library categories.
- Recently PlayedView recently played files. Tap ShowAll to view your listening history.
- Recently AddedView recent additions to your music library. Tap ShowAll to view the recently added files list.
- Mini PlayerDisplays the currently playing song. Play or pause the music. Tap to display more detailed track information. 4/18
- Navigation BarTap to access the device connection tab, the equalizer, the app settings tab and to return to your music library.
Your Music Library
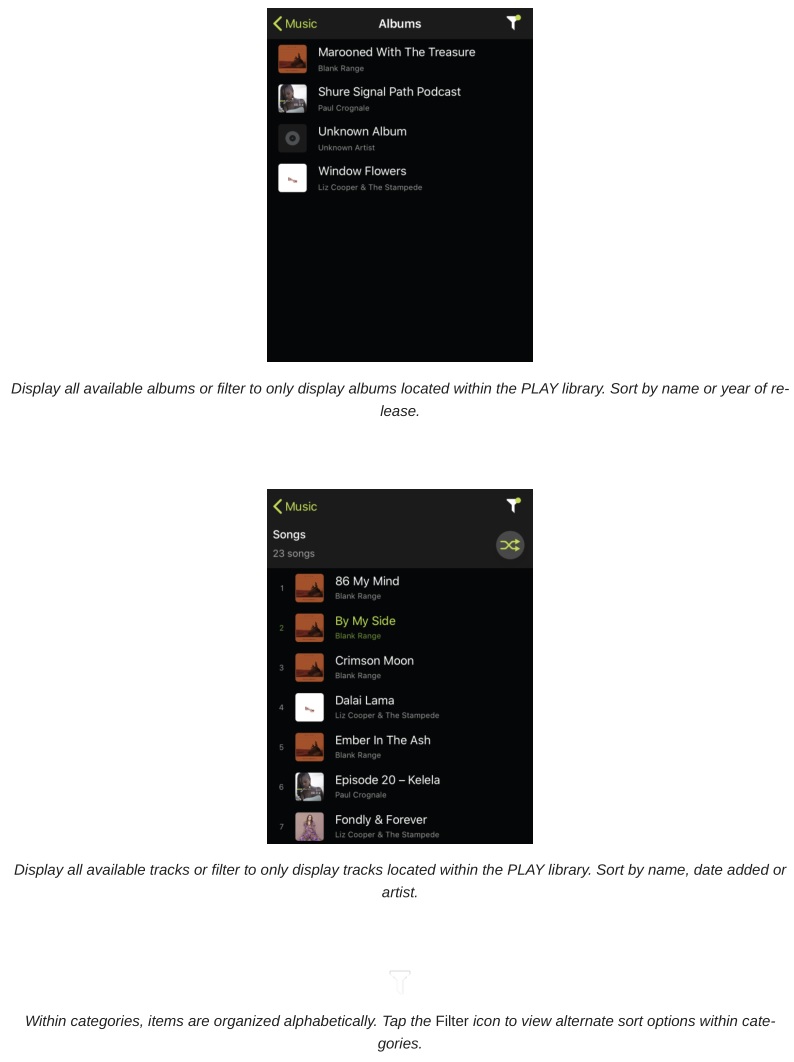
Sort and view your audio files by using playlist, artist, album, song, genre, or composer categories. Tap Edit on the Music screen to select the categories you want to view.

Add Music to Your iOS Device
ShurePlus PLAY can play files that are stored locally on your device. Every time that you launch PLAY, a green dot appears on the Settings tab when audio files have been found on your device and are being added to the PLAY music library. Allow a few moments for the songs to appear in the music library. Every time that you open PLAY, the music library syncs with the files on your device. Any changes made to the audio files, for example a song title change, remains consistent across the device.
Tip: For best results, keep the app open to allow for a complete, uninterrupted music library sync. Load time is dependent up on device type and library size. If sync becomes interrupted, simply reopen PLAY and sync will resume.
Note: Tracks that are stored in the cloud will not appear in the PLAY app and cannot be played. Files are playable when they have been downloaded to your device and are DRM free. PLAY will not stream music from another app or from the cloud.
Add Music Using AirDrop®
- Make sure that Receiving is on for the receiving device. Select ContactsOnly or Everyone.
- Select the audio file on the sending device. Tap Share and then More to access your contacts.
- Select PLAY to copy the song to ShurePlus PLAY.
Important: ShurePlus PLAY will not add a track if the file is corrupted and unplayable. Also, PLAY will not add duplicate tracks.
Add Music Using the Files App
You can copy music to the PLAY app from other apps on your device if those apps support file sharing.
- Upload audio files from your computer to any cloud-based app on your mobile device.
- Open the Files app on your device and locate your uploaded file.
- Select the file that you’d like to add to ShurePlus PLAY. For best results, upload one file at a time.
- Tap the action icon (the square with an arrow pointed up).
- Tap CopytoPlay. The Play app will open.
- A notification will appear to let you know when your file is successfully imported.
Important: ShurePlus PLAY will not add a track if the file is corrupted and unplayable. Also, PLAY will not add duplicate tracks.
Add Music from the iTunes Store
Music files that have been purchased from the iTunes Store are DRM free and playable on the PLAY app. On your iOS device, sync by opening Settings > PLAY. Turn on “Allow PLAY to access Media and Apple Music.” The next time you open the PLAY app, the green sync dot will appear on the Settings tab, and your files will be added to the PLAY music library automatically. The newest files will be visible in the Recently Added row in addition to the Music Library. If the files do not appear, open the Music app, download the purchased songs, then return to the PLAY app and look for the green sync dot.
Note: PLAY can play most files that have been purchased and downloaded from iTunes because they will not have DRM (digital rights management).
Add Music from the iCloud Music Library
On your iOS device, enable iCloud Music Library sync by opening Settings > PLAY. Turn on “Allow PLAY to access Media and Apple Music.” The next time you open PLAY, the app will automatically find files that have been purchased and down loaded to your device.
- First, download your files to the device. Enable iCloud Music Library syncing in the Apple Music app on your device by going to Settings > Music > SyncLibrary. Or sync with a computer using a USB cable or WiFi to connect to your device.
- Download your DRM free music files to your device. These are files that have been purchased from the iTunes store (DRM free) or that have been ripped from media that you already own.
- Open PLAY to automatically sync downloaded files to your PLAY music library. The green dot will indicate that PLAY is syncing to the device.
- Your available DRMfree files will appear in the PLAY music library. Copy protected music tracks, like those down loaded from an Apple Music subscription, are not supported by PLAY, and will not appear in the app.
Note: All music from the Apple Music subscription service, whether streamed or downloaded, has DRM (digital rights management) and will not be available on ShurePlus PLAY.
Add Music to Your Android Device
Activate File Sharing
Some Android devices require you to activate file sharing before you can transfer files into ShurePlus PLAY. When a mobile de vice is connected to a computer with a USB cable, the device will automatically begin to charge. Follow these steps to allow file transfers.
- Connect the Android device to your desktop computer with a USB cable
- Open Settings to locate USB connection preferences
- Select Filetransfer
- On your computer, locate your device in Windows Explorer
- Find the Music folder
- Drag and drop files from your computer to the music folder on your device. Any audio files already physically stored on your device will be synced to ShurePlus PLAY when you open the PLAY app.
Important: ShurePlus PLAY will skip a track if the file is corrupted and unplayable. Also, PLAY will not add duplicate tracks.
Add Music Using Other Audio Apps
ShurePlus PLAY will automatically display audio files found in other apps on the device. This is because Android apps can rec ognize audio files that are stored on the device.
Play an Album
Tap on the album that you’d like to play. Tap the first track to hear the whole album. You can also listen to the album in Shuffle mode. Shuffle plays all of the songs on the album in a random order and stops when all of the songs have been played.
Track View
Playback
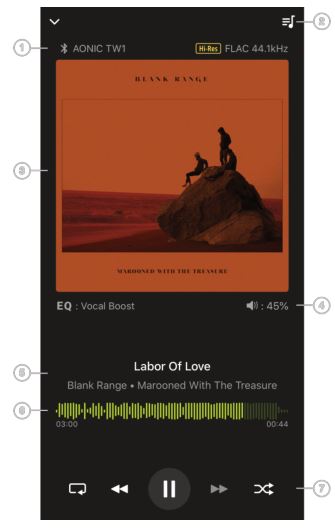
- Audio Output
- Play queue (You can also swipe up to view the play queue.)
- Track artwork
- EQ information, Volume level
- Track information: Track title, Artist, Album
- Track waveform
- Playback controls: Loop, Previous track, Play/Pause, Next track, Shuffle on/off
The Equalizer
Preset Modes
Use presets to quickly access commonly used listening scenarios. Five selectable 4-band presets optimize settings for gain, equalization, and compression. Play a song and find the preset that you think suits the song best. Then adjust levels as need ed.


Create Custom Presets
Add new preset
- Tap Settings > EQ to access the equalizer.
- Scroll down to tap Add New Preset
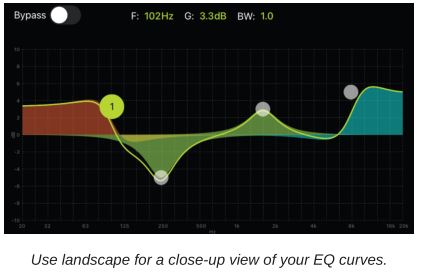
- Adjust your frequency, gain, and bandwidth parameters. There are three ways to adjust your equalizer. Tap the values to type in a specific number. Tap the – or + to adjust in larger increments. Or, tap and drag the numbered circles for bigger changes.
- Tap the check mark to save your new customized preset.
Duplicate a Preset
- Select one of the five preset modes and tap Duplicate.
- Tap the More Options 3 dots. Tap Edit EQ Preset.
- There are three ways to adjust your equalizer. Tap the values to type in a specific number. Tap the – or + to adjust in larger increments. Or, tap and drag the numbered circles for bigger changes.
- Tap the check mark to save your new customized preset.
Use Screen Orientation to Adjust EQ

Adjust the Volume
- From the song playing screen, tap the volume icon. Slide the green bar up and down to adjust volume and tap X to close when you find your listening level.
- Long press the volume icon until the full-screen fader appears. Slide the green bar up and down to adjust volume and tap X to close when you find your listening level.
Loop
![]()
Tap loop for continuous play of a single song or all songs in an album, playlist or play queue. If loop is not selected, play will end once all of the songs have been played.
Shuffle
![]()
There are two versions of shuffle play.
- Play Queue shuffle: Accessible from the song playing view, randomly shuffles all of the songs in the play queue.
- Album shuffle: Accessible from album view, randomly shuffles all of the songs on the album.
Turn shuffle mode off to continue playing the songs in the original order, minus the songs that have already been played.
Play Queue
To view the play queue, open the track view screen and swipe up or tap the play queue icon in the top right corner. The play queue is the collection of song queued up for play. Once a song is played, it is removed from the queue. Pressing play on a song in a new album or playlist will clear the queue. Play will continue from the selected track.
Controls
Press and hold on any artist, album, or song to bring up the related menu options.Play Next: Adds a song, artist, or album to the top of the play queue.Play Later: Adds a song, artist, or album to the bottom of the play queue.Add to Playlist: Adds a song, artist, or album to a playlist that you select.View Artist: Artist library opens.View Album: Album opens.Delete: Delete the song, artist, or album.
Using Playlists
Create a New Playlist
- Tap the playlists link on the home screen.
- Tap “Create Playlist…”.
- Enter the playlist name and tap “OK”.
Add Music to a Playlist
Add songs from the Songs list
- Tap Songs.
- Long press the song you’d like to add to your playlist.
- Tap Add to Playlist and select the playlist that you want to use.
Add songs from the Playlist
- Tap Playlists.
- Select your playlist.
- Tap the 3 dots at the top right corner to bring up the options menu.
- Tap Edit Playlist and Add Songs.
Delete Songs, Albums, Artists, or Playlists
When you delete the PLAY app, any songs that you have uploaded to the app music library are also deleted. Songs stored in other apps are unaffected.
Delete a playlist – Long press the playlist you want to remove and tap Delete Playlist. The playlist will be deleted but the songs will remain in the PLAY library.
Delete an artist – Long press the artist you want to remove and tap Delete Artist. All songs and albums by that artist will be deleted from the device.
Delete an album – Long press the album you want to remove and tap Delete Album. Only that album will be deleted from the device.
Delete a song – Long press the song you want to remove and tap Delete Song. The song will be deleted from the device. Or long press a song within a playlist and tap Delete Song to remove the song from the device.
Use the playlist queue to remove a song from a playlist without deleting it from the music library. From the Playback window, swipe up to reveal the play queue. Tap the red circle with the line through it and tap Delete. This will keep the song on the de vice, but delete it from the playlist.
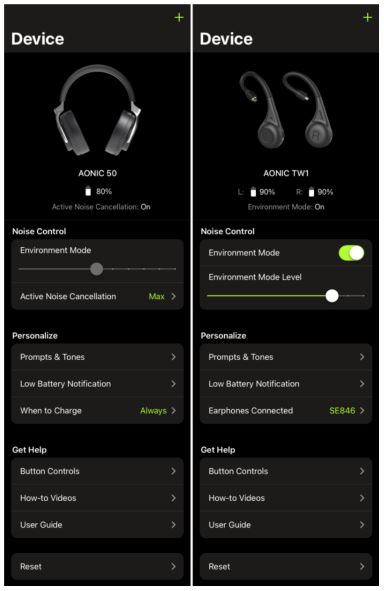
The Device Tab
Use the device tab to connect to Shure wireless products and access features that are available to your device, like environ ment mode and ANC, and to personalize prompts and tones. Ensure that you are selecting the correct accessory model so that the PLAY app supports the appropriate sensitivity level. Your device will appear in the display with corresponding features.
Warning! Failure to select the appropriate earphone can lead to increased sound pressure levels. Overexposure to excessive sound levels can damage your ears resulting in permanent noise induced hearing loss (NIHL). Please consult the safety guide lines in the users guide for your earphones for additional information.
The Settings Tab
![]()
Tap the Settings icon to access the PLAY app Setting tab. Here you can configure app features, and access the user guide and equalizer settings. Use PLAY equalizer presets to shape the sound, or create your own custom presets. See Create Custom Presets for more information.
Updating the Firmware for Shure AONIC products
Take advantage of additional features and design enhancements by updating the firmware on your AONIC product. To check for firmware updates, connect the AONIC product to a device running the ShurePlus PLAY app, available for Android and iOS.
Follow these steps for a successful firmware update
- Enable Airplane mode on your mobile device.
- Turn on Bluetooth and pair the AONIC product to your device.Attention: Android users, check settings to ensure that both adapters are connected to your device.
- Open the ShurePlus PLAY app and select the Device tab.
- IMPORTANT: Ensure that both earphones or adapters are paired with the device and in close range (for applicable products).
- If both earphones or adapters do not automatically connect, tap the music tab and then tap back into the device tab.
- When an update is available, a green dot will appear next to Firmware Update in the device settings menu.

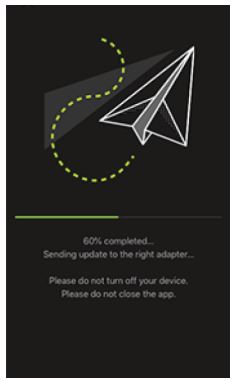
- Tap the caret icon and follow the onscreen step-by-step instructions. The progress bar displays progress percentage for both adapters; it is a single process.
- After a successful update, the “Update Completed” confirmation screen appears. Do not power off the AONIC product until the update completes. Note: If the update fails on the first attempt, be sure to quit the app completely before attempting again. You may need to force quit the app to confirm that it isn’t running in the background. Wait 5 minutes before opening the app and attempting again. Check the list below for tips on a successful update.
- Confirm the new firmware version as displayed in the About menu (Device screen > … > About > Firmware Version).
Tips to ensure a reliable update
- Ensure that the mobile device and your AONIC product are powered on and near to one another.
- Using the product or mobile device while downloading may slow or cancel the update process.
- Update requires a minimum battery charge of 50% on your mobile device and on the AONIC product.
- Approximate download time for headphones and earphones is up to 30 minutes.
- Do not exit the PLAY app and ensure that your screen is on.
- Do not update in areas with high volume mobile or WiFi wireless activity, like a plane or train station. This interference cansignificantly slow down or cancel the update process.
- Ensure that your mobile device is using the most current operating system (OS).
Contact Shure Service and Repair if you experience any issues.
Troubleshooting

There are two ways to perform a factory reset:
- Delete all songs from device About > Delete All Songs
- Clear the PDL (Paired Device List) Settings > Forget Devices
Specifications
System Requirements
System Requirements and Compatibility: iOS
- iOS: iOS 11.3 and higher
- iPhone: iPhone 6 and higher
System Requirements and Compatibility: Android
Will work with any Android device with:
- Android Oreo 8.0 and higher
- USB Audio Class 1.1 support and higher
Android is a trademark of Google Inc.
Supported Audio Formats

[xyz-ips snippet=”download-snippet”]