Assembly InstructionsPanel radiator Duplex (SHWD)
Parts Supplied
| Ref | Description | Illustration | Qty |
| A | Radiator Vertical
|
1 | |
| B | Air vent | 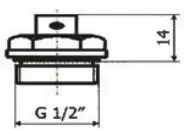 |
1 |
| C | Blanking plug | |
1 |
Tools Required (not supplied)
Drilling MachineDrill 10 mm masonry22 mm SpannerHammerFlat Nosed Pliers
Fittings Supplied
| Ref | Description | Illustration | Qty |
| D | Masonry plus | 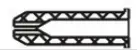 |
4 |
| E | Screw | |
4 |
| F | Bolster |  |
4 |
| G | Bracket for vertical use | |
4 |
A Radiator Horizontal
Before you start :
- Please read the instructions carefully before installation.
- Check the pack and make sure you have all parts listed above. If not, contact your supplier who will be able to help you.
- Before drilling, first, check that there are no hidden water pipes or electrical cables.
- This radiator is designed for use in closed heating systems only with a maximum pressure of 3 bars ( most common domestic heating systems do not exceed 3 bars )
- When you are ready to start, make sure you have the right tool to hand, plenty of space, and a clean dry area for assembly.
- Make sure that you use the right type of wall fixing;-masonry wall plugs supplied -.
Installation
A: Vertical use
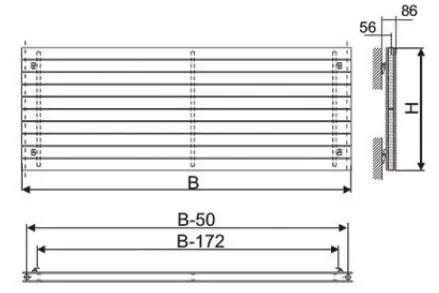
- Using the dimensions given in the fixing hole template if using the plugs supplied drill 4 holes to a depth of approximately 60 mm and a diameter of 10 mm. NOTE:The distance from the floor to the bottom of the radiator must be at least 200 mm for efficient heating and ventilation.The horizontaldistance between the two %” pipe connections is B mm.
B: Horizontal use
- Using the dimensions given in the fixing hole template if using the plugs supplied drill 4 holes to a depth of approximately 60 mm and a diameter of 10 mm.NOTE:The distance from the floor to the bottom of the radiator must be at least 200 mm for efficient heating and ventilation. The verticaldistance between the two ½” pipe connections is Hmm.
- Insert masonry wall plugs ( D ) provided into the drilled holes, solid walls only.
- Fasten screw ( E ) with a bolster (F) through bracket ( G ) to fix securely to the wall.Take care not to overtighten.
- Hang the radiator on the brackets.
- Fit the supplied air vent ( B ) and blanking plug ( C ) into the upper threaded openings of the radiator.
- Connect the water flow and the return pipe to the chosen side of the radiator and the isolation valves ( not supplied ). Ensure a water-tight seal is obtained by using PTFE tape on the threads.
- Open the valves of the radiator, fill and purge the remaining air from the radiator using the air vent ( B ). When full close the air vent.
Care & Use
- After fitting you MUST be absolutely certain that the system is THOROUGHLY flushed before it is commissioned in order to rinse out any metal, flux, and foreign residues. The system must also be thoroughly vented.
- To help prevent internal corrosion and limescale formation a suitable inhibitor MUST be added to the central heating system when it is refilled
- Wipe radiator clean with a soft damp cloth. Never use scourers, abrasives or chemical cleaners.
Troubleshooting
SHWD02/2010
[xyz-ips snippet=”download-snippet”]