![]() QUICK START GUIDE
QUICK START GUIDE

SIGNAL LEVEL METER FOR OVER-THE-AIRAND CABLE TVMODEL 40
CONTENT
Contents Includes:
| 1. SignalScout Tester | 1. AC Power Adapter |
| 2. Carrying Case | 2. USB/Charging Cable |
| 3. Strap (+2 Buckles) | 3. Quick Start Guide |
| 4. Stylus |
Psiber, the Psiber logo, and SignalScout are trademarks of Psiber Data Systems Inc. ©2020 by Psiber Data Systems Inc. All rights reserved. 1005-0400-0000 Rev: A
GETTING STARTED
Press the Power Button for 1 second to turn on the SignalScout. The HOME screen is displayed.Select either LEVEL, SCAN, NOISE, or SETUP.Select SETUP from the HOME Screen to display the MAIN SETUP Screen.
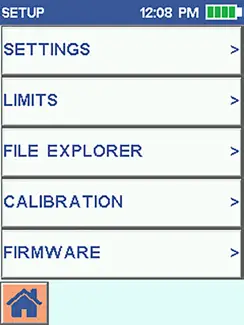
SETUP
 |
|
SETTINGS allows the TIME/DATE, SPEAKER VOLUME, and AUTO POWER OFF to be changed. Select the RETURN button to go back to the MAIN SETUP screen.LIMITS changes the limit levels for ATSC, CATV, and NOISE Power which will be used on the testing screens. FILE EXPLORER brings up a list of files that can be edited or deleted. Both Channel Plans (ATSC & CATV) can be customized. See the user manual BEFORE deleting one of the calibrations (CAL) files. CALIBRATION calibrates the TOUCHSCREEN, COMPASS, and METER (User). METER (User) allows user calibration but METER/NOISE (Factory) cannot be changed.
FIRMWARE shows the version and allows for new updates. Select the HOME button to go back to the Home Screen.
ATSC LEVEL
Press LEVEL from the HOME Screen.The SignalScout continuously scans for ATSC LEVELS on the selected Channel and Frequency. There are 2 graphs displayed – the Power Level (Left) and Signal-to-Noise Ratio (SNR – Right). These graphs show if a signal is detected and signal strength. The levels are shown numerically under each graph.
The Center Button is the GAIN CON-TROL which cycles from AGC (OFF), AUTO, +10 dB (AMP), -20 dB (PAD). Selecting the +10 button may identify weak TV stations that will require an amplifier in the home system.PRE and POST errors are shown on this screen. PRE are coding errors in the data that are automatically corrected by a TV’s error correction algorithm. POST errors cannot be corrected and cause picture problems. The 8 VSB encoding level is displayed. Select the UP and DOWN ARROW buttons to change the Channel and Frequency or select the white CHANNEL or FREQUENCY button and enter in a specific channel or frequency. Select the GREEN ENTER ARROW button to select a specific number or select the “X” to cancel and go back to the ATSC LEVEL Screen without saving entered data.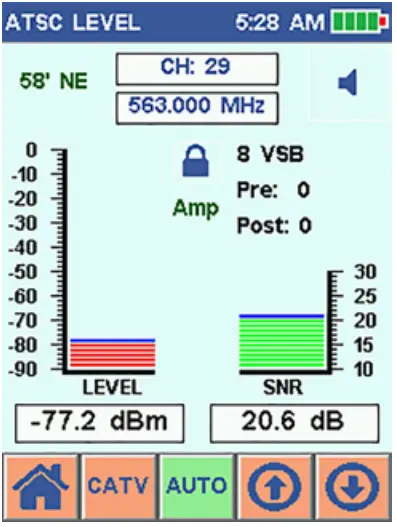 Select the SPEAKER icon to enable an audible tone that is proportional to the received signal strength. (No tone below -79 dBm)The built-in COMPASS gives a starting direction for aiming the antenna. (Shown in degrees & direction)When the LOCK icon is displayed, the channel is locked and being decoded.
CATV LEVEL
Select the Orange CATV button from the ATSC LEVEL Screen to display the CATV Signal Level and SNR. This screen setup is identical to the ATSC LEVEL Screen.The QAM encoding level is displayed. The SignalScout is 64/256 QAM compliant and DOCSIS 3.1 (OFDM) signal level compatible. Select the HOME button to return to the Home Screen.
SCAN
Select SCAN from the HOME Screen.The SignalScout will scan all channels from the selected frequencies in the channel plan entered in SETUP and displays the power levels for each frequency in a single graph.Select the UP and DOWN ARROW buttons to scroll through the channels/frequencies. The selected channel will be displayed as a blue line. The POWER LEVEL (dBm) and TILT (dB) is displayed for the selected channel. TILT is calculated as the last channel power minus the first channel power.
Select the LEARN button in the top right-hand corner to scan all channels and display the number of channels detected.The GAIN CONTROL button cycles from AGC (OFF), AUTO, +10 dB (AMP), -20 dB(PAD).
NOISE
Press NOISE from the HOME Screen. The NOISE Power Level graph is displayed. The actual power level number is displayed below the graph. In the shown example, the level is -21.0 dBm.
Select the SPEAKER icon to enable an audible tone that is proportional to the Ground Block Noise Strength. This can be used to detect problems like loose connectors and cut cables that should be minimized to get the best cable modem installation. There is no tone below -30 dBmV. Noise return power is measured through a 42MHz low pass filter.
WARRANTY/SERVICE OPTIONS
Psiber Data Systems Inc. warrants that the product shall be free from defects in parts or workmanship for a period of o12 months from the date of purchase if used in accordance with Psiber Data Systems Inc. operating specifications.
report this adTHIS IS THE ONLY WARRANTY MADE BY PSIBER DATA SYSTEMS INC. AND IS EXPRESSLY MADE IN LIEU OF ALL OTHER WARRANTIES, EXPRESSED OR IMPLIED, INCLUDING BUT NOT LIMITED TO ANY IMPLIED WARRANTIES OF MERCHANTABILITY OR FITNESS FOR ANYPARTICULAR PURPOSE.Should any parts or workmanship prove defective, Psiber Data Systems Inc. will repair or replace at Psiber’s discretion, with no cost to the Buyer except for shipping costs from the Buyer’s location to Psiber’s location. This is the Buyer’s SOLE AND EXCLUSIVE REMEDY under this agreement. This warranty does not apply to products that have been subject to neglect, accident, or improper use, or to units that have been altered or repaired by other than an authorized repair facility.Return of Equipment – Return of product to Psiber Data Systems Inc. requires a Return Merchandise Authorization (RMA) issued by Customer Service. To obtain an RMA, contact us at 619-287-9970 (8 am to 5 pm PST) or email [email protected]. The RMA# must be clearly marked on the shipping label or package. See sample label: To Psiber Data Systems Inc. RMA# XXXXXXXX 7075-K Mission Gorge Rd., San Diego, CA 92120
[xyz-ips snippet=”download-snippet”]