silentnight Oil Filled Radiator
Instruction Manual

Read all instructions before using this appliance and keep them for future reference.
WARNING: IN ORDER TO AVOID OVERHEATING, DO NOT COVER THE HEATER.
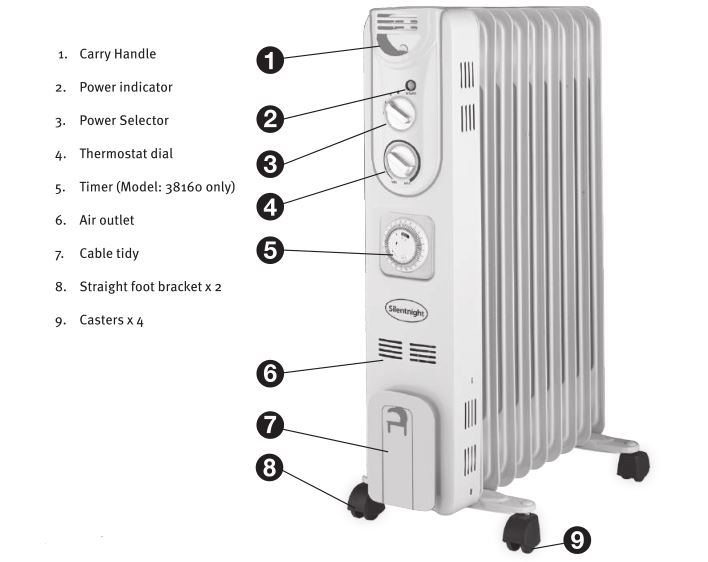
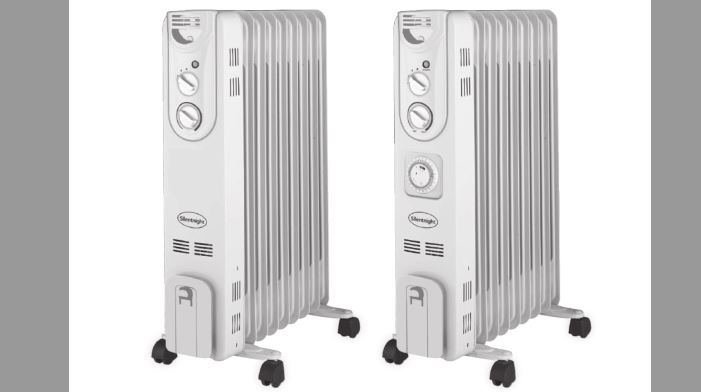
ABOUT YOUR HEATER
Read all instructions before using this appliance and keep them for future reference.
WARNING: IN ORDER TO AVOID OVERHEATING, DO NOT COVER THE HEATER.
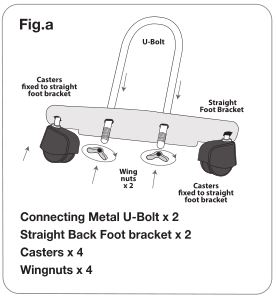
Attaching the Straight Back Bracket and Castors (Fig. a)
- Turn the heater upside down for easy assembly of foot brackets.
- Place U-bolt between front two fins at the control end of the heater and attach to Straight Foot Bracket and secure with wingnuts.
- Place U-bolt between back two fins of the heater and attach the other Straight Foot Bracket and secure with wingnuts.
- After having attached all caster assemblies, DO NOT FORGET TO RETURN THE HEATER TO ITS UPRIGHT POSITION FOR OPERATION.
DO NOT operate the heater without the caster assemblies attached to the bottom of the unit. Otherwise it may result in a fire hazard.
IMPORTANT: The radiator must only be operated in the correct upright position with the casters assembled on the bottom and carry handle located on the top.
WARNING: Operating the radiator upside down may cause fire. This heater is equipped with a tip over switch, if for any reason, the heater is operated while it is tipped over, power will be cut off automatically. No measures should be required to repair it. Once placed in the correct upright position, it will begin to work normally.
If you are in doubt, please consult a qualified electrician before use.
HOW TO USE
Read all instructions before using this appliance and keep them for future reference.
- Before using the heater make sure that it is on a flat and stable surface. Damage may occur if it is placed on an incline or decline.
- Then insert the plug into a socket-outlet.
- Rotate the thermostat dial (Fig.c) clockwise to “MAX” position and select the power setting on the power dial (Fig.d).
- When your room reaches the desired temperature, slowly rotate the thermostat dial counter-clockwise until the power indicator light goes out. The thermostat can now be left at this setting. As soon as the room temperature has dropped below the set temperature, the unit will switch on automatically, until the set temperature has been reached again. In this way the room temperature remains constant with the highest energy efficiency.
- If you want to change the room temperature setting, rotate the thermostat dial clockwise to raise the temperature, or counter-clockwise to lower it.
- This heater includes an overheat protection system that shuts off the heater when parts of the heater are getting excessively hot.
- To completely shut the heater off, turn thermostat to “Min” and setting button to “off”, and unplug the heater from the socket-outlet.
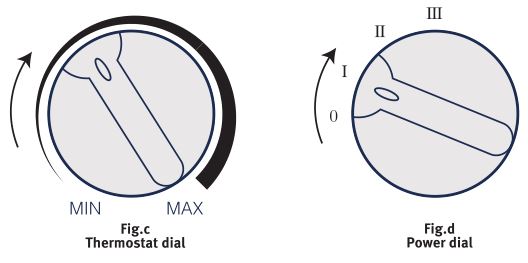
POSITION I: Boo wattsPOSITION II: 1200 wattsPOSITION Ill: 2000 wattsPOSITION 0: Power off
USING THE TIMER
(Model 38160)
Read all instructions before using this appliance and keep them for future reference.
The device must be installed so that airflow is not obstructed.
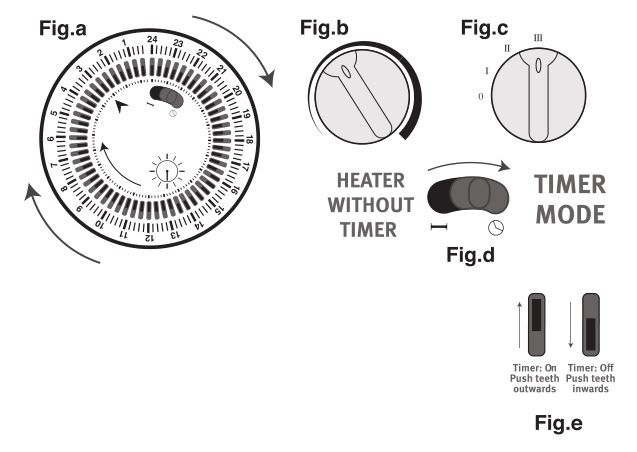
- Control the time settings of the heater by turning the timer dial in a clockwise direction (Fig.a).
- Before selecting the timer the heater must be plugged in with thermostat turned to the max position (Fig.b).
- Select the desired heat setting for when the heater turns on (Fig.c).
- Set the timer function switch to the timer position (Fig.d).
- Push the timer pins inwards/outwards to select when the heater turns on and off. There are 96 small plastic pins each correspond to 15 minute intervals. Push pins to outward position for the time you want the heater to turn ON, and push pins inward for the time you want the heater to turn OFF (Fig.e).
Important rules when using the timer:
- WARNING: Do not use the timer function unattended.
- The heater will not operate if all the pins are pushed inwards.
- Please reset the timer each time the heater loses mains power (ie. when unplugged/power failure) for it to function properly.
TROUBLESHOOTING
Read all instructions before using this appliance and keep them for future reference.If your heater fails to operate, please follow these procedures before contacting Customer service:
THE HEATER WILL NOT POWER ON.
The thermal cut-off has been activated.Unplug and turn the heater off; allow it to cool for 30 minutes. Once the heater has cooled off, check to make sure that there are no objects on or adjacent to the unit. To resume operation, plug the unit back in.
Breaker/Fuse has been tripped.Ensure unit is in OFF position. Plug in unit and attempt to turn on again.
Heater is not plugged into a 240V polarized outlet/receptacle.Check your fuse box to confirm the breaker has not been blown. This may occur if the receptacle is shared between other high consumption appliances.
POWER LIGHT IS ON, BUT NO HEAT IS EMITTING FROM THE UNIT.
Room temperature has warmed up to thermostat setting.To increase the room temperature, adjust thermostat control dial to a higher setting by turning clockwise.
The heating elements inside the unit have not warmed up yet.Allow 15 minutes after the unit has been turned on for the oil fins to heat.
THE HEATER IS CREATING A BURNING SMELL.
Check & ensure there are no combustible materials 3′ (0.9m) surrounding the heater.Remove the combustable units adjacent to the heater.
The heater feet have not been properly installed on the unit.Follow assembly instructions on how to attach front and hind legs to the unit.
THE HEATER IS MAKING SMALL CRACKLING SOUNDS.
It is normal for the heater to emit small crackling sounds as it heats the oil inside the fins.Allow heater to operate for a period of time. After the heater has warmed up, the crackling sounds should stop. Do not be alarmed. It will go away after approximately 15 minutes.
CLEANING & STORAGE
Read all instructions before using this appliance and keep them for future reference.If your heater fails to operate, please follow these procedures before contacting Customer service:
The heater requires regular cleaning to ensure trouble free operation:
- Do not stand or drop the heater and treat it carefully at all times.
- Always turn off and unplug the heater from the mains supply before cleaning.
- Use a damp cloth to wipe the exterior of the heater to remove dust and dirt.
- Ensure the heater is dry before plugging back into the mains supply.
- Do not allow water to run into the interior of the heater as this could create a fire or electric shock hazard.
Storage:If the heater is not required for long periods, for example during the summer, it should be stored in a dry place and preferably covered to prevent the accumulation of dust and dirt. Unplug the heater and store the mains lead in the storage recess provided. Ensure that the plug does not trail on the floor where it could be damaged.
GENERAL CARE AND SAFETY GUIDE
Read all instructions before using this appliance and keep them for future reference.
WARNING: IN ORDER TO AVOID OVERHEATING, DO NOT COVER THE HEATER.
- When using electrical appliances, basic precautions should always be followed to reduce the risk of fire, electric shock, and injury to persons, including the following:
- Before using, ensure that mains cord is fully extended and is not touching the surface of the heater.
- Before connecting the heater, check that the voltage indicated on the rating plate corresponds.
- Avoid the use of an extension cord because it may lead to overheating.
- The radiator should be placed on flat ground. You must not place it on an uneven or angled surface.
- DO NOT use the radiator in a room containing combustible or explosive gas.
- DO NOT use aerosols, flammable substances or materials sensitive to heat in the flow of hot air.
- DO NOT use this heater in the immediate area surrounding a bath, shower or swimming pool.
- The heater must not be placed immediately below a socket outlet.
- To ensure safety do not put anything in between the fins of the radiator.
- When in use, there should be a safety buffer around the heater of at least 8 inches. There must also be a 3-foot clearance above the unit to allow for ventilation.
- WARNING: In order to avoid overheating, do not cover the heater.
- Prevent overheating of the heater by keeping the air inlet and outlet free of obstructions.
- Before cleaning the radiator turn off power and remove plug from outlet.
- Only touch the heater with dry hands.
- Please always unplug the unit from the socket when not in use.
- While using the radiator keep doors and windows shut to maximize the unit’s heating potential.
After Sales Service
©Silentnight Group Limited 2014All rights reservedLicensed by JELCExclusively manufactured for and distributed by BML LIVERPOOL L24 9WD UK ©2014All Rights Reserved.Product may vary slightly from the image shown.Specifications will however remain the same.
[xyz-ips snippet=”download-snippet”]