![]()
DS-700AC Setup GuideWA10630XX![]()
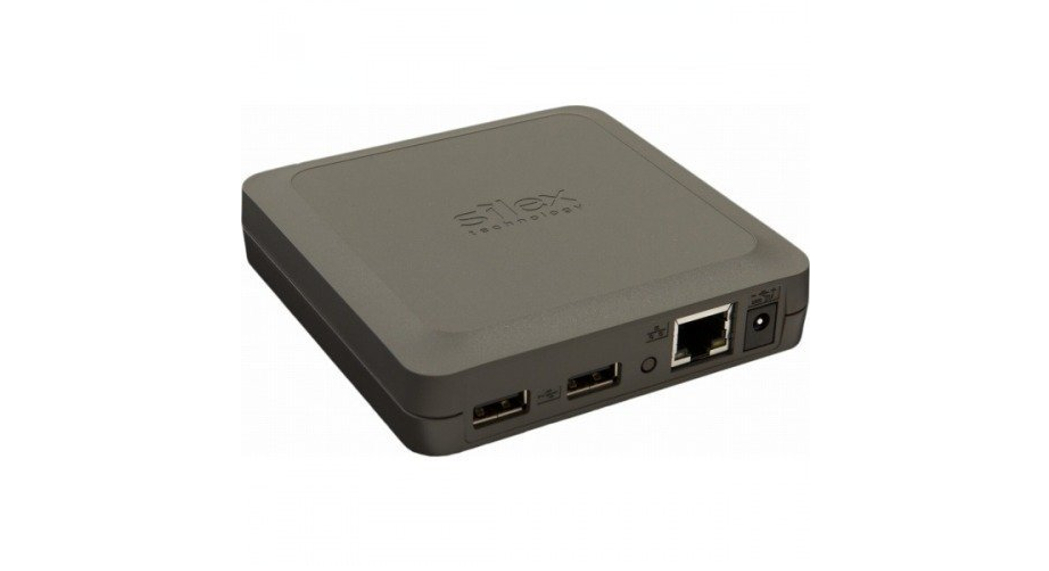
Thank you very much for purchasing the Wireless USB Device Server “DS-700AC”.
This Setup Guide provides information on how to configure and use DS-700AC in your network environment.
Package Contents
Please confirm the following items are bundled with DS-700AC:
- DS-700AC
- Setup Guide (this document)
- AC Adaptor
- GPL Inquiry Card
Parts and Functions
FRONT
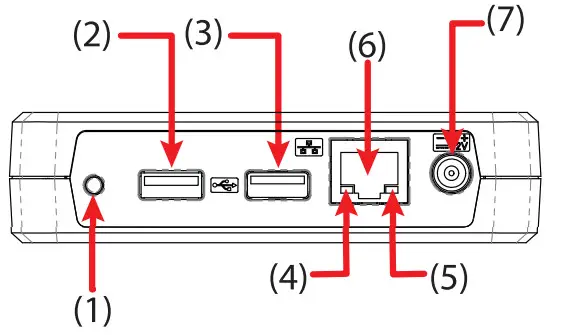
- Push Switch
- USB3.0 Port
- USB2.0 Port
- Link LED (Green/Orange)
- Power LED (Yellow)
- Network Port
- Power Connector

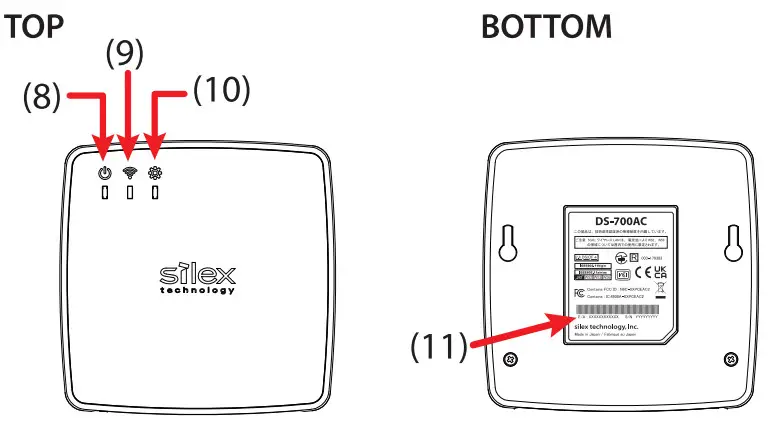
- Power LED (Green)
- WLAN LED (Green/Orange)
- SETTING LED (Green/Red)
- MAC Address
Before You Begin
About configuration methods
The following 3 configuration methods are supported.This Setup Guide explains how to configure DS-700AC using a network cable. For other configuration methods, please refer to the online manual.
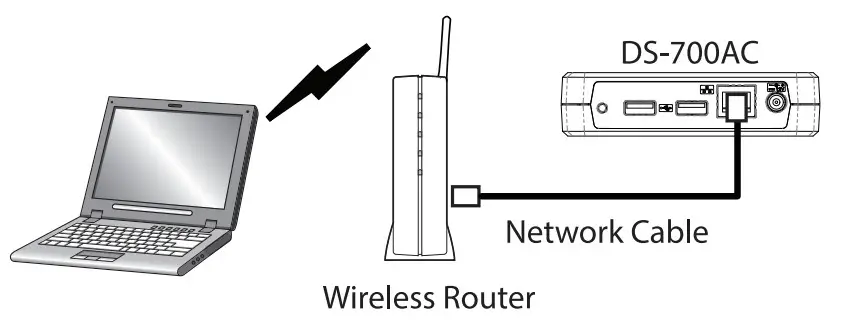
Configuration using a network cable (Recommended)By connecting DS-700AC to your existing network using a network cable, you can configure the network settings from your computer.
For this method, a network cable is required.
- Sample connection
Configuration using the WPS feature of your wireless router
If your wireless router supports WPS (Wi-Fi Protected Setup), the network configuration can be done automatically by pressing the wireless connection button on your wireless router and the push switch on DS-700AC.
For this configuration method, a wireless router supporting WPS is required.
Configuration using a USB flash drive
By saving the configuration information to a USB flash drive and connecting it to DS-700AC, you can configure the network settings. To save the configuration information to the USB flash drive, please use the configuration utility of DS-700AC. For this configuration method, a USB flash drive is required.
■ Check Your Wireless Settings
To use DS-700AC in your wireless network, DS-700AC must have the same settings as your wireless router (Access Point). Please check the wireless settings of your router and write them down in the table below:
* The information below is specific to your network and cannot be provided by Silex’s technical support. For how to confirm each setting, please refer to the operating manual that came with your router or contact the manufacturer.
| Configuration Memo | ||||
| SSID | The SSID is an ID that distinguishes a wireless LAN network from others.For wireless devices to communicate with each other on a wireless network, they must share the same SSID. (The SSID is also referred to as “ESSID”.) Please note that some wireless routers have several SSIDs. If there are different SSIDs for a game and computer, use the one for the computer. | SSID | ————————————— | |
| Encryption Mode(NetworkAuthentication) | No Encryption | Uses no encryption for wireless communication. (In this case, you do not have to check any of your settings beforehand.) | NetworkAuthentication | WEP / WPA / WPA2 / WPA3(Open) |
| WEP | If WEP encryption is used, wireless communication will be encrypted using the settings for “WEP Key 1-4” and “Key Index”.Set the same “WEP Key Size(64bit/128bit)”, “WEP Key” and “Key Index” as your wireless router. | |||
| WEP Key orPre-Shared Key | ————————————— | |||
| WPA / WPA2WPA3 | Uses PSK for network authentication. The encryption key will be generated by communicating with the wireless router using a Pre-Shared key. WEP key setting is not used for this model.Set the same “Pre-Shared key” and “Encryption Mode” (AUTO/AES)* as your wireless router. For the Pre-Shared Key, 8-63 alphanumeric characters can be used.• For WPA3, only AES is supported. | |||
| WEP key Size andKey Index orEncryption Mode | ————————————— |
Step 1. Power On
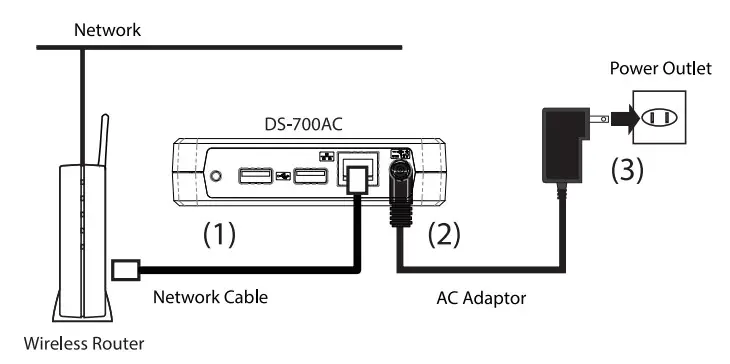
Connect DS-700AC to your network using a network cable.If DS-700AC has been used somewhere on your network and you want to use it for another network, reset it to factory defaults first.
- Connect DS-700AC to your wireless router using a network cable (1).
- connect the AC adaptor to DS-700AC (2) and the AC plug to the power outlet (3).* Be sure to use the AC adaptor that came with DS-700AC.
- confirm that the POWER LED turns Green.
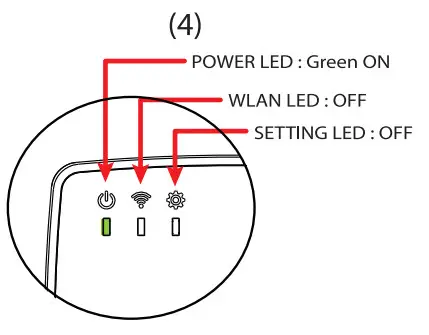
When the POWER LED is OFF
The AC adaptor is not plugged in properly. Start from 2 again.
When the WLAN LED blinks
The network cable is not plugged in properly. Start from 1 again.
If the network cable is plugged in properly, DS-700AC may contain incorrect network settings. In such a case, reset DS-700AC to factory defaults and start from 1 again.
For details on how to reset DS-700AC to factory defaults, refer to Factory Default Configuration.
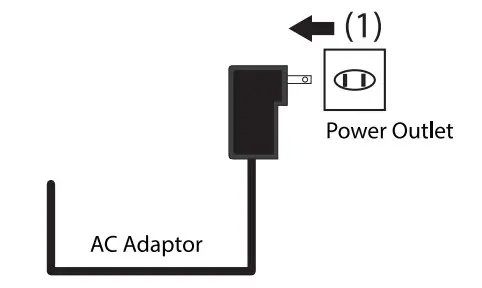
Factory Default Configuration
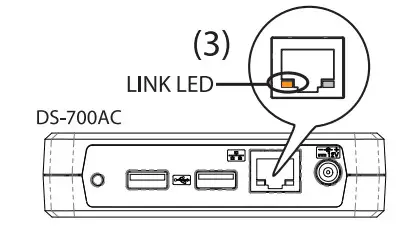
- Remove the AC plug from the power outlet (1).
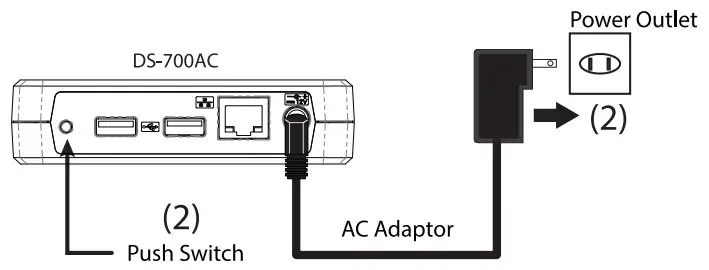
- Push and hold the push switch while inserting the AC plug back into the power outlet (2). Continue holding.When the LINK LED(orange) turns on, the factory default configuration begins(3).
- Release the push switch when the LINK LED(orange) turns off. The factory default configuration is completed.* Do not release the push switch until the LINK LED(orange) turns off.
Step 2. Configuration
2-1. Downloading the Necessary Items
- Access the URL below to download the utilities and user manuals.URL: https://www.silextechnology.com/
- Go to the Support page and select the product model.
Product Model DS-700AC - Download the utilities and documents below to your computer.
Utility Device Server Setup SX Virtual Link User’s Manual DS-700AC User’s Manual Device Server Configuration guide
2-2. Configuration
- Please temporarily disable the firewall function of the computer during the configuration. Some of the methods to disable the firewall are provided in the FAQ on our homepage.– Commercial security software’s firewall function
- For wireless settings to configure, see the settings you checked at Before You Begin on the back.
- Extract the Device Server Setup file that you have downloaded at 2-1. Downloading the Necessary Items.
- Configure the DS-700AC using the Device Server Setup utility according to instructions on the Device Server Configuration guide (PDF file).
- Unplug the AC plug of DS-700AC from the outlet to restart DS-700AC. If you want to use DS-700AC wirelessly, unplug the network cable, too.Connect DS-700AC to the USB device that you want to use over the network and plug the AC plug of DS-700AC back into the outlet.* The setting will take effect after DS-700AC is restarted by unplugging/plugging the AC plug.* The USB3.0 port of DS-700AC does not support a connection with a USB HUB, URI HUB embedded device, and USB video converter.
Step 3. Using the USB Devices over Network
The SX Virtual Link is the software program to make communication between your computer and the USB devices connected to the device server.
To use the USB devices over the network, you have to connect to or disconnect from them using the SX Virtual Link.
3-1. Installing the SX Virtual Link
If the SX Virtual Link is not installed to your computer, install it by following the instructions in this section.
- Extract the SX Virtual Link file that you have downloaded at 2-1. Downloading the Necessary Items.
- See the downloaded PDF manual (SX Virtual Link Installation) to install the SX Virtual Link.* The SX Virtual Link installer will restart your computer after it is installed. Make sure that you finished all software programs on your computer before starting the installation.3-2. Basic Use of the SX Virtual LinkStarting the SX Virtual Link
Click the application icon
in the task tray or go to the Start menu and click silex Tools – SX Virtual Link from the app list.
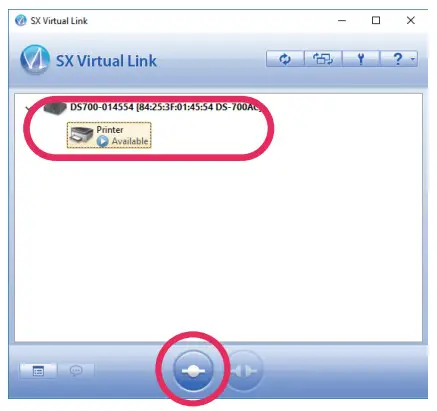
Connecting the USB devices
* When using the USB device for the first time, you mayneed to install the device driver for that USB device.
To install the driver, refer to the operating manual that came with the USB device, or follow the instructions on the screen displayed after clicking the Connect button in the SX Virtual Link.
- Select a USB device and click the Connect button (). The USB device can be connected when the status icon ( ] is displayed.*The USB device can also be connected by selecting and double-clicking it on the SX Virtual Link.* If a device server is not displayed on a list, please click the Refresh button ().* Do not unplug the USB cable or network cable, or click the Disconnect button () on the SX Virtual Link while the USB device is in use.
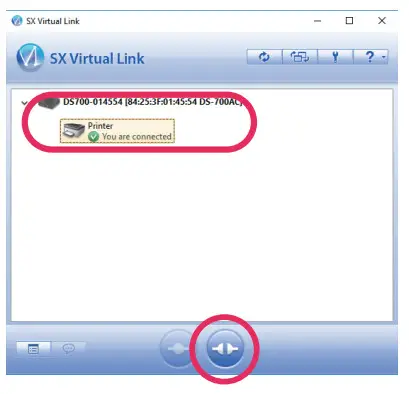
- The Plug and Play function automatically creates an appropriate environment to use the selected device.
The USB device will be ready to use once the status icon has changed[
]. See the operating manual that came with your USB device for how to use it.* Only one device can be connected at a time. When the USB device is in use by another computer, the status icon [
] is displayed, which means that the USB device is not available now.
Disconnecting the USB devices
When you have finished using the USB device, disconnect the device by selecting it and clicking the Disconnect button (![]() ).
).
*The USB device can also be disconnected by selecting and double-clicking it on the SX Virtual Link.
Accessing Online Help
 Accessing Online Help
Click the Help button (![]() ) and select Help from the displayed menu to access the SX Virtual Link’s Online Help.
) and select Help from the displayed menu to access the SX Virtual Link’s Online Help.
 report this ad
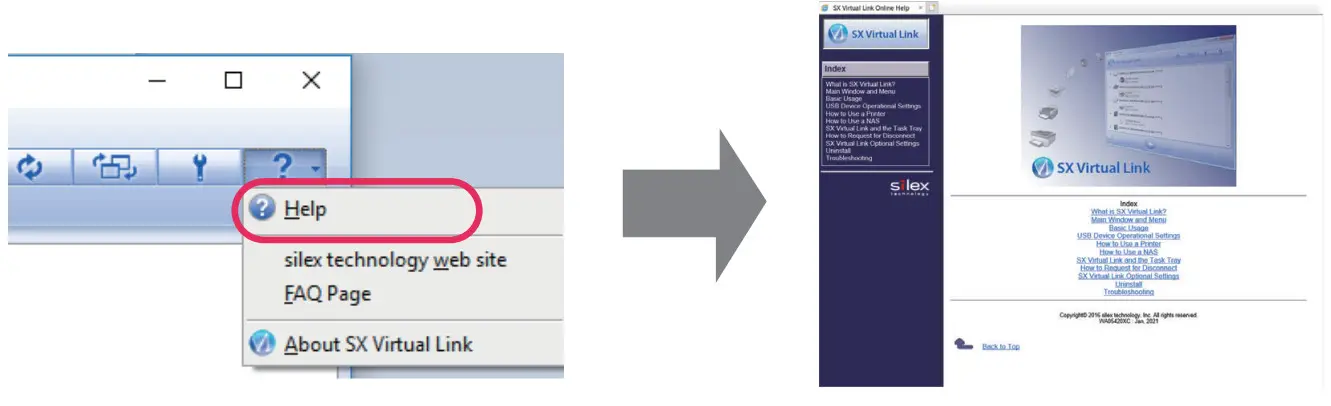
Customer Support
USA : silex technology America, Inc.E-mail :[email protected]URL : https://www.silextechnology.com/Phone : +1-657-218-5199
Europe : silex technology europe GmbHE-mail : [email protected]URL : https://www.silextechnology.com/Phone : +49-2154-88967-0
[xyz-ips snippet=”download-snippet”]