

SILVA TRAIL SPEED 5X
PRODUCT OVERVIEW
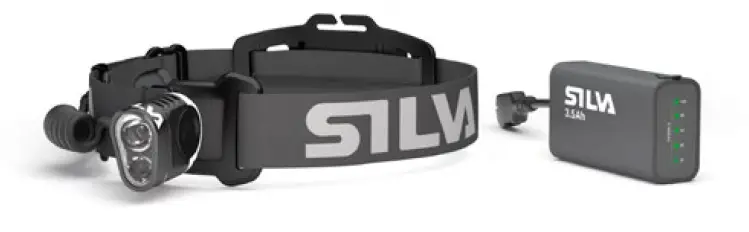
The Trail Speed 5X packaging contains the following parts:
- Lamp unit
- Headband
- Extension cord with helmet strap
- Cable guide (side)
- Cable guide (rear) with 3M adhesive
- Rechargeable Li-Ion battery 3.5 Ah
- USB-C charge cable
- Helmet bracket with 3M adhesive
- Battery holder (2.0/3.5)
- Quick guide
BEFORE USE
BATTERY CHARGING
The battery needs to be charged before first use.
- Located on the side of the battery pack is a USB-C connector.Attach the included USB charge cable to this USB-C connector.
- Connect the USB connection to a wall outlet, computer or other standard USB connection.
- On the battery, there are 5 LEDs showing battery status during charging:• Green light (all 5 LEDs) = battery is fully charged• Red light blinking = battery is charging
The charge time is approximately 4 hours.Note! When the battery is fully charged the charger automatically switches to maintenance mode.Note! Never leave a battery unattended during charging.Trail Speed 5X is compatible with all Silva batteries with the same connector as on Trail Speed 5X battery. Note that the battery indication may not be accurate with other Silva batteries and that the battery won’t fit the battery holder.
SILVA TRAIL SPEED 5X – THE FLEXIBLE, MODULAR HEADLAMPTrail Speed 5X is designed for Multi-activity Sports. Here is a description of the different options:
ADJUST THE HEADBANDThe headband is ergonomically shaped to give a comfortable fit. Use the 2 buckle adjustments to fit it perfectly to your head.Attach the headlamp in the head bracket by sliding the headlamp foot into the snap-in socket. To remove, slide the headlamp up and out of the bracket.
BATTERY CARRYINGThe battery pack can be carried in multiple ways; for example on the headband by using the battery holder, in a pocket, backpack or on the waist by using the extension cable and cable guide (rear), or mounted on the bike frame by using the Velcro strap (not included).The ergonomic battery holder keeps the battery in place and improves the comfort when you carry the battery on your head. You attach the battery holder to the headband and then easily slide in the battery.
MODULAR SYSTEMIn order to move the headlamp body from the headband to either the helmet bracket or the bar mount (not included), gently push the lamp upward relative the head plate with head band. Insert the headlamp body in the new bracket and gently press it down until you hear a click sound.
HELMET ATTACHMENTThe helmet bracket + rear cable guide comes with pre-mounted adhesive tape on the back for easy mounting on any helmet. The adhesive is a polyethylene foam tape developed to not damage or cause any type of weakness to the plastic in your helmet.
To mount the helmet bracket, remove the protective film covering the adhesive tape. Make sure the surface of the helmet is clean and dry. Press the bracket onto its correct position. If you do not want to use the adhesive on your helmet the attachment is prepared for mount-ing with 2 or more straps on the sides. (Not included)Attach the headlamp in the helmet bracket by sliding the headlamp bracket into the snap-in socket. To remove, slide the headlamp up and out of the bracket.Attach the cable by using the back cable guide or integrated helmet strap.Depending on helmet type, it might be preferable to use the Helmet mode – Flow light deac-tivated, when the headlamp is used on a helmet.The headband is designed to fit on a helmet by detaching the battery holder – thus giving you the flexibility to use either the included helmet bracket or to just snap the headlamp onto your helmet and go.
DURING USE
SILVA INTELLIGENT LIGHT AND FLOW LIGHTSILVA Intelligent Light optimizes the light pattern by the unique combination of a long reach spot light and a close flood light. With less head movements and a clear view of near as well as far obstacles, you gain the balance and confidence it takes to move fast and perform bet-ter. Our ingenious SILVA Flow Light takes the optimization even further by providing seam-less tuning of the light pattern for your favourite sport. Simply tilting the light downwards makes the beams wider to brighten up slower activities. When tilting the headlamp upwards, the light reaches longer to provide perfect vision when you move fast.
SWITCH ON YOUR HEADLAMPA push button is located on the left side of the headlamp body. This button controls all light modes.
- To start the headlamp with Flow Light activated press push button with a short press.
- To start the headlamp with Flow Light deactivated press and hold push button for 1 second
- To cycle between the different modes use short presses.
- To turn the headlamp off press and hold button for 1 second
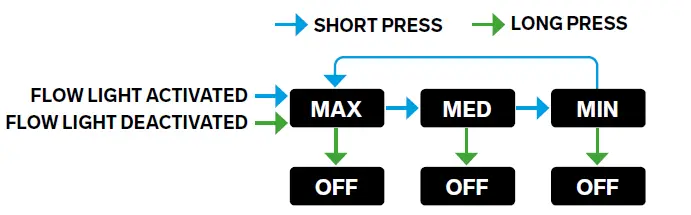
DEACTIVATED FLOW LIGHTFlow Light deactivated means that the Light image will remain unchanged even if the headlamp is tilted up or down. This might be useful when the lamp is mounted on a helmet or a bike handle bar.
TEMPERATURE CONTROL:This headlamp might get hot. The headlamp temperature is depending on light mode, ambi-ent air temperature and airflow (speed). Make sure to keep it away from children.Also, make sure it will not get in contact with sensitive or flammable material.NOTE: Always make sure to disconnect the battery when the lamp is not is use.Why does the light dim down for no apparent reason?If the cooling is not sufficient, for instance if used while standing still, indoors or in high temperatures, then the light will automatically be reduced until acceptable surface tempera-ture on the lamp body is reached. This means that the lower the ambient temperature, the stronger the light output.
LOW BATTERY WARNINGDuring the operation of the headlamp, there will be a low battery warning when 10% of the bat-tery energy remains. This is done by flashing both LEDs for 1 second.
RESERVE MODEDuring operation, the lamp will go into reserve mode when there is 10% power left of the bat-tery. All LEDs will flash before the lamp goes into this mode.Reserve mode can be overridden by pressing the button.Warning: If you have pressed the button when headlamp is in reserve mode no more low bat-tery warnings will appear before the headlamp turns OFF.
BATTERY STATUS INDICATIONWhen battery is connected and the headlamp is switched on – the current battery status will automatically be visible for 30 seconds. To check battery status during use, the headlamp has to be switched OFF and then back ON again.
• 5 green LEDs = Fully charged• 4 green LEDs = 80% of the battery remains• 3 green LEDs = 60% of the battery remains• 2 green LEDs = 40% of the battery remains• 1 red LED = 20% of the battery remains
To get as much power as possible out from your battery, keep it away from low temperatures during use.
AFTER USE
MAINTENANCE
To make sure you get maximum performance from your headlamp, clean it regularly with a damp cloth. Headband cleaning – rinse in warm water.
TECHNICAL SPECIFICATIONS:
- Weight headlamp including headset: 86 g
- Battery weight: 129 g
- Battery type: Li-ion 7.4 V, 3.5 Ah
- Light distance Max/Med/Min: 160 m/70 m/40 m
- Lumen Max/Med/Min: 1200/450/80
- Burn time 20˚C Max/Med/Min: 5 h/8 h/20 h
- Burn time -5˚C Max/Med/Min: 2 h/6 h/20 h
- Reserve mode: 0.5 h
- Charging time: 4 h
- Water resistance: IPX5
- Operative temperature range: -20 – +60º

ABOUT LI-ION BATTERIES
- The battery should be stored in a dry environment within the temperature range of -20°C and +35°C.
- If you would like to store your battery for a longer period (more than 30 days) the battery should not be fully charged. This may cause loss of its characteristics.
- Li-ion batteries have a discharge rate of approx. 20% over a 30-day period. You can always charge a half full battery without damaging its characteristics.
- Do not expose the battery for extreme temperatures which may cause fire or explosion.
- Do not disassemble or mistreat the battery; risk for chemical burn.
- Keep away from children.
- Do not dispose of batteries in fire. This may cause an explosion.
- Do not submerge the batteries in water.
- Do not short circuit the contacts.
- Replace only with Silva batteries with the same connector as on Trail Speed 5X battery.
PROTECTING THE ENVIRONMENT.Headlamp, batteries and packaging are recyclable. Please dispose these items at designated recycling stations.
WARRANTY
Silva warrants that, for a period of two (2) years*, your Silva Product will be substantially free of defects in materials and workmanship under normal use. Silva’s liability under this warranty is limited to repairing or replacing the product. This limited warranty extends only to the original purchaser.If the Product proves defective during the Warranty Period, please contact the original place of purchase. Make sure to have your proof of purchase on hand when returning the product. Returns cannot be processed without the original proof of purchase. This warranty does not apply if the Product has been altered, not been installed, operated, repaired, or maintained in accordance with instructions supplied by Silva, or has been subjected to abnormal physical or electrical stress, misuse, negligence or accident. Neither does the warranty cover normal wear and tear. Silva is not responsible for any consequences, direct or indirect, or damage resultant from use of this product. In no event, will Silva’s liability exceed the amount paid by you for the product. Some jurisdictions do not allow the exclusion or limitation of incidental or consequential damages, so the above limitation or exclusion may not apply to you. This Warranty is valid and may be processed only in the country of purchase.
 report this ad
* Batteries: 1 yearFor more information please visit www.silva.se
References
[xyz-ips snippet=”download-snippet”]