
![]()
PREMIUM 5.8QT AIR FRYER
AIR FRYERUser ManualModel: SL-AFD2-5L
![]()
(WE HOPE YOU LOVE OUR NEW AIR FRYER AS MUCH AS WE DO)
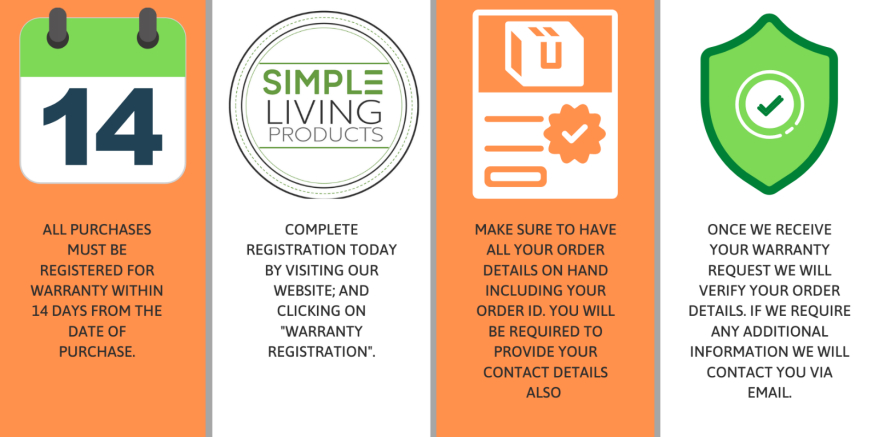
| RegisterYour must registered your purchase to activate your warranty. Visit our website. | |
| EnjoyWeekly, featured recipes. Follow us on Instagram todaywww.instagram.com/simplelivingproducts/ | |
| ExploreOur recipe gallery on our blog.simplelivingproducts.com/blogs/blogs |
![]() Contact Us
Contact Us
Our helpful customer care team is ready to assist you with any questions you might have!Email: [email protected]Toll-Free: 844-799-7995M-F: 9am – 5pm PST
| SIMPLE LIVING | On behalf of all of us at Simple Living Products, Happy Air Frying! |
Introduction
We all know that fried foods taste delicious but are better left to the occasional indulgence rather than becoming a staple of your diet. So, what is a fried food aficionado to do? When we need a fix of crispy deliciousness, we turn to Air drying. Our Simple Living Products Air Fryers use hot air to cook without added oil, making them a guilt-free solution to quench my craving for crunchy.At Simple Living Products, we are all about practical solutions to get you in the kitchen and cooking delicious unprocessed food. So, jump in and experiment – we believe there are no mistakes in cooking, only learning experiences.Happy Cooking,The Simple Living Products Air Frying Team
All About Air Frying
Your Simple Living Products Air Fryer uses 360˚ air circulation technology to cook with little to no oil, for quick, crispy, delicious food with 80% fewer calories than deep fryers. With user-friendly, one-touch controls and an intuitive, safe design, the Simple Living Products Air Fryer will be the star of your kitchen.
Everyone loves fried foods. It’s that crispy, delicious, crunchy texture and savory flavor that is just irresistible. But what we do not love is the icky, heavy feeling we get after over-indulging on that last fried chicken wing.
Enter the Air Fryer. Using rapid air circulation, the Air Fryer can “fry” ingredients without any oil or butter. This preserves the delicious flavor and a crispy texture while helping to eliminate extra calories from added oil. Enjoy everything from classic French fries to fried chicken, to savory spring rolls with your air fryer and that is just the beginning.It is a Dry HeatAn air fryer is like a convection oven in the principles that it uses to cook. Hot air circulates around the food and creates a crispy layer on the outside of the food. Since the heat is contained in the basket, Air Fryers can cook faster than a convection oven.Simple & HealthyAir Fryers can be used to “fry” everything from appetizers to desserts. To get started, you add your ingredients to the basket, set the timer and temperature, and let the air fryer do the rest. Since air fryers cook with dry heat, you can also use an air fryer to bake and roast.Zero Oil = A Better Way to FryFrom crunchy zucchini fries to buffalo wings, it’s hard to believe that this appliance does not require any oil. Less oil does not only mean fewer calories, it also means a better cooking experience. Preparing your food in an air fryer is a cleaner way to cook, eliminating the extra parts and added mess that comes with deep frying. Air frying is a convenient way to fry without sacrificing flavor.
REGISTER FOR WARRANTY TODAY
Customer Support
We are Here to Help!If you encounter any issues or have any questions regarding your new product, please contact our helpful Customer Support Team. Your Satisfaction is our goal! Customer SupportEmail: [email protected]Toll-Free: 844-799-7995Support HoursMonday – Friday9 am – 5 pm PST*Please have your order ID number ready before contacting customer support.
SAVE THESE INSTRUCTIONS
To ensure safety, before using your Air Fryer please read this manual carefully. Incorrect operation can result in serious damage, personal injury, or property damage to othersPlug & CordA short power-supply cord is provided to reduce the risk of becoming entangled in or tripping over a long cord. An extension cord is not recommended for use with this Air Fryer. Check if the voltage indicated on the Air Fryer fits the local main voltage. Plug the Air Fryer into a standard electrical outlet. The appliance complies with all standards regarding electromagnetic fields (EMF).General Safety While Air Frying
- Do not immerse your air fryer housing or plug in water or liquid.
- Do not leave your air fryer unattended while in use. Always supervise children.
- Unplug the air fryer when not in use.
- Do not use your air fryer if it is damaged or not working. Contact customer support.
- Do not use replacement third-party parts or accessories, as they may cause injuries.
- Do not use an unauthorized person to replace or fix this Air Fryer.
- Do not plug it into an unearthed socket.
- Do not use your air fryer outdoors or in a commercial setting.
- Do not place your air fryer on a stove, near gas or electric burners, or in a heated oven.
- Keep your air fryer away from flammable materials (curtains, tablecloth, etc.) Use on a flat, stable, heat-resistant surface away from heat sources or liquids.
- Do not place anything on top of your air fryer and do not store anything inside it.
- Do not pull out the plug with wet hands, this can cause an electric shock.
- Only use your air fryer as directed in this manual.
- An air fryer works with hot air only. Never fill the basket with oil or fat or liquids.
- Never use your air fryer without the basket placed inside it.
- Do not place oversized foods or metal utensils into your air fryer.
- Do not place paper, cardboard, non-heat-resistant plastic, or similar materials, into your air fryer. You may use foil.
- Do not put foil in the air fryer without food on top. Air circulation can cause the foil to lift and touch the heating element.
- Always use heat-safe containers.
- Do not place the Air Fryer against a wall or against another appliance. Leave at least 4” free space around the Air Fryer. Do not cover or touch the air inlet or outlet.
- During operation, steam is released through the air outlet. Keep distance from the air outlet.
- Be careful of hot steam and air when you remove the basket from the Air Fryer.
- Immediately unplug your air fryer if you see dark smoke coming out. Food is burning. Wait for the smoke to clear before pulling the basket out.
- Keep all food in the basket to prevent any contact with the heating elements.
- Do not touch the inside of the Air Fryer while it is operating.
- Do not move or shake the Air Fryer during operation.
- Do not insert any material into the vent or bottom of the Air Fryer in case of electric shock.
- Some Air Fryer parts, including outer surfaces, may get hot to touch. To prevent burns, refrain from touching the body ofthe Air Fryer during operation.
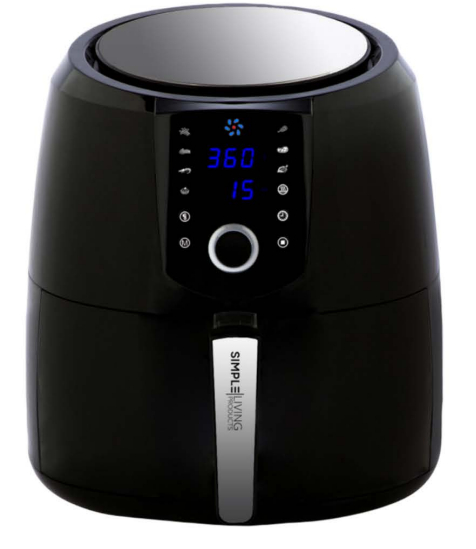
Air Fryer Display

Before First Use
- Remove all packaging from the Air Fryer, including any temporary stickers.
- Pull the handle to remove the baskets from the air fryer.
- Wash both baskets using hot water, mild soap, and a non-abrasive sponge. Dry thoroughly.
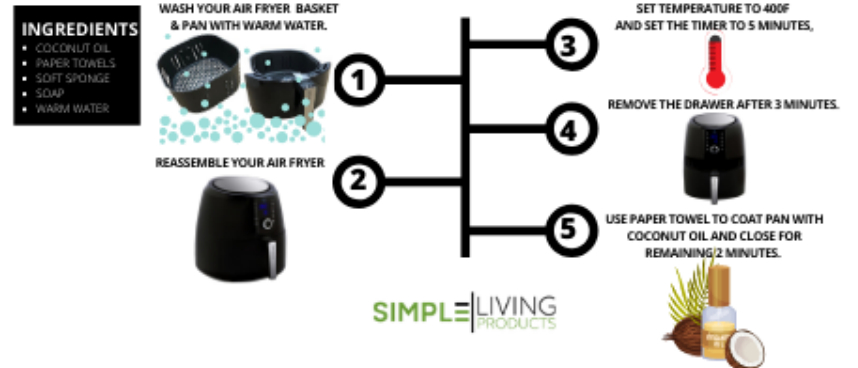
- Season Your Air Fryer (See instructions below).
- Put the baskets back inside the air fryer using the scooping method (See next page).
- Turn your air fryer on for 1 hour with no food inside. This will help remove any “new smells”
Seasoning Your Air Fryer
Air Fryer Scooping Motion
When inserting the pan back into the air fryer the scooping motion should be used.
Preheating Your Air Fryer
We recommend preheating before placing food into the air.
- Plugin. To turn the Air Fryer ON press the “PUSH Button”.
- Set the temperature to 400˚. Press the temperature icon and rotate the knob to the right
- Set the time to 5 MIN. Press the timer icon and rotate the knob to the right.
- Press the “Push Button” to begin the preheating process.
- When preheating is done the air fryer will beep 3 times. You can then place your food inside the air fryer and begin your cooking.
Preset Settings
- You can customize time (1-60 Minutes) and temperature (170˚ -400˚).
- Results may vary.
- Check out our reference guide and recipe book for a guide to customizing presets for perfect results.
- Reheating: If you are using the Air Fryer to reheat food, set the temperature to 300° and set the timer to 10 minutes.
| Preset | Default Temp | Default Time | Preset | Default Temp | Default Time |
| Fries | 390° | 20 Minutes | Poultry | 360° | 25 Minutes |
| Ribs | 360° | 15 Minutes | Steak | 320° | 20 Minutes |
| Shrimp | 320° | 20 Minutes | Fish | 360° | 20 Minutes |
| Cake | 360° | 40 Minutes | Keep Warm | 180-200° | 120 Minutes |
Preset Air Frying Programs
Using a preset is the easiest way to air fry. Presets are programmed with an ideal time and temperature for cooking certain foods.
- Preheat your air fryer (see instructions above).
- Once your air fryer is preheated add your food to the basket.
- Select a preset cooking program. To select the cooking mode, press the
 button, then rotate the knob to scroll through the preset settings.
 - After selecting the correct cooking setting press the “PUSH Button” to start cooking.
- When using some presets, such as fries we do recommend shaking the ingredients halfwaysthrough the cooking cycle.• Take the baskets out of the air fryer, being careful of hot steam. The air fryer will pause cooking automatically. The display will turn off until baskets are replaced.• Shake or flip the food. Be careful not to press the basket release button.• Put the basket back into the air fryer.• Note: See Shaking Food on Page 9
- The air fryer will beep when finished the cooking cycle.
- If you are not ready to remove your food from the air fryer you can choose the keep warm function.Simply select the keep warm function and adjust the time and temperature to suit your personalpreference.
- Take the baskets out of the air fryer being careful of steam.
- Remove inner basket from outer basket to serve food. When separating baskets:• Make sure the baskets are resting on a flat surface.• Watch for hot oil or fat collected in the outer basket. To avoid splashing, drain the oil before replacing the inner basket.
- When a batch of ingredients is ready, the appliance is instantly ready for preparing another batch.
Manual Air Frying
In addition to the preset modes, you can also set temperatures and times yourself. Simply select any mode and adjust the temperatures and times by using the following buttons.
- Preheat your air fryer (see instructions on page 7).
- Once your air fryer is preheated add your food to the basket.
- Set the temperature and time.• To adjust the temperature, press the “Temperature Button”. Rotate the knob to the left to reduce the temperature or to the right to increase the temperature.• To adjust the timer, press the “Timer Button”, Rotate the knob to the left to reduce the time or to the right to increase the time.
- Once you have selected your desired times and temperatures press the “Push Button” to begin the cooking process.
- The air fryer will beep when finished the cooking cycle.
- If you are not ready to remove your food from the air fryer you can choose the keep warm function. Simply select the keep warm function and adjust the time and temperature to suit your personal preference.
- Take the baskets out of the air fryer being careful of steam.
- Remove inner basket from outer basket to serve food. When separating baskets:a. Make sure the baskets are resting on a flat surface.b. Watch for hot oil or fat collected in the outer basket. To avoid splashing, drain the oil before replacing the inner basket.
- When a batch of ingredients is ready, the appliance is instantly ready for preparing another batch.
Shaking Food
Some foods may require shaking halfway throughout the cooking process. For example, the preset cooking function for French fries is 20 minutes. Therefore, you should remove the basket to shake the ingredients after 10 minutes.How to Shake
- During cooking, take the baskets out of the air fryer and shake or flip the food. Be careful not to press the basket release button.
- When you take the baskets out, the air fryer will pause cooking automatically. As a safety feature, the display will turn off until the baskets are replaced.
- When you replace the baskets, cooking will automatically resume.
- Avoid shaking longer than 30 seconds, as the air fryer may start to cool down.
What to Shake
- Small foods that are stacked will usually need shaking, such as fries or nuggets.
- Without shaking food may not be crispy or evenly cooked.
- You can flip other foods such as steak, to ensure even browning.
When to Shake
- Shake once halfway through cooking or more if desired.
Cooking Guide Over-Filling
Over-Filling
- If the basket is overfilled, food will cook unevenly. Do not pack in food.
Using Oil
- Adding a small amount of oil to your food will make it crispier. Use no more than 2 tablespoons of oil.
- Oil sprays are excellent for applying small amounts of oil evenly to all food items.
- Excess oil or food can collect at the bottom of the outer basket. You can wipe these off after you have finished cooking and when the appliance has cooled down. If you are cooking numerous batches of food continuously always make sure to remove the juices and crumbs from each batch before starting the next.
Food Tips
- You can air fry any frozen foods or goods that can be baked in an oven.
- To make cakes, hand pies, or any food with filling or batter, place food in a heat-safe container before placing in the baskets.
- Air frying high-fat foods will cause fat to drip to the bottom of the baskets. To avoid excess smoke while cooking, pour out fat drippings after cooking.
- Liquid marinated foods create splatter and excess smoke. Pat these foods dry before air frying.
Want More Cooking Tips? Check us Out:
| www.facebook.com/simplelivingproducts/ | |
| www.instagram.com/simplelivingproducts/ | |
| YouTube > Simple Living Products |
More Functions
Pausing
- Press the “Stop” button to pause cooking. The Air Fryer will stop heating, to restart the air fryer you will need to press on the “push” button.o After 30 minutes of inactivity the air fryer will turn off.o This function allows you to pause cooking without taking the baskets from the air fryer.
Memory Control Function
- If you would like to check how your food is cooking, you can remove the baskets from the air fryer without pausing the cooking cycle.o Pull the baskets out of the air fryer, the air fryer will pause cooking automatically. The display will turn off temporarily as a safety feature.o Simply and quickly check your food. When you return the baskets to the air fryer, the air fryer will automatically resume cooking based on your previous settings.
Automatic Shutoff
- If the air fryer has no active cooking programs, after several minutes of inactivity, the air fryer will turn off. This means that after each cooking cycle when the timer reaches zero the air fryer will automatically shut down. You can manually switch off the appliance by turning the timer to zero. The fan will continue to run up to 20 seconds to “cool down” the unit.
Overheat Protection
- If the air fryer overheats it will automatically shut down as a safety feature.
- Allow the air fryer to cool down before using it again.
Care & Maintenance
Note: We recommend thoroughly cleaning the air fryer after every use.
- Unplug the air fryer and allow it to cool completely before cleaning. Pull out the baskets forfaster cooling.
- Wipe the outside of the air fryer with a moist cloth.
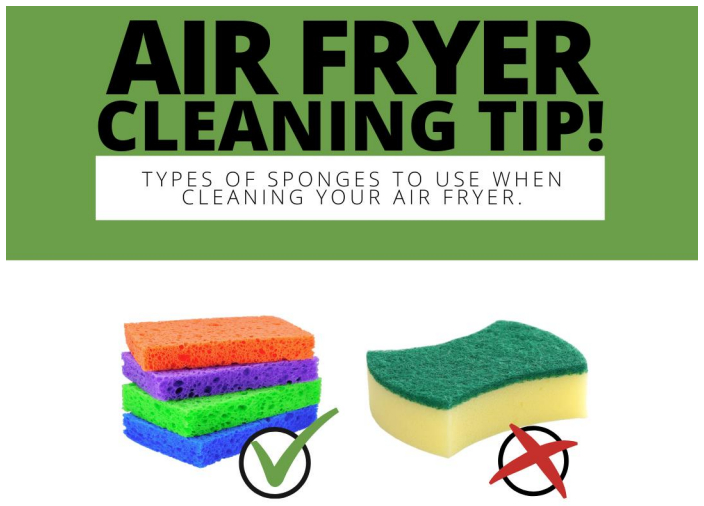
- The baskets are dishwasher safe.NOTE: For the longevity of the baskets we recommend hand washing. Wash the baskets with hot, soapy water and a non-abrasive sponge.NOTE: Soak (overnight) if necessary.NOTE: Baskets have a non-stick coating. Avoid metal utensils and abrasive cleaners.
- For stubborn grease:a. In a small bowl, mix ½ cup (118ml) of baking soda a few tablespoons of water (1 tbsp =15 ml) until forming a spreadable paste.b. Use a sponge to spread the paste on the baskets and scrub. Before rinsing, let the baskets sit for 15 minutes.c. Wash baskets with soap and water before using.
- Clean the inside of the air fryer with a slightly moist, nonabrasive sponge or cloth. Do not immerse in water.
- Dry before using or storing away.
Types of Sponges to Use
Recommended Cooking Times & Temperatures
| Temp
(˚F) |
Time
(mins) |
Temp
(˚F) |
Time
(mins) |
||
| Vegetables | |||||
| Asparagus (sliced 1”) | 400˚F | 5 | Onions (pearl) | 400˚F | 10 |
| Beets (whole) | 400˚F | 40 | Parsnips (½” chunks) | 380˚F | 15 |
| Broccoli (florets) | 400˚F | 6 | Peppers (1” chunks) | 400˚F | 15 |
| Brussel Sprouts (halved) | 380˚F | 15 | Potatoes (small baby, 1.5lbs) | 400˚F | 15 |
| Carrots (sliced, ½”) | 380˚F | 15 | Potatoes (1” chunks) | 400˚F | 12 |
| Cauliflower (florets) | 400˚F | 12 | Potatoes (baked whole) | 400˚F | 40 |
| Corn on the cob | 390˚F | 6 | Squash (½” chunks) | 400˚F | 12 |
| Eggplant (1½” cubes) | 400˚F | 15 | Sweet Potato (baked) | 380˚F | 30-35 |
| Fennel (quartered) | 370˚F | 15 | Tomatoes (cherry) | 400˚F | 4 |
| Green Beans | 400˚F | 5 | Tomatoes (halves) | 350˚F | 10 |
| Kale Leaves | 250˚F | 12 | Zucchini (½” sticks) | 400˚F | 12 |
| Chicken | |||||
| Breasts, bone in (1.25lbs) | 360˚F | 25 | Legs, bone in (1.75lbs) | 380˚F | 30 |
| Breasts, boneless (4 oz.) | 380˚F | 12 | Wings (2lbs) | 400˚F | 12 |
| Drumsticks (2.5lbs) | 370˚F | 20 | Game Hen (halved – 2lbs) | 390˚F | 20 |
| Thighs, bone-in (2lbs) | 380˚F | 22 | Whole Chicken (6.5lbs) | 360˚F | 75 |
| Thighs, boneless (1.5lbs) | 380˚F | 18-20 | Tenders | 360˚F | 8-10 |
| Beef | |||||
| Burger (4 oz.) | 370˚F | 16-20 | Meatballs (3”) | 380˚F | 10 |
| Fillet Mignon (8 oz.) | 320˚F | 18 | Ribeye, bone-in (1”, 8 oz.) | 320˚F | 10-15 |
| Flank Steak (1.5lbs) | 320˚F | 12 | Sirloin Steaks (1”, 12 oz.) | 320˚F | 9-14 |
| London Broil (2lbs) | 320˚F | 20-28 | Beef Eye Round Roast (4lbs) | 390˚F | 45-55 |
| Meatballs (1”) | 380˚F | 7 | |||
| Pork and Lamb | |||||
| Loin (2lbs) | 360˚F | 55 | Bacon (thick cut) | 400˚F | 6-10 |
| Pork Chops, bone-in (1”, 6.5oz.) | 400˚F | 12 | Sausages | 380˚F | 15 |
| Tenderloin (1lbs) | 370˚F | 15 | Lamb Loin Chops (1” thick) | 400˚F | 8-12 |
| Bacon (regular) | 400˚F | 5-7 | Rack of Lamb (1.5-2lbs) | 380˚F | 22 |
| Fish & Seafood | |||||
| Calamari (8 oz.) | 400˚F | 4 | Tuna Steak | 400˚F | 7-10 |
| Fish Fillet (1”, 8 oz.) | 400˚F | 10 | Scallops | 400˚F | 5-7 |
| Salmon, fillet (6 oz.) | 380˚F | 12 | Shrimp | 320˚F | 20 |
| Frozen Foods | |||||
| Onion Rings (12 oz.) | 400˚F | 8 | Fish Sticks (10 oz.) | 400˚F | 10 |
| Thin French Fries (20 oz.) | 400˚F | 16 | Fish Fillets (½”, 10 oz.) | 400˚F | 14 |
| Thick French Fries (17 oz.) | 400˚F | 20 | Chicken Nuggets (12 oz.) | 400˚F | 10 |
| Mozzarella Sticks (11 oz.) | 400˚F | 8 | Breaded Shrimp | 400˚F | 9 |
Troubleshooting
| Problem | Possible Solution |
| The Air Fryer will not turn on. | • Make sure the air fryer is plugged in.• Push the baskets securely into the air fryer. |
| The basket does not slide into the air fryer. | • Inner basket is not correctly installed in the outer basket.• Use the scooping method to place the baskets into the air fryer.• There is too much food in the basket. |
| Foods are not completely cooked. | • Place smaller batches of food into the basket. If the basket is overstuffed the food will be undercooked.• Increase cooking temperature or time. |
| Foods are cooked unevenly. | • Foods that are stacked on top of each other or close to each other need to be shaken during cooking (See shaking food, page 9) |
| Foods are not crispy after air frying. | • Spraying or brushing a small amount of oil on foods can increase crispiness. (See cooking guide, page 9) |
| Smoke is coming out of the air fryer. | • Immediately unplug your air fryer. Food is burning. Wait for the smoke to clear before pulling the baskets out. |
| The display shows Error Code “E1”. | • This is an open circuit in the temperature monitor. Contact customer support (page 3) |
| The display shows Error Code “E2”. | • This is a short circuit in the temperature monitor. Contact customer support (page 3) |
Tips on Using the Basket
- Press the basket release button to separate the inner basket from the outer basket.
- Separate baskets only after cooking, to serve food and to wash the baskets.
- Slide the button guard forward to press the release button. Never press the release button when carrying the baskets.
- Only press the release button when baskets are flat on a counter (any level heat resistant surface).
- The handle is attached to the inner basket, not the outer basket. When you press the release button the outer basket will drop.
Warranty Information
| Model Number | SL-AFD2-5L |
| Default Warranty Period on electrical components. | 1 Year |
| Default Warranty Period on non-electrical components. | 90 Days |
| Date of Purchase | |
| Order Number |
Simple Living Products warrants all products to be of the highest quality in material, craftsmanship, and service, effective from the date of purchase to of the warranty period. It will be the discretion of Simple Living Products to repair or replace any parts of this appliance that prove to be defective in materials and workmanship, provided the appliance has been used under normal operating conditions as intended by the manufacturer.
Proof of purchase must be demonstrated prior to any replacements or repairs being conducted. Please ensure that your purchase is registered for warranty before requesting warranty support.
Obtaining Service
Contact Simple Living Products by email at [email protected] or by filling out the contact us form on our website (www.simplelivingproducts.com)
- Include your order ID and place of purchase
- Include a brief note of the issue you are encountering.
A representative will follow up with you within 24-48 hours advising on the next steps.NOTE: The purchaser is responsible for all shipping costs associated with warranty repairs. Replacement parts and/or units will be new, re-manufactured, or refurbished and is subject to the manufacturer’s discretion.
Warranty Exclusions
The warranty will NOT apply if the damage is caused by any of the following:
- Power failure
- An improper power supply such as low voltage, defective household wiring, or inadequate fuses
- Accident, alteration, misuse, or abuse of the appliance such as using non-approved accessories, inadequate air circulation in the room or abnormal operating conditions.
- Use in commercial or industrial applications
- Fire, water damage, theft, war, riot, hostility, or acts of God such as hurricanes, floods, etc.
- Use of force or damage caused by external influences
- Partially or completely dismantled appliances
- If unauthorized personnel have conducted work
- The warranty will automatically be voided if this appliance is used outside the USA or Canada.
![]()
WE HOPE THIS MANUAL HAS BEEN HELPFUL. WE CAN’T WAIT TO SEE YOUR BEAUTIFUL RESULTS, AND WE THINK YOU’LL WANT TO SHARE SOME GLAM SHOTS! WE AWAIT YOUR TAG. JUST PICK YOUR PLATFORM OF CHOICE BELOW. SNAP, HASHTAG, AND TAG AWAY, SIMPLE LIVING PRODUCTS!
![]()
#simplelivingproducts
More Simple Living ProductsIF YOU ARE HAPPY WITH THIS AIR FRYER, THE LINE DOESN’T STOP HERE. CHECK OUT WWW.SIMPLELIVINGPRODUCTS.COM FOR A LINE OF ALL OUR BEAUTIFUL AND THOUGHTFULLY DESIGNED COOKWARE. THEY MIGHT BE RIGHT AT HOME IN YOUR KITCHEN, TOO!
SIMPL=LIVINGWWW.SIMPLELIVINGPRODUCTS.COMON BEHALF OF ALL OF US THANK YOU FOR BEING ASIMPLE LIVING PRODUCTS CUSTOMER.
References
[xyz-ips snippet=”download-snippet”]