singing machine Kids Superstar Instruction Manual
Warnings
 CAUTION:TO REDUCE THE RISK OF ELECTRIC SHOCK, DO NOT REMOVE COVER (OR BACK). NO USER-SERVICEABLE PARTS INSIDE.REFER SERVICING TO QUALIFIED SERVICE PERSONNEL.
 symbol within an equilateral triangle is intended to alert the user to the presence of uninsulated dangerous voltage within the product’s enclosure that may be of sufficient magnitude to constitute a risk of electric shock to persons.
 ATTENTION: The exclamation point within an equilateral triangle is intended to alert the user to the presence of important operating and maintenance (servicing) instructions in the literature accompanying this product.
DRIPPING WARNING: This product shall not be exposed to dripping or splashing, and no objects filled with liquids, such as vases, shall be placed on the product.VENTILATION WARNING: The normal ventilation of the product shall not be impeded for intended use. Warning: Changes or modifications to this unit not expressly approved by the party responsible for compliance could void the user’s authority to operate the equipment.THIS PRODUCT COMPLIES WITH DHHS RULES 21 CFR CHAPTER 1, SUBCHAPTER J APPLICABLE AT DATE OF MANUFACTURED
WARNING: TO PREVENT FIRE OR SHOCK HAZARD, DO NOT EXPOSE THIS UNIT TO RAIN OR MOISTURE.WARNING: CHOKING HAZARD- Small parts. Not for children under 36 months.WARNING: STRANGULATION HAZARD – LONG CORD. NOT FOR CHILDREN UNDER 36 months.
FCC WARNING: This equipment may generate or use radio frequency energy. Changes or modifications to this equipment may cause harmful interference unless the modifications are expressly approved in the instruction manual. The user could lose the authority to operate this equipment if an unauthorized change or modification is made.This device complies with part 15 of the FCC Rules. Operation is subject to the following two conditions: (1) This device may not cause harmful interference, and (2) this device must accept any interference received, including interference that may cause undesired operation.
NOTE: This equipment has been tested and found to comply with the limits for a Class B digital device, pursuant to part 15 of the FCC Rules. These limits are designed to provide reasonable protection against harmful interference in a residential installation. This equipment generates, uses and can radiate radio frequency energy and, if not installed and used in accordance with the instructions, may cause harmful interference to radio communications. However, there is no guarantee that interference will not occur in a particular installation. If this equipment does cause harmful interference to radio or television reception, which can be determined by turning the equipment off and on, the user is encouraged to try to correct the interference by one or more of the following measures:
- Reorient or relocate the receiving antenna.
- Increase the separation between the equipment and receiver.
- Connect the equipment into an outlet on a circuit different from that to which the receiver is connected.
- Consult the dealer or an experienced radio/TV technician for help.
- The rating information is located at the rear of the unit.
INDUSTRY CANADA NOTICE:
This device complies with Industry Canada Iicense-exempt RSS standard(s). Operation is subject to the following two conditions:
- This device may not cause interference, and
- This device must accept any interference, including interference that may cause undesired operation of the device.
CAUTION – ELECTRICALLY OPERATED PRODUCT:
– Not recommended for children under 4 years of ages. As with all electric products, precautions should be observed during handling and use to prevent electric shock.– This unit recommended to be periodically examined for potential hazardous parts be repaired or replaced.
Important Safety Information
- Read these Instructions.
- Keep these Instructions.
- Heed all Warnings.
- Follow all Instructions.
- Do not use this apparatus near water.
- Clean only with a dry cloth.
- Do not block any of the ventilation openings. Install in accordance with the Manufacturer’s instructions.
- Do not install near any heat sources such as radiators, heat registers, stoves, or other apparatus (including amplifiers) that produce heat.
- Only use attachments/accessories specified by the manufacturer.
- Use only with a cart, stand, tripod, bracket, or table specified by the manufacturer, or sold with the apparatus.
- Unplug this apparatus during lightning storms or when unused for long periods of time.
- Refer all servicing to qualified service personnel. Servicing is required when the apparatus has been damaged in any way, such as power-supply cord or plugis damaged, liquid has been spilled or objects have fallen into the apparatus, the apparatus has been exposed to rain or moisture, does not operate normally, or has been dropped.
- WARNING: To reduce the risk of fire or electric shock, do not expose this apparatus to rain or moisture. Do not place objects filled with water, such as a vase, on the apparatus.
- CAUTION: To reduce the risk of fire or explosion, do not expose batteries to excessive heat such as sunshine, fire or other heat sources.
 is damaged, liquid has been spilled or objects have fallen into the apparatus, the apparatus has been exposed to rain or moisture, does not operate normally, or has been dropped.
Included
What’s in the box.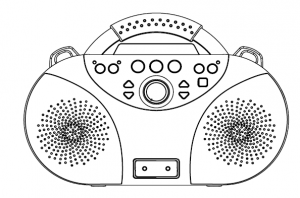
Main Unit
Strap
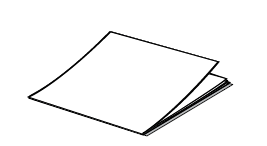
Manual

Wired Microphone
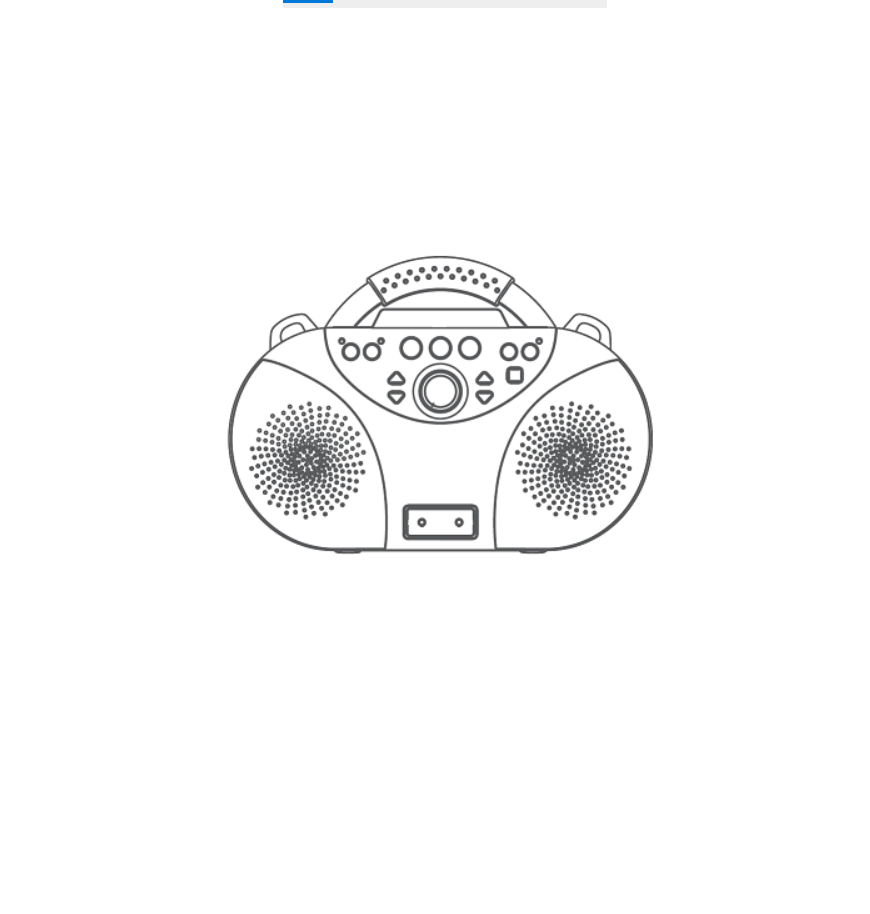
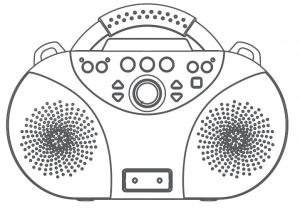
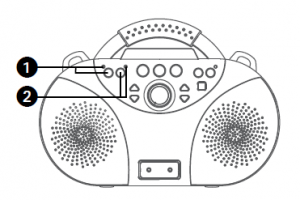
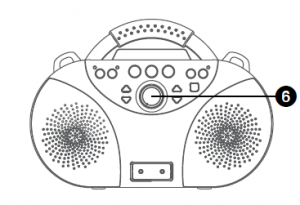
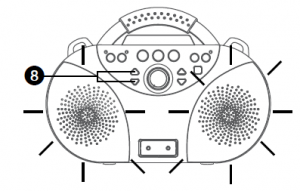
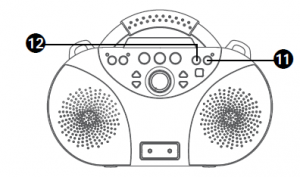
Location of Controls (Front)
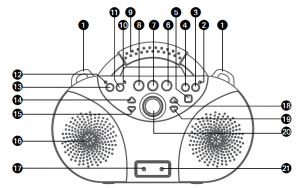
- Strap holders
- Record indicator
- RECORD Button
- PLAYBACK Button
- LIGHTS buttonSound effects Button:
- Carrying Handle
- Function Indicator
- Bluetooth Button
- Power Indicator
- ON/STANDBY Button
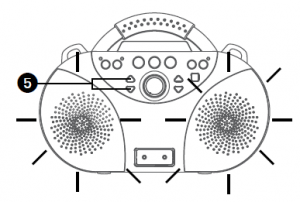
- VOICE EFFECTS UP button
- VOICE EFFECTS DOWN button
- Speaker
- LINE IN Jack
- Built-in loop Songs UP button
- Built-in loop Songs DOWN button
- MASTER VOLUME Control
- Mic Jack
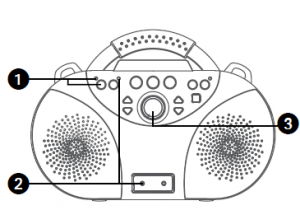
Location of Controls (Rear)
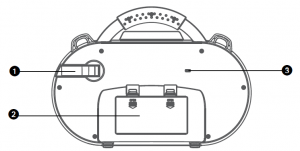
- Mic Holder
- Battery Compartment
- Micro USB port (For Power Supply only)
Connection
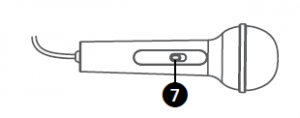
Connecting the Microphone(s)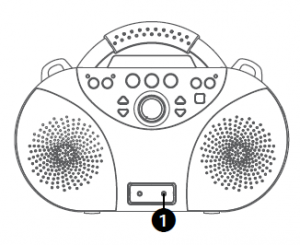
Microphones:
Connect a microphone into Mic jack u.Note: Do not drop or tap the Mic as damage to the Mic or speakers may occur. Do not twirl the microphone cord as it will cause damage to the encased wiring.
Connection
Connecting to Power Insert the USB cable (not included) into micro USB port on rear of the unit. Plug the other end of the cable into computer USB port or other USBcharging device (not included)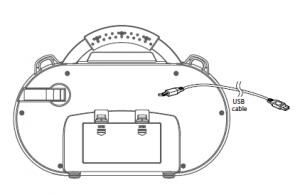
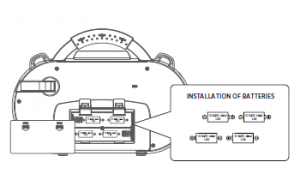
Inserting Batteries
- Slide the battery door in the direction the arrows to reveal the battery compartment. Insert four (4) “C” size alkaline batteries (not included) as indicated on the diagram.
- Replace cover tightly before operating.
BATTERY PRECAUTIONS:
Follow these precautions when using batteries in this device:
- Warning – Danger of explosion if battery is incorrectly replaced. Replace only with the same or equivalent type.
- Use only the size and type of batteries specified.
- Be sure to follow the correct polarity when installing the batteries as indicated in the battery compartment. A reversed battery may cause damage to the device.
- Do not mix different types of batteries together (e.g. Alkaline, Rechargeable and Carbon-zinc) or old batteries with fresh ones.
- If the device is not to be used for a long period of time, remove the batteries to prevent damage or injury from possible battery leakage.
- Do not try to recharge a battery not intended to be recharged; it can overheat and rupture. (Follow battery manufacturer’s directions.)
- Remove batteries promptly if consumed.
- Clean the battery contacts and also those of the device prior to battery installation.
Connection
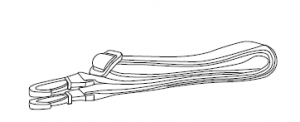
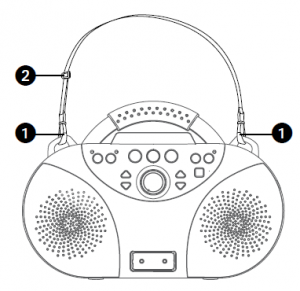
Inserting the strap
- Insert the both of buckle to strap holders left and right of the unit.
- Adjust the length of the strap to your favour.
When the unit is turned on, the Light mode 1 is automatically activated. The lights will light up and will synchronize with sound when you speak or sing into the microphone.Press the LIGHTS button for Light mode 2 which will display the light show but will not respond to the microphone. Press the LIGHTS button once again to turn off theLights.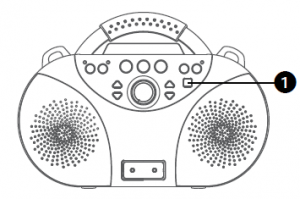
Operation
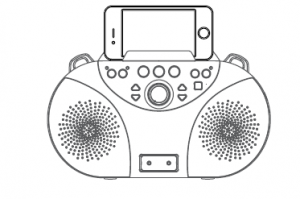
Using a Bluetooth Device
- Connect the unit as described previously. Press the button to turn the unit on; the Power indicator will light.
- The Bluetooth pair indicator will blink rapidly to indicate it is in the pairing mode.Note: You may also press the button to initiate the pairing mode.
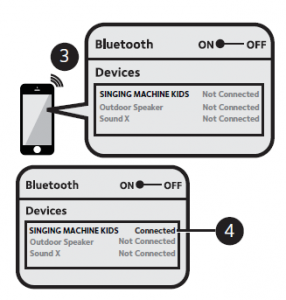
- Switch on the Bluetooth function of your Bluetooth compatible device within three feet of the unit. You will see “SINGING MACHINE KIDS” appear on your device’s search list.
- Select “SINGING MACHINE KIDS” to start pairing. Wait for completion of the pairing and the Bluetooth indicator will light solid blue and a chime will sound. Please always refer to the user manual of your bluetooth device for detailed instructions.Note:• If your Bluetooth device prompts you for a passcode during the pairing process, please enter “0000” to connect.• If pairing fails, repeat steps 2-4.• If you have paired before, a list of previously searched results will be displayed. Select “SINGING MACHINE KIDS” again.• On some Bluetooth devices (i.e., computers), once pairing is complete, you must select your Bluetooth device as “Use as Audio Device” or similar.
- PLAY/PAUSE: Press the PLAY/ PAUSE button on the Bluetooth device to start.OperationUsing a Bluetooth Device (Continued)
- Make sure the Bluetooth device has its volume set to mid range, then adjust the volume to a comfortable level using the MASTER VOLUME control.
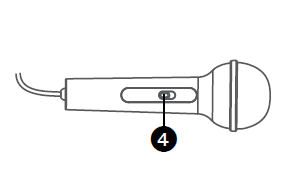
- Connect microphone and slide the microphone’s ON/OFF switch to the ON position.
- SING-ALONG WITH BUILT-IN VOICE CHANGERS There are 6 built-in voice changers in this unit. When press the VOICE EFFECTS UP or DOWN buttonthe speaker will change the light. The voice will change when the singer starts to sing through the microphone.Purple light – ECHOPink light -FEMALEOrange light – MALELime light – CHIPMUNKCyan light – ROBOTBlue light – RADIOSelect NONE to sing without any voice effect and speaker will light up white.
Operation
Using a Bluetooth Device (Continued)
- SING-ALONG WITH BUILT-IN LOOP SONGS There are 3 built-in loop songs. Repeatly press SONGS up or down buttons to play the 3 difference songs. The loop song will stop when pressing fourth time.
- PLAYING BUILT-IN EFFECTS Press , or buttons to play three different built-in sound effects.
- RECORD YOUR VOCAL PERFORMANCE During music playback, press the REC button to record your singing and the music, the record indicatorwill light solid. You can press the REC button again to stop recording, the indicator will turn off. This unit is able to record for 1 minute. It will stop recordingautomatically after 1 minute and the record indicator will turn off.Note: Please note that each time when the new recording is being recorded, the existing recording will be deleted.
- PLAYBACK YOUR VOICE RECORDING To playback your voice recording, you can press the PLAYBACK button. Press again to stop.
- Press the button to turn the unit off; the Power indicator will turn off.
 the speaker will change the light. The voice will change when the singer starts to sing through the microphone.Purple light – ECHOPink light -FEMALEOrange light – MALELime light – CHIPMUNKCyan light – ROBOTBlue light – RADIOSelect NONE to sing without any voice effect and speaker will light up white.
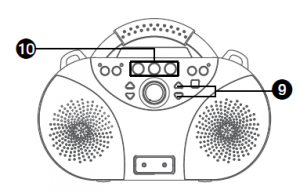
 Note: Please note that each time when the new recording is being recorded, the existing recording will be deleted.
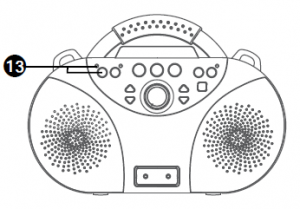
Operation
Using the LINE IN Jack
- Connect the unit as described previously. Press the button to turn the unit on; the Power indicator will light.
- Connect the external unit to the LINE IN jack on front of this unit. When connected, the Aux function is automatically selected. The function indicator will light solidred.Note: It is highly recommended to set the volume on the auxillary unit to 1/3 or lower to avoid distortion.
- Adjust the volume to a comfortable level using the MASTER VOLUME control.
- Connect microphone and slide the ON/OFF switch to the ON position.
- SING-ALONG WITH BUILT-IN VOICE CHANGERS There are 6 built-in voice changers in this unit. When press the VOICE EFFECTS UP or DOWN buttonthe speaker will change the light. The voice will change when the singer starts to sing through the microphone. Purple light – ECHO Pink light – FEMALEOrange light – MALELime light – CHIPMUNKCyan light – ROBOTBlue light – RADIOSelect NONE to sing without any voice effect and speaker will light up white.
Operation
Using the LINE IN Jack (Continued)
- SING-ALONG WITH BUILT-IN LOOP SONGS There are 3 built-in loop songs. Repeatly press SONGS up or down buttons to play the 3 difference songs. The loop song will stop when pressing fourth time.
- PLAYING BUILT-IN EFFECTS Press , or buttons to play three different built-in sound effects.
- RECORD YOUR VOCAL PERFORMANCE During music playback, press the REC button to record your singing and the music, the record indicator will light solid. You can press the REC button again to stop recording, the indicator will turn off. This unit is able to record for 1 minute. It will stop recording automatically after 1 minute and the record indicator will turn off.
- PLAYBACK YOUR VOICE RECORDING To playback your voice recording, you can press the PLAYBACK button. Press again to stop.
- Press the button to turn the unit off; the Power indicator will turn off.Should this unit exhibit a problem, check the following before seeking service:
 the speaker will change the light. The voice will change when the singer starts to sing through the microphone. Purple light – ECHO Pink light – FEMALEOrange light – MALELime light – CHIPMUNKCyan light – ROBOTBlue light – RADIOSelect NONE to sing without any voice effect and speaker will light up white.
No Power.
- Power is not on; press the button to turn the unit on.
- Confirm that the USB jack is connected securely to the back of the unit.
- Connect the unit to a different outlet.
- Batteries are dead or not inserted properly. Insert batteries as shown on page E5.
No Sound – General.
- Master Volume is set to minimum; raise volume.
- Cable connected to LINE IN jack. When a cable is connected, the Line in function is selected. Unplug to select Bluetooth.
No Sound from the Microphone.
- Make sure microphone is firmly connected to the MIC jack.
- Make sure microphone is turned on.
- MASTER VOLUME is set to minimum; raise volume.
The Bluetooth device cannot be paired or connected with the unit.
- Ensure any other Bluetooth devices are turned off to avoid accidental pairing.
- Turn the power off; wait five seconds then turn power back on for automatic reconnection with the paired device.
- You have not activated the Bluetooth function of your device; see page E7 or refer to the Bluetooth device’s user manual.
- The unit is not in pairing mode; see page E7 to pair.
The Music playback is not available on the unit after successfully connecting the Bluetooth.
- Ensure your Bluetooth device can support the A2DP Bluetooth profile.
- The volume on the external Bluetooth device is set too low or muted; raise as desired.
- Make sure your music’s application is open.

Visit Our Website: www.singingmachine.com/kidsVisite nuestro sitio web: www.singingmachine.com/kidsVisitez notre site Internet au: www.singingmachine.com/kids PRINTED
The Singing Machine Company, Inc. 4060 E Jurupa Street, Unit B Ontario, CA 91761-1413 USA
Specifications
AUDIO
Output Power (Maximum). 2W + 2W (RMS)Output Impedance.. 4 Ohms
BLUETOOTH
Bluetooth Version.. .V5.0Working Distance. Up to 10 meters measured in open space
GENERAL
Input Power.. Micro USB DC5V 2APower (DC). DC 6V (4 x “C” cell)Dimensions. 12.5 x 4.3 x 8.8 inches / 31.8 x 10.9 x 22.4 cmWeight 2.2 lbs / 1 kgMicrophone 3.5mm Condensor MicrophoneLINE IN . 3.5mm Stereo Line in JackSpecifications are subject to change without notice.
Read More About This Manual & Download PDF:
References
[xyz-ips snippet=”download-snippet”]