
Processor with Speaker, Microphone and Cables

Important Safety Instructions
![]() Terminals marked with this symbol carry an electrical current of sufficient magnitude to constitute a risk of electric shock. Use only high-quality professional speaker cables with ¼” TS or twist-locking plugs pre-installed. All other installation or modification should be performed only by qualified personnel.
Terminals marked with this symbol carry an electrical current of sufficient magnitude to constitute a risk of electric shock. Use only high-quality professional speaker cables with ¼” TS or twist-locking plugs pre-installed. All other installation or modification should be performed only by qualified personnel.
![]() This symbol, wherever it appears, alerts you to the presence of uninsulated dangerous voltage inside the enclosure – voltage that may be sufficient to constitute a risk of shock.
This symbol, wherever it appears, alerts you to the presence of uninsulated dangerous voltage inside the enclosure – voltage that may be sufficient to constitute a risk of shock.
![]() This symbol, wherever it appears, alerts you to important operating and maintenance instructions in the accompanying literature. Please read the manual.
This symbol, wherever it appears, alerts you to important operating and maintenance instructions in the accompanying literature. Please read the manual.
![]() CautionTo reduce the risk of electric shock, do not remove the top cover (or the rear section). No user-serviceable parts inside. Refer servicing to qualified personnel.
CautionTo reduce the risk of electric shock, do not remove the top cover (or the rear section). No user-serviceable parts inside. Refer servicing to qualified personnel.
![]() CautionTo reduce the risk of fire or electric shock, do not expose this appliance to rain and moisture. The apparatus shall not be exposed to dripping or splashing liquids and no objects filled with liquids, such as vases, shall be placed on the apparatus.
CautionTo reduce the risk of fire or electric shock, do not expose this appliance to rain and moisture. The apparatus shall not be exposed to dripping or splashing liquids and no objects filled with liquids, such as vases, shall be placed on the apparatus.
![]() CautionThese service instructions are for use by qualified service personnel only. To reduce the risk of electric shock do not perform any servicing other than that contained in the operation instructions. Repairs have to be performed by qualified service personnel.
CautionThese service instructions are for use by qualified service personnel only. To reduce the risk of electric shock do not perform any servicing other than that contained in the operation instructions. Repairs have to be performed by qualified service personnel.
1. Read these instructions.2. Keep these instructions.3. Heed all warnings.4. Follow all instructions.5. Do not use this apparatus near water.6. Clean only with a dry cloth.7. Do not block any ventilation openings. Install in accordance with the manufacturer’s instructions.8. Do not install near any heat sources such as radiators, heat registers, stoves, or other apparatus (including amplifiers) that produce heat.9. Do not defeat the safety purpose of the polarized or grounding-type plug. A polarized plug has two blades with one wider than the other. A grounding-type plug has two blades and a third grounding prong. The wide blade or the third prong is provided for your safety. If the provided plug does not fit into your outlet, consult an electrician for the replacement of the obsolete outlet.10. Protect the power cord from being walked on or pinched particularly at plugs, convenience receptacles, and the point where they exit from the apparatus.11. Use only attachments/accessories specified by the manufacturer.
 12. Use only with the cart, stand, tripod, bracket, or table specified by the manufacturer, or sold with the apparatus. When a cart is used, use caution when moving the cart/apparatus combination to avoid injury from tip-over.13. Unplug this apparatus during lightning storms or when unused for long periods of time.14. Refer all servicing to qualified service personnel. Servicing is required when the apparatus has been damaged in any way, such as power supply cord or plug is damaged, liquid has been spilled or objects have fallen into the apparatus, the apparatus has been exposed to rain or moisture, does not operate normally, or has been dropped.15. The apparatus shall be connected to a MAINS socket outlet with a protective earthing connection.16. Where the MAINS plug or an appliance coupler is used as the disconnect device, the disconnect device shall remain readily operable.
 17. Correct disposal of this product: This symbol indicates that this product must not be disposed of with household waste, according to the WEEE Directive (2012/19/EU) and your national law. This product should be taken to a collection center licensed for the recycling of waste electrical and electronic equipment (EEE). The mishandling of this type of waste could have a possible negative impact on the environment and human health due to potentially hazardous substances that are generally associated with EEE. At the same time, your cooperation in the correct disposal of this product will contribute to the efficient use of natural resources. For more information about where you can take your waste equipment for recycling, please contact your local city office or your household waste collection service.18. Do not install in a confined space, such as a bookcase or similar unit.19. Do not place naked flame sources, such as lighted candles, on the apparatus.20. Please keep the environmental aspects of battery disposal in mind. Batteries must be disposed of at a battery collection point.21. Use this apparatus in tropical and/or moderate climates.
LEGAL DISCLAIMERMUSIC Group accepts no liability for any loss which may be suffered by any person who relies either wholly on or in part upon any description, photograph, or statement contained herein. Technical specifications, appearances, and other information are subject to change without notice. All trademarks are the property of their respective owners. MIDAS, KLARK TEKNIK, LAB GRUPPEN, LAKE, TANNOY, TURBOSOUND, TC ELECTRONIC, TC HELICON, BEHRINGER, BUGERA, and COOLAUDIO are trademarks or registered trademarks of MUSIC Group IP Ltd. © MUSIC Group IP Ltd. 2018 All rights reserved.
LIMITED WARRANTYFor the applicable warranty terms and conditions and additional information regarding MUSIC Group’s Limited Warranty, please see complete details online at music-group.com/warranty.
1. Welcome to the Big Show!
Thank you for purchasing your very own SingThing! We’ve packed a lot of creative potential into this Thing, and we’re confident that you’ll enjoy exploring its many capabilities. SingThing is the definitive singer’s toolbox, loaded with effects, instrument inputs, and a premium lightweight powered speaker system that’s just as happy on your bedroom floor as the lighted stage. Your SingThing can help you to explore your creative voice, experiment with great-sounding effects, and most importantly, have fun. Keep reading to find out how!
Quick Start GuideIf you haven’t read the Quick Start Guide that came in the box, please check it out now. It’ll show you how to get up and running with all the basic connections.All set? Ok! Moving on…
2. Set Up where should my SingThing live?
Step one: figure out where you’re going to put the SingThing. You’ve got a few options, depending on your situation.
Option 1: Mic Stand MountThis is our preferred location. It’s nice and close-at-hand for adjustments and creates a great angle for crystal clear sound. To mount SingThing to your mic stand:1. Slide the mic stand pole in between the brackets on the back of the speaker.
2. Line up the mic stand pole with the indents in the brackets.
3. Twist the speaker so the top rotates toward you and the bottom rotates toward the mic stand. This will lock the speaker into place and give the brackets a firm grip on the stand.
4. That’s it! SingThing is now securely mounted to your mic stand and ready to rock!
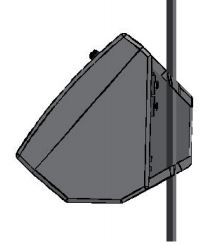
![]() Some mic stands have a thinner top post that’s too narrow for the brackets. If this is the case for you, the ideal mounting location for your SingThing is directly on top of the “chuck”, or tightening mechanism, between your lower and upper mic, stand sections.
Some mic stands have a thinner top post that’s too narrow for the brackets. If this is the case for you, the ideal mounting location for your SingThing is directly on top of the “chuck”, or tightening mechanism, between your lower and upper mic, stand sections.
Option 2: On the floorIf you don’t like to hang with your SingThing, you can rest it on its back between the legs of your microphone stand (or anywhere else). The angled back is designed to point the speaker directly up at your face for the best clarity and volume. This is a good position if you like to play and sing while sitting down, but it also makes accessing the controls a bit more challenging. May we recommend a Switch-3 or Switch-6 for foot control? Footswitch control is discussed later in this manual, so read on!
Option 3: TabletopOn a tabletop, SingThing can be positioned either on its 45° or 90° back faces. Choose the angle that gives you the most direct monitoring for your location.
3. Inputs & Outputs
On the back of your SingThing you’ll find a panel with all of the connections for your mic, instrument(s), music player, headphones, and power.
(1) MIC Combo Input — Your SingThing comes conveniently packaged with all the cables you’ll need. This jack is where the 3 pin XLR cable goes. Connect the male end of the cable to the MIC input and the female end to the microphone. A ¼” (6.35 mm) balanced TRS (Tip-Ring-Sleeve) microphone cable will also work in this handy combo-jack.(2) GUITAR Input — Connect your acoustic guitar here. SingThing’s effects are best suited for acoustic guitar if you’re plugging indirectly from your instrument, but it’s possible to use an electric guitar as well. If you want distortion and other electric guitar-style effects, we suggest putting your effects pedals between your electric guitar and this input.(3) SWITCH Pedal Input — Connect an optional Switch-3 or Switch-6 pedal here.NOTE: Be sure to use either the cable that came with your switch or a similar TRS cable; a standard guitar cable will not work properly!(4) AUX/KEYS Input — This is where you can plug in a 1/8″ (3.5 mm) stereo cable from your smartphone, tablet, or laptop to add backing tracks or software instruments to your stunning vocal performance. With the correct adapter cable, you can also send the output from keyboards and other digital instruments like samplers or drum machines to this jack.(5) OUT jack — Use this output to connect SingThing to an audio mixer for larger venues that have a PA system. All of the inputs (voice, instrument, and aux) are mixed together and sent out as a mono signal via this output.(6) MIDI Input — This input gives you the ability to control parameters from a MIDI controller or MIDI keyboard.(7) Headphone Output — Plug in a 1/8″ (3.5 mm) stereo headphone jack here.(8) USB — This is how you connect SingThing to your computer. SingThing, like all of our products, works in concert with VoiceSupport to manage your presets and keep your products updated with our latest firmware. Download it here: TC-HELICON.com/products/voicesupport(9) Power Jack & Power Switch — Plug your SingThing’s power supply into the lower-left jack. Do NOT substitute any other power supply or you will likely damage your SingThing. Sad!Toggle your SingThing on and off with the Power Switch to the right of the Power Jack.
4. The Front Panel
Knobs & Buttons
The front panel of your SingThing is the control interface you’ll use to create interesting new sounds and manipulate your voice in ways that you’ve never heard before. There’s a lot of potential for exploration here, so have fun with it! This section will give you a quick overview of the front panel features, then we’ll dive into the specifics in later sections.
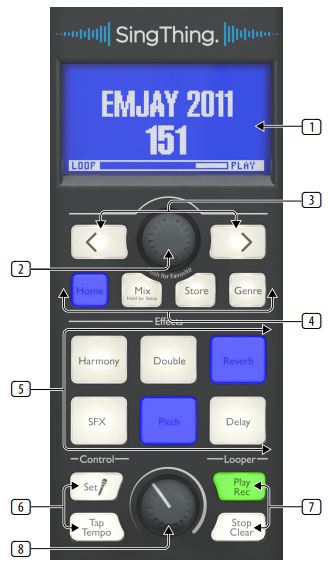
(1) LCD Display — The LCD Display shows the currently-selected preset’s name and number, along with some other useful details like the preset’s genre.(2) Control Knob — This knob is your master control tool. Use it to scroll through presets, adjust level settings, control effects parameters, and more! Press the knob while on the home screen to select the displayed preset as one of your favorites.(3) Navigation Buttons — Here we have your left/right navigation buttons to switch between presets or change menu pages.(4) Menu Buttons — These buttons, from left to right, will get you back to the home screen, allow you to change mix volume and system settings, save presets, and navigate presets by genre.(5) Effects — Press these buttons to hear what almost 20 years of “hey, wouldn’t it be cool if…” sounds like when it’s applied to technology for your voice. There are six styles to choose from! Press and hold an effect button to bring up a simple editing menu for that effect.(6) Control — With the Mic Set button, you can automatically set the input level on your microphone so that it’s just right for your voice. Tap Tempo lets you tap in time to the beat, causing all of the time-based effects in SingThing (echoes and delays) to sync up to this tempo.(7) Looper — One of our favorite things to do at the TC HELICON HQ plays around with vocal loops. Now you can, too! This simple one-track looper is easy to use and a lot of fun.(8) Volume — This is the master output level control. Play it loud!
5.1 Home
The Home button does what you might imagine. Press once to jump back to the home screen, which will show you the current preset and information about that preset, including its genre and whether or not it’s one of your favorites. Just a reminder, you can make any preset a favorite by pressing the Control Knob while that preset is displayed on the home screen.
If you press and hold the Home button, it will flash white and the LCD will show you the Switch Learn Mode screen. Switch Learning is a simple and intuitive way to set up a footswitch or mic control on your SingThing. You may have noticed that the MP-75 microphone that came in the box has a button did you know you can use that button to control the features on your SingThing? True fact. You can use Mic Control (or a Switch-3 or Switch-6, sold separately) to turn effects on and off, start and stop the looper, or scroll through presets!
Switch Control
To start from a blank slate, make sure no effects are turned on when you enter Switch Learn Mode. Here’s how to teach your SingThing a new trick with your switches:
- Press and hold the Home button.
- Press a Mic Control button on your MP-75 or MP-76 microphone, or one of the footswitches on a Switch-3 or Switch-6. SingThing will recognize your microphone or switch and prompt you to choose the functions you want to control with the specific button or switch you pressed.
- Select from any of the white-lit buttons you can control a single effect, or several things at once, even Setup features! For example, there’s a guitar tuner in the Setup menu; if you navigate to the guitar tuner before entering Switch Learn Mode, then choose Mix as the feature for your switch, you can turn the guitar tuner on and off with your footswitch or mic. Neat!
- Repeat steps 2-3 to assign controls for all the buttons on your microphone or footswitch. In addition to the MP-75 and MP-76 microphones, SingThing also supports the Sennheiser E835FX.
5.2 Mix
The Mix button gives you control over the balance between the different elements of your sound. You can change the volume on your Headphones, Guitar, Guitar Reverb, Aux/Keys Input, and Looper relative to one another. Use the Left/ Right Navigation buttons to choose what you’re adjusting, and turn the Control Knob to change the level. The obvious next step is to add Mix Master to your job description or business card.
SetupThe Mix button’s secondary feature, as you may have guessed from the helpful “Hold for Setup” text on the button, is the System Setup menu. You can switch Setup pages using the Left/Right buttons, and change the settings by turning the Control Knob. The Setup menu has 11 pages:
1. Mic TypeThere are 5 Mic Types to choose from:a) Dynamic — this is the most common type of vocal microphone. Most industry-standard vocal mics like the Shure SM58 are dynamic microphones.b) Condenser — more common in the studio, condenser mics tend to be more sensitive than dynamic mics. Condenser mics also need a power source, which is turned on automatically when you select Condenser as your mic type. If you plug in a mic and can’t hear anything coming out of the speaker on the Dynamic mic setting, your microphone is probably a condenser or broken.c) MP-75 — we put one of these in the box for you! A dynamic microphone with Mic Control.d) E835FX — a premium-quality Sennheiser microphone with Mic Control. If you happen to own one, lucky you!e) MP-76 — the upgraded MP-75; same great sound, 4 extra buttons for enhanced control.
2. Tone StyleWe’ve built a vocal producer into SingThing to help your voice sound it’s very best. The Tone feature adds compression, EQ, de-essing, and gating to your voice, all features to give your voice the clarity, warmth, and definition that it deserves. We recommend leaving Tone on all the time! There are 8 Tone Styles to choose from:a) Normalb) Less Brightc) Normal + Warmthd) More Compressione) Normal No Gatef) Less Bright No Gateg) Warmth No Gateh) More Compression No Gate
3. Global Pitch CorrectPitch correction gives your voice a little bit of a nudge to the note closest to what you’re singing. It can be subtle or an extremely obvious Auto-Tune style as you increase the level towards 100%. Some preset have pitch correction built-in; when you turn on Global Pitch Correct, it will be active in the background all the time.
4. Guitar BodyrezBodyrez enhances the sound of your acoustic guitar by boosting the warmth and resonance that’s lost through your guitar’s pickups. It makes the amplified signal sound more like your guitar when it’s unplugged.
5. Loop InputUse this feature to change which inputs are captured by the looper. You can loop your voice, guitar, aux input, or all three.
6. LCD ContrastYou can increase or decrease the text/background contrast to suit the brightness of your performance space.
7. Global KeyWhen you turn on Global Key, the harmony setting for all of your presets will be derived from the same key.
8. Global TempoWhen you turn on Global Tempo, all of the effects that use a tempo (echoes, delays, etc.) will use the same tempo, which you can adjust with the Tap Tempo button.
9. Bass ExtendWhy have less bass when you could have more bass? Turn on Bass Extend to feel some more low-end in your mix.
10. Guitar TunerPretty self-explanatory: plug in your guitar, strum a string, and adjust until the tuning needle points straight up!
11. Product Info This page displays your current firmware version, serial number, and the date your SingThing was brought into the world.
5.3 Store
When you’ve crafted the perfect mix of effects for your song, the Store button allows you to save your special sonic recipe and recall it whenever you want. You can overwrite an existing preset, or save it to one of the blank slots starting at Preset #235. There are 500 total slots available, and we’ll be madly impressed if you manage to fill all of them. Remember, you can also download packs of professionally crafted presets from VoiceSupport and sync them to your SingThing by plugging them into your computer with the supplied USB cable.Press the Store button to bring up the Preset Storage screen. Press the Genre button to switch between Preset Naming and Preset Slot selection. When you’re in a Naming mode, use the Left/Right navigation buttons to jump between letters or spaces, and use the Control Knob to choose a letter or character. Once you’ve chosen a name for your preset, press Genre again and use the Control Knob to select a Preset Slot. Blank slots begin at #235. Finally, press Store to save your artfully named preset to the chosen slot.
5.4 Genre
The Genre button lets you filter your Preset selections by organizing them into groups of sounds that fit a particular genre or style. There are 18 genres to choose from:
- All
- Favorite
- Showcase
- Songs & Artists
- Pop
- Rock
- Alternative
- Country
- Hip Hop/Rap
- Dance
- Echo
- Doubling
- Reverb
- Harmony
- Hardtune
- Megaphone
- Extreme
- Character
We’ve done our best to organize these genres in a sensible fashion, but the best way to find the ones you like quickly and easily is to add them to your Favorites, which you can do with any preset by pressing the Control Knob while that preset is displayed on the Home screen.
6. Effects
6.1 Harmony
We can’t all afford to hire backup singers, but we here at TC HELICON couldn’t bear the thought of you singing by yourself, so we designed some software that creates one or two additional voices to harmonize with you. The Harmony effect has four parameters: style, level, key, and scale. Press and hold the Harmony button to see these parameters.
StyleThe style parameter determines the number of harmony voices and the way those voices relate to your lead vocal. A simple acoustic ballad may call for a single high or low voice; a big ol’ sing-along might sound that much better with an octave up and down, and some doubling, to reallythicken up that big chorus. Much like ice cream, harmony comes in many flavors try them all! There are 28 styles to choose from:
- High
- Higher
- Low
- Lower
- Octave Up
- Octave Down
- High & Low
- High & Higher
- High & Lower
- Higher & Lower
- Higher & Low
- Lower & Low
- Oct Down & Up
- Oct Down & Higher
- Oct Down & High
- Oct Down & Low
- Oct Down & Lower
- Oct Up & Higher
- Oct Up & High
- Oct Up & Low
- Oct Up & Lower
- +7 Semitones
- -5 Semitones
- +7 & -5 Semitones
- +12 & +7 Semitones
- +12 & -5 Semitones
- -12 & +7 Semitones
- -12 & -5 semitones
LevelThe level parameter controls how loud the harmonies will be in the mix relative to your lead vocal. You can adjust the level by turning the Control Knob.
KeyTo unlock the secret to amazing vocals, you must first choose the appropriate key. Get it right and things sound amazing… get it wrong and they sound, well, unusual at best.
There are two Key modes:1. Auto — This is the one to pick if you don’t know anything about music theory. SingThing will set the key for you based on what it hears coming in through the Guitar or Aux/Keys inputs pretty clever if you ask us. If you have a guitar plugged in and tracks playing via the Aux-in, the system will read key/scale from the guitar first. If you stop playing guitar and the Aux signal continues, the system will look to the Aux input for chord information.2. Key — This mode allows you to explicitly choose any of the 12 keys (A through G and their sharps/flats) in western music.
ScaleWhen you switch from Auto to a defined Key in the previous setting, it unlocks the Scale feature. Use the Scale to match the particular needs of your song. Bold and triumphant? Try one of the Major scales. Dark and brooding? A Minor scale will probably suit you best. There are six scale types: three Major scales and three Minor scales.
6.2 Double
The Double effect creates a sense that one or two additional vocalists are singing along with you. The effect is a “thicker” or fuller-sounding vocal track. Almost 100% of all modern recorded music has double-tracked vocals because, well, it sounds good. We thought we’d offer you the tools to create that same effect because we’re decent people and it gives us the warm fuzzies when your vocal performance sounds awesome.Double has two parameters: level and style.
Style
This parameter determines the number of voices, their timing, and their pitch relative to your voice. There are 10 styles to choose from:
- Voice Tight
- 1 Voice Loose
- 2 Voices Tight
- 2 Voices Loose
- Shout
- 1 Voice Oct Up
- 1 Voice Oct Down
- 2 Voices Oct Up
- 2 Voices Oct Down
- Oct Up & Oct Down
Tight and Loose refer to how precisely the doubled voice lines up with your lead vocal. Tight means that the voice comes in almost perfectly in time with yours, while Loose means that it’s slightly delayed. Have a listen to the various styles and see what suits your music best, we think you’ll find something that complements you beautifully.
LevelThis parameter makes the doubled voices louder or quieter relative to your lead voice.
6.3 Reverb
Reverb means that we make your voice sound like it’s bouncing around a room. You can choose to have yourself in all kinds of simulated spaces, from a cozy library to a large arena. As the size and composition of the simulated room change, it gives your voice a sense of depth, space, and distance. It’s a bit like virtual reality for your voice!Reverb has three adjustable parameters: style, level, and decay.
StyleWhat kind of room would you like to use for your performance? Get stylish with it. The Style parameter determines the size of the simulated space and the type of simulated material used to create the space.There are 28 styles to choose from:
- Smooth Plate
- Reflection Plate
- Thin Plate
- Bright Plate
- Real Plate
- Real Plate Long
- Jazz Plate
- Quick Plate
- Soft Hall
- Amsterdam Hall
- Broadway Hall
- Snappy Room
- Library
- Dark Room
- Music Club
- Studio Room
- Bouncy Room
- Cozy Corner
- Bright Chamber
- Wooden Chamber
- St. Joseph Church
- Dome Chapel
- Hockey Arena
- Museum
- Indoor Arena
- Warehouse
- Thin Spring
- Full Spring
LevelUse this control to have more or less reverb in your life.
DecayReverb decay is the time it takes for the reverb to fade out. You can choose anywhere from 10 milliseconds, which is barely audible, to 20 seconds of decay. Longer decay times generally sound like large spaces, while shorter times sound like small spaces. Each Style has its own decay time, but you can adjust each one to suit your needs.
6.4 SFX
You’ve reached the Special Effects (SFX) department of the SingThing operation. Your call is important to us. Please listen carefully as our menu options have changed. SFX provides a range of transducer (simulated loudspeaker) effects to put some distortion and heavy filtering on your voice, and sci-fi-inspired oscillator effects to send your voice into outer space. You can adjust the Drive and Filter on the transducer effects and the Level and Speed of the oscillator effects.
StyleWhen you finally decide that you don’t want to be an alien all the time, you can choose from any of these exciting styles. There are five transducer styles and six oscillator styles:
- Transducer
- Megaphone
- Radio
- Overdrive
- Combo
- Oscillator
- Fast Rotor
- Flanger
- Auto-Wah
- Cylon Mono
- Alien Voiceover
DriveYou can increase the level of distortion on the transducer effects with this setting. As you increase the level towards 100, your voice gets increasingly fuzzy and harsh.
FilterThis sets the filter level.
LevelThis parameter increases the level of the oscillator effects. If you could have a more alien voice in your life, you’d have that, right? This is how you add more alien voices.
SpeedWhile Reverb adds a sense of spaciousness to your voice, our oscillator SFX adds a sense of wobbliness. Speed control changes the frequency of the wobble; it’s measured in Hertz (Hz), which means the number of wobbles per second. Choose from a lethargic 0.05 Hz, 20 seconds to complete a single wobble, all the way up to an invading squadron of UFOs at 10 Hz or 10 wobbles per second.
6.5 Pitch
The Pitch effect tunes your voice so that it matches the notes in a regular 12 note scale more precisely. You can use the Pitch effect to sound more like a robot or techno-pop star and to change the perceived gender of your voice. Pitch has three parameters: style, shift, and gender.
StyleUse the Styles to give your voice a bit of that modern pop sheen, or tune it up to sound extremely processed and robotic. There are seven styles to choose from
- Pop
- Country Gliss
- Robot
- Correct Natural
- Correct Chromatic
- Drone
- Gender Bender
The Correct Natural and Correct Chromatic styles will use either the Global Key or Harmony Key to pitch-correct your voice to the appropriate note.
ShiftUse the Shift feature to push your voice up or down by up to 36 semitones. When you’re on the Robot style, the Shift feature lets you pick the note for your robot voice.
GenderYou can sound more gentlemanly, or more ladylike, by changing the Gender parameter. The range goes from -50 to +50, or Barry White to Mariah Carey, if you like.
6.6 Delay
The Delay effect plays your voice back to you in a repeating, rhythmic series. You decide how quickly the repetitions come, and how long they last. You can also switch on a filter that adds a vintage radio kind of feel to your sound. Delay has four parameters: style, level, feedback, and filter.
StyleThe Style determines the delay’s rhythm as it’s playing back. There are 18 styles to choose from:
- Quarter
- Eighth
- Triplet
- Dotted 1/8th
- Dotted ¼
- ¼ Triplet
- Sixteenth
- Ping Pong 1
- Ping Pong 2
- Ping Pong 3
- Multitap 1
- Multitap 2
- Multitap 3
- Multitap 4
- Multitap 5
- Multitap 6
- Classic Slap
- Set Time
LevelIncrease the level to add more of the delayed signal to your overall mix.
FeedbackThe Feedback parameter determines how much of the delayed signal is recycled back into the mix for additional delay. The more feedback you add, the fuller and noisier the delay signal becomes.
FilterThe filter goes on, the filter goes off. This low-frequency filter will help you switch between a more “modern” and “vintage” feeling delay sound.
Your singing comes equipped with two dedicated Control buttons: one to adjust your microphone input level, the other to change the system tempo.
Mic SetSingThing comes equipped with automatic level control for your mic input. Press and hold Mic Set, then sing your heart out into the microphone. The system will adjust the input level to match your vocal level so that it won’t cause any unwanted distortion when you’re belting it out.
Tap TempoPress the Tap Tempo button to bring up the current system tempo and turn the Control Knob to change the tempo. The Global Tempo, which you can enable or disable in the Settings, will use this tempo. You can also tap the button in time to the music to set the tempo. If you press and hold the button, it will revert back to your last tempo setting.
8. Looper
We think that loopers are a whole bunch of fun! This simple two-button looper gives you the ability to record up to 30 seconds of audio, then loop it back and layer it up with an unlimited number of overdubs.
Rec/PlayWhen you press Rec/Play, the looper immediately starts recording whichever inputs you have selected in the Settings -> Loop Input menu. You’ll know that it’s in Recording mode because the LED behind the button will turn red. When you press the button again, the LED will turn green and your loop will start playing back. Press Rec/Play again to record an overdub on top of your loop. The LED turns orange in Overdub mode, and the text beside the Loop progress bar says “O-Dub.”
Stop/ClearPress this button once to stop loop playback. Press and hold to erase your loop and start recording a new one from scratch. When you erase a loop it’s gone forever, so make sure that you really want to erase the whole thing before you press and hold.
9. Support and Updates
9.1 VoiceSupport & Firmware Updates
TC HELICON’s VoiceSupport 2 application connects you to firmware updates, new presets, and all the tools you need to save and load your customized SingThing preset packs. Head to http://tc-helicon.com/en/products/voicesupport-2/ to download VoiceSupport. Once it’s up and running, power up SingThing and plug it into your computer via the supplied USB cable to access all the support and upgrade features for your product.
9.2 Factory Reset
Preset Reset: Hold the “Store” and “Genre” buttons while powering on. This restores factory presets, deleting user-made presets.Settings Reset: Hold the “Store” and “Genre” and “Mix” buttons while powering on. This restores settings in the “Setup” menu to their factory defaults.Factory Reset: Hold the “Mix” and “Harmony” buttons while powering on. This performs a full factory reset including settings and presets.
Stay in touch with us on Facebook, Instagram, Twitter, and YouTube, we’d love to hear from you! Make a video with your SingThing and tag us on social media and we’ll share your creations with other TC HELICON users!http://support.tc-helicon.com
10. MIDI
Perhaps you noticed the 5-pin MIDI input on the back panel? If you’re so inclined, you can control many of your SingThing’s functions using MIDI control commands (CCs). If this is an entirely new concept to you, don’t worry, it’s pretty straightforward. Musical Instrument Digital Interface (MIDI) is a standard that allows cross-platform communication between all kinds of digital instruments. Part of the MIDI standard is designed to allow controllers (keyboards, buttons, sliders, knobs, etc) to send messages to devices under control. Some of the CCs are pre-defined by the MIDI standard, and some are left deliberately open to allow manufacturers to choose CCs that are specific to certain functions on their products SingThing uses both to allow MIDI control over most of its parameters.The table below shows the MIDI CCs to which SingThing is responsive. If you’d like to learn more about MIDI CCs, or anything else to do with the MIDI standard, the good people at TweakHeadz Lab have written one of the best guides we’ve found so far: http://tweakheadz.com/midi-controllers/
SingThing MIDI Chart
11. Technical Specifications

EMC: Complies with EN 55103-1 and EN 55103-2FCC part 15, Class B, CISPR 22, Class BSafety: Certified to IEC 65, EN 60065, UL6500 and CSA IEC 65, EN 60065, UL6500, and CSA![]()
References
[xyz-ips snippet=”download-snippet”]