
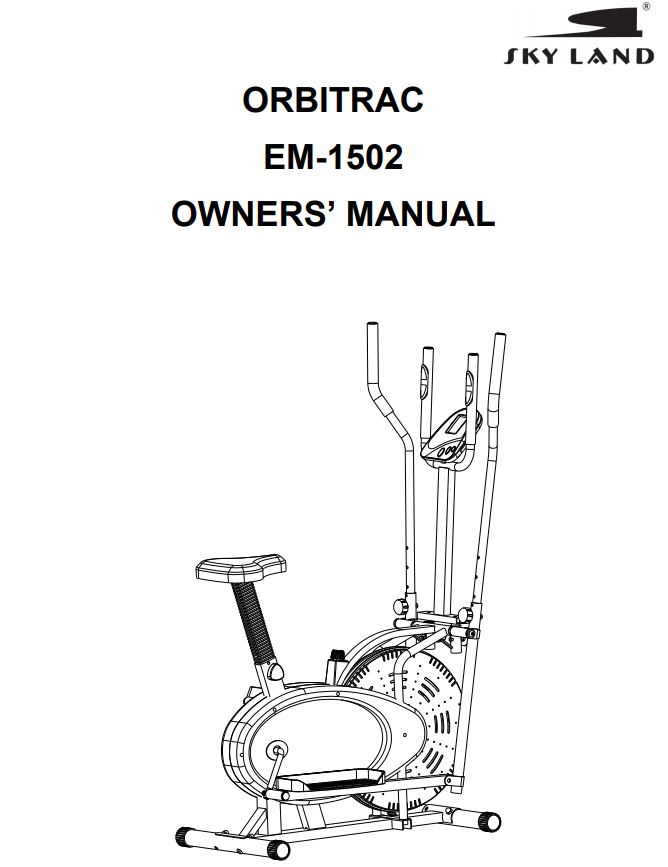
SKY LAND Orbitrac
Important Safety Information
Before you undertake any program of exercise that will increase cardiovascular activity please be sure to consult with your doctor. Frequent strenuous exercise should be approved by your doctor and proper use of your product is essential. Please read this manual carefully before commencing assembly of your product or starting to exercise.
- Please keep all children away from exercise products when in use. Do not allow children to climb or play on them when they are not in use.
- For your own safety, always ensure that there is at least 1 meter of free space in all directions around your product while you are exercising.
- Regularly check to see that all nuts, bolts, and fittings are securely tightened. Periodically checking all moving parts for obvious signs of wear or damage.
- Clean only with a damp cloth, do not use solvent cleaners. If you are in any doubt, do not use your product.
- Before use, always ensure that your product is positioned on a solid, flat surface. If necessary, use a rubber mat underneath to reduce the possibility of slipping in use.
- Always wear appropriate clothing and footwear such as training shoes when exercising. Do not wear loose clothing that could become caught or trapped during exercise.
- Always cool down when the products last running over 3-4 hours.
- If you feel any pain or abnormal symptoms, STOP YOUR WORK IMMEDIATELY AND CONSULT YOUR DOCTOR.
- Never allow children alone to use the machine.
Storage and UseThis product is intended for use in clean dry conditions. You should avoid storage in excessively cold or damp places as this may lead to corrosion and other related problems that are outside our control.Weight Limit: Max.110KGS
Exploded Diagram
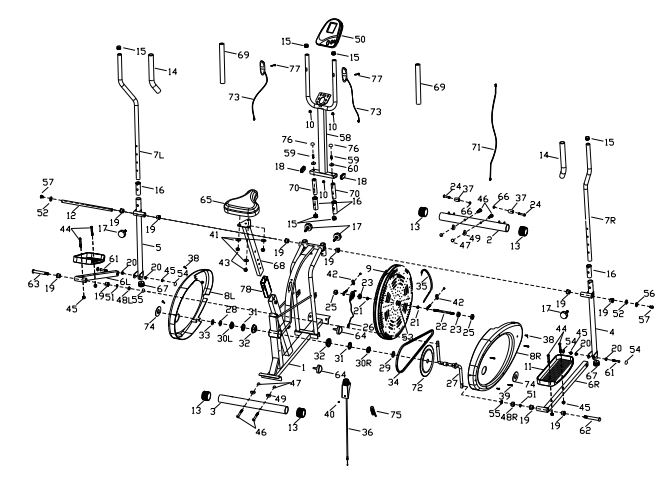
Parts List

Assembling of item:
STEP 1:Install the Front bottom tube (2) and Back bottom tube (3) to the Mainframe (1) with Carriage bolts (46), Arc washers (49), and Acorn nuts 3/8″ (47). STEP 2:
- Use Handlebar shaft (12) to connect the Coupler bar of left & right (4, 5) and the Mainframe (1).
- Fix with D shape washers (56), Washers (52), Bolts (57) on both sides.
- Screw the Pedal arm ( 6L,6R) onto the Crankshaft (27L, 27R) with a Pedal hinge bolt (62,63) and Nylon nuts (48L, 48R), and then put on the Caps (55).


STEP 3:Fasten with Bolts (44) and Nylon nuts (45) to connect with the left and right pedals (11) and the Right and Left pedal tube (6L, 6R) respectively.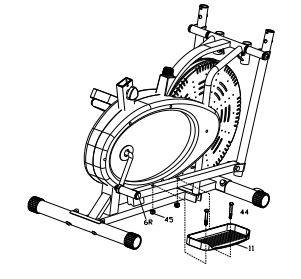 STEP 4:
- 1. Insert the handlebar (7L, 7R) to the coupler bar (5, 4) respectively, select a height setting that is comfortable to the user, and make sure both handlebars are set at the same height.
- 2. Fasten the handlebar (7L, 7R) with Knobs (17).

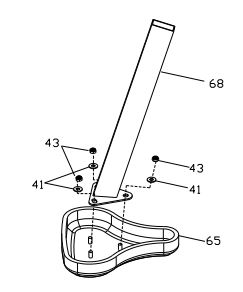
STEP 5
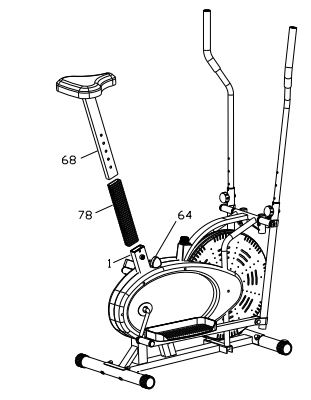
- 1. Firstly unscrew the Nylon nut M8 (43), Washer D8 (41) from the seat (65).
- 2. Secondly put the seat onto the seat tube (68), and screw the seat with the Nylon nut M8 (43) and Washer D8 (41).
STEP 6:
- Firstly put the Seat tube (68) through the Pipe (78).
- Secondly, insert the Seat tube (68) into the Mainframe (1), and then screw it with the knob (64).
STEP 7
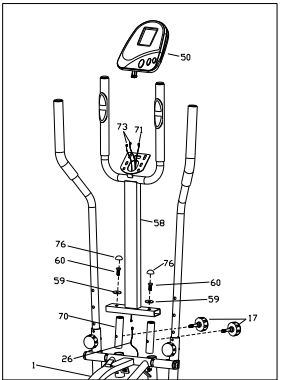
- Screw the Cylindrical tube (70) onto the Mainframe (1) with 2 knobs (17).
- Screw the Vertical tube (58) onto the Cylindrical tube (70) with 2 washers (59) and 2 bolts (60), and then put on the caps (76).
- Link the Sensor (26) with Connecting line (71), and then link all the computer lines. Put the computer (50) onto the Vertical tube (58).
STEP 8Assemble finished. Check all the screws before using them.
Operation
1. BALANCE THE BICYCLE EXERCISER.Place the BICYCLE EXERCISER in the location it will be used. The floor should be hard and flat and the bike should sit firmly on the floor. If the bike is not stable, turn the end caps on the bottom tubes until the bike is stable. Turn one end cap at a time as it may only be necessary to adjust one.
2. ADJUSTING THE TENSIONThe assembly of the bicycle Exerciser is now complete. As you try it for the first time, you should adjust the tension to a desirable level before you begin a full workout. To increase tension turn the tension knob to the right and to decrease tension turn the tension knob to the left. For greater tension adjustment, you may loosen or tighten the tension belt by re-strapping it. To do so, first, turn the tension adjustment knob all the way to the loosest setting. Then re-strap the belt at the buckle on top of the fan wheel, just beneath the center beam. The more length you allow for the more friction it will cause. Readjust the tension knob after you finished re-strapping.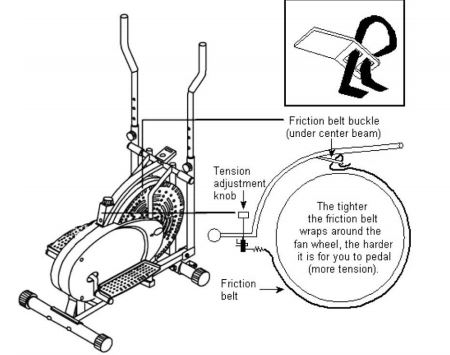 3. REVERSIBLE MOVEMENT Remember, your machine has REVERSIBLE movement! Forward pedaling emphasizes your quadriceps muscles (front thighs), while backward pedaling emphasizes your hamstrings (back thighs). Take advantage of this fact to make your workout less fatiguing and more fun.
SKYLANDWebsite: www.topskyland.com

Made In China
[xyz-ips snippet=”download-snippet”]