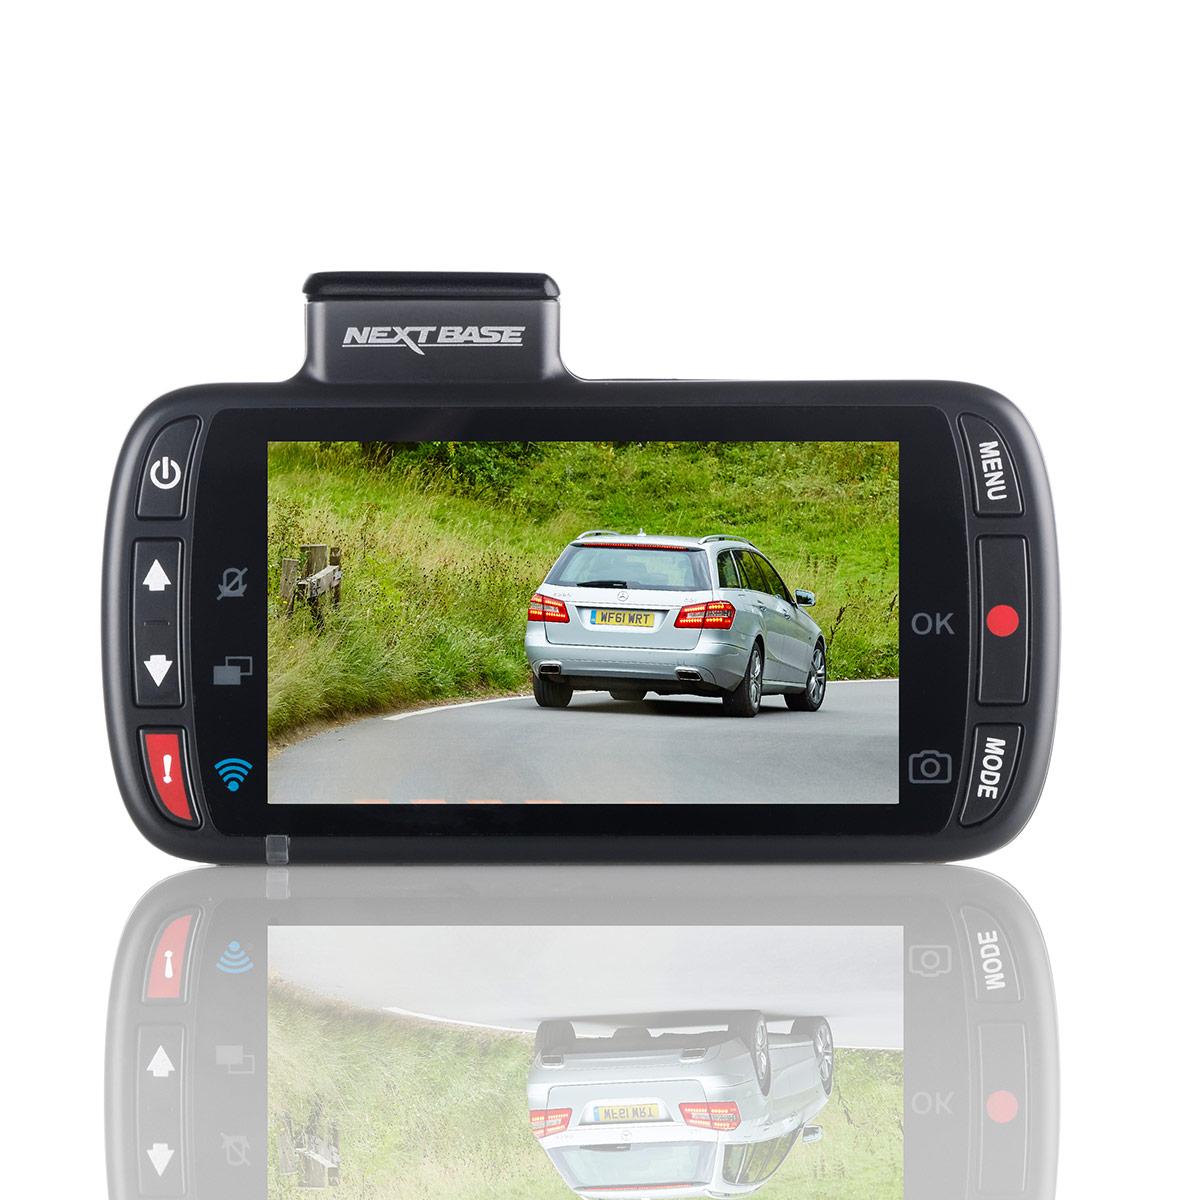
SKYVIEW NBDVR312GW NBDVR312GW 1080p Full HD Dash Camera
IN VEHICLE INSTALLATION
Please follow the instructions below for first-time installation of the B2 Elite DASH CAM. For day to day use simply remove the camera from the mount as required.
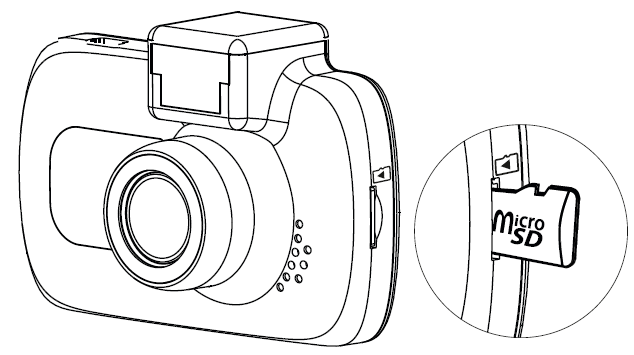
- Insert MicroSD CardInsert a suitable MicroSD card (Class 10 48/Mbps) in to the B2 Elite DASH CAM, taking care that the gold contacts are facing towards the LCD screen side of the B2 Elite DASH CAM. Push the memory card until it clicks into place.
 Note:
Note:
- Use the edge of a small coin (or similar object) to push the memory card in place if required. Take care that card has ‘clicked’ into place, a second push inwards will release the memory card.
- Do not remove or insert the memory card when the B2 Elite DASH CAM is turned on. This may damage the memory card.
- Remove dust cover from B2 Elite DASH CAMRemove the dust cover that is located on the top of the B2 Elite DASH CAM to gain access to the mounting point. To remove the dust cover, slide it forwards away from the LCD screen of the B2 Elite DASH CAM.Note:
- If the B2 Elite DASH CAM is not to be used for a period of time please replace the dust cover to help keep the metal contacts free of dust or other contaminants.
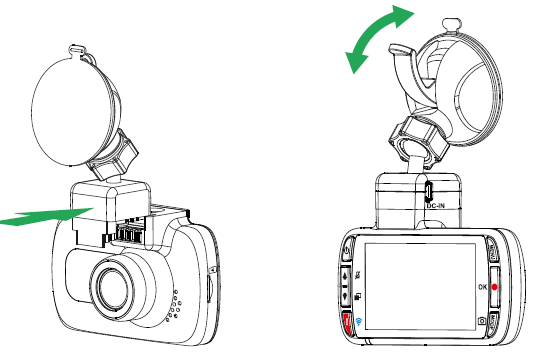
- Attach the mount to the B2 Elite DASH CAMSlide the B2 Elite DASH CAM onto the mount. Once attached magnets within the mount will hold the two parts together.
- Attach the mount to the windscreenRemove the protective plastic film from the suction cup of the mount. Select a suitable position for the mount and clean the windscreen with a dry / clean cloth to achieve a good contact between the glass and suction cup. Release the locking lever of the mount by pulling down and then whilst holding the suction cup onto the glass push the lever up to secure the mount to the windscreen.Note:
- Choose a smooth glass area without painted effect.
- Please ensure that once mounted the B2 Elite DASH CAM will be located within the area of the vehicles windscreen wipers to maintain a clear view during rainfall.
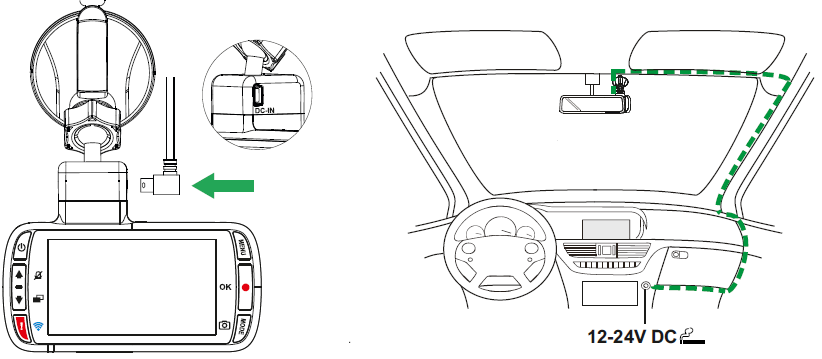
- Connect car power cableConnect the supplied car power cable to DC-IN socket of the mount. The B2 Elite DASH CAM will automatically power on and start recording once power is availableIn some vehicles this will be when connections are made, for others the B2 Elite DASH CAM will power on once the ignition has been turned on. Should your vehicle not have a 12-24Vdc outlet, but does have a 5Vdc USB Outlet, th i s c au ns ebde instead. Connect the USB cable supplied with your B2 Elite DASH CAM in place of the car power cable. Ensure you connect the USB cable to the Powered Mount only, NOT directly to the camera when using B2 Elite.Plug the power cable into the 12-24Vdc outlet of your vehicle. The above diagram is for illustration purposes only.Note: Do not wire the B2 Elite DASH CAM directly to a 12V supply by cutting the cigarette plug off the end of the cable, or damage will result.A SKYVIEW hardwire kit is available from your retailer. This connects directly to the vehicle fusebox and hence leaves your cigarette socket available for Phone / Sat Nav charging. The SKYVIEW hardwire kit includes the necessary 12-24VDC to 5Vdc convertor and battery protection circuitry.Please read and follow the notes below for the safe operation of your B2 Elite DASH CAM within your vehicle. As per the installation instructions, you must install the B2 Elite DASH CAM so it does NOT obstruct the drivers view of the road, preferably on the passenger side of the vehicle and behind the rear view mirror. Whilst the B2 Elite DASH CAM clearly needs to view through the windscreen in an area swept by the windscreen wipers, the B2 Elite DASH CAM should be installed so as not to intrude significantly within the wiped area. A 40mm intrusion into the green wiped area is the maximum permitted by law.Do NOT mount the B2 Elite DASH CAM in front of the driver, as depicted by the red area in the above illustration. When installing the B2 Elite DASH CAM in a vehicle, always place the device securely against the windscreen and where possible conceal the power cable under trim. Make sure that the B2 Elite DASH CAM power cable does not interfere with the drivers operating controls, such as the steering wheel, pedals or gear levers. Do NOT mount the B2 Elite DASH CAM in front of an airbag field of deployment or in a position to obscure any mirrors.Clean the windscreen at the point of location, prior to fitting the B2 Elite DASH CAM, also, applying some moisture to the suction cup may be beneficial, to ensure absolute adhesion. It is recommended NOT to operate the B2 Elite DASH CAM whilst driving. The automatic Start-Stop technology incorporated within the device negates any need to operate the controls whilst driving. Adjust any settings or review recordings whilst stationery, not whilst driving. Only use your mobile device whilst stationery, not whilst driving.After the preliminary SETUP has been carried out upon the B2 Elite DASH CAM, adjust the Screen Saver setting to 1 minute, this will blank the screen automatically shortly after starting the vehicle and therefore the screen will NOT be a distraction in any way to the driver.
 Note:
Note:
 Note:
Note:
 Note:
Note:
 Plug the power cable into the 12-24Vdc outlet of your vehicle. The above diagram is for illustration purposes only.Note: Do not wire the B2 Elite DASH CAM directly to a 12V supply by cutting the cigarette plug off the end of the cable, or damage will result.A SKYVIEW hardwire kit is available from your retailer. This connects directly to the vehicle fusebox and hence leaves your cigarette socket available for Phone / Sat Nav charging. The SKYVIEW hardwire kit includes the necessary 12-24VDC to 5Vdc convertor and battery protection circuitry.Please read and follow the notes below for the safe operation of your B2 Elite DASH CAM within your vehicle. As per the installation instructions, you must install the B2 Elite DASH CAM so it does NOT obstruct the drivers view of the road, preferably on the passenger side of the vehicle and behind the rear view mirror. Whilst the B2 Elite DASH CAM clearly needs to view through the windscreen in an area swept by the windscreen wipers, the B2 Elite DASH CAM should be installed so as not to intrude significantly within the wiped area. A 40mm intrusion into the green wiped area is the maximum permitted by law.
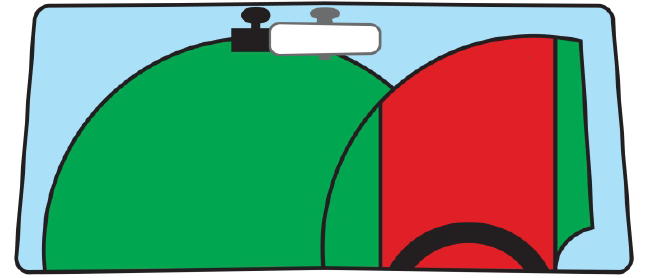 Do NOT mount the B2 Elite DASH CAM in front of the driver, as depicted by the red area in the above illustration. When installing the B2 Elite DASH CAM in a vehicle, always place the device securely against the windscreen and where possible conceal the power cable under trim. Make sure that the B2 Elite DASH CAM power cable does not interfere with the drivers operating controls, such as the steering wheel, pedals or gear levers. Do NOT mount the B2 Elite DASH CAM in front of an airbag field of deployment or in a position to obscure any mirrors.Clean the windscreen at the point of location, prior to fitting the B2 Elite DASH CAM, also, applying some moisture to the suction cup may be beneficial, to ensure absolute adhesion. It is recommended NOT to operate the B2 Elite DASH CAM whilst driving. The automatic Start-Stop technology incorporated within the device negates any need to operate the controls whilst driving. Adjust any settings or review recordings whilst stationery, not whilst driving. Only use your mobile device whilst stationery, not whilst driving.After the preliminary SETUP has been carried out upon the B2 Elite DASH CAM, adjust the Screen Saver setting to 1 minute, this will blank the screen automatically shortly after starting the vehicle and therefore the screen will NOT be a distraction in any way to the driver.
 report this ad
Before use, please download and read the Manual.PDF
- Amazon’s product introduction page
- www.Newskyview.com
- Email: [email protected]
[xyz-ips snippet=”download-snippet”]