SKYZONE SKY04X OLED FPV Goggle
Specifications
|
Specifications |
|
| SKY04X | |
| Screen | OLED |
| Resolution | 1280X960 |
| FOV(Diagonal) | 46° |
| Aspect Ratio | 4:3/16:9 |
| Focus | -6~+6 adjustable |
| Receiver | 5.8Ghz 48CH Steady View Receiver |
| Language | 10 Languages |
| Power Supply | DC 6.5-25.2V/USB 5V |
| Power Consumption | 720mA at 12V |
| DVR | H264, 30fps,MOV 6Mbps, SD Card support up to 128Gb |
| Head Tracker | 3-axis Accelerometer, 3-axis gyroscope |
| Dimensions | 185*75*67mm |
| Weight | 267g |
BAND/CHANNEL table
|
BAND/CH table |
||||||||
|
BAND/CH |
CH 1 | CH2 | CH3 | CH4 | CH5 | CH6 | CH7 | CH8 |
|
A |
5865M | 5845M | 5825M | 5805M | 5785M | 5765M | 5745M | 5725M |
|
B |
5733M | 5752M | 5771M | 5790M | 5809M | 5828M | 5847M | 5866M |
|
E |
5705M | 5685M | 5665M | 5645M | 5885M | 5905M 5 | 5925M | 5945M |
|
F |
5740M | 5760M | 5780M | 5800M | 5820M | 5840M | 5860M | 5880M |
|
R |
5658M | 5695M | 5732M | 5769M | 5806M | 5843M | 5880M | 5917M |
|
L |
5362M | 5399M | 5436M | 5473M | 5510M | 5547M | 5584M | 5621M |
|
Sensitivity |
-98dBm±1dBm |
|||||||
|
Antenna port |
2 X SMA-K,50ohm |
Package Included
- Goggles*1
- Receiver Module*1
- Faceplate*2(wide and narrow)
- Sponge with Velcro*1
- Zipper case*1
- Power cable*1
- Headtracker cable*1
- 5.8GHz 2dB antennas*2
- Video/Audio Cable*1
- USB-C Cable*1
- User Manual*1
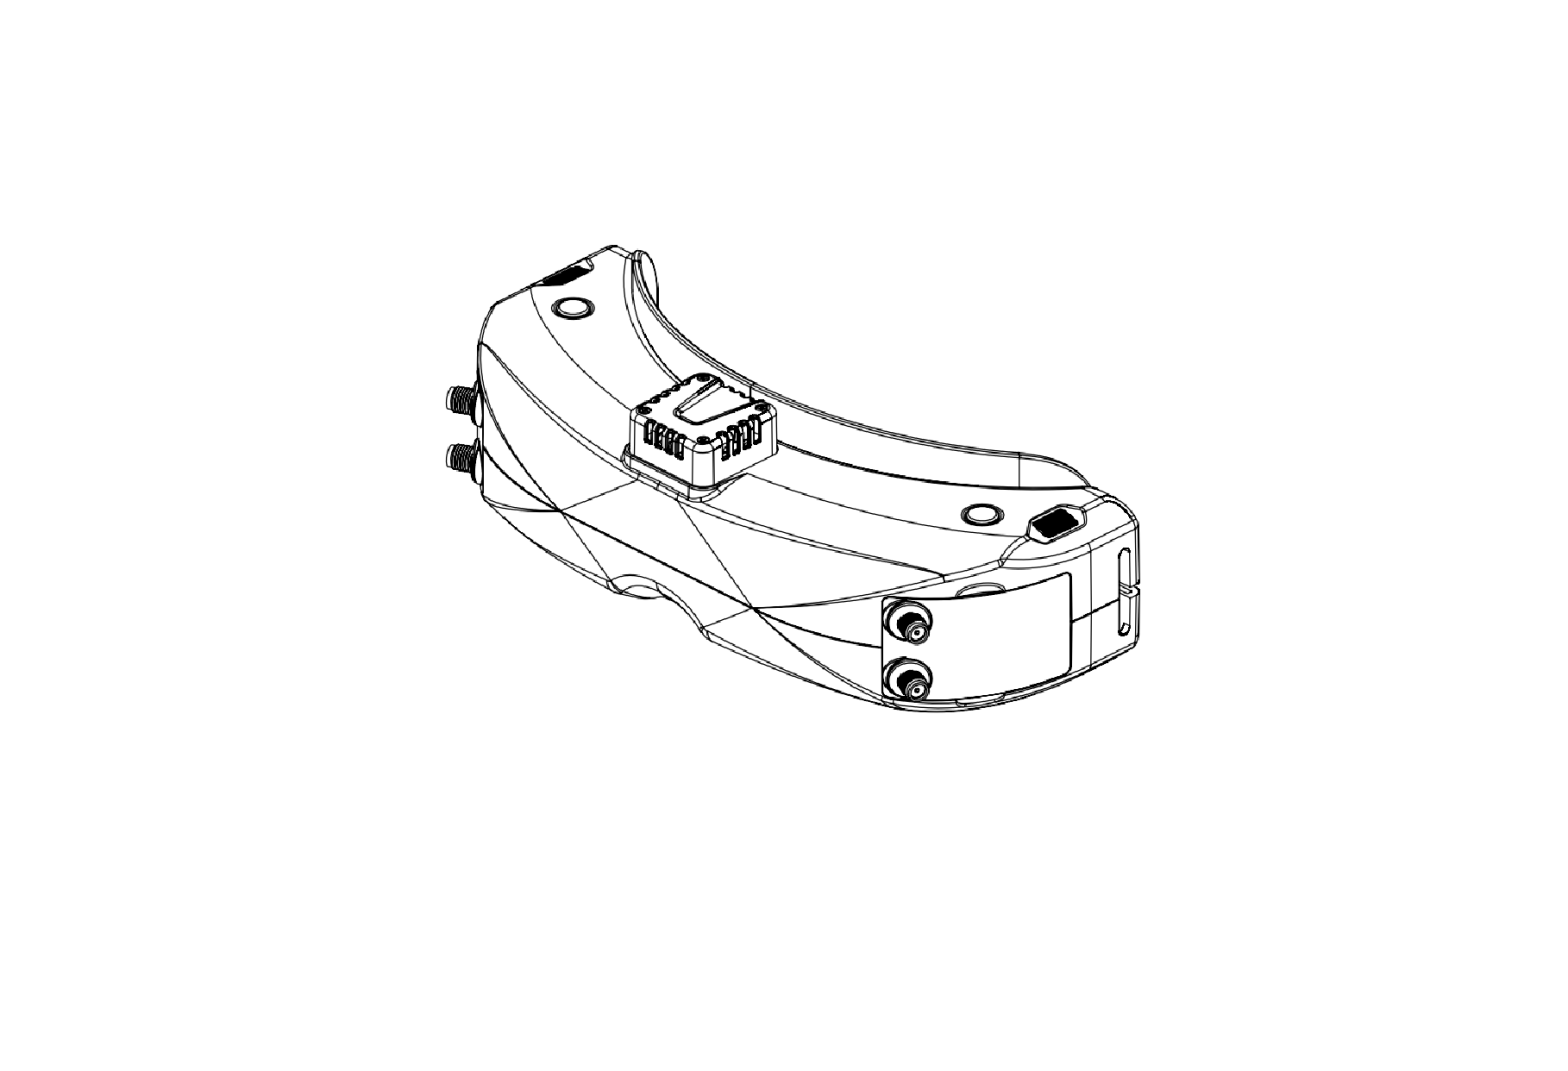
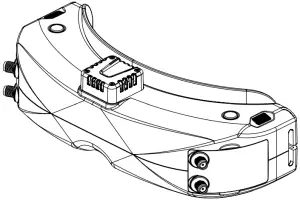
Diagram

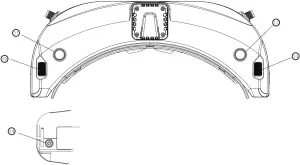
- DC PORT(5.5*2.1mm)
- Head tracker port
- USB C port
- IPD Slider
- Focus adjustment wheel
- HDMI input
- SD card slot
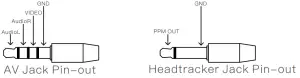
- AV IN/OUTPUT
- Earphone jack
- Volume/ Mode
- Record/Delete
- System Menu/Headtracker
- CH/BAND/Search
- Power/Fan
Introduction
The SKY04X is First skyborne goggle with focus adjustment, the 1280*960 high resolution screen have vivid color and high contrast ration, pilot can see more details in the racing . With Steady View receiver , the receiver merge two signals to one, avoid image tearing and rolling, make image more steady and clear in challenging condition. The new designed optics have focus adjustment feature and 46 degree Field of view, give pilots more immersive FPV experience. The new OS with 10 languages to set select, pilot have no trouble with the menu system, with shuttle wheel and new user interface, pilot can set all the settings just by rolling the wheel without taking off the goggle.
Diversity
Steady View
 |
DO NOT EXPOSE THE LENS DIRECT TO SUNLIGHT, OTHERWISE THE SCREEN WILL BURN IN. |
Quick Start Guide
- Install the antenna and faceplate.
- Use power cables to connect battery to the goggles, Goggles can power by 2~6cell lipo battery, hold the power button to turn on.
- Focus adjustment: move the focus adjustment wheel to focus, close one eye to adjust the focus, you can pop up the OSD menu as the template, when the image is clear, repeat the process with the other eye.
- IPD adjustment: move the IPD slider until there is no double vision of the image.
Band and Channel setting
- Press the right wheel, then roll right wheel to change channel, press the wheel again switch to Band setting mode, then roll the wheel to change the Band.
- No wheel operation for 3 seconds RF setting will back the channel setting mode.
- Hold the right wheel to pop up search menu, press the right wheel to start auto search, after searching all the frequency, receiver will work on the strongest signal. roll the right wheel to manually select the channels, short press the right wheel to quit searching.
 |
Sometime the auto search channel is not accurate, user may need manually select the channel. When in a new Field, auto search can find which frequency is clean and not interfered. |
Volume Setting
- In all mode preview mode, roll the left wheel to adjust the volume. Volume setting is only effective on earbud. Not effective on AV OUT volume.
- System didn’t save the volume setting, in case of the volume is too high in AVIN or RF mode.
- Short press the left wheel to pop up mode menu.
- RF normal: this mode is normal 48 CH receiver mode.
- RF Racing: this mode will make received only work on Racebends.
- RF Third-Party: in this mode, the goggles button cant control the external receiver, also the OSD of the goggles cant read the band/channel of the receiver, third party receiver must plug into left modal bay.
- AVIN: When enable the AV IN mode . The NTSC and PAL system format can be supported to be automatically switched. The receiver module will be automatically turned off to save the power.
- HDMI IN the receiver module and the video recording module will be automatically turned off to save the power.
- It is recognized that the screen and the corresponding resolution information will be automatically displayed in the supported resolution format.
- Playback: in this mode, customer can review the DVR Files.
- Short press right button to pop up or quit system menu.
- Roll right shuttle wheel to navigate, press the wheel into the sub menu.
- In image setting menu, customer have standard, bright, vivid, soft and 3 customized Files to select, customer can adjust Brightness, Contrast, Saturation, Hue and Sharpness to suit different environment.
- In system menu, RSSI can be calibrate, this function only effective on skyborne steady view receiver, when using dual receiver mode, make sure both receiver RSSI is calibrate to get stable image.
- System Language can select in to: English, French, German, Russian, Italian, Portuguese, Spanish, Chinese, Japanese, Korean.
- In Power supply menu, user can choose battery type(2S~6S) to make sure goggles shown real capacity of the battery.
- Voltage calibration gives user ±0.9V range to adjust the voltage, when calibrate the voltage, use multimeter to measure the loaded voltage of the battery, then use shuttle wheel to adjust voltage on OSD to match the real voltage.
- Factory Reset : User can reset all the functions and settings in this menu.
- DVR FW upgrade: User can upgrade DVR Firmware from SD card in this menu.
- Firmware version :Goggles Firmware , DVR Firmware version and Serial Number will shown in this menu.
|
The function of the wheel and buttons can be swapped from left side to the right side , makes to adapt left handed user. when rotary switch is enabled, all the functions in manual is changed from left to right. |
DVR
- Left button is record button and stop button. ·Build in DVR H264 encoding, SD card recommend Class10, SD card can support up to 128GB.
- SD card must be formatted into FAT32 , user can get into system menu to select the Format SD .
- The video recording function can be used in both the RF Mode and the AVIN Mode..
- By default, when recording the video (including: Recording the sound), the “sound recording” function can be turned off in the system menu, but the video signal can be recorded only.
- Automatic recording: enable this function , if the video signal has been detected, the recording function will be activated automatically. The recording function can also manually be stopped by press the REC button.
- Cyclic recording Overwriting of older recordings on or off (in case of storage space is wasted).
- The video recording File will be automatically divided into the multiple Files. In the menu system, the video length can be set as: 5 minutes, 10 minutes, 20 minutes and 30 minutes. The default video length can be set as 30 minutes / each File.
- If the power has been suddenly disconnected in the video recording process, the DVR will be damaged. The goggles have repairing function. After entering into the playback mode, the last DVR will be automatically checked. If it has been damaged, the DVR will be automatically repaired.
PLAYBACK
- In playback mode, roll right wheel to choose the DVR, short press right wheel to play and pause.
- Left wheel to adjust the volume.
- When playing the DVR, roll the right wheel to Fast Forward or Fast backward.
- Press the Right button to quit DVR .
- Press the Left button to delete DVR.
DISPLAY
- In Display setting menu, customer can change the aspect ratio(4:3 or 16:9), default is 4:3.
- In Display menu, customer can set the RSSI icon: icon + percentage, Icon, Percentage, disable, also adjust the vertical position of the RSSI.
- The Luminance of the OLED screen and be adjust in the menu (8 stage, default is 5).Normally do not set the brightness too high unless the image is dim. Due to the OLED’s characteristic, excessive brightness may cause a slight brightness drop in local screen.
- OLED Sleep MODE: To prevent OLED burn out, the goggles have OLED sleep mode, The sleep mode can be set in the menu( 1minute 3minutes 5 minutes, default 3 minutes.) When sleep mode is enabled the goggles will detect the movement of the goggles (via Headtracker gyro), when the goggles stay still to the preset time , the buzzer will beep , after 10 seconds, the goggles will switch to sleep mode , the ogled screen will turn off, move the goggles to quit OLED sleep mode.
- When OLED sleep mode is triggered, the rest functions of goggle is still working (receiver ,DVR etc.).
- OLED Screensaver: The image will move 1pixel/10s, flow the order: middlerightmiddleleftmiddle, circulating. this function can’t turn off.
|
To quit OLED Sleep mode: Move the goggles when hearing beep. |
Head Tracking
- The head tracking button is on the right side of the goggles.
- The gyro required for an initialization time. When it is powered on, goggles must be kept horizontal and stable as long as possible. When hearing the sound of a “beep”, the initialization is done.
- Hold HT button to reset the PPM signal to the center, goggles will beep when press the button. Disable the Headtracker can save the gyro initialization time to speed up goggles boot time.
FAN
- The built-in fan can not only be mainly used for defogging, but also can be used to dissipate the heat within the product. The speed of fan can be set in the system menu.
- Press the POWER button to start up/stop the fan for defogging.
- User can manually set fan speed to adjust the fan noise.
|
The fan will auto turn on when the temperature over a certain point. |
Firmware Update Upgrade Firmware
Goggles
- Connect goggles to the computer.
- Hold the left button when turn on the goggles, the usb cable will power the goggles, release the left button, computer will automatically install the driver , computer will show a new removable storage .
- copy the Firmware File to folder(Not the SD card). goggles will installing the update at the same time.
|
Even enabled the rotary switch function, the boot button is still left button. It will takes about 60s to install the Firmware.. |
DVR
- Take a TF card and format the card to FAT32.
- Copy the DVR Firmware to the SD card , insert it in the goggles and turn it on.
- Go to the system menu and choose DVR FM upgrade.
Receiver Firmware
- Take the receiver out, hold the boot button when connect the receiver to the computer.
- Computer will automatically install the driver , computer will show a new removable storage .
- Copy the Firmware File to the folder(Not the SD card). goggles will installing the update at the same time. it will takes about 60s to install the Firmware.
This content is subject to change, download latest version from:
 report this ad
References
[xyz-ips snippet=”download-snippet”]