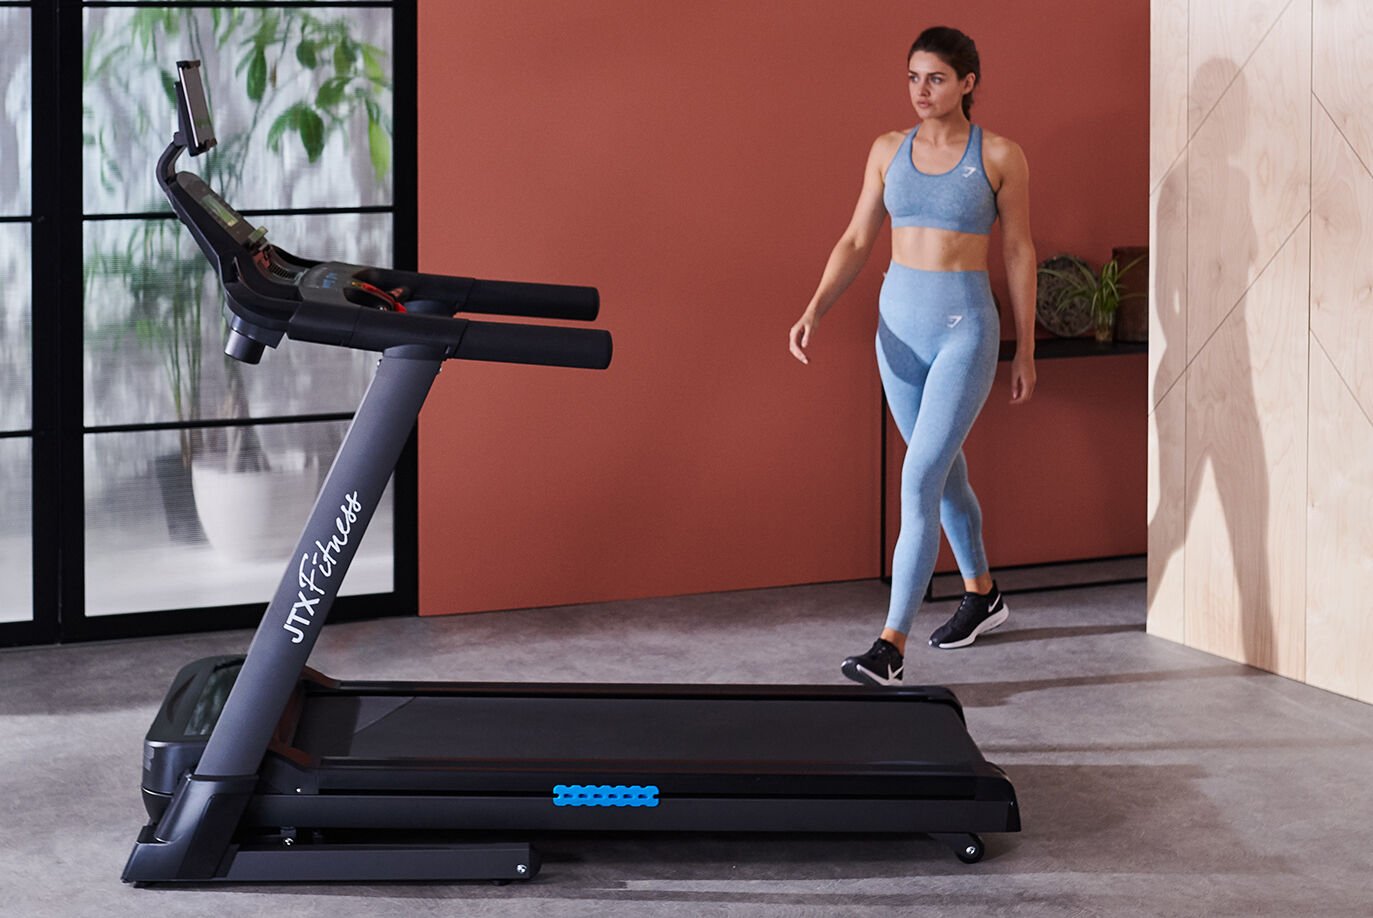
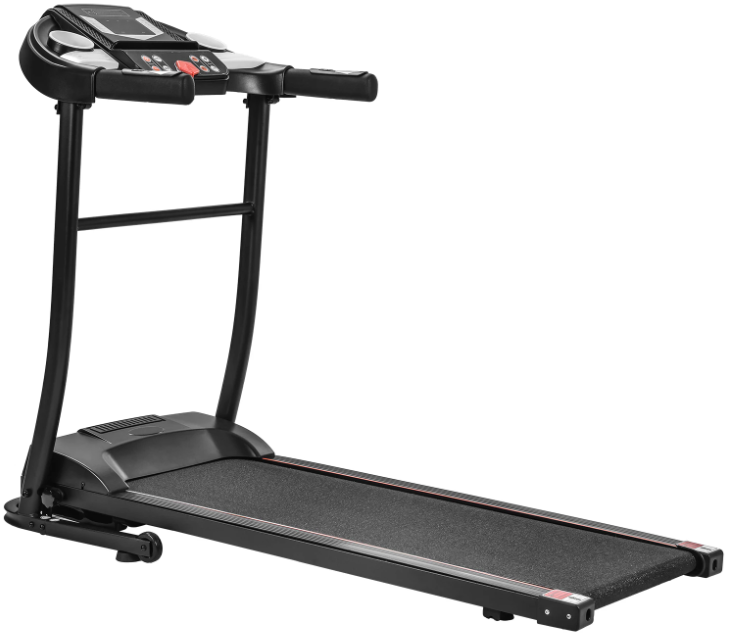
Slim Line Folding Electric Treadmill Motorized Running Machine
PLEASE DO NOT RETURN THE PRODUCT TO THE STOREIf you have any problem or concerns, please feel free to contact the seller.We will reply you as soon as possible.
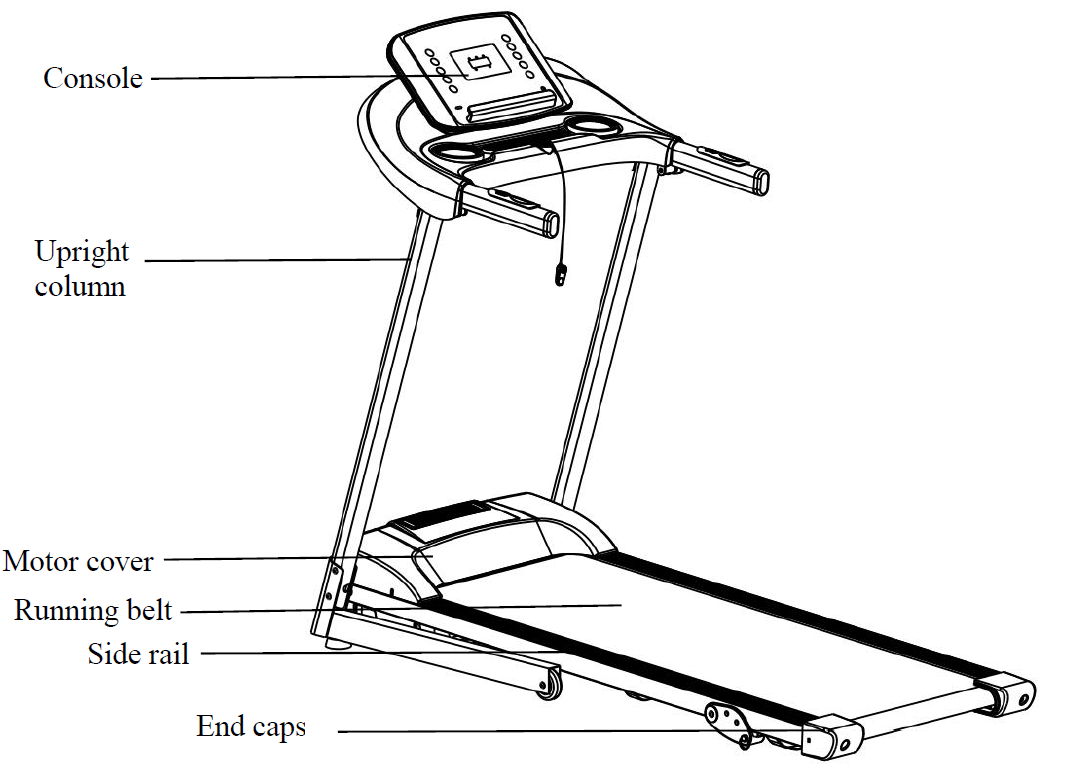
Product Brief
Product name: Folding Electric Treadmill Motorized Running Machine
| Main parameters and parts list | |||||
| Main technical parameters | |||||
| No. | Parameters Names | Description | |||
| 1 | Input Power Voltage | 110V~(50-60Hz) | |||
| 2 | Speed | 0.5-10 mile/h | |||
| 3 | Running Surface | 16.5 x 45.3 inch | |||
| 4 | Functions | Running and walking | |||
| Packing list | |||||
| No. | Name | Units | Qty | ||
| 1 | Main Frame | Set | 1 | ||
| 2 | Accessory Bag | Piece | 1 | ||
| Accessory bag list | |||||
| No. | Name | QTY | No. | Name | QTY |
| 1 | Inner hexagon spanner 5mm | 1 | 6 | User Manual | 1 |
| 2 | Inner hexagon spanner 6mm | 1 | 7 | MP3 Cable | 1 |
| 3 | Combination Wrench | 1 | 8 | ScrewM8*22 | 4 |
| 4 | Safety Key | 1 | 9 | Screw M8*45 | 2 |
| 5 | Silicone Oil | 1 | 10 | Screw M8*25 | 2 |
Security Precautions and Warnings
NOTICE: Please read the instructions carefully before use.
- Indoor using and storing the treadmill, avoid dampness, and cannot be spilled by water.
- Please wear suitable clothes and sneakers before exercise. Prohibited to exercise on the treadmill barefoot.
- High power plug must be grounded, electric outlet should have a dedicated circuit, do not share with other electrical equipment.
- Keep children away from the machine to avoid accidents.
- Avoid too long time and overload operations, otherwise will cause motor and controller damaged, and will accelerate the deterioration of bearing, running belt and running board. Should maintain machine on a regular basis.
- Keep the machine away from dust to avoid strong static.
- Please cut the electric power off after using.
- Please maintain good ventilation when running.
- Please clamp security lock cable on your clothing to make sure the machine stops at emergency condition.
- If you feel not very well when using this machine, please stop and consult a doctor.
- Silicone oil must be kept away from children after use.
- If power cord is damaged, please contact our qualified maintenance personnel for service rather than disassemble it at your own discretion.
Forbidden
- Don’t use the machine in the status of the shell break in or break off (the internal structure exposed) or under the condition of welding-parts may fall off. Otherwise an accident or injuries may happen.
- Don’t jump up and down in the process of movement. May be injuries caused by the fall.
- Don’t keep the machine in or near moist space such as the bathroom.
- Don’t place the machine in direct sunlight, or at high temperature places such as near a stove or a heating appliance. Otherwise may cause the leakage and burst into flames.
- Don’t use when the power cord is damaged or power plug pin is loose. Otherwise will lead to an electric shock, short circuit or fire.
- Don’t damage or bent by force or reverse the power cord. Don’t place heavy objects on machine, don’t clamp the power line. Otherwise will cause fire or get an electric shock.
- Don’t use machine for more than 2 people at the same time, and don’t get close to the machine when it is in use. Or it may be an accident or injuries due to falls.
- People who can’t express their consciousness or can’t operate the machine by themselves cannot use the treadmill. May occur accident or injury. Avoid drinking water or pouring water when operation. May cause electric shock and fire. Forbidden!
- People who seldom do exercise shouldn’t suddenly do intense exercise.
- After eating or when feel tired, do not use machine. May lead damage to your health.
- This product is suitable for family use, does not apply to schools, gymnasium and so on. —- There is the danger of injury.
- Don’t use when hard objects are in pants pockets. May cause accidents or injuries.
- Don’t use when the power plug is on the needle, garbage, or water. May cause electric shock, short circuit, or fire. Do not use with wet hands!
- When not in use, pull out the power plug from the socket. The dust and moisture can age the insulation, and result in leakage fire.
- This appliance is not intended for use by persons (including children) with reduced physical, sensory or mental capabilities, or lack of experience and knowledge, unless they have been given supervision or instruction concerning use of the appliance by a person responsible for their safety.
- Children should be supervised to ensure that they do not play with the appliance.
Ground protection system!
- This product must be grounded. If the machine is dysfunctional, grounding will provide a good channel for electric current, in order to reduce the electric shock risk.
- This product is equipped with power plug with grounding conductor and plug. Completely insert the plug to standard socket.
- If the equipment grounding conductor’s connection is improper, it will cause electric shock. If you have doubts about whether your product is grounded correct or not, please entrust professional to check.
- Please use the socket which has the same shape with the grounding plug. Don’t use plug adapter.
Installation Instructions
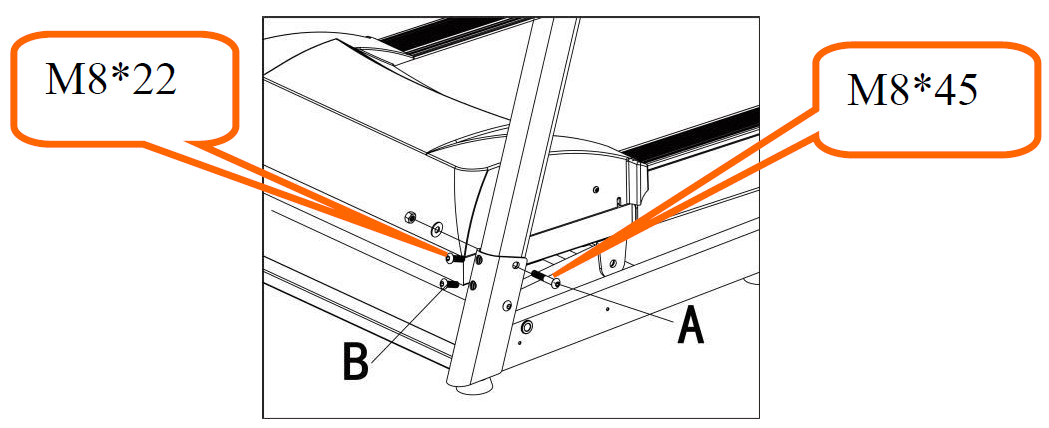
When installing the treadmill, simply fix all screws first, and then tighten them when the installation of frame is done.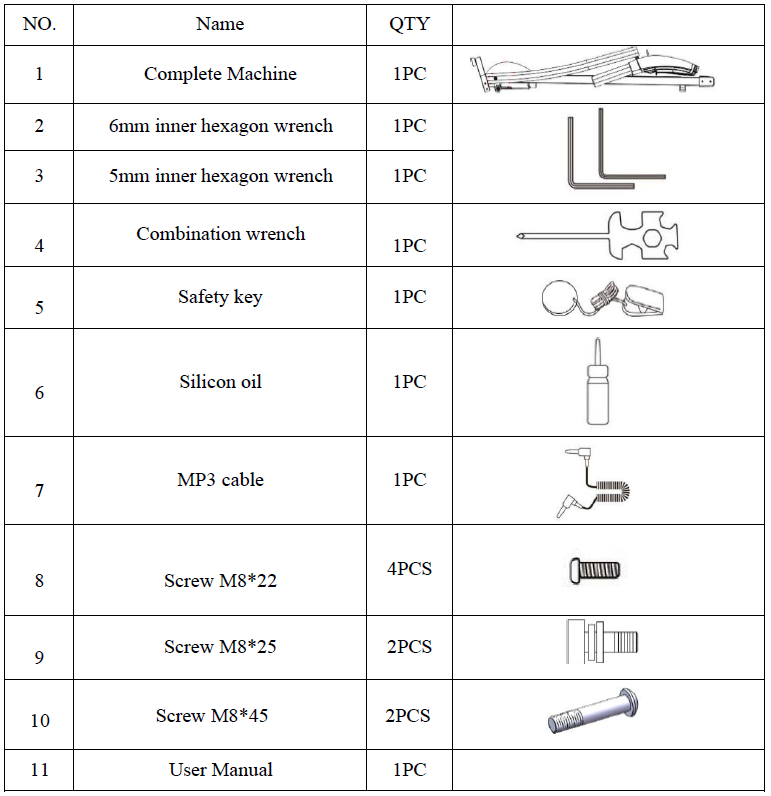
- Place the machine flat on the ground. Raise the supportive columns and console upward in the direction shown by the arrows in the picture below.

- Fix the column on the base. Use a 5# inner hexagon wrench, screws M8*45 to lock the right side/ left side columns onto the base, then use screws M8*22 to fix the column on the base.
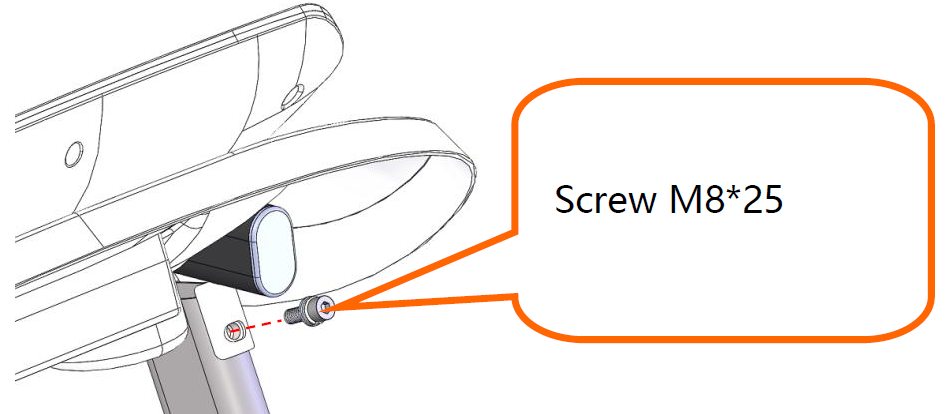
- Secure the console frame to the upright columns. Hold the left and right columns upright, then using a #6 hexagon wrench, screw in the M8*25 screws to secure the console frame to the upright columns. Be sure to tighten any screws installed in previous steps. Take care to not accidentally clamp the cable between the upright columns
- Put the safety key on the yellow circle of the console.(Notice: The treadmill only starts when the safety key is attached to the yellow circle on the console.)NOTE: after you have finished putting the treadmill together, ensure that all screws are installed in their appropriate places according to the previous steps. Please ensure all parts are properly locked in and secured by screws before plugging in electricity.

 NOTE: after you have finished putting the treadmill together, ensure that all screws are installed in their appropriate places according to the previous steps. Please ensure all parts are properly locked in and secured by screws before plugging in electricity.
Folding instructions
Fold the treadmill:It saves space when the treadmill is folded. Please turn off the switch and pull the power plug out before folding. Lift the running deck until it is held. Unfold the treadmill: Kick the pressure rod, and let the running deck lower down gradually.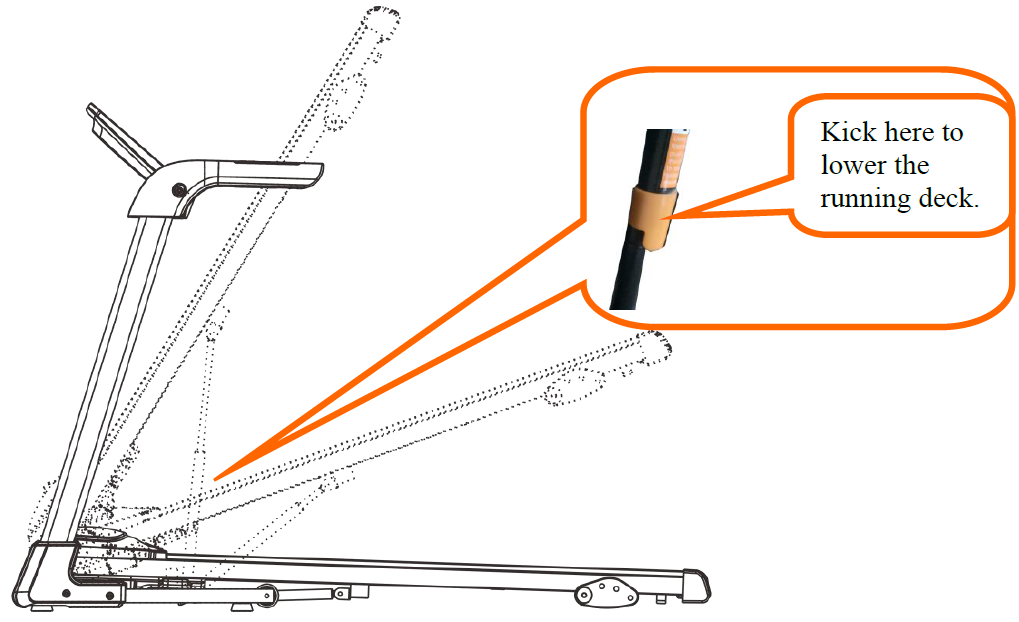
Using the treadmill
- Insert the power plug into a proper outlet and turn on the red switch located at the base of the treadmill (1). When the light is on, you will hear a beep sound and the treadmill display screen will light up.
- Please keep the safety key away from children when the treadmill is not in use. Please put the silicon oil bottle in a place where children cannot reach. If the silicon oil gets into the eyes or is ingested, please flush with running water and consult a doctor immediately.
- Safety key Introduction The treadmill can only start when the safety key is put on the yellow circle on the treadmill console. Clip the safety key onto your clothes when using the treadmill to prevent accidents. Put the safety key back on the yellow circle when the treadmill is not in use.

Console Instruction
Button InstructionsIt typically takes a 3 second countdown for the treadmill starts functioning.Programs and ModesThere are 3 modes and 12 automatic programs.Safety Key FunctionWhen the safety key is disconnected, “E7” will appear on the screen, the treadmill will gradually stop and you will hear a beeping sound. If you put the safety key back, all of the data on the screen will be cleared in 2 seconds. Under any circumstance, the treadmill will stop when disconnected from the safety key and it will immediately show the data from your run on the screen. Once you put the safety key back, the data on the screen will reset.
Key Function
- Start/Pause button, Stop button:When the power is on, press the start button and the screen will display “0.5 mile/h”, and the treadmill will start. When you are running on the treadmill and press pause button, the treadmill will stop while the data on the screen will not be cleared. Pressing start button again will start the treadmill and the data keeps accumulating based on the paused values. When you are running on the treadmill, press the stop button, all of the data on the screen will clear and the treadmill will gradually come to a complete stop and return to manual mode.
- Speed ± buttonUse these buttons to adjust the speed of the treadmill in 0.1mile increments. Press the ‘+’ key to increase the speed by 0.1mile and ‘-’ to decrease the speed by 0.1mile.
- Play/Pause keyWhen the music is on, press Play/Pause to pause the music. Press the button and the music will go on.
- Program buttonWhen the treadmill is in standby mode, pressing the program key multiple times can cycle the options from manual mode to different automatic programs (P1-P12). The default speed while using manual mode is 0.5 mile/hour, the highest speed is 10mile/hour.
- Mode buttonWhen the treadmill is in standby mode, press the mode key to cycle through 3 different ways to countdown your running: time, distance and calories. H-1: Time countdown mode. The default countdown time is 15 minutes. The time value can be set from 5:00-99:59 H-2: Distance countdown mode. The default distance is 1 mile. The distance value can be set from 1-99mile. H-3: Calorie countdown mode. The default countdown starting point calorie value is 50 calories. The starting countdown calorie value can be set from 10-999 calories.
- Volume ± buttonWhen connected to your mobile phone, press the ‘+’ to turn the volume up and press the ‘-’ to turn the volume down.
- AUX functionConnect your phone to the treadmill with the auxiliary cable in the accessory bag. Press play on your phone and the music will play through the speakers on treadmill.
Display Function
- Speed DisplayDisplays how fast you are running.
- Time DisplayDisplays how long you have been running when the treadmill is on manual mode, displays a countdown timer when the treadmill is on an automatic mode or a program.
- Distance DisplayDisplays the total distance ran when the treadmill is on manual mode or programs. A countdown of a set distance displays when the treadmill is in automatic mode.
- Calorie DisplayDisplays total calories burned when the treadmill is on manual mode or programs. A calorie countdown is displayed when the treadmill is in automatic mode.
- Heart rate displayThe heart rate value will show on the display when you place your hands on the heart rate monitors.
Treadmill Automatic ProgramsThe treadmill has pre-set programs installed. Each program is divided into 10 segments while you are running. The time spent running during reach segment throughout the duration of the program is evenly distributed. Users can adjust the overall duration of a segment by pressing the speed buttons.
| Time
Programs |
Set time / 10 = running time of each period |
||||||||||
| 1 | 2 | 3 | 4 | 5 | 6 | 7 | 8 | 9 | 10 | ||
| P1 | SPEED | 3 | 3 | 6 | 5 | 5 | 4 | 4 | 4 | 4 | 3 |
| P2 | SPEED | 3 | 3 | 4 | 4 | 5 | 5 | 5 | 6 | 6 | 4 |
| P3 | SPEED | 2 | 4 | 6 | 8 | 7 | 8 | 6 | 2 | 3 | 2 |
| P4 | SPEED | 3 | 3 | 5 | 6 | 7 | 6 | 5 | 4 | 3 | 3 |
| P5 | SPEED | 3 | 6 | 6 | 6 | 8 | 7 | 7 | 5 | 5 | 4 |
| P6 | SPEED | 2 | 6 | 5 | 4 | 8 | 7 | 5 | 3 | 3 | 2 |
| P7 | SPEED | 2 | 9 | 9 | 7 | 7 | 6 | 5 | 3 | 2 | 2 |
| P8 | SPEED | 3 | 4 | 4 | 4 | 5 | 6 | 8 | 8 | 6 | 2 |
| P9 | SPEED | 2 | 4 | 5 | 5 | 6 | 5 | 6 | 3 | 3 | 2 |
| P10 | SPEED | 2 | 5 | 7 | 5 | 8 | 6 | 5 | 2 | 4 | 3 |
| P11 | SPEED | 2 | 5 | 6 | 7 | 8 | 9 | 10 | 5 | 3 | 2 |
| P12 | SPEED | 2 | 3 | 5 | 6 | 8 | 6 | 9 | 6 | 5 | 3 |
Error Code Translations
| Error Code | Possible Causes | Solution |
|
E1 |
Disrupted Electronic Connection: When turned on, the connection between the lower controller and the console is abnormal. |
The electronic connection between the console and lower controller is blocked, check each wire that connects the console with the lower controller, and make sure that wire base is fully plugged in. Check the cable of the console and lower controller, replace it if it’s broken. |
|
E2 |
No motor signal |
The motor cable might not be connected.
Check the connection, connect the cable if disconnected. The motor might be damaged. Check to see if it has visible damage or a burnt smell. If yes, replace the motor. |
|
E5 |
Electric Current Overload Prevention: When the treadmill is running, the controller detects the electric current is over 6A (unit to measure electricity) for more than 3 seconds |
* Overloading the treadmill machine system through prolonged use can lead to excessive electric current and the treadmill will stop for your safety. * Something might be stuck causing the motor to stop, adjust the treadmill and restart it. * The motor may need to be replaced. Check if there is liquid or burnt smell while the motor is running, replace it if yes. * The treadmill monitor may need to be replaced. Check if it has a burning smell, replace the monitor if yes. * The power supply voltage may need to be changed, check the power supply voltage if it does not match specifications adjust to the correct voltage and test the treadmill again. |
|
E6 |
Explosion Prevention: An abnormal voltage level or motor issue has caused the motor to not work properly |
* The power supply voltage may be low. Check if the power supply voltage is 50% lower than the normal voltage of 110V, if it is, adjust it back to 110V and test the treadmill again. * The controller may need to be replaced. Check if the controller has a burning smell. Replace the controller if yes. * The motor cable or wire may need to be reconnected. Check if the motor cable and wire are connected, connect if one or both are not properly connected. |
|
E7 |
No safety key |
Put the safety key back on the yellow circle on the console. |
Routine Maintenance
WarningBefore cleaning or doing product maintenance, please ensure the treadmill power plug is pulled out of the electric socket. Ensure that the power plug is disconnected before removing the motor cover. Clean the motor at least once a year.CleaningThoroughly cleaning your treadmill will extend its usage life. Remove dust periodically in order to keep the parts clean. Be sure to clean both sides of running belt, this will reduce the accumulation of dust and dirt. Treadmill belts must be cleaned with a damp soapy cloth. Do not use a dripping wet cloth. Please be sure to not wet the electrical components of the treadmill including underneath the running belt to keep everything dry and functional.Running Belt LubricantThis electric treadmill’s running board and running belt have already been lubricated in the manufacturing process. Friction between the running belt and running board heavily impacts how long your treadmill will last and its performance, therefore regular application of the lubricant is needed. Please check the board regularly to ensure it is properly lubricated. If the board’s surface is damaged, please contact our customer service center. We recommend applying the lubricant between the running belt and running board using the following schedule: Light user (uses treadmill less than 3 hours a week): Apply lubrication once a month. Heavy user (uses treadmill more than 7 hours a week): Apply lubrication twice a month, at the beginning of the month and halfway through the month.
- For safety concern and to extend the life of your treadmill, it is recommended that if you use the treadmill for 2 hours or more non-stop, to turn off the machine and let it rest for 10 minutes before using again.
- If the treadmill belt is too loose, you will experience skipping while running. If the belt is too tight, it may reduce motor performance and increase friction between the roller and running belt impacting your running experience. You can lift two sides of the running belt for 50-75mm where the tightness is appropriate.
- Running with adjusted alignment and tightness To make sure you treadmill function properly, it is necessary for you to adjust the running belt into the best position.How to align the running belt
- Put the treadmill flat on the ground
- Make the treadmill run at a speed of about 2-4mile/hour
- If the running belt is closer to the right, rotate the right adjusting bolt with a ½ turn clockwise, then rotate the left adjusting bolt with a ½ turn counter-clockwise (Picture B)
- If the running belt is closer to the left, rotate the left adjusting bolt with a ½ turn clockwise, then rotate the right adjusting bolt with a ½ turn counter-clockwise (Picture A).

Applying the treadmill silicone oil
Step 1: Lift the running belt slightlyStep 2: Open the silicone oil bottle, squeeze the silicone oil on the sides of the running board as shown in the following picture: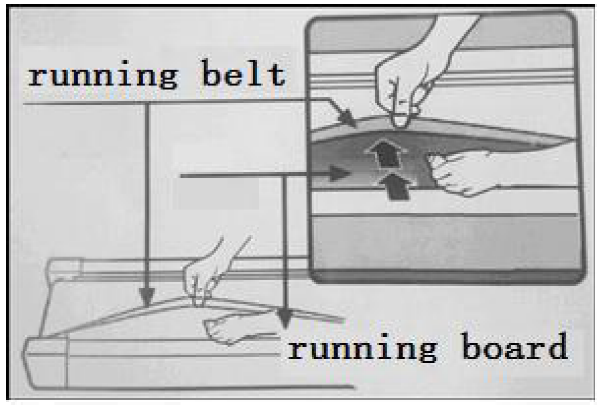
![]()
[xyz-ips snippet=”download-snippet”]