
LEM4 pro 3G Intelligent Watch
User Manual
Please refer to the User Manual before using this device.
V 1.0
1. Precautions
1.1 The Company reserves the right to make any change to this manual without noticing its customers. It may happen that some features are different in specific software versions.
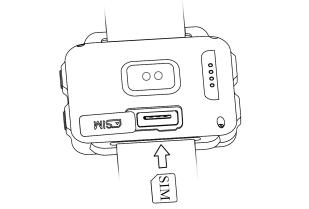
1.2 Please open the SIM card cover before mounting a SIM card. When mounting a SIM card, please keep its unfiled corner to the upper left and insert it into the slot with a gentle push. When demounting a SIM card, just gently push its bottom to pop it out. This device only support Nano SIM cards. Please turn off its power when handling a SIM card.
1.3 Before using this device, please fully recharge it with a mobile adapter and the special recharging line in the packaging. Please disconnect the adapter as soon as the watch is fully recharged. The metal pins on the recharging line shall not contact other metal objects when connecting to power or short circuit may happen.
1.4 Network mode of the device: GSM: 900\ 1800850\ 1900. 3G WCDMA: 850\ 2100. It does not support CDMA network.
2. Product Overview
2.1 Basic information

2.2 Basic operation of the device
1. Boosting the device for the first time may cost longer time since the system needs to configure parameters. So please wait patiently.
I) Set the language according to your need;
II) Set your body parameters including weight and height, as well as your gym goal;
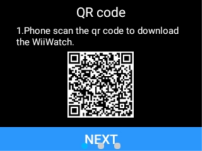
III) Scan the QR code using your mobile phone and download the synchronization application to connect the device with your phone; the device can be connected with your phone through the software using Bluetooth, in order to synchronize relevant information on your phone to the shortcut interface on the device, so that you can read it easily.
2. After turning on the power, press on the power button to carry out the following operations: Switch OFF, Restart, and Recent Tasks. You can find applications recently used from recent tasks and remove them away from the backstage to release memory.
3. Interface display switch button for applications installed by the user (on top of the menu, enabling you to switch the display of applications installed by users between Small display and Full display).
2.3 Dial Setting
Design sketch and setting of the dial: Press on the dial for 2 seconds before popping out the design sketch of the dial. Slide to the left or right to choose your favorite dial and press Confirm button (refer to the product for more dial designs).


3. QuickStart Guide
3.1 Download the synchronization application

(WiiWatch download link)
Connection guide for Android
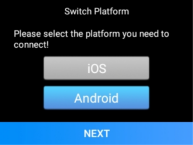
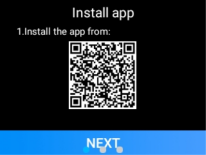
1. Set language and other parameters at the time of boosting for the first time. Then choose Android and press Next.
2. After entering the QR code screen, scan the QR code with suitable applications on your mobile phone (except WeChat); or download the application by searching “WiiWatch” at Google Play (oversea users) or other application stores.
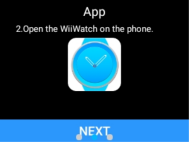
3. After downloading and installing this App, activate Bluetooth on your phone and launch the synchronization App “WiiWatch”.

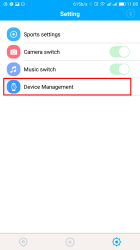
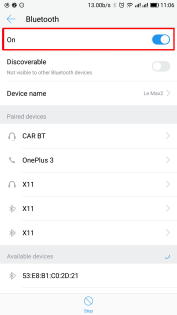
4. Make sure that both your watch and the Bluetooth of your mobile are activated. Enter the device management screen by tapping the ![]() icon after switching to the setting screen by tapping the
icon after switching to the setting screen by tapping the ![]() icon on your phone. Then choose this watch device from the device list generated from automatic search.
icon on your phone. Then choose this watch device from the device list generated from automatic search.


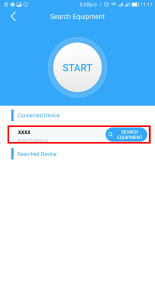
5. Name of the device will be displayed in the red frame after being connected, when pairing of your phone and the watch is successful. Now the App will synchronize data and the watch can realize corresponding functions. Press the red frame to disconnect the device.
6. From the second connection, you can press the “Start” button to search the watch and “Close” button to cancel the search.
Connection guide for IOS
1. Set language and other parameters at the time of boosting for the first time. Then choose IOS and press Next.

2. After entering the QR code screen, scan the QR code with suitable applications on your mobile phone; or download the application by searching “WiiWatch” at the App Store.
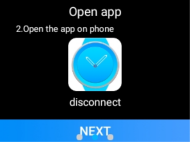
3. After downloading and installing this App, activate Bluetooth on your phone and launch the App “WiiWatch”.
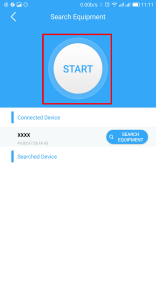
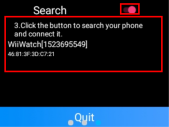
4. At the QR code screen, slide to the left to the search screen on the watch. Press the search button to start and a second press will end the search. (Make sure to activate the Bluetooth on both devices and open the “WiiWatch” App on your phone, or the device cannot be found)

5. Press on the device from the search list to connect it. The pairing process takes about 30 seconds. Press “Pairing” when it pops out on your phone.


6. After successful connection, the App will synchronize data and the watch can realize corresponding functions.
Caution:
1. Make sure the Bluetooth is activated on both devices during connection.
2. In case of switching the platform, press “Platform Switch” on the watch menu. The watch shall be rebooted.
3. Please enable the notification permission when it pops out on your phone, in order to easily check App notifications.
4. You may not be able to install on some Android phones. In this case, please activate “Unknown Source” from “Security and Privacy” at settings of your phone.
5. IOS users need to search devices from the searching screen on the watch when boosting for the first time. From then on, they will be able to search devices by opening “Connecting Mobile phone” from the menu screen of the watch.
6. Please keep the synchronization App running at background and make sure not to turn them off when cleaning up applications on Android phones. How to set up background operation: Open the setting screen — Application control — Find WiiWatch — Permission control — Background control — choose to permit background operation. (The setting process may differ due to different phones and versions of the system)
7. If you have obtained this application from other channels, please check its version and make sure to use the latest application for a better use experience. Please update the application as soon as possible if there is a new version.
3.2 Introduction of Major Functions in the Menu
1. Telephone: Tap the telephone icon to enter the dialer interface. In dialer interface, slide to the left to check the shortcut of “Call Record” and “Contacts”.
2. Contacts: You can search, add, delete and synchronize your contacts with this function.
a. Create new or edit your contacts
b. Tap the Create New Contact icon in the contact list screen
c. Tap a existing contact or use the menu button to edit, delete or apply other operations to such contacts
d. Save the name and phone number of a contact
e. Contacts of an Android phone can be synchronized to the watch, but IOS does not support this feature
3. Message: Send or receive messages.
4. Notification: Drag the standby screen to the right to check your notifications. Tap a notification to view its contents under full screen.
5. Weather: Drag the standby screen upward to check the weather. The latest weather information shall be displayed under normal network.
6. Main menu: Drag the standby screen to the left to enter the main menu.
7. Music player: Drag the standby screen to the left to enter the main menu. Then drag the screen to the left again to enter the music player screen.
8. Heart rate measurement: Enter the main menu – Health – Heart rate: This is dynamic heart rate measurement. Slide to the right to exit. Tap the historical records to check the latest 20 records, showing the average / maximum / minimum value of each measurement.
9. Pedometer: It displays step number, distance and other information. The data shall be saved and restored to 0 at 0 o’clock each night. Slide to the left to check the calorie information and total records.
10. Browser: Enter a URL to surf the Internet.
11. Alarm clock: The default screen is an alarm clock. Slide to the left to enter stopwatch screen.
12. Camera: It can take photos or videos with the local camera of the watch. Photos and videos will be saved to the gallery.
13. File management: Enter to check the memory condition and document storage.
14. Bluetooth converse: Slide to the left to enter the setting screen and apply pairing with your mobile phone. After Bluetooth pairing, you can make phone calls through the watch and synchronize the call records and contacts from the phone. Note: During pairing with an Android phone, it may ask for permissions to visit contacts and call record. Please check these items or you may not be able to synchronize call record and contacts information. If you cannot synchronize contacts from an iPhone, please find the Bluetooth connection of the watch from Settings – Bluetooth on your phone. Then tap the i icon on the right and enable the “Synchronize Contacts” switch.
15. Remote camera: You can control your mobile phone camera with your watch and store photos to your phone. Photos will be stored in a third-party application photo clip under Android system.
16. Remote music: You can control the music player with your watch and choose the previous or next song, play, pause, or add or reduce the volume.
17. Switch the platform: Switch the platform according to the phone system and then connect to the phone.
18. Mobile phone connection: Connect to a PC suite according to the guidance and synchronize data.
19. Find my equipment: After pairing, you can find your phone within the connection range by ring an alarm on the phone.
20. Settings: This enables various settings of the device, such as WiFi, GPS, Bluetooth, brightness, volume, language and other operational settings.
4. Attention during Use
4.1 Please fully recharge the device before use. It takes about 2.5 hours to recharge it.
4.2 You can use an Android phone adapter together with our special magnetic absorption recharging line. Make sure the magnetic absorption works well during recharging.
4.3 If the Bluetooth connection is disconnected due to long distance, you will not be able to use the “Find my device” function before reconnection.
4.4 If some functions do not work after connecting with a PC suite, please delete the Bluetooth pairing information and reconnect. If the connection process does not proceed according to the manual, it may result in abnormal connection, making some functions unavailable.
5. Trouble shooting
Please refer to the following items when coming across with any failures during use. If the failure still exists, please contact the distributor or designated maintenance personnel.
5.1 Cannot boost the device
A. Too short press time. Press on the power button for over 3 seconds.
B. Low battery, please recharge the device with an adapter.
5.2 The watch powers off automatically
C. Low battery, Please recharge the device with an adapter.
5.3 Very short use time of the watch
D.The battery is not fully recharged. Please make sure it is recharged long enough.
E. Some power-consuming features have been enabled, such as raising-hand display, visiting 3G network, using GPS and so on.
5.4 The watch cannot be recharged normally
F. Make sure the adapter works well and try to replace with a new adapter (the adapter shall be 5V-1 to 2A).
G. Make sure the recharging line is tightly connected. Please try to reconnect it.
5.5 Watch network failure
H. Make sure it is correctly connected with WiFi and try to reconnect it. Or insert a valid USIM card and turn on its mobile data network
5.6 Cannot dial
I. Make sure a SIM card has been mounted and the signal is strong enough. Please try again under strong a strong signal.
LEM4 pro 3G Intelligent Watch User Manual – LEM4 pro 3G Intelligent Watch User Manual –
[xyz-ips snippet=”download-snippet”]