![]()
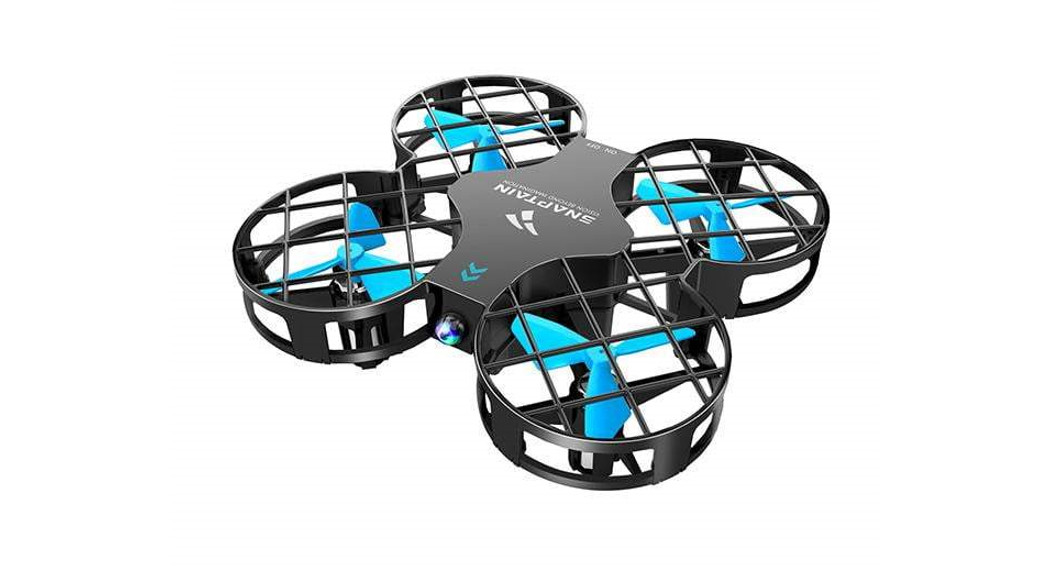
H823H Mini DroneUSER MANUAL
DISCLAIMER AND SAFETY GUIDELINES
- DO NOT look directly into the drone light.
- DO NOT treat the product as household waste.
- DO NOT fly above or near obstacles, crowds, open water, public road, high voltage power lines, or trees.
- DO NOT use the drone in severe weather conditions. These include wind, snow, rain, smog, hail, lightning, tornadoes, or hurricanes.
- Stay away from the rotating propellers and motors to avoid some tiny objects (e.g. hair) getting into them.
- This drone does not come with a GPS module. Please fly the drone within the control range.
- Be sure to observe all local regulations, obtain appropriate authorizations and understand risks. Please note it is solely your responsibility to comply with all flight regulations. CAPTAIN accepts no liability for damage, injury, or any legal responsibility incurred directly or indirectly from the use of this product. The user shall observe safe and lawful practices including, but not limited to, those set forth in these Safety Guidelines. CAPTAIN reserves the right to update this user manual.
MAINTENANCE AND CARE
- Thoroughly check the drone after a crash or violent impact.
- Do not charge battery before it cools down.
- Remove the batteries if the products will not be in use for a long time.
- Do not over charge the battery. Unplug the charger once it’s fully charged.
- Store the drone and remote in a cool, dry place away from direct sunlight.
- Do not charge the battery next to inflammables, such as carpet, timber floor etc., or on the surface of electro-conductive objects. Please always keep an eye on the battery while charging.
- Please use the original battery provided. Use an incorrect type of battery may lead to fire hazards.
- Do not dispose of the battery in fire or a hot oven, cut or mechanically crush the battery, as this may cause explosions.
- Do not leave the battery in an extremely high-temperature environment that can result in an explosion or the leakage of flammable liquid or gas.
- Do not expose the battery to the extremely low air pressure, as this may result in an explosion or the leakage of flammable liquid or gas.
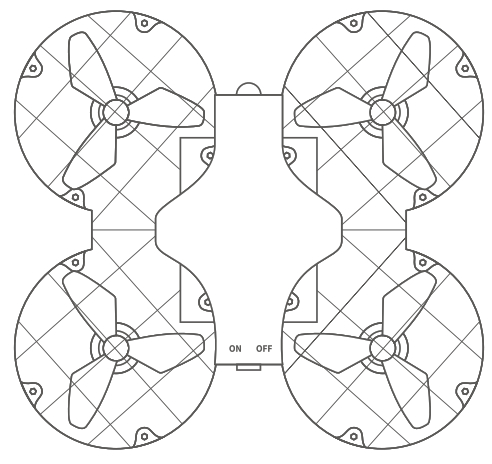
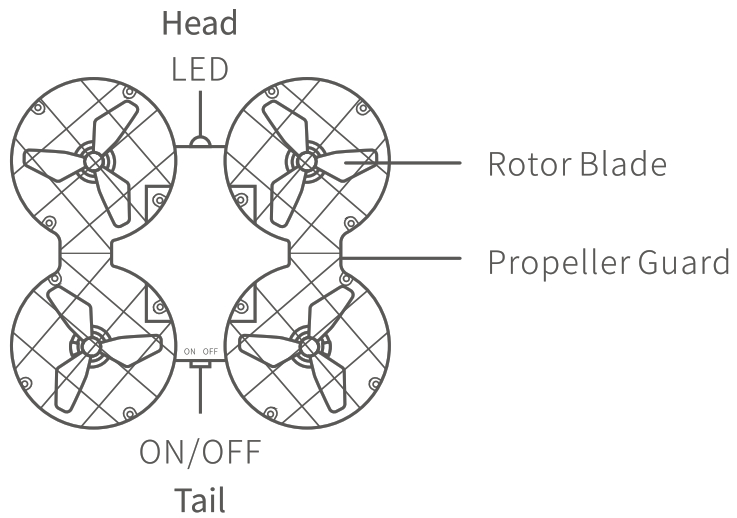
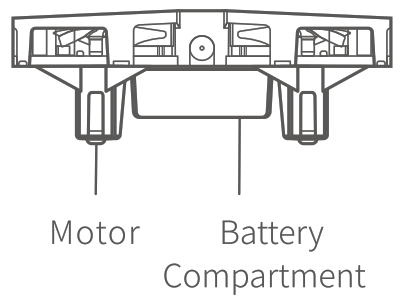
PRODUCT OVERVIEW

Note: Press and hold the One Key Take-off/Landing button for 3s to make an emergency stop.
 |
 |
FLIGHT PREPARATION
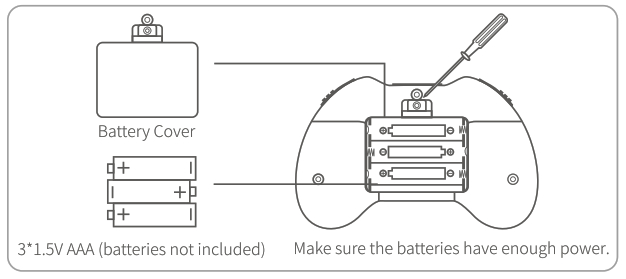
- Install the remote batteries.

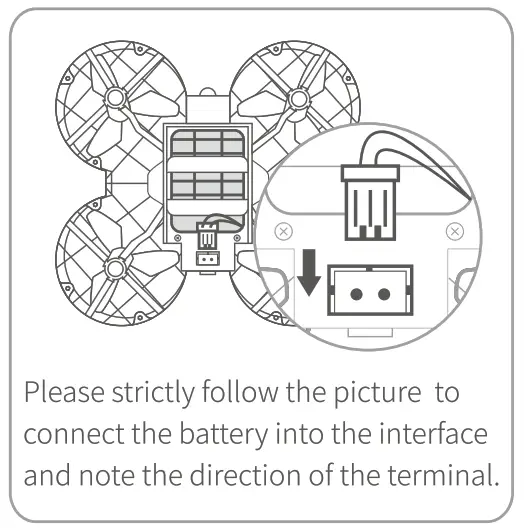
- Charge the battery of the drone.
- Install the drone battery after it’s fully charged.Tips1. For your safety, please use the original battery and USB cable.2. Flight time of the battery may be reduced when flying in cold weather.3. Free the battery of any sharp objects that could puncture into the battery to avoid risks of explosion and fire.4. There is a continuous beeping sound from the remote and the LED on the drone will flash quickly when the battery of the drone is low.5. To extend the battery’s lifespan, recharge it at last once every three months if not for long periods of time. using

 Tips1. For your safety, please use the original battery and USB cable.2. Flight time of the battery may be reduced when flying in cold weather.3. Free the battery of any sharp objects that could puncture into the battery to avoid risks of explosion and fire.4. There is a continuous beeping sound from the remote and the LED on the drone will flash quickly when the battery of the drone is low.5. To extend the battery’s lifespan, recharge it at last once every three months if not for long periods of time. using
FLIGHT OPERATION GUIDE
Note:“Make sure you power on the drone first, then the remote in each flight.* Do repeat the pairing procedure each time when the drone or remote is restarted.* For all flight functions and modes, the operator and tail of the drone must be aligned.
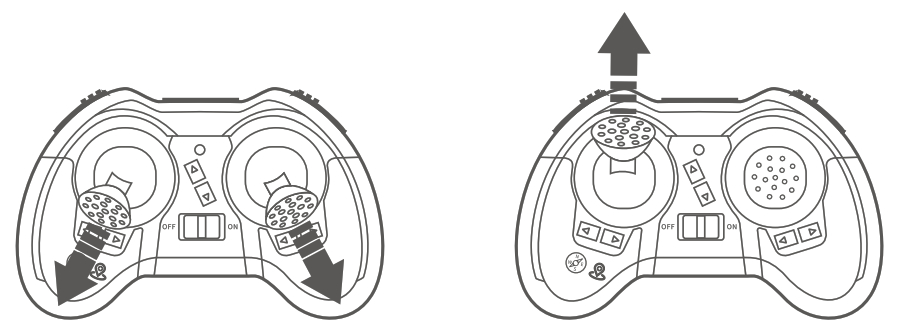
Pair the Remote with the Drone
Step 1: Turn on the drone, then the remote. The LED on the drone starts to flash, then put the drone on a flat surface with the head forward.Step 2: Push the Left Control Stick forward to the top, then pull it back till the bottom. Pairing is successful when the LED on the drone is solid.
Flight Calibration
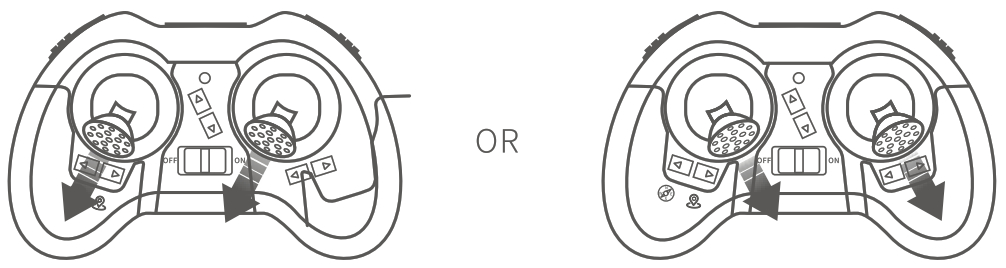
Move both control sticks to the lower left in 45°or lower right in 45° and hold for 2-3 sec after the pairing. The calibration completes when the LED on the drone turns to solid on from quikk flash.
Instructions of the Remote
Left Control Stick
|
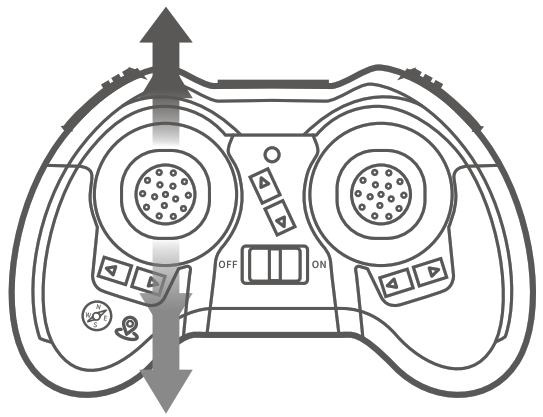
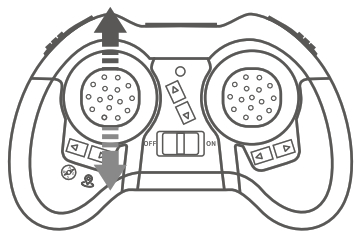
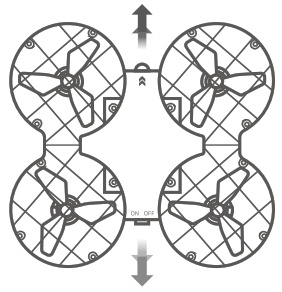
Ascend and descend RN
|
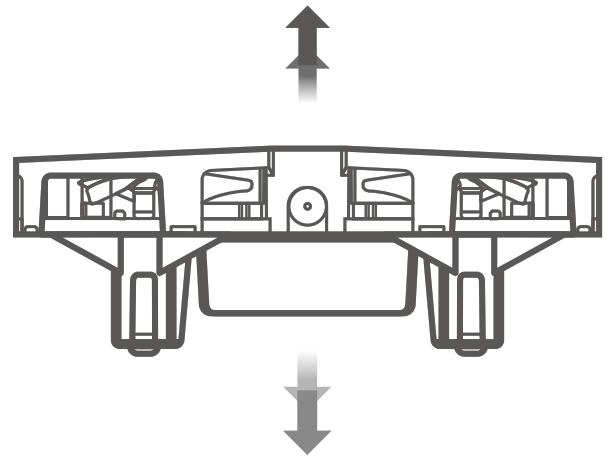 |
Push the Left Control Stickforward and the drone will ascend; pull itbackward and the drone will descend |
|
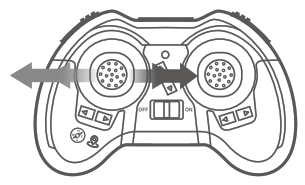
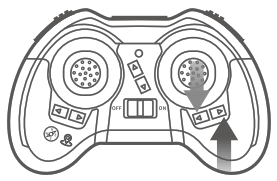
Rotate Left and Rotate right
|
 |
Pull the Left Control Stickleftward and the drone will rotate to the left; pullit rightward and the drone will rotate to the right. |
Right Control Stick
 |
 |
If the drone drifts forwardor backward when flying, press the Backward Trim button or the ForwardTrim button to adjust. |
 |
 |
If the drone drifts leftwardor rightward when flying, slightly press the Rightward Trim button or the Leftward Trim button to adjust. |
Altitude Hold/HoverThis is one of the default settings in the drone. When you release the Left Control Stick after the ascending/descending action, the drone will hover at the current flight height. For a stable flight, press the trim buttons to adjust accordingly.
Take-off
Option 1:Press the ![]() button to take off.
button to take off. Option 2:Move the Left Control Stick to the lower left at 45° and the Right Control Stick to the lower right at 45° at the same time until four rotor blades start rotating, then slowly push the Left Control Stick forward to take off.
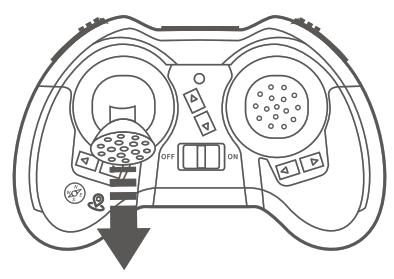
 Option 3:Place the drone in your pair with the LED indicator in the front, then gently throw it into the air.
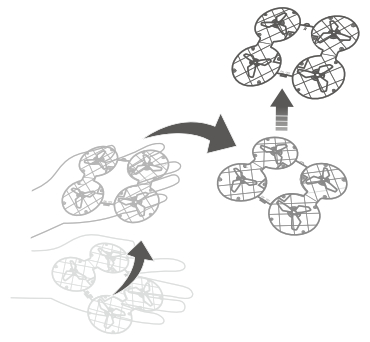 * Please make sure there is enough space while throwing the drone up. We recommend this option only when the operator is skilled in basic operations.* Do not throw the drone to go when its LED flashes quickly. Please restart the drone and remote, repeat the pairing and calibration procedures, then throw again.
LandingOption 1:Press the ![]() to land during the flight.
to land during the flight.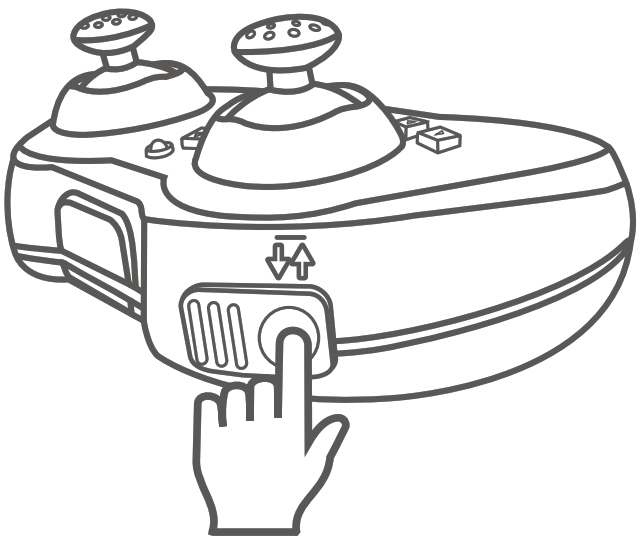 Option 2:Pull the Left Control Stick backward to the bottom to land the drone, and hold it for 3s at least until all the rotor blades stop rotating.
 360° FlipAfter flying the drone to a height over 2 meters, press the Right Control Stick down to activate the 360° Flip function and there is a beeping sound from the remote for 3-4 seconds. (The 360 Flip mode will be canceled if there is no motion after beeping). Then move the Right Control Stick forward/backward/leftward/rightward to flip the drone 360° accordingly.
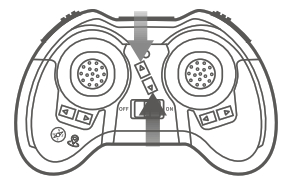
 Speed SwitchThe drone is set to low speed by default. Press the Left Control Stick down once for medium-speed and there are two beeps from the remote. Press it down again for high speed and there are three beeps from the remote. A third press will get back to low speed and there is one beep from the remote.

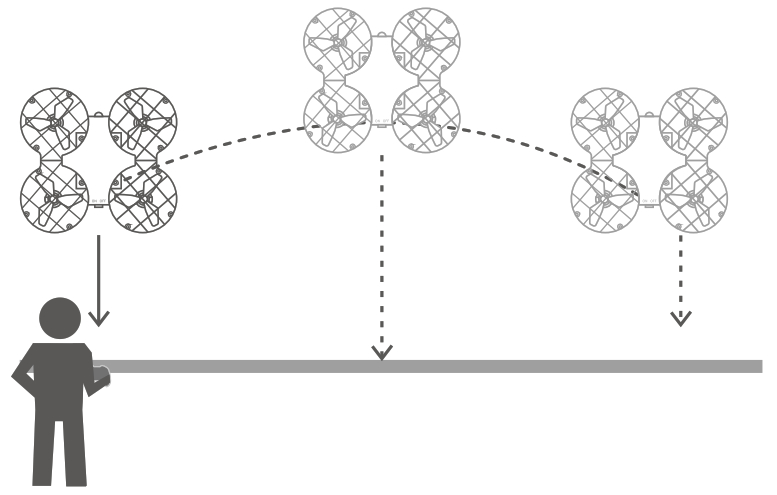
One Key ReturnPress the ![]() button, the drone will fly toward its back following a path that parallels with its original take-off path. Press the button again to cancel the mode.
button, the drone will fly toward its back following a path that parallels with its original take-off path. Press the button again to cancel the mode.
Headless ModePress the ![]() button to activate the function. In this mode, the drone will fly following the direction of the Right Control Stick regardless of the position of your drone’s head or the tail. The LED on the drone will flash and there is a beeping sound from the remote. Press the same button again to exit this mode.
button to activate the function. In this mode, the drone will fly following the direction of the Right Control Stick regardless of the position of your drone’s head or the tail. The LED on the drone will flash and there is a beeping sound from the remote. Press the same button again to exit this mode.
![]()
TROUBLESHOOTING GUIDE
Q1: The LED doesn’t turn on after the battery is installed.* Make sure the power switch on the drone is turned ON.* Make sure there is enough power in the drone battery.* Make sure the connectors of the battery are plugged in firmly.
Q2: The drone LED keeps flashing and the control input is unresponsive after switching on the drone and remote.* There is no connection between the drone and remote. Pair them again as instructed.
Q3: The motors don’t respond to the control stick and the LED on the drone flashes.* Charge the battery or replace it with a fully charged battery of the drone.* Make sure the batteries of the remote have enough power.
Q4: The flight is not stable.* Return the drone and restart to do a flight calibration as instructed.* Fly the drone when the weather is good.
Q5: The response from the drone to the control is not sensitive.* Make sure the distance between the drone and the remote is effective.
Q6: The drone will fly beyond the control range.* Activate the Headless Mode, then move the Right Control Stick to fly the drone back.
Q7: After a crash, the drone keeps ascending or pitching when flying again.* Pull the Left Control Stick backward to the bottom to land the drone, and hold it for 3s at least until all the rotor blades stop rotating. Please check if the blades reach the top of the Propeller Guard after landing.If yes, please press down the center part of the Propeller Guard to adjust the blades. Then calibrate the drone again.
SPECIFICATIONS
| Drone | |
| Operating Temperature | 32°F to 104°F (0°C to 40°C) |
| Frequency Range | Model H823H: 2.416-2.475 GHz |
| Remote | |
| Frequency Range | Model H823H: 2.416-2.475 GHz |
| Transmit Power (EIRP) | Model H823H: 2.4GHz<18 dBm |
| USB Cable | |
| Input | SV == 1-2A |
| Output | 4.2v= 300mA |
| Rated Power | 1.26W |
FCC Caution:
Any changes or modifications no expressly approved by the party responsible for compliance could vo’d the user’s authority to operate the equipment. This device complies with part 15 of the FCC Rules. Operation is subject to the following two conditions: (1) This device may not cause harmful interference, and (2) this device must accept any interference received, including interference that may cause undesired operation.Note: This equipment has been tested and found to comply with the limits for a Class B digital device, pursuant to part 15 of the FCC Rules. These limits are designed to provide reasonable protection against harmful interference in a residential installation. This equipment generates, uses and can radiate radio frequency energy and, if not installed and used in accordance with the instructions, may cause harmful interference to radio communication. However, there is no that interference will not occur in a particular installation. guarantee I this equipment does cause harmful interference to radio or television reception, which can be determined by turning the equipment off and on, te user is encouraged to try to correct the interference by one or more of the following measures:– Reorient or relocate the receiving antenna.– Increase the separation between the equipment and receiver.– Connect the equipment into an outlet on a circuit different from that to which the receiver is connected,– Consult the dealer or an experienced radio/TV technician for help.Fr Remote:This equ man complies with FCC radiation exposure limits set forth for an uncontrolled environment.For R/C QUADCOPTER;This equ pmet compy with FCC radiation exposure limits set forth for an uncontrolled environment. This equipment should be installed and operated with a minimum distance 20cm between the radiator& you body.This transmitter must not be co-located or operating in conjunction with any other antenna o transmitter.
CAUTIONRISK OF EXPLOSION IF BATTERY IS REPLACED BY AN INCORRECT TYPEDISPOSE OF USED BATTERIES ACCORDING TO THE INSTRUCTIONS
 The symbol indicates DC voltage
 RECYCLING
This product bears the selective sorting symbol for Waste electrical and electronic equipment (WEEE). This means that this product must be handled pursuant to European directive 2012/19/EU in order to be recycled or dismantled to minimize its impact on the environment. User has the choice to give his product to a competent recycling organization or to the retailer when he buys a new electrical or electronic equipment.
This product can be used across EU member states. The device is low-power device, it can meet the requirement of the RF exposure. EU Compliance Statement: Shenzhen VanTop Technology & Innovation Co., Ltd hereby declares that this device is in compliance with the essential requirements and other relevant provisions of the Directive 2014/53/EU. A copy of the EU Declaration of Conformity is available online at https://doc.vantop.com/.
 BATTERY MUST BE RECYCLED OR DISPOSED OF PROPERLYManufacturer
Shenzhen VanTop Technology & Innovation Co., Ltd. Manufacturer address:502, 5th Flr. BLDG 4, MinQi Technology Park, No. 65 Lishan Road, Taoyuan Street, Nanshan District, Shenzhen, China
 C&E Connection E-Commerce (DE) GmbH Zum Linnegraben 20, 65933, Frankfurt am Main, Germany [email protected]
SNAPTAIN SUPPORT
 report this ad
US [email protected]CA [email protected]UK [email protected]
 https://qrs.ly/3zbd6ne https://qrs.ly/3zbd6ne |
||
| www.snaptain.com | @snaptainofficial | @snaptain_official |


[xyz-ips snippet=”download-snippet”]