![]()
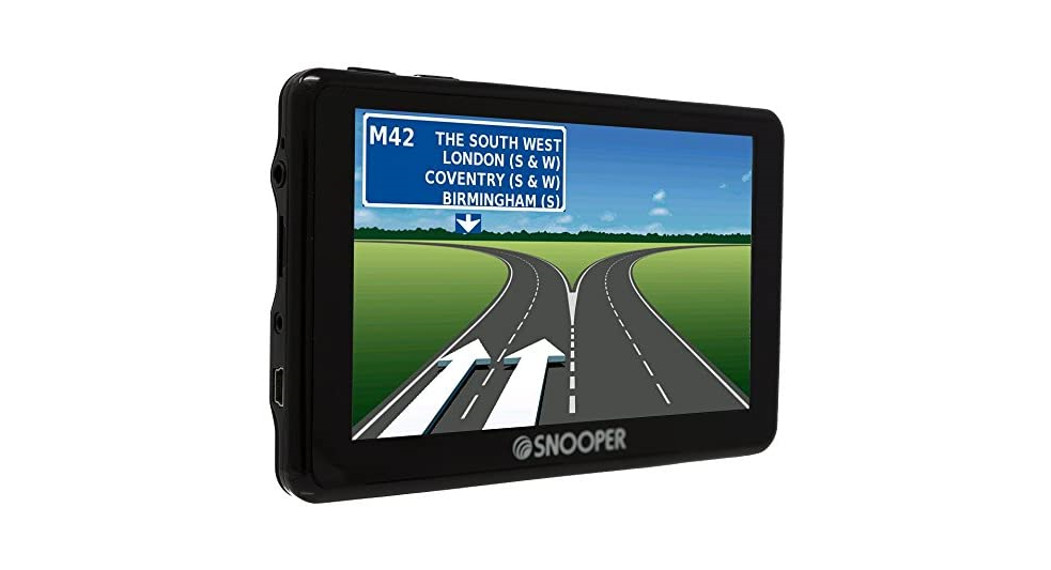
Navigation Quick Start GuideFor S2700, S5100, S68xx, S6900, S81xx, SC5900, SC5800,and variantsBus/Coach, Car, Truckmate, and Ventura
What’s included?
1 x Snooper satellite navigation system1 x Micro-SD Card – Mapping1 x 8GBMicroSD card – DVR – SC5800 and SC5900 DVR only1 x Windscreen Mounting Bracket1 x Active magnetic mount – S6900 ONLY1 x Protective case – except S27001 x In-Vehicle Charger and TMC cable combined – S6800, S8100, S6900, SC5800, and S5C900 ONLY1 x TMC antenna with jack connector – S2700, S6810, and S8110 Only1 x USB download Cable1 x 3.5mm to RCA video cable ( for reversing camera – not included) except S2700 (NO AV-In)1 x Mounting disk for dash mounting the bracket – except S2700 and S6900
PLEASE NOTE: Due to our desire to continually improve our products, the specification may change without notice.
StartUP

The Micro-SD Card comes complete with digital mapping and is also where the AURA™ camera database is stored if you choose to subscribe and download it.
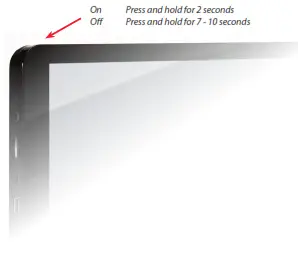
Switch on the device by pressing and holding the standby power button located on the top of the unit for 2 seconds. The Snooper will automatically synchronize with the Micro-SD Card. Once the synchronization is completed, the Micro-SD Card will not function with any other device. Snooper is now ready to navigate and the camera database can be downloaded if necessary.NOTE: In most cases, the MicroSD card is already installed in the device.
Refer to page 3 for additional, important, MicroSD card guidance.
Please note that if the unit does not activate when you press and hold the standby power button for 2 seconds it may require charging. Refer to the section ‘Charging the internal battery’ later in this manual.
PLEASE NOTE
Due to our desire to continually improve our products, the specification may change without notice.
Installing
Snooper comes with a windscreen bracket so that the unit can be mounted onto your vehicle’s windscreen.
When installing Snooper please ensure that:
- The unit, with its built-in GPS antenna, has a clear view of the sky.
- It is located in a position where you can easily view the LCD display without having to take your eyes too far from the road aheadand that you can reach the controls safely.
- Do not interfere with the vehicle’s controls.
- Do not jeopardize the driver’s or passengers’ safety.
- You will be able to remove the device to perform updates.
PLEASE NOTE: Be careful to choose a location that does not block the driver’s view or where it might endanger the driver or passengers should your vehicle suddenly come to a stop or be involved in an accident.
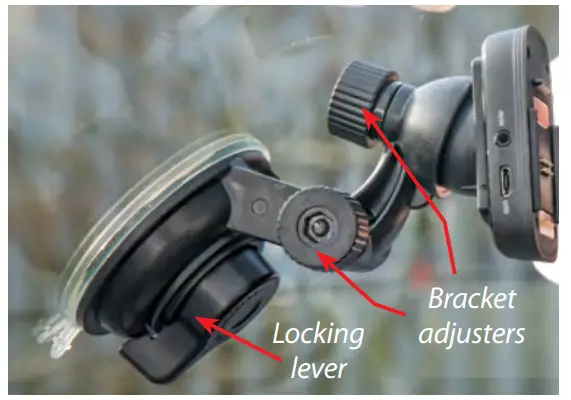
Installing Snooper using the Windscreen Suction Cup bracket
 |
|
You can mount Snooper to the inside of your vehicle’s windscreen using the windscreen bracket provided.
- Clean the area where you wish to position the bracket thoroughly with a good quality glass cleaner. This allows a more secure seal on the windscreen.
- Place the suction cup and bracket on the windscreen and twist the locking lever to secure the bracket.
- Adjust the angle of the bracket so that when the unit is attached to it you can view the display and operate the controls safely. Lock lever
- Position Snooper onto the bracket, by inserting the bottom of the unit first and then clipping the top of the bracket into the slot on the top of the unit. To remove Snooper, simply unclip the unit by pushing the top of the bracket and taking the unit from the holder.
- Snooper can be powered directly either from the internal battery if it is fully charged or powered from the cigarette lighter socket. To use the cigarette lighter socket, plug the connector on one end of the power cable into the socket on the side of Snooper and plug the larger plug into the cigarette lighter socket of your vehicle.
Please Note: Only use the cigarette lighter power cable provided with Snooper. Snooper operates on 5V and using any other cigarette lighter power cable will damage your device and void the warranty.
Installing Snooper using the Dash Mounting DiskIf you prefer not to attach your navigation device to the windscreen, Snooper provides a dashboard mounting disc to fix your Snooper suction cup mount to your dashboard instead.
Instructions:
- Clean the area where you want to install the disc on the vehicle’s dashboard with a damp cloth, then dry the dashboard.
- Peel the paper backing away from the permanent mounting adhesive located on the disc bottom.
- Press the disk onto the dashboard in the desired location, then set the GPS suction cup mount on top of the disk. Twist the suctioncup mount’s lever. This locks the Snooper into place.Note: Take care when attaching the disc. This type of bracket is not intended to be moved from vehicle to vehicle and is classed as a permanent fixing.THE USE OF THE DASH MOUNT DISC IS NOT RECOMMENDED FOR LEATHER DASHBOARDS.
Power Connection & Charging
Powering and charging Snooper from the cigarette lighter socket
Snooper comes with a power cable designed to plug into your vehicle’s cigarette lighter socket. The power cable is suitable for both 12v DC and 24v DC vehicles. This lead will power the device but will also charge Snooper’s internal battery (when the device is switched OFF).

- Plug the power cable into the unit or on the S6900 into the active mount.
- Plug the other end of the cigarette lighter adaptor into your vehicle’s cigarette lighter socket.
- Press and hold the standby power switch on the top of Snooper for two seconds to switch the device ON (Note: The device will power up automatically if there ispower being supplied by the vehicle power cable).
If Snooper does not power up please check that the cigarette lighter socket is clean of any debris, remembering not to insert metal objects into the socket. Check that thecigarette lighter adaptor is inserted all the way into the socket and check that the fuse in the cigarette lighter adaptor is operational. If Snooper will still not power up, pleasecheck that the cigarette lighter socket in your vehicle is functioning correctly.
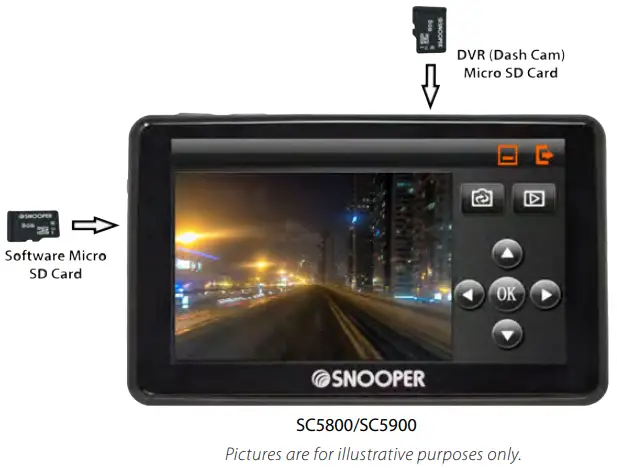
Micro SD cards
SC5800 and SC5900 onlyThe mapping and DVR/DashCam Micro SD cards must not be swapped around.If the SW/Mapping MicroSD card is placed in the DVR, by mistake, the Micro SD card will be formatted automatically and ALL mapping data will be lost.
All UnitsUnder no circumstance should the mapping MicroSD card be formatted when the unit is connected to a PC. Sometimes during a mapping or speed camera update theWindows operating system will advise that “the SD card requires formatting” please click CANCEL.If the card is formatted then all mapping data will be lost and the unit will be unusable until the card is replaced – the current replacement card cost is £9.99** Cost is subject to change
Charging the internal batteryConnect the device to the PC or external power, the unit will switch On automatically. To charge the battery, switch the unit off by holding the power button for 7-10 seconds. The battery icon will appear on the screen to indicate that the unit is on charge.
Note: The new battery’s full performance is only achieved after two or three complete charges and discharges. The battery icon indicates that the battery is charging ONLY and does not indicate the level of charge currently within the battery. When fully charged you will see an icon similar to the picture on the right.
Powering Snooper using the built-in battery
Once Snooper is fully charged, it is ready for use. Press and hold the power switch on the top of the unit for 2 seconds to switch on the device. The battery is for power protection ONLY and is not designed to power the device for any longer than 10 minutes.
Note: the battery is designed to be a backup ONLY and Snooper recommends that the navigation device is powered from the vehicle charger when in use.
Note: when the power button is held there are 3 options

 bleep: this will switch standby mode for a faster restart but it may discharge the internal battery.
 Shut down: this will completely shut the Unit down, conserving the internal battery.
 Return to the previous screen
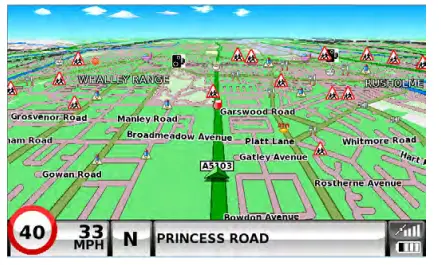
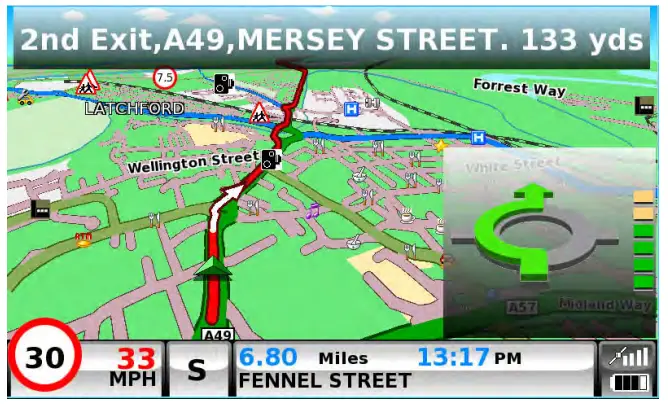
- Take the Snooper outside so that the GPS receiver can locate your position. This may take between 15 – 30 minutes the first time . When satellite lock is achieved, the screen will display your current position on its map in a ‘3D’ navigation view. Your position (and direction) is indicated by the icon.
 Tip: To reduce the ‘cold start’ GPS time remain stationary.
 - Bring up the main navigation menu by touching the center of the display.Select Find by Post CodeTip: This indicates that there are more options on the next screen (currently there are three screens in total).
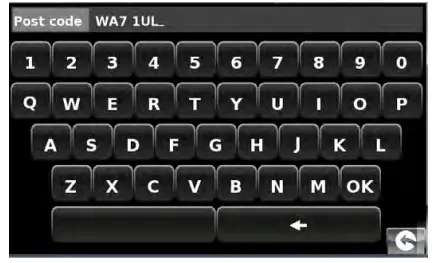
- You will see a standard browser screen, used for entering postcodes. Enter the full UK postcode using the keyboard and press2. Destination address:
Tip: The default route options are set to Quickest Route. To change the route options refer to Section 6 in this user manual.
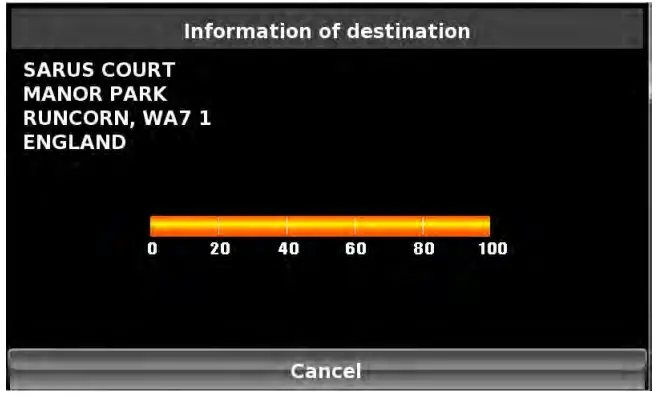
- Press and Snooper will calculate the fastest route from your current position to your destination.This should only take a short time and a progress bar is shown on the screen.* If you are using a Truckmate or Ventura an additional screen will be displayed where you can ‘choose your vehicle’. (see page 24 for details)
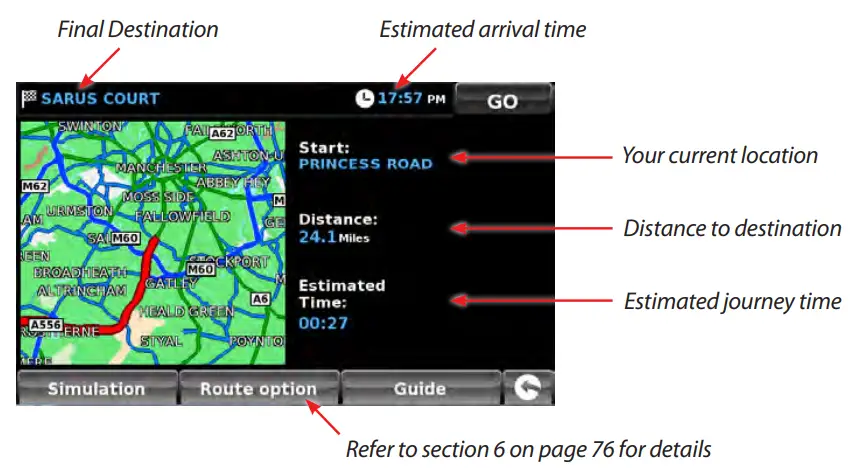
- A journey summary screen will then be displayedPlease note: The summary screen is only displayed for approximately 10 seconds before the unit automatically begins to provide you with turn-by-turn instructions.
- PressThe navigation view will now be displayed, but with the route now highlighted for you. As you approach a specific turn in the calculated route, Snooper will advise you what to do. For example, “After 200 yards, turn left”, followed by “Now turn left”. As you proceed along your journey, following the voice instructions, you will notice that the navigation view is updated constantly, always showing approaching roads and junctions and presenting the best route to you.Tip: If you miss a turn or drive down the wrong road, a new fastest route will be calculated automatically, based on your new position and direction of travel, a tone willbe heard to confirm re-routing. Snooper will always give you clear instructions that will take you to your chosen destination.
 Find by Post Code
 Tip: This indicates that there are more options on the next screen (currently there are three screens in total).
 2. Destination address:

 Tip: If you miss a turn or drive down the wrong road, a new fastest route will be calculated automatically, based on your new position and direction of travel, a tone willbe heard to confirm re-routing. Snooper will always give you clear instructions that will take you to your chosen destination.
Low Battery Warning
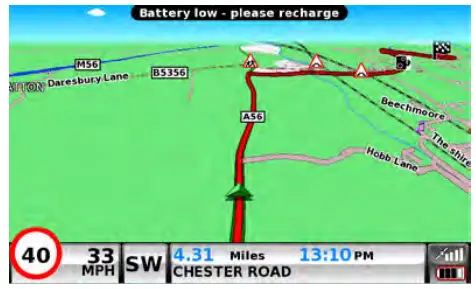
If Snooper is powered from the internal battery and the ‘Battery Low – Please Recharge’ warning is displayed on the screen, the unit has a few minutes of battery power remaining. You should connect the cigarette lighter adaptor lead to the unit whilst in the vehicle.
WARNING: PLEASE DO NOT USE OR LEAVE SNOOPER IN EITHER WET OR HUMID CONDITIONS, OR IN EXTREME TEMPERATURES, AS THIS COULD PERMANENTLY DAMAGE THE UNIT AND THE BATTERY. WHEN NOT IN USE DO NOT LEAVE THE UNIT ATTACHED TO THE WINDSCREEN, ESPECIALLY WHEN THE WEATHER IS WARM, TO AVOID DAMAGE TO THE UNIT AND ALSO REDUCE THE RISK OF THEFT.
CAUTION: THERE IS A RISK OF EXPLOSION IF THE BATTERY IS REPLACED WITH AN UNAPPROVED TYPE. USING THE WRONG TYPE OF BATTERY MAY DAMAGE YOUR UNIT AND INVALIDATE YOUR WARRANTY. ONLY SNOOPER AUTHORISED PERSONNEL SHOULD REPLACE THE BATTERY. PLEASE DISPOSE OF USED BATTERIES ACCORDING TO LOCAL WASTE MANAGEMENT RULES AND REGULATIONS. FURTHER INFORMATION CAN BE FOUND LATER IN THIS USER MANUAL.
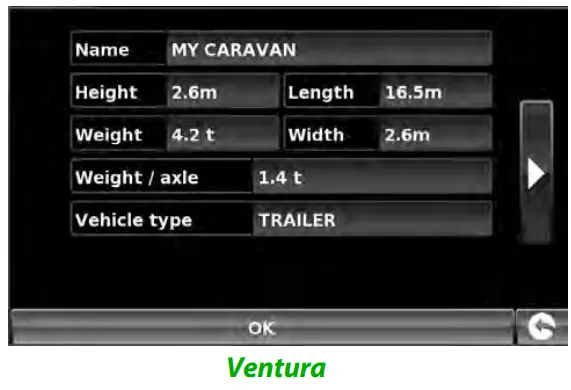
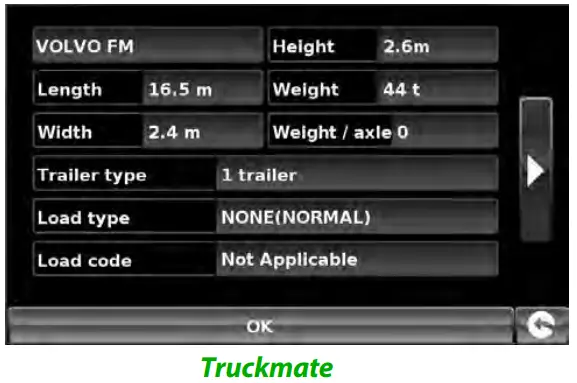
Setting up vehicle parameters
For Truckmate/Ventura or Bus and Coach to calculate a route suitable for your vehicle it needs to know certain information about the vehicle itself such as its height, weight, and width. It is possible to save the settings of 10 different trucks. Follow these instructions to enter your vehicle’s details. Option may differ depending on variant.
Press the center of the screen to access the menu, press ‘Configure’, and then press the ‘Truck’, ‘Motorhome’ or ‘Bus/Coach ‘icon.
 |
 |
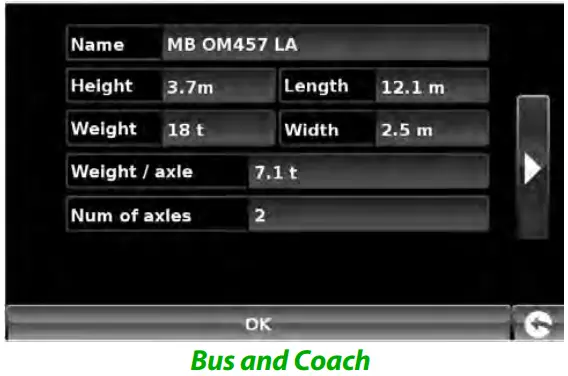 |
Name: Enter the name here (Top left field, default name TRUCK 1).Height: Enter the height of the vehicle here.Length: Enter the length of the vehicle here.Weight: Enter the weight of the vehicle here.Width: Enter the width of the vehicle here.Weight per axle: Enter the weight per axle of the vehicle here
Load type (Truckmate ONLY) :
- None (Normal)
- Hazardous: Hazardous goods that are not explosive or harmful to water.
- Explosive and Flammable
- Harmful for water
- Trailer type (Truckmate ONLY) :
- Truck with NO trailer: Standard setting for fixed axle vehicles.
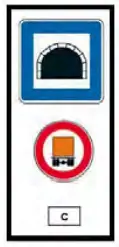
- Trailer (1, 2, 3, or more): Specific traffic rules exist for trucks with trailers. For example, there are roads that are forbidden for vehicles with trailers. These will be avoided. Choose between: Truck with No trailer, Truck with 1 trailer, Truck with 2 trailers, Truck with 3 or more trailers or semi or tractor with 1 or more trailers.Tunnel Category (Truckmate ONLY) ADR Tunnel Codes:
- Select one of the applicable tunnel codes, by default ‘Normal’, is selected
- The tunnel category codes consist of an individual letter from “A” to “E” this will be indicated by the use of road signs and or signals. Restrictions will not apply to category “A” tunnels as these are unrestricted and will not require any signage.
| B Most restrictive | Passage forbade through tunnels of category B, C, D, and E |
| B1000C | A carriage where the total net explosive mass per transport unit exceeds 1000 kg: Passage forbidden through tunnels of category B, C, D, and E; does not exceed 1000 kg: Passage forbidden through tunnels of category C, D, and E |
| B/D | Tank carriage: Passage forbidden through tunnels of category B, C, D, and E; another carriage: Passage forbade through tunnels of category D and E |
| B/E | Tank carriage: Passage forbidden through tunnels of category B, C, D, and E; another carriage: Passage forbade through tunnels of category E |
| C | Passage forbade through tunnels of category C, D, and E |
| C5000D | A carriage where the total net explosive mass per transport unit exceeds 5000 kg: Passage forbidden through tunnels of category C, D, and E; does not exceed 5000kg: Passage forbidden through tunnels of category D and E |
| C/D | Tank carriage: Passage forbidden through tunnels of category C, D, and E; another carriage: Passage forbidden through tunnels of category D and E |
| C/E | Tank carriage: Passage forbidden through tunnels of category C, D, and E; another carriage: Passage
forbidden through tunnels of category E |
| D | Passage forbade through tunnels of category D and E |
| D/E | Bulk or tank carriage: Passage forbidden through tunnels of category D and E; another carriage: Passage forbidden through tunnels of category E |
| E | least restrictive Passage forbidden through tunnels of category E |
| NORMAL | Passage allowed through all tunnels (For UN Nos. 2919 and 3331, see also ADR 8.6.3.1). |
For mixed loads choose the MOST restrictive category
DisclaimerThis content gives general guidance only and should not be regarded as a complete or authoritative statement of the law.The user guide will be updated to reflect any developments in new legislation or case law.
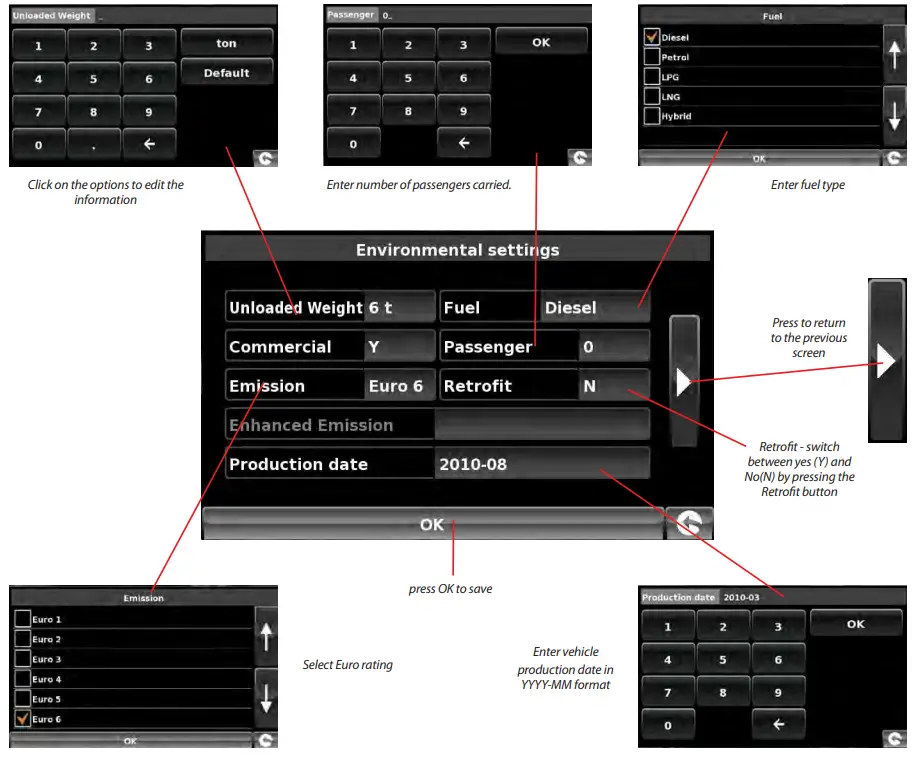
Environmental settings or Low Emission Zones (LEZ)
Low Emission Zones (LEZs) or Ultra-Low Emission Zones (ULEZ) are areas or roads where the most polluting vehicles are restricted from entering. This means that vehicles are banned, or in some cases charged, if they enter the LEZ when their emissions are over a set level.
Vehicle emissions are classified by Euro Standards (1-6) for the vehicles that they affect. In many cases, another factor is whether or not the vehicle has a particulate filter or catalytic converter. Before you travel into a LEZ, you need to find out the emissions standard of your vehicle.
All LEZs affect heavy-duty goods vehicles (usually over 3.5 tonnes Gross Vehicle Weight (GVW)), and most buses and coaches (usually defined as over 5 tonnes GVW). Some LEZs also affect vans, cars, and motorcycles.
Most LEZs operate 24 hours a day, 365 days a year, with some of the Italian LEZs currently the only exceptions to this rule. To enter your environmental setting press on the arrow once in the Environmental setting page press the arrow again to return to the vehicles setting page. 
TMC
Traffic Message Channel (TMC) is a technology for delivering traffic and travel information to motor vehicle drivers via the FM Radio Data System (RDS) network.
The positioning of the TMC antenna is critical in order to revive TMC alerts.When TMC data is integrated directly into a navigation system, traffic information can be used in the system’s route calculation
The positioning of the antenna will affect the reception of TMC ‘alerts’ (see diagrams below for positioning guidance)

Not ALL all functions and features shown in this quick start guide are the same for all models and variants.For a detailed, unit-specific, comprehensive user guide go to www.snooperneo.co.uk or scan the QR code below.


 report this ad
PLEASE NOTEDue to our desire to continually improve our products, the specification may change without notice.
![]() In Phase International Ltd. Rani Drive, Nottingham. United KingdomTel +44 (0)330 232 2020 E: [email protected].For technical support Tel +44(0)330 232 0020 E: [email protected] QSG EN v1.1 11/19
In Phase International Ltd. Rani Drive, Nottingham. United KingdomTel +44 (0)330 232 2020 E: [email protected].For technical support Tel +44(0)330 232 0020 E: [email protected] QSG EN v1.1 11/19![]()
References
[xyz-ips snippet=”download-snippet”]