
Maleta Lightweight Folding Electric Mobility Scooter
Dear Customer
Congratulations on your purchase and thank you for choosing the Solax Maleta! Please read this manual carefully before operating your mobility scooter. By doing so you can ensure that you are familiar with all the components of your new scooter and are able to use it safely in a range of different situations. If you still have questions after reading this manual, please contact your retailer for further information.
Warning: Failure to heed the warnings in this manual can cause personal injury.Notification: Failure to follow the instructions from this manual will damage your Transformers.
This manual covers the Solax Maleta’s
- Main structural characteristics
- Main components
- Function of each part
- Safety requirements and instructions
- Battery instructions
- Matters that need extra attention
- Scooter maintenance.
Fig.1 Solax Maleta
Finally, we hope that your new Solax Maleta will help you enjoy a more comfortable, convenient, and wonderful life.All the information and pictures contained in this manual are subject to the factory’s products and are to be used as a reference only. The products will continue to be improved and modified without prior notice and images may not match the delivered product.
1. Features
Please refer to the diagram below to identify the different components of your scooter. Familiarise yourself with the terminology to better understand part references throughout the Owner’s Manual.
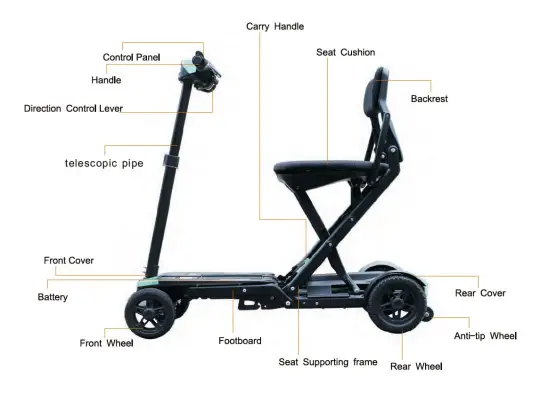 Fig. 2Product images may vary and will be subject to real products received. 4
1.1 Main characteristics
The Maleta is packed with innovative modern design features. It is safe, comfortable, easy to operate, convenient to be folded and carried, lightweight and steady.
- The frame is made of a lightweight aluminum alloy
- It can be folded and unfolded without any tools or effort. It has 2 automatic folding functions and a manual safety foldoverride.
- A lightly padded seat and spring-style backrest will provide you with support during journeys
- Once folded the Solax Maleta can be transported easily and conveniently either in the boot of your car, by train, plain or ship.
- The split, easy-remove battery design allows you to simply pull the battery out of the scooter, without having to worry about any cables or wires. Its safe Lithium design makes it perfect for air travel. The split design allows you to utilize the automatic folding feature and remove the batteries after it has been folded.
- The tiller is adjustable in height to allow for additional user comfort In conclusion, The Solax Maleta is a unique scooter, that suits a large range of different users and will provide the user with the ability to access many places and enjoy more freedom in everyday life.
Fig. 3
2. Product Specifications and Relevant Parameters
|
Model |
Solax Maleta (S3121) |
|
Maximum Product Size |
940mm (L) x 450mm (W) x 950 mm (H) |
|
Product Minimum Size |
280mm (L) x 450mm (W) x 640mm (H) |
|
Seat Above Ground |
520mm |
|
Product weight (excluding battery) |
22.5kg |
|
Maximum Weight Capacity |
125kg |
|
Travel Distance |
15km |
|
Fastest Speed |
6km/h |
|
Turning Radius |
≤1.55m |
|
Maximum Climbing Angle |
0º-12º |
|
Driveway |
Rear Wheel Drive |
|
Obstacle Crossing Ability |
38mm |
|
Battery Specifications |
Power Lithium Battery, 24V 5AH x 2 |
|
Battery Watt Hours |
120Wh x 2 |
|
Charger Planning |
24V 2A (output:29.4V 2A) |
3. Main Parts and Relevant Function
3.1 Control Panel/Dash – Fig.01The Dash is the “control-center” of your Solax Maleta. It offers access to all the features and controls.It features
- Horn
- Key Ignition
- Charge Socket
- Speed adjustment dial
- Fold/unfold button
- LCD Display
- Forward and Reverse Levers
Fig. 4
Notice: Do not put the control panel in the humid area. If the control panel has been affected by moisture before using, please ensure it is dry when you operate it.
3.2 Key Ignition Fig. 05
- Turn the key switch clockwise to ON, this will turn on the scooter.
- Turn the key switch anticlockwise to OFF, to turn the scooter off. Please turn the power off when you stop driving.
Always turn the scooter off when entering or exiting the scooter to avoid “knocking the controls” and causing unexpected movement.
OFF ONFig.05
Warning: If turn off the battery during operating. The electromagnetic brake will be locked, and your scooter will stop suddenly.
3.3 Speed adjustment dial Fig. 0
The speed adjustment dial is used for controlling the speed when driving. You can set the speed from 0km/h to 6km/h. When you adjust the dial to the left end (the slowest), it is the minimum speed; when you adjust the knob to the right end (the fastest), it is the maximum speed.
Slowest FastestFig.06
Warning: when you are turning or driving backward, please do not adjust the speed to the maximum speed.
3.4 Power Indicator (Fig.04)
When the scooter is turned to the “on” position, your battery charge will show on the LCD display.
3.5 Direction Control Lever
The direction control lever is used to control the forward and backward. Move the lever with your right hand to drive forward. (Fig.08) Move the lever with your left hand to move backward. (Fig.09) When the scooter moves backward, you will hear a beeping noise The control lever will return to the center position when releasedand the brake will engage. Causing the scooter to stop.
 Please note: The direction levers can be “reversed” if required.
When you press the button, it will sound the horn.
3.7
Lift the latch, which will allow you to lift or collapse the tiller. Once you have adjusted it to your preferred height, push the latch down to lock in the position. (Fig.11 & Fig.12).
 Fig.11
Fig.12
3.8 Controller
The Controller is fixed in the rear cover and it receives the signal from the control panel and transfers the signal to motor, brake, and bulb. You should not remove the cover yourself any work on the controller needs to be carried out by a fully trained technician or you may void your warranty.
Notice: Do not store the controller in the moisture environment. If the controller has been affected by moisture, make sure to dry it before operation.
3.9 Brake
The Maleta is equipped with an electromagnetic brake. We recommend not to put the scooter into “freewheel mode” please see point 3.10. Instead to fold the scooter and use the tiller to wheel the scooter to the required position.
3.10 Freewheel Lever
When you need to move the scooter manually, you can flip the lever back to engage “freewheel” mode. (Fig.13).Please note, you will not be able to drive your scooter in free-wheel mode. Once the lever is back to the drive position. You may need to turn the scooter on/off before driving.
3.11 Motor/Transmission component
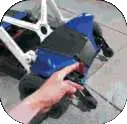 Fig.13
Motor/ Transmission component as a mechanical and electrical part will convert the electrical energy to rear wheel drive.
4. Electric Folding and Unfolding
Remote control – Fig.15
Fig.15
4.1 Automatic folding and unfolding scooters user the remote control
- Press the “B” button and the scooter will fold automatically.
- It will stop halfway to ensure there are no obstacles
- Pres the “B” button again and the scooter will continue folding
- After it is folded completely, you will hear “click” sound and a few short beeps.
- To unfold follow the above instruction, but use the “A” Button instead
In case your scooter remote is flat or damaged you can also use the Buttons located on the dash to fold your scooter. Please follow the Folding instructions outlined in 4.1, but instead of pushing the remote Buttons push the buttons on the dash. Please see Fig.19 for fold/unfold referenceNotice: Ensure your scooter is on level ground, before using the fold/unfold function of your Solax Charge
5 Manual Folding & Unfolding5.1 Manual unfolding
- Place the scooter on a level ground and use your hand to lift the red bar located under the seat
- After manually lifting the bar you will notice the scooters front and rear wheels coming together. When about half-way folded, use both hands to push together the scooter until you hear a “click”.
Push down the carry handle as far as possible and the scooter will start to unfold.Use one hand to hold the tiller and the other to hold the handle or bottom of the seat to guide the scooter apart.
5.2 Manual Folding
Pull the carry-handle and pull in upward, you will notice the front and rear to come together. Once the scooter is about half-way folded use your hands to push the front and rear together until you hear a click.
6 Safety Requirements6.1 Driving Surface and Tips
The Solax Travel scooter range has been designed to be used on paved surfaces, such as carpet, well maintained footpath, shopping centers etc. However, it may also be used on other surfaces, such as grass or walkways in parks etc. However, there are some things that need to be considered to ensure a safe and comfortable ride.
- Condition of surface ensure the surface you are driving on is not too soft to ensure the wheels will not sink into the surface and get stuck. Try to avoid loose gravel and sandstone.
- Comfort The Solax Maleta has smaller solid tires, which will not absorb impact the same way as larger more rugged scooters would.
- Balance and Safety Ensure you do not exceed maximum slope allowances and keep an eye out for potential hazards and obstacles. The scooter can handle obstacles of a certain size, but it is best to reduce the speed when tackling these.
- Cleaning and Maintenance Ensure to thoroughly “brush” down your scooter (including under the base) after use on unsealed roads and grass. This will ensure that all dirt particles are removed and will not get “stuck” in the folding mechanism
- Your ability ensure you are feeling well and feel physically fit to operate your Solax Maleta
Please note: You should not drive your scooter if you cannot see the condition of the road ahead of you.
6.2 Safety Precautions
- Do not operate your scooter before you fully read and understand this manual.
- Do not carry passengers on your scooter or exceed the maximum carrying capacity
- Ensure your scooter is fully unfolded before riding your scooter. The Seat sensor will start beeping if you try to sit on your scooter before it is ready for operation.
- Please slow down when driving on the uneven or soft ground.
- Please slow down before turning.
- Do not park on slopes.
- Approach slope end, slopes, raised group and unprotected edge zone (such as curbside, vestibule and stairs ets.) with extra care.
- Do not change the scooters setting or modify your Solax Maleta in anyway. Any breeches of this may result in your warranty being void and your scooter not operating in a safe manner.
- Be careful and aware of other users when driving in the busy streets, markets, or shopping centers
- Hold the handle with both hands and put both feet on the footboard when driving.
- Using your scooter as a seat on moving vehicle is forbidden.
- Climbing or driving along the edges of roads is forbidden, otherwise, the scooter will be damaged permanently.
- Do not exceed the maximum tolerance gradient when driving.
- Do not reverse on uneven slopes or uneven ground; be careful when passing over slopes.
- Do not use the scooter if you suffer from uncontrollable seizures, severely reduced eyesight, or severely reduced reactions.
![]() WARNING–Do not attempt to drive on slopes more than 12 degrees.
WARNING–Do not attempt to drive on slopes more than 12 degrees.![]() WARNING–Do not exceed the maximum weight capacity (125 kg).
WARNING–Do not exceed the maximum weight capacity (125 kg).
7 Battery and Battery Charging
This scooter is designed with a maintenance free, high quality Li-polymer (Lithium) battery. Please follow the below instructions to ensure a long-lasting battery life.
- Charge the battery before the first operation.
- Avoid your battery to go flat/fully use its charge as this will damage the battery
- If you know that you will not be using your scooter for a long period of time, you can follow the below instructions to prevent severe damage1. Fully charge the battery2. Remove battery from scooter3. Store the battery and scooter in a cool and dry place with steady temperature and temperatures that do not exceed25’C or under 10’C
7.1 Battery charging guide
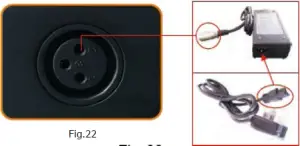
You can charge your Solax Maleta in the folded or unfolded position. The Charging Socket is in the center of your scooters dash. Please see image below.
- Ensure your scooter is turned off (Set key to “off” position) Fig.22
- Open the protective rubber tab
- Plug the charger into a functioning power socket or extension lead cable
- Plug the specialized Plug into the socket under your scooters dash, ensuring the pins are lined up correctly Fig.23
- The light on the battery charging unit will change depending on battery status. Red & Orange light indicates power on, and charging and green light means fully charged
- Turn off the power switch first when the battery is fully charged. Then take out the DC charging connector before you take out the AC input power socket.
- If the red light is off when the power on, please check whether the power plug is properly inserted.
- Normally allows 8-14 hours for charging.
![]() Warning: Ensure the pins are matched properly.
Warning: Ensure the pins are matched properly.![]() Note: The scooter has a self-locking function to prevent driving when you charge the battery.
Note: The scooter has a self-locking function to prevent driving when you charge the battery.
7.2 Guide to a safe and long-lasting battery7.2.1 How does the charger work?
- When the battery voltage is low, the battery charger outputs a large current to charge the battery.
- When battery voltage is close to full, the battery charger outputs a small current, this is known as a trickle feed.
- When battery is full, the battery charger will output very little current which is almost zero. Therefore.
- The battery will continually charge after connecting the charge but will not overcharge. It is better to charge no more than 24 hours.
7.2.2 How does the indicator light (LED) in charger display.
There are two LED indicator lights in the charger. The red indicator light is the power indicator light. Regarding the other one, it is orange when charging and it will become green when the battery is charged fully. The red one will sometimes stay on after pulling the charger plug out from the power socket; this is perfectly normal, it just needs a few seconds for the red light to snuff out when the battery voltage is up to 26V.
7.2.3 Can I use other chargers with my Solax scooter?
To charge safely and efficiently, we highly recommend using the charger supplied by the original manufacturer or registered dealer. Using a third-party charge may damage your battery.
7.2.4 How often should charge the battery?
- If you are driving scooter every day, you should charge it after every use. This way it is always ready for you. The battery charging time will vary depending on how full/empty your battery is at the time of charging.
- If you are driving your scooter once a week, then it is best to charge the battery once a week. Battery charging times will vary, depending on how full/empty the battery is.
- Make sure you always fully charge the battery.
7.2.5 How to achieve optimum operating distance?
Some driving conditions such as hills, uneven and soft surface, wind conditions and user weight will affect the driving distance and battery performance.
- Fully charged your battery before driving it.
- Avoid hills and soft surface.
- Only to carry the necessities and reduce the luggage weight.
- Keep a constant speed.
- Avoid intermittent driving.
![]() Warning: Please do not dismantle the Li-polymer battery and do not add water. Failure to observe this note will void the warranty and damage the battery and scooter.
Warning: Please do not dismantle the Li-polymer battery and do not add water. Failure to observe this note will void the warranty and damage the battery and scooter.
7.2.6 Why does the power of my new battery seem weak?
Deep-cycle battery use a unique chemical technology and design. It can be charged quickly and can be used for a long time after it has been fully charged. The battery is fully charged when it leaves the factory but may change its initial charge during transportation. The battery will lose power in high temperatures and it will extend the held charge in low temperatures.The battery needs a few days to adapt to the surrounding environment before performs consistently. More importantly, deep-cycle batteries require several charging cycles (full charge and large discharge) before they will perform at maximum capacity.
Please follow these steps to improve the battery performance
- Fully charge the battery before first use
- Use a low speed setting for the first use and do not travel too far until you are familiar with the operation of your scooter.
- Try to use as much battery as possible, before giving it a second full charge. This will make the battery operate at up to 90% capacity.
- The battery capacity will reach 100% after four to five charging and discharging cycles as outlined above.
7.2.7 How to ensure the battery life?
A fully charged battery will provide a good performance and battery life, so keep the battery fully charged whenever possible. Your battery performance and battery life will suffer if you
- Let your battery get flat
- Do not charge the battery regularly
- Do not fully charge the battery.
![]() Warning: If battery was frost, it should be kept warming for several days before charging.
Warning: If battery was frost, it should be kept warming for several days before charging.
8. Basic Troubleshooting8.1 Scooter not turning on
- Please check the key is inserted into the switch and turned to the on position
- Check it if the battery is fully charged, if not charge the battery until the charger light turns green
- If the battery capacity is insufficient, please increase the charging time/cycles.
- If the issue continues, then battery may need testing. Please contact the sellers store
8.2 Scooter “cut outs” when you are driving it
- Battery line may be loose
- Motor carton bush is damagedPlease contact your retailer
8.3 Speed suddenly slows down when driving
- Battery capacity is insufficient.
- Battery aging
![]() Please note: If you have any problems and are unsure on how to best resolve them. Please contact your retailer for further information.
Please note: If you have any problems and are unsure on how to best resolve them. Please contact your retailer for further information.
9 Maintenance
Given that the Solax scooter is a moving piece of equipment it is recommended to get it serviced by a trained service technician on a regular basis. The service technician will check the following. Please note we recommend an annual service of your scooter. Services should ONLY be carried out by trained technicians
The connection of the battery and electrodes
- Ensure the electrode connections are tight and have no corrosion.
- The battery should be placed flat inside the battery holder.
Wire Connector
- Check all the wire connectors regularly.
- Check all the wiring insulation condition, including the plug of the charger regularly.
- Repair or change the damaged connector and connector joint.
ABS Plastic Cover
- Control panel, front cover, footboard, and back cover are all made by durable ABS plastic with baking finish on the surface. Do not use oil or other chemical liquids to wipe the scooter. To prevent the electrical components from damage, do not wash the scooter from the tap directly. Bearings and Motor/ Transmission Parts
- The components have injected lubricant and are sealed; therefore, it is unnecessary to inject lubricant anymore.
- Protect all the electronic components from moisture, such as control panel, battery charger and other electric controlled components.
- If some components become damp, please dry it before use.
Warranty Registration Card
|
Purchase by |
Contact No. |
||
|
Email Address |
|||
|
Shipping Address |
|||
|
Model |
Maleta S3121 |
Serial No. |
|
|
Purchasing Date |
Y M D |
||
|
Warranty Period |
12 months warranty from purchasing date |
||
|
Manufacturer |
Solax Technology Limited |
||
|
Importer |
|
||
|
Name of reseller / Purchasing Store |
Please complete your Warranty registration card and email through a copy to
Warranty Statement
Materials, manufacturing or assembling problems under the normal usage is responsibility of the dealer for the repair or replacement of parts.
Warranty Exclusions:
- Failure to follow the proper use of operation and maintenance.
- Not using approved spare parts, batteries, or chargers.
- Mechanical damage caused by improper use and/or accidents, Including exceeding the weight capacity.
- Consumables such as the inner core and outer tires, bearings, light bulbs, etc. are not covered in the limits of the warranty.
- Any unauthorized changes or work performed to the design or workings to the mobility scooter.
- Any nature disasters or accidents such as typhoons, hurricanes, floods, and earthquakes.
The following symbols are found on the Scooter:I Manufacturer2J Date of ManufactureRefer to The Instruction ManualMedical Device Serial Number Catalogue Number Lot NumberCE MarkWEEE Label. Do not discard the item in general waste. Follow the local recycling policy.Item is recyclableDongguan Prestige Sporting Goods Co., Ltd. 3rd Industrial, Qiaotou Area, Houjie Town, Dongguan City, Guangdong Province, China.Share Info GmbH Heerdter Lohweg 83, 40549 Dusseldorf, GermanyWarning of Microwave Radiation Do not drive in rain or snowy weatherkeep loose clothing clear of the scooter Do not operate cell phones while the scooter is powered on. Warning. Beware of potential hazardWarning. Pinch hazardBe aware of nearby transmitters, such as radio or television stations, and avoid proximity.
[xyz-ips snippet=”download-snippet”]