Installation and User Manual

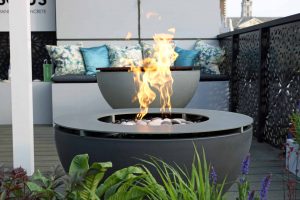
solus Fire Pit
INSTALLER: Leave this manual with the applianceCONSUMER: Retain this manual for future reference
For Outdoor Use Only. Read Installation and User Manual before use.
This fire pit is tested for compliance to the standards: ANSI Z21.97 – 2004/CSA 2.41 – 2014 Outdoor Decorative Gas Appliance and CSA 2.17 – 2017 Gas-Fired Appliances for Use at High Altitudes.
Made in Canada by Solus Decor Inc. – 109 Braid St., Building C, New Westminster, BC, V3L 5H4 Canada – T: (604) 255-2472 – E:
Gas Type:

Electric if applicable: 24V/110VAC, 1.5A, 60 Hz
Gas Pressure:
NG – Inlet pressure: 7.0 inwc; Manifold Pressure: 3.5 inwc (Honeywell valve)/5.80 inwc (Baso valve) for 40,000, 60,000 & 73,000 BTU; Inlet pressure: 2.5 inwc for 108,000 BTU
LP – Inlet pressure: 11 inwc; Manifold pressure: 10.80 inwc (Baso valve) for 40,000, 60,000 & 73,000 BTU; Inlet pressure: 4.5 inwc for 108,000 BTU
For installation of Electronic Ignition System, refer to the “Electric Hook Up” Instruction –a separate page included in your shipment.
For general installation, refer to the “Fire Pit Installation”.
 Warning
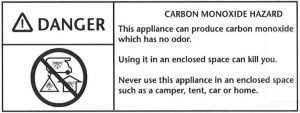
![]() DANGER: if you smell gas:
DANGER: if you smell gas:
- Shut off gas to appliance
- Extinguish any open flame
- If odor continues, keep away from appliance and immediately call gas supplier or firedepartment
![]() WARNING: Improper installation, adjustment, alteration, service, or maintenance cancause injury or property damage. Read the installation, operating, and maintenance instructions thoroughly before installing or servicing this equipment.
WARNING: Improper installation, adjustment, alteration, service, or maintenance cancause injury or property damage. Read the installation, operating, and maintenance instructions thoroughly before installing or servicing this equipment.
![]()
![]()
![]()
![]()
![]()
![]()
![]()
![]()
![]()
![]()
![]()
![]()
![]()
![]()
![]()
![]()
![]()
![]()
![]()
![]()
![]()
![]()
![]()
![]()
![]()
![]()
![]()
![]()
![]()
![]()
![]()
![]()
![]()
![]()
![]()
![]()
![]()
![]()
![]()
![]()
![]()
![]()
![]()
![]()
![]()
![]()
![]()
![]()
![]()
![]()
![]()
![]()
![]()
![]()
![]()
![]()
![]()
![]()
![]()
![]()
![]()
![]()
![]()
![]()
![]()
![]()
![]()
![]()
![]()
![]()
![]()
![]()
![]()
![]()
![]()
![]()
![]()
![]()
![]()
![]()
![]()
![]()
![]()
![]()
![]()
![]()
![]()
![]()
![]()
![]()
![]()
![]()
![]()
![]()
![]()
![]()
![]()
![]()
![]()
![]()
![]()
![]()
![]()
![]()
![]()
![]()
![]()
![]()
![]()
![]()
![]()
![]()
![]()
![]()
![]()
![]()
![]()
![]()
![]()
![]()
![]()
![]()
![]()
![]()
![]()
![]()
![]()
![]()
![]()
![]()
![]()
![]()
![]()
![]()
![]()
![]()
![]()
![]()
![]()
![]()
![]()
![]()
![]()
![]()
![]()
![]()
![]()
![]()
![]()
![]()
![]()
![]()
![]()
![]()
![]()
![]()
![]()
![]()
![]()
![]()
![]()
![]()
![]()
![]()
![]()
![]()
![]()
![]()
![]()
![]()
![]()
![]()
![]()
![]()
![]()
![]()
![]()
![]()
![]()
![]()
![]()
![]()
![]()
![]()
![]()
![]()
![]()
![]()
![]()
![]()
![]()
![]()
![]()
![]()
![]()
![]()
![]()
![]()
![]()
![]()
![]()
![]()
![]()
![]()
![]()
![]()
![]()
![]()
![]()
![]()
![]()
![]()
![]()
![]()
![]()
![]()
![]()
![]()
![]()
![]()
![]()
![]()
![]()
![]()
![]()
![]()
![]()
![]()
![]()
![]()
![]()
![]()
![]()
![]()
![]()
![]()
![]()
![]()
![]()
![]()
![]()
![]()
![]()
![]()
![]()
![]()
![]()
![]()
![]()
![]()
![]()
![]()
![]()
![]()
![]()
![]()
![]()
![]()
![]()
![]()
![]()
![]()
![]()
![]()
![]()
![]()
![]()
![]()
![]()
![]()
![]()
![]()
![]()
![]()
![]()
![]()
![]()
![]()
![]()
![]()
![]()
![]()
![]()
![]()
![]()
![]()
![]()
![]()
- ANSI Z21.97/CSA 2.41-2004/CSA 2.41-2014 Outdoor Decorative Gas Appliances
- Fixed piping system: The National Fuel Gas Code, ANSI Z223.1/NFPA 54 or InternationalFuel Gas Code.
- Electrical ground: The National Electrical Code, ANSI/NFPA 70.
- 2012 and 2009 International Fire Code® (IFC)
- 2012 and 2009 International Mechanical Code® (IMC)
- 2012 and 2009 Uniform Mechanical Code® (UMC)
- 2010 Natural Gas and Propane Installation Code
![]()
![]()
![]()
![]()
![]()
![]()
![]()
![]()
![]()
![]()
![]()
![]()
![]()
![]()
![]()
![]()
![]()
![]()
![]()
![]()
![]()
![]()
![]()
![]()
![]()
![]()
![]()
![]()
![]()
![]()
![]()
![]()
![]()
![]()
![]()
![]()
LP:Supply Pressure: Inlet pressure: 11 inwcManifold Pressure: 10.80 inwc (Baso valve)
![]()
![]()
![]()
![]()
![]()
![]()
![]()
![]()
![]()
![]()
![]()
![]()
![]()
![]()
![]()
![]()
![]()
![]()
![]()
![]()
![]()
![]()
![]()
![]()
![]()
![]()
![]()
![]()
![]()
![]()
![]()
![]()
![]()
![]()
![]()
![]()
![]()
![]()
![]()
![]()
![]()
![]()
![]()
![]()
![]()
![]()
![]()
![]()
![]()
![]()
![]()
![]()
![]()
![]()
![]()
![]()
![]()
![]()
![]()
![]()
![]()
![]()
![]()
![]()
![]()
![]()
![]()
![]()
![]()
![]()
![]()
![]()
![]()
![]()
![]()
![]()
![]()
![]()
![]()
![]()
![]()
![]()
![]()
![]()
![]()
![]()
![]()
![]()
![]()
![]()
![]()
![]()
![]()
![]()
![]()
![]()
![]()
![]()
![]()
![]()
![]()
![]()
![]()
![]()
![]()
![]()
![]()
![]()
![]()
![]()
![]()
![]()
![]()
![]()
![]()
![]()
![]()
![]()
![]()
![]()
![]()
![]()
![]()
![]()
![]()
![]()
![]()
![]()
![]()
![]()
![]()
![]()
![]()
![]()
![]()
![]()
![]()
![]()
![]()
![]()
![]()
![]()
![]()
![]()
![]()
![]()
![]()
![]()
![]()
![]()
![]()
![]()
![]()
![]()
![]()
![]()
![]()
![]()
![]()
![]()
![]()
![]()
![]()
![]()
![]()
![]()
![]()
![]()
![]()
![]()
![]()
![]()
![]()
![]()
![]()
![]()
![]()
![]()
![]()
![]()
![]()
![]()
![]()
![]()
![]()
![]()
![]()
![]()
![]()
![]()
![]()
![]()
![]()
![]()
![]()
![]()
![]()
![]()
![]()
![]()
![]()
![]()
![]()
![]()
![]()
![]()
![]()
![]()
![]()
![]()
![]()
![]()
![]()
![]()
![]()
![]()
![]()
![]()
![]()
![]()
![]()
![]()
![]()
![]()
![]()
![]()
![]()
![]()
![]()
![]()
![]()
![]()
![]()
![]()
![]()
![]()
![]()
![]()
![]()
![]()
![]()
![]()
![]()
![]()
![]()
![]()
![]()
![]()
![]()
![]()
![]()
![]()
![]()
![]()
![]()
![]()
![]()
![]()
![]()
![]()
![]()
![]()
![]()
![]()
![]()
![]()
![]()
![]()
![]()
![]()
![]()
![]()
![]()
![]()
![]()
![]()
![]()
![]()
![]()
![]()
![]()
![]()
![]()
![]()
![]()
![]()
![]()
![]()
![]()
![]()
![]()
![]()
![]()
![]()
![]()
![]()
![]()
![]()
![]()
![]()
![]()
![]()
![]()
![]()
![]()
![]()
![]()
![]()
![]()
![]()
![]()
![]()
![]()
![]()
![]()
![]()
![]()
![]()
![]()
![]()
![]()
![]()
![]()
![]()
![]()
![]()
![]()
![]()
![]()
![]()
![]()
![]()
![]()
![]()
![]()
![]()
![]()
![]()
![]()
![]()
![]()
![]()
![]()
![]()
![]()
![]()
![]()
![]()
![]()
![]()
![]()
![]()
![]()
![]()
![]()
![]()
![]()
![]()
![]()
![]()
![]()
![]()
![]()
![]()
![]()
![]()
![]()
![]()
![]()
![]()
![]()
![]()
![]()
![]()
![]()
![]()
![]()
![]()
![]()
![]()
![]()
![]()
![]()
![]()
![]()
![]()
![]()
![]()
![]()
![]()
![]()
![]()
![]()
![]()
![]()
![]()
![]()
![]()
![]()
![]()
![]()
![]()
![]()
![]()
![]()
![]()
![]()
![]()
![]()
![]()
![]()
![]()
![]()
![]()
![]()
![]()
![]()
![]()
![]()
![]()
![]()
![]()
![]()
![]()
![]()
![]()
![]()
![]()
![]()
![]()
![]()
![]()
![]()
![]()
![]()
![]()
![]()
![]()
![]()
![]()
![]()
![]()
![]()
![]()
![]()
![]()
![]()
![]()
![]()
![]()
![]()
![]()
![]()
![]()
![]()
![]()
![]()
![]()
![]()
![]()
![]()
![]()
![]()
![]()
![]()
![]()
![]()
![]()
![]()
![]()
![]()
![]()
![]()
![]()
![]()
![]()
![]()
![]()
![]()
![]()
![]()
![]()
![]()
![]()
![]()
![]()
![]()
![]()
![]()
![]()
![]()
![]()
![]()
![]()
![]()
![]()
![]()
![]()
![]()
![]()
![]()
![]()
![]()
![]()
![]()
![]()
![]()
![]()
![]()
![]()
![]()
![]()
![]()
![]()
![]()
![]()
![]()
![]()
![]()
![]()
![]()
![]()
![]()
![]()
![]()
![]()
![]()
![]()
![]()
![]()
![]()
![]()
![]()
![]()
![]()
![]()
![]()
![]()
![]()
![]()
![]()
![]()
![]()
![]()
![]()
![]()
![]()
![]()
![]()
![]()
![]()
![]()
![]()
![]()
![]()
![]()
![]()
![]()
![]()
![]()
![]()
![]()
![]()
![]()
![]()
![]()
![]()
![]()
![]()
![]()
![]()
![]()
![]()
![]()
![]()
![]()
![]()
![]()
![]()
![]()
![]()
![]()
![]()
![]()
![]()
![]()
![]()
![]()
![]()
![]()
![]()
![]()
![]()
![]()
![]()
![]()
![]()
![]()
![]()
![]()
![]()
![]()
![]()
![]()
![]()
![]()
![]()
![]()
![]()
![]()
![]()
![]()
![]()
![]()
![]()
![]()
![]()
![]()
![]()
![]()
![]()
![]()
![]()
![]()
![]()
![]()
![]()
![]()
![]()
![]()
![]()
![]()
![]()
![]()
![]()
![]()
![]()
![]()
![]()
![]()
![]()
![]()
![]()
![]()
![]()
![]()
![]()
![]()
![]()
![]()
![]()
![]()
![]()
![]()
![]()
![]()
![]()
![]()
![]()
![]()
![]()
![]()
![]()
![]()
![]()
![]()
![]()
![]()
![]()
![]()
![]()
![]()
![]()
![]()
![]()
![]()
![]()
![]()
![]()
![]()
![]()
![]()
![]()
![]()
1. LOCATION OF INSTALLATION
The Solus fire pit vessel must be placed on a stable surface. Select a location with good drainage that allows easy access for installation and maintenance of the fire pit. Pick a location that allows sufficient horizontal room to enjoy the fire pit while allowing a safe distance from the heat and flame (see “Safe Fire pit Clearance”)
The weight of the burner unit must be supported as per original assembly supplied by Solus and not by any control/valve box. For electronic ignition models the control/valve box must be above grade with adequate drainage to prevent water damage to the controls inside the box.
1.2 Safe Fire Pit Clearances
Sides surrounding Fire Pit – 16” or more from side of vessel from structure or combustibles; Overhead clearance – minimum 77” overhead from ground where vessel is placed.
2. FIRE PIT INSTALLATION
Solus products must be installed by professionals that are locally licensed by the authority having jurisdiction in gas piping.
Every Solus fire pit has a built-in open base or drilled access hole through which the gas line or propane line can be brought in. The gas line or propane line must be brought in through these line access holes so that the line is not pinched and that the positioning of the fire pit is not compromised. The gas line must be positioned in such a way that it is not a tripping hazard.
For Auto Electric Burner, the wiring must be done by a certified electrician and meet the outdoor electrical code requirements. In addition, check with your local utilities before digging to ensure you stay away from utility pipes and cables buried in your yard. The use of approved conduit material in your jurisdiction is required.
For installation at elevations above 2000 ft (610 m), the appliance shall be de-rated 4 percent for each 1000 ft (305 m) of elevation above sea level.
3. PLACEMENT of LAVA ROCKS and REFRACTORY STONES
The lava rocks and refractory stones must be properly placed as follows:a) Position the fire pit per “Location of Installation”.
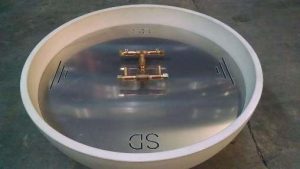

3. Placement of Lava Rocks and Refractory Stones continued…b) Place the lava rock deep enough to only cover aluminum plate and brass burner fitting. Do not cover the nozzles and the pilot light assembly.
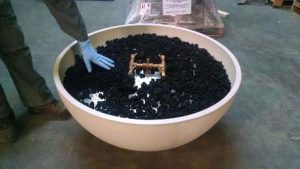

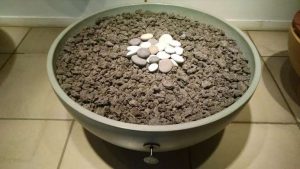
c) Place the refractory stone in the center of the fire pit on top of lava rocks.

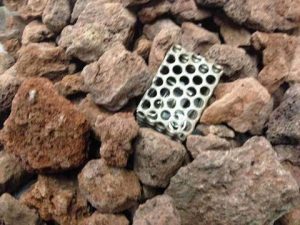
d) Do not cover pilot assembly screen or opening with lava rocks or refractory stones. Incorrect placement of rocks or stones will cause the pilot flame to suffocate and delay or prevent main burner ignition.

4. PARTS LIST
Solus fire pit equipped with either Manual Lit System or if optioned Electronic IgnitionSystems comes standard with the following:
- Fire pit vessel
- Cross-jet action brass burner
- Aluminum burner plate and burner plate support
- If optioned, Manual Lit System with Flame Supervision Gas Valve and Pilot/Thermocouple Assembly.
- If optioned, Electronic Ignition System with Automatic Gas Valve, Pilot Assembly, Ignition Control Module and 24V Transformer.
- LP Conversion Kits, consisting of the following parts:
- LP Nozzles (4 pieces) – for both Electronic Ignition and Manual Lit System For Baso Gas Products Components:
- Baso Gas Products Part # Y90AA-4212 for Pilot Light nozzle conversion (For Electronic Ignition and Manual Lit System)
- Baso Gas Products Part # GM-70-CLP LP Gas Conversion Kit for regulator adjustment of 8” – 12” WC (For Electronic Ignition System only) For Honeywell Components:
- Honeywell Part # 393691 LP Gas Conversion Kit for regulator adjustment of 8” – 12” WC (For Electronic Ignition System only)
- No pilot light conversion required
5. FIRE PIT OPERATION
![]()
![]()
![]()
![]()
![]()
![]()
![]()
![]()
![]()
![]()
![]()
![]()
![]()
![]()
![]()
![]()
![]()
![]()
![]()
![]()
![]()
![]()
![]()
![]()
![]()
![]()
![]()
![]()
![]()
![]()
![]()
![]()
![]()
![]()
![]()
![]()
![]()
![]()
![]()
![]()
![]()
![]()
![]()
![]()
![]()
![]()
![]()
![]()
![]()
![]()
![]()
![]()
![]()
![]()
![]()
![]()
![]()
![]()
![]()
![]()
![]()
![]()
![]()
![]()
![]()
![]()
![]()
![]()
![]()
![]()
![]()
![]()
![]()
![]()
![]()
![]()
![]()
![]()
![]()
![]()
![]()
![]()
![]()
![]()
![]()
![]()
![]()
![]()
![]()
![]()
![]()
![]()
![]()
![]()
![]()
![]()
![]()
![]()
![]()
![]()
![]()
![]()
![]()
![]()
![]()
![]()
![]()
![]()
WARRANTY REQUIREMENT: When not in use the fire pit must always be covered with the All-Weather Cover and/or Metal Tabletop from Solus.
IMPORTANT: During the initial start-up, it may be necessary to purge air in gas lines after system installation.
5.2 Lighting Instructions
IMPORTANT: During the initial start-up, it is necessary to purge air in gas lines after system installation. Purging the air is especially important for firepits equipped with Electronic Ignition System or Manual Lit System equipped with Flame Supervision Valve System.
- BEFORE LIGHTING: Smell all around the fire pit area for gas.
- WHAT TO DO IF YOU SMELL GAS:
- Do not try to light the fire pit.
- Do not touch any electric switch; do not use any phone in the vicinity of the fire pit.
- Shut off the gas supply at the shut off valve and immediately call your gas supplier from a neighbor’s phone. Follow the gas supplier’s instructions.
- If you cannot reach the gas supplier, call the fire department.
![]()
![]()
![]()
![]()
![]()
![]()
![]()
![]()
![]()
![]()
![]()
![]()
![]()
![]()
![]()
![]()
![]()
![]()
![]()
![]()
![]()
![]()
![]()
![]()
![]()
![]()
![]()
![]()
![]()
![]()
![]()
![]()
![]()
![]()
![]()
![]()
- BEFORE LIGHTING and
- WHAT TO DO IF YOU SMELL GAS before relighting.
5.3 Manual-Lit System Lighting Instructions
Manual Lit System with manual ball valve:
- STOP! Read the safety information above and read the User Manual before proceeding to the next step.
- Turn key valve clockwise to the OFF position.
- Wait (5) minutes to clear out any gas. Then smell for gas.a. If you smell gas, STOP! See front page- “What to do if smell gas” section.b. If you do not smell gas, proceed to next step.
- Turn key valve slowly counter-clockwise to the ON position, while simultaneously using a lighter to ignite the burner. Immediately after the pilot light is lighted, retrieve and stay clear of the burner as the burner will ignite immediately.
- Never leave fire pit unattended by an adult.
Manual Lit System equipped with Flame Supervision Valve (if optioned):
- STOP! Read the safety information above and read the User Manual beforeproceeding to the next step.
- Turn key valve clockwise to the OFF position.
- Wait (5) minutes to clear out any gas. Then smell for gas.a. If you smell gas, STOP! See front page- “What to do if smell gas” section.b. If you do not smell gas, proceed to next step.
- Turn key valve slowly counter-clockwise to the ON position, allow 10 minutes to purge the air off the system, then press on the grey button continuously for 15 seconds while simultaneously using a lighter to ignite the pilot light. Immediately after the pilot light is lighted, retrieve and stay clear of the burner as the main burner will ignite immediately. Note that the cool-off period can be up to 1 minute (depending on surrounding temperature). Within the cool-off period, the burner will light up by simply turning the ball valve to ON position (anti-clockwise).
- Never leave fire pit unattended by an adult.
5.4 Manual Lit System – Extinguishing
- Turn the key valve clockwise until it stops.
- Carefully verify flame is OUT.
- After cooling, cover fire pit with Solus cover.
5.5 Electronic Ignition System – Lighting Instructions
- STOP! Read the safety information above and read the User Manual before proceeding to the next step.
- Allow 10 minutes to purge the air off the system, then ON/OFF Switch (such as a wall switch) to ON position.
- Never leave fire pit unattended by an adult.
5.6 Electronic Ignition System – Extinguishing
- ON/OFF Switch to OFF position.
- Carefully verify flame is OUT.
- After cooling, cover fire pit with Solus cover.
![]()
![]()
![]()
![]()
![]()
![]()
![]()
![]()
![]()
![]()
![]()
![]()
![]()
![]()
![]()
![]()
![]()
![]()
![]()
![]()
![]()
![]()
![]()
![]()
![]()
![]()
![]()
![]()
![]()
![]()
![]()
![]()
![]()
![]()
![]()
![]()
6. MAINTENANCE
Please refer to document in this package called “Care and Maintenance – Firepits”
![]()
![]()
![]()
![]()
![]()
![]()
![]()
![]()
![]()
![]()
![]()
![]()
![]()
![]()
![]()
![]()
![]()
![]()
![]()
![]()
![]()
![]()
![]()
![]()
![]()
![]()
![]()
![]()
![]()
![]()
![]()
![]()
![]()
![]()
![]()
![]()
- Keep fire pit covered at all times when not in use. Always keep the firepit covered when it is raining, snowing and during Fall season when leaves and debris are falling.
- Keep any debris out of fire pit. Clean as needed.
- Drain the water in the brass tubing (below burner plate) as water can condensate or rain water can accumulate if the fire pit is not covered when not in use.
- Periodical inspection by a qualified service technician of the air-intake is required to ensure your fire feature performs properly.
- Cross-jet action nozzles cleaning (one cleaning per year): If flames exhibit any abnormal shapes or behavior, or if burner fails to ignite properly, then the burner nozzles may require cleaning. The appliance can be cleaned by carefully removing the media to allow access to burner. Use a paperclip and carefully insert in jet to remove dust, spider webs, and loose particles from base.
- Pilot Light Nozzle, Ignitor and Thermocouple soot cleaning (one cleaning every 6 months or as often as needed): Remove lava rocks & refractory stones around pilot, clean the protective cage, Pilot Light Nozzle, Ignitor and Thermocouple any soot using soft brush. Place lava rocks or refractory stones back as explained in “Placement of Lava Rocks and Refractory Stones”.
7. LP (Liquid Propane) CONVERSION
To convert the burner system to LP Gas application, the LP conversion kits must be purchased from Solus. The conversion must be conducted by a certified Gas Fitter (Refer to Section 4 – Parts List for additional details).
8. TROUBLESHOOTING
All (100%) of our burners are extensively burn-tested and documented for normal functioning in our factory before shipping as part of our Quality Assurance program. This burn-testing is also a key requirement of our CSA, ANSI and CE certification programs.
If you experience difficulty in lighting the burner, it is likely due to one or two simple reasons.
The 5 most common reasons we found are:
- Air in the gas line not purged. SOLUTION: Purge the air, turn on the gas supply and allow 10 minutes to purge all the air and saturate the entire system.
- Gas pressure or gas line not adequate. SOLUTION: Ensure that the correct supply pressure has been used: 7 inwc for Natural Gas; 11 inwc for LP Gas.
- Trying to use an LP unit with NG Gas or vice versa without using the prescribed conversion kits.
- Electrical line not grounded at source.
- Firepit has been exposed to rain for an extended period of time, resulting in the condensation chamber (vertical brass tubing below burner plate) being over filled with water passing the T- connector and flooding the electronic gas valve. Prolonged flooding of the valve may corrode the valve mechanism resulting in the valve not functioning properly. SOLUTION: see “Care and Maintenance – Firepits” for clearing the burners. Long-term Solution – use a Solus All-Weather cover to limit the exposure to the elements.
Below are some potential causes and possible corrective actions by certified Gas Fitter.
8.1 No Pilot Flame (only Ignitor sparks)
Possible Cause and Corrective Action:
- Air in gas line. If new install, may take several attempts to purge air. Simply turn on the gas supply and wait 10 minutes.
- Debris in gas line. Confirm gas line is clear of any debris.
- Improper gas pressure. Confirm proper gas pressure.
- Pilot orifice dirty. Clean pilot head.
8.2 Main Burner Won’t Light (even though the Pilot lights)
Possible Cause and Corrective Action:
- Firepit has been left unsheltered from rain – too much water accumulates in brass tubing below burner plate, blocking the gas flow. Drain the water by removing the end cap; cap it back and test for gas leakage.
- Improper gas pressure. Confirm proper gas pressure.
- Small pilot flame. Clean pilot head and clean orifice.
- Dirty thermocouple or temperature sensor. Clean thermocouple using a soft brush.
- Crossfire Burner Nozzles are obstructed. Confirm no debris or water in burner. Drain water in vertical brass tubing by remove end cap; recap and ensure gas tightness (Always cover fire pit when not in use)
- Improperly placed lava rocks or refractory stones, totally blocking nozzles. Ensure correct placement.
8.3 Main Burner Turning Off/On Frequently
Possible Cause and Corrective Action:
- Improper gas pressure; gas pressure too low. Ensure appropriate gas line size and regulator.
- Small Pilot flame. Clean pilot head and clean orifice.
- Improperly placed lava rocks or refractory stones. Ensure correct placement.
- Thermocouple or temperature sensor defective. Change thermocouple / temperature sensor.
8.4 Main Burner Flame /Pilot Flame too low
Possible Cause and Corrective Action:
- Improper gas pressure; gas pressure too low. Ensure appropriate gas line size and regulator.
- Wrong gas type; incorrect use of NG on firepit unit meant for LP. Ensure factory approved conversion kits are used and properly installed per instructions provided.
8.5 Main Burner Flame /Pilot Flame too high
Possible Cause and Corrective Action:
- Improper gas pressure; gas pressure too high. Ensure appropriate gas line size and regulator.
- Wrong gas type; incorrect use of LP on a firepit unit meant for NG. Ensure factory approved conversion kits are used and properly installed per instruction provided.
solus Fire Pit Installation and User Manual – solus Fire Pit Installation and User Manual –
Questions about your Manual? Post in the comments!
[xyz-ips snippet=”download-snippet”]

