SOUND PRO Portable 8″ Bluetooth Blaze Party Speaker

The lightning flash with arrowhead symbol within an equilateral triangle is intended to alert the user to the presence of uninsulated “dangerous voltage” within the product’s enclosure that may be of significant magnitude to constitute risk of electric shock.The exclamation point within an equilateral triangle is intended to alert the user to the presence of important operation and servicing instructions in the literature accompanying the appliance.
IMPORTANT SAFETY INSTRUCTIONS
- Read these instructions.
- Guard this manual.
- Obey all alerts.
- Follow all instructions.
- WARNING: To prevent fire or shock hazard, do not expose this equipment to rain or moisture. Do not store and operate this product near liquid.
- Clean only with dry cloth.
- Not store and not operate this product near any heat sources such as radiators and heat registers, stove or other appliances (including amplifiers) that produce heat. Keep this product in a well ventilated place.
- Not ignore the safety purpose of the polarized or grounding plug. A polarized plug has two blades being wider than the other. A grounding plug has two blades plus a round pin to ground.The wide blade or the third prong is intended to provide security. If the provided plug does not fit into your outlet, consult an electrician to replace the outlet.
- Protect all wires connected to this unit from being walked on or pinched, particularly at plugs and the point where the cord exits the unit. When unplugging from the electrical outlet, grasp the plug and do not pull the cord.
- Disconnect the unit during lightning storms or when long period is to remain unused.
- Keep this unit off when connecting all the devices connected to it.
- After finishing the installation and connections, connect all your equipment with low volume level. Once all devices are connected, slowly increase the volume or level controls to achieve the proper position.
- Before placement, installation, assembly or suspending any product, inspect all equipment, suspension, cabinets, transducers, brackets and associated equipment. Any missing component, corroded, deformed, or with non-nominal load can reduce the intensity, placement and arrangement of the installation significantly. Any of these conditions can reduce the security of the facility and must be corrected immediately. Use only suitable equipment for the loading conditions of the installation and that any possibility of reducing term, unexpected overload, never exceed the capacity of the material or equipment.
- Consult a licensed professional to install the equipment and make sure that all local, regional and national regulations related to security are understood and adhered to.
- All services should be performed by qualified professionals. Servicing is required when the apparatus has been damaged in any way, as if having the power cord or its damaged connector, or if the machine breaks contact with liquid or if any object is inserted in the unit or if the unit is exposed to rain or moisture, or if the unit does not operate normally, or has been dropped.
CHARGE THE BATTERY FULLY BEFORE FIRST USE TO OPTIMIZE ITS LIFETIME PERFORMANCE.
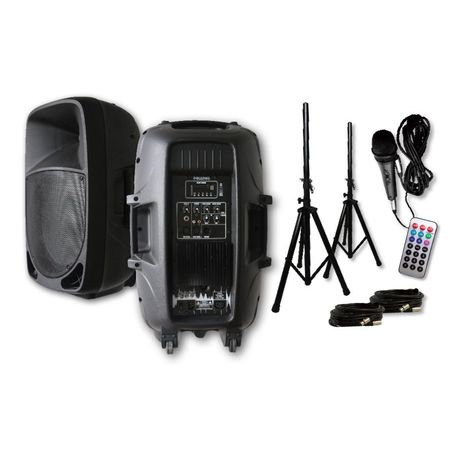
IN THE BOX
Upon opening your new portable Bluetooth® speaker, first check to ensure all of the following contents are present:
- Portable Bluetooth® Speaker
- Remote Control
- Power Adapter
- Wired Microphone
- User Manual
KEY FEATURES
- Bluetooth® functionality allows you to wirelessly stream all your favorite music content from Bluetooth-enabled devices in high-quality audio.
- Connect to other Sound Pro NDS-8008 TWS speakers allowing you to sync speakers up to 33 Feet from each other without any wires.
- Start the party off right with the Disco Light.
- Play media from removable storage devices, such as TF memory cards and USB flash drives thanks to the built-in TF card slot and USB port.
- Manually connect to external media devices to seamlessly stream your favorite audio via the 3.5mm AUX input.
- Become the star of the show thanks to the built-in 6.5mm MIC input and included wired microphone
- High-power speaker produces peerless soft, clear, and dynamic sound.
- Tune in on all of your favorite local radio station with the FM radio tuner.
- Built-in carrying handle allows you to move the speaker anywhere easily.
- Accessories Included: User Manual, Remote Control, Power Adapter, & Wired Microphone.
Back Panel

REMOTE CONTROL
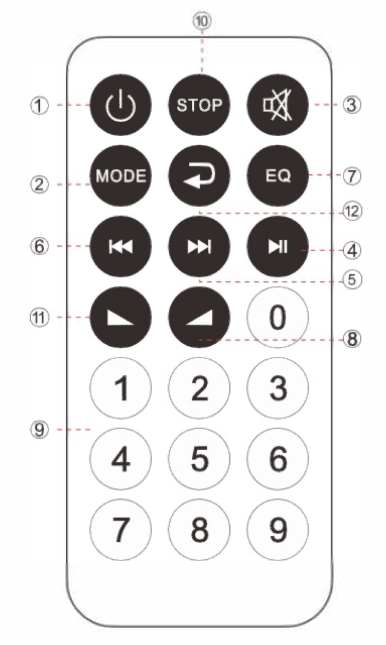
- Standby Button
- Mode Button (AUX/FM/BT/USB)
- Mute Button
- Play/Pause Button (MP3 Mode); Scan (FM Mode)
- Next Song (MP3 Mode); Next Channel (FM Mode)
- Previous Song (MP3 Mode); Previous Channel (FM Mode)
- EQ Effect (MP3 Mode)
- Increase Speaker Volume
- 0-9 Number Pad: Choose Song Number Directly in MP3 Mode.
- Stop Button
- Decrease Speaker Volume
- Repeat Song (MP3 Mode)
PAIRING A BLUETOOTH® DEVICE
Use Bluetooth® mode to stream music from a Bluetooth® enabled player (e.g., smartphone or tablet device). A device must be paired with the unit before using them together for the first time.To pair a Bluetooth® enabled device with the Speaker, follow these steps:
- Make sure Bluetooth® is enabled on your device and that it is next to the unit before attempting to pair it.
- Turn on the Speaker. The speaker will automatically enter pairing mode and make a beeping sound.
- Use your device to search for nearby Bluetooth devices. The Speaker will be listed as “SOUND PRO NDS-8008”. (This function is usually in the Bluetooth® settings menu; refer to your device’s instruction manual to learn more.)
- Select “SOUND PRO NDS-8008” from the list of found/available devices. The Speaker will make a confirmation tone upon successful connection.
You can now start playback on your connected device to begin streaming music to the speaker.
TWS FUNCTION
The Bluetooth® speaker allows you to enjoy your favorite audio played over multiple speakers at the same time thanks to the included TWS function. To use the TWS function, follow these steps:
- Turn on the speakers you intend to use. Switch both speakers to BT mode.
- Choose one of the speakers to begin the pairing process.
- Press the PLAY/PAUSE (TWS) button and hold it for 3 seconds. When you hear a chiming sound, the speaker is ready to pair with another unit.
- Use your smart phone device to connect one of the paired speaker via Bluetooth®.
- The audio will play through the two connected speakers.
NOTE: TWS functionality is for two speakers at a time only. It can not support more than two speakers at the same time.
USB/TF CARD
The Bluetooth® speaker allows you to enjoy your favorite audio played from external storage devices, such as USB flash drives and TF memory cards. To use do so, follow these steps:
- Insert the USB or TF card into the USB port/ TF slot.
- Press the “Play/Pause” button to start or stop playback. Briefly press the-/ I◄◄ or+/ ►►I button to skip to the previous or next song. Press and hold the-/ I◄◄ or+/ ►►I button to decrease or increase the volume.
NOTE: When a USB flash drive / memory card is inserted into the USB / memory card input, the unit will automatically switch to USB / memory mode and begin playing Mp3 audio files from the USB flash drive/ memory card. You can also enter USB / memory card mode by pressing the “MODE” button to cycle through modes.
FM RADIO
The Bluetooth® speaker allows you to enjoy your favorite local FM radio stations. To use do so, follow these steps:
- Press the MODE button to change to FM radio mode.
- Press and hold the “Play/Pause” button to automatically search for available FM channels.
- Once the scan is complete, you can use the -/ I◄◄ or+/ ►►I button to search the previous or next stations. Press and hold the-/ I◄◄ or+/ ►►I button to decrease or increase the volume.
NOTE: During the station scan, the Bluetooth speakers will pre-record all found stations into memory. The scan procedure will take several minutes to complete and should not be interrupted.
AUX INPUT
The Bluetooth® speaker allows you to enjoy your favorite audio played from external devices that don’t have Bluetooth® capabilities via the auxiliary input. To use do so, follow these steps:
- Insert the included auxiliary audio cable into the AUX input on the speaker.
- Plug the other end of the audio cable into the desired external media device’s AUX input.
- Press the “Play/Pause” button to start or stop playback.Press and hold the-/ I◄◄ or+/ ►►I button to decrease or increase the volume.
NOTE: When an external media device is connected via the AUX input, you can enter AUX mode by pressing the “MODE” button to cycle through modes and begin playing MP3 audio files from the connected device.
CHARGING
To charge the Wireless Speakers, plug the included adaptor into the speaker’s DC port. A red light will come on to notify you of a successful connection and that the speaker is charging.The red light will turn off when charging is complete.
TROUBLESHOOTING
| Fault | Possible Cause | Solution |
| No sound | 1. No input sound source.
2. Volume is too low. |
1. Use a better music signal.
2. Adjust volume. |
| Distortion of sound | 1. Volume too high.
2. Speaker may be damaged. |
1. Turn down the volume.
2. If speaker is damaged, repair or replace it. |
| Karaoke does not work | 1. Microphone plug is not fully inserted.
2. Microphone switch is not on. 3. Microphone volume knob is at the lowestposition. |
1. Plug microphone properly into the socket.
2. Turn on microphone switch. 3. Adjust microphone volume properly. |
| MP3 does not play | 1. The song format in the U disc is incorrect.
2. Improper operation has caused a process disorder. 3. USB disc is disconnected. |
1. Transform song format into Mp3 format.
2. Reboot the machine. 3. Insert USB disc properly. |
SPECIFICATIONS
| Speaker | 8″ Woofer + 1″ Tweeter |
| Wireless Source | Bluetooth® |
| Feature Function | TWS |
| Knobs | Microphone Volume, Microphone Echo, Bass Adjustment, & Treble Adjustment |
| Display Type | LED |
| Media Inputs | USB Port, Micro SD Card Slot, AUX, MIC |
| Radio Tuner | FM |
| Lighting Effects | Full Panel LED Disco Light |
| Power Source | 3.7V 3000mAh Rechargeable Battery |
| Battery Type | Built-in Lithium Rechargeable |
| Accessories Included | User Manual, Remote Control, Power Adapter, Wired Microphone |
FCC NOTICE
This device complies with Part 15 of the FCC Rules. Operation is subject to the following two conditions: (1) this device may not cause harmful interference, and (2) this device must accept any interference received, including that may cause undesired operation.
NOTE: This equipment has been tested and found to comply with the limits for a Class B digital device, pursuant to Part 15 of the FCC Rules. These limits are designed to provide reasonable protection against harmful interference in a residential installation. This equipment generates, uses and can radiate radio frequency energy and, if not installed and used in accordance with the instructions, may cause harmful interference to radio communications. However, there is no guarantee that interference will not occur in a particular installation. If this equipment does cause harmful interference to radio or television reception, which can be determined by turning the equipment off and on, the user is encouraged to try to correct the interference by one or more of the following measures:
- Reorient or relocate the receiving antenna.
- Increase the separation between the equipment and receiver.
- Connect the equipment into an outlet on a circuit different from that to which the receiver is connected.
- Consult the dealer or an experienced radio/TV technician for help.
CAUTION ON MODIFICATIONS
Any changes or modifications not expressly approved by the grantee of this device may void the authority granted by the FCC to operate the equipment.
SUPPORT
If you have problems with your device, please consult the instructions in this manual. Please also visit us on the web at www.naxa.com to get up-to-the-minute news, alerts, and documentation for your device. For additional assistance, please contact Naxa Technical Support.Naxa Technical Support2320 East 49th St.Vernon, CA 90058(866) 411-6292http://www.naxa.com/supportcenter/
![]()
[xyz-ips snippet=”download-snippet”]