![]()
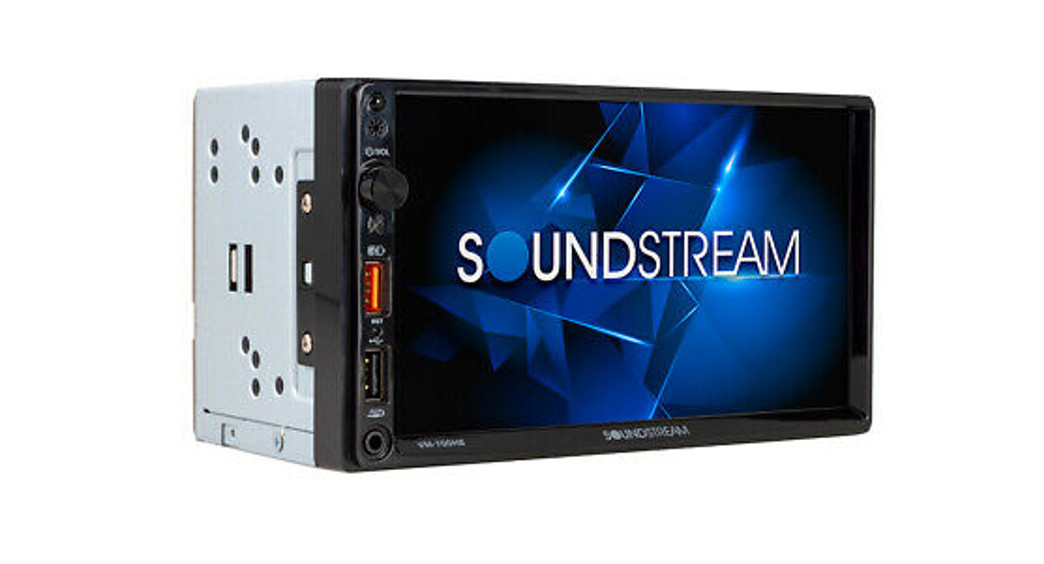
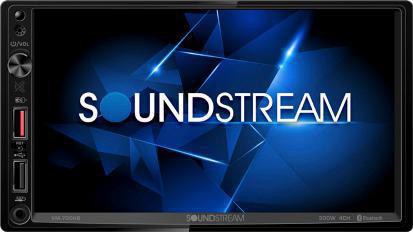
Model No.: VM-700HB
 USER’S MANUAL
2 DIN MP3/MP4, USB Player,AM/FM Receiver, w/7” TFT LCD, Bluetooth
Setup:
in main menu, touch the “Setup” icon to enter the setup menu, as below image. Then user can set up or adjust the general settings for this digital media receiver.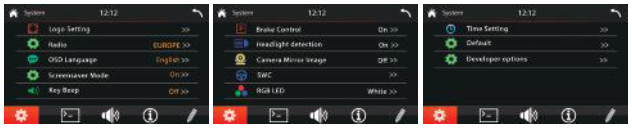 A. System: Logo Setting, Radio Area, OSD Language, Screensaver Mode, Key Beep, Brake Control, Headlight Detection, Camera Mirror Image, SWC, RGB LED Setting,Time Setting, Default.
- Logo Setting: To set a logo as the splash screen for this media player.
- Radio Area: To choose the radio area: EUROPE, USA 1, USA 2, RUSSIA, JAPAN, ASIA.
- OSD Language: English, Chinese, Arabic, Greek, Thai, Hebrew, Turkish, Russian, French, German, Spanish, Persian, indonesian, Portuguese, Italian.
- Screensaver Mode: Enables or Disables the screensaver of this media player.
- Key Beep: Enables or Disables the beep buzzer signal to confirm use.
- Brake Control: Enables or Disables the brake control detection.This safety feature to prevent driver distraction. We recommend user to enable this brake detection function. When enable this function, user were forbidden to watch video from this unit while this unit does not detect the brake signal of the parking brake.
- Headlight detection: Enables or Disables the car headlight detection.
- Camera Mirror Image: Enables or Disables the camera mirror image.
- SWC(Steering Wheel Control)
- Tap “SWC” to enter the study operation menu. First, make sure the SWC connecting wires have been connected to this unit. Before study, tap the
 icon to clear all previous settings.Press and hold a steering wheel button, at the same time, tap the function button on touch screen that you want to set on to the steering wheel.
 - Time Setting:Tap the “Time Setting” to enter the time setting interface, tap the and button to adjust Year, Month, Day, Hour, Minute.Tap the button to preset 12 or 24 Hours format as system clock time format.
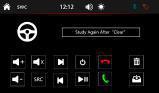 Press and hold a steering wheel button, at the same time, tap the function button on touch screen that you want to set on to the steering wheel.
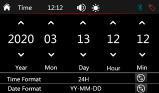
INSTALLATION:
Before installation:
- We recommend you to let a professional technician install the unit in vehicle.
- Remove the trim ring from unit (if installed).
- Disconnect negative battery terminal of vehicle.installation Process:
- Carefully remove the existing head unit.
- Before finaily installing this product, connect wiring harness temporarily and make sure it’s all connected up properly and test the head unit fit can work properly. (Consult a qualified technician if you unsure)
- Mount this video player using both “L” mounting metal brackets (Not included) and screws (MSx6bm) to the vehicle.Note: you need other screws to fix other terminal, please buy from your dealer according to the drilling of holes size.Wiring Connections:
 Wiring Connections:
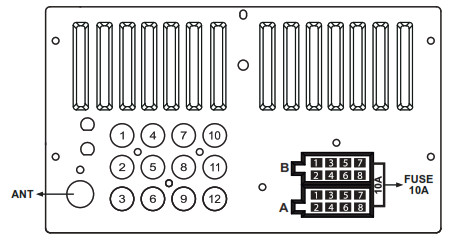
Setup:Tap the ![]() button to preset date format.
button to preset date format.
- DefaultTap this item to restore to ali parameters to factory default settings.
- Developer optionsThe initially factory default “8288”B. Screen(Video Settings)Tap the icon to set up the video parameter of screenC. Audio SettingsTap the icon to enter the audio setting.D. Version (System information)Tap this item to view the software version.E. Password (Factory Setup)The initially factory default “1688”
 C. Audio SettingsTap the
  D. Version (System information)Tap this item to view the software version.
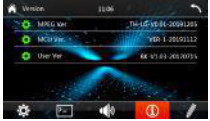 E. Password (Factory Setup)The initially factory default “1688”
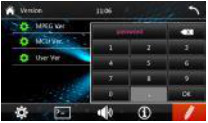
Wiring Connections:
Audio/Video I/O Connections
| 1. Rear Camera Video Input (Yellow) | 7. Video Output 1 (Yellow) |
| 2. Front Camera Video Input (Yellow) | 8. Rear Left RCA Output (White) |
| 3. Subwoofer Output (Green) | 9. Rear Right RCA Output (Red) |
| 4. Video Input (Yellow) | 10. Video Output 2 (Yellow) |
| 5. Audio Input Left CH (White) | 11. Front Left RCA Output (White) |
| 6. Audio Input Right CH (Red) | 12. Front Right RCA Output (Red) |
ISO Speaker/Power Connections
| A1: Reverse In + (Orange)A2: Brake – (Pink)A3: KEY (Brown)A4: ME B+ 12V (Yellow)A5: ANT + (Blue)A6: ILL B+ (Orange/Black)A7: ACC B+ (Red)A8: GND – (Black) | B1: Right Rear Speaker + (Violet)2: Right Rear Speaker – (Violet/Black)B3: Right Front Speaker + (Gray)B4: Right Front Speaker – (Gray/Black)B5: Left Front Speaker + (White)B6: Left Front Speaker – (White/Black)B7: Left Rear Speaker + (Green)B8: Left Rear Speaker – (Green/Black) |
Main Menu:In each mode, touch the ![]() icon to enter the main menu as below image. In the main menu, tap the desired icon to enter each fo the following settings: Radio, BT(Bluetooth), Phonelink, AUX/AV IN, EQ Preset, USB, F.CAM(Front View Camera), Setup.
icon to enter the main menu as below image. In the main menu, tap the desired icon to enter each fo the following settings: Radio, BT(Bluetooth), Phonelink, AUX/AV IN, EQ Preset, USB, F.CAM(Front View Camera), Setup.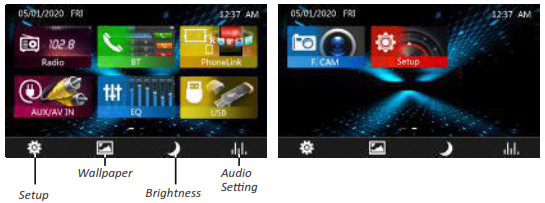
Radio Operations:Press the MODE button on the remote control, or tap the “Radio” icon on touch screen to enter radio mode.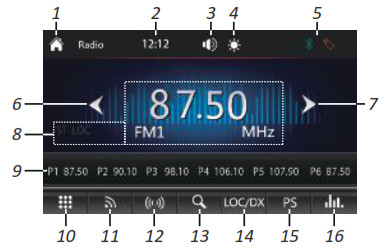
- Switch to the Home Page
- Clock Time
- Volume Level Adjust
- TFT Screen Backlight brightness Adjust
- Active Media
- Tune/Seek DownTap and hold this button to seek tuning down.Tap this button to move radio frequency down one step at a time.
- Tune/Seek UpTap and hold this button to seek tuning up.Tap this button to move radio frequency up one step at a time.
- Current Radio Reception State
- Preset StationsTap and hold one of preset station touch buttons to store the preset station.Tap one of preset station touch buttons to recall the preset station.
- input a specific radio frequency
- Band SelectorTap this button repeatedly to select between FM1, FM2, FM3, AM1, AM2 bands.
- Stereo/Mono ReceptionTap this button to choose FM STEREO or MONO audio effect.
- AS(Automatic Store Preset Stations),Tap and hold this button for more than 2 second to store station automatically.
- DX/LOC ReceptionTap this button to choose local or distant reception mode.
- PS(Automatic Scan Preset station)Tap this button to recall each preset station that stored in the memories.
- Audio Setting
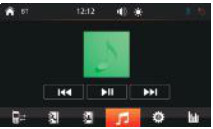
Media Playback:
USB Connection
- The black USB port is designed for media playback from a flash memory device. if you would like to play MP4/MP3/IPEG files contained in a USB flash memory device, please insert the USB flash memory device into the USB port of the unit. The unit will play automatically MP3/MP4/IPEG files.
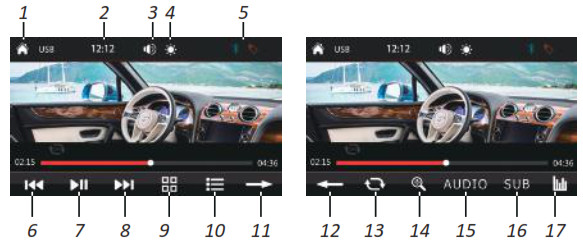
- This orange USB port is also designed for charging for iPhone / android mobile phone. The charging current consumption is 1 ampere.Music PlaybackPress the MODE button on the remote control, or tap the “USB” icon on home page of to switch music playback from a USB flash memory device.

| 1. Switch to the Home Page | 11. Next Page |
| 2. Clock Time | 12. Previous Page |
| 3. Volume Level Adjust | 13. Repeat Playback |
| 4, TFT Screen Backlight Brightness Adjust | 14. Random Playback |
| 5. Active Media | 15. Audio Settings |
| 6. Previous Track / Fast backward | 16. View the Root Directory in USB |
| 7. Play/Pause | 17. View the Music Files/Folders |
| 8. Next Track / Fast forward | 18. View the Video Files/Folders |
| 9. Sort the List of the Folders and Files | 19. View the Photo Files/Folders |
| 10. View the Music File List | 20. Return |
Movie playback
Android Phone Link Operations:
Phone link allows you to mirror the screen of certain Android smartphones on the screen of this car digital media player. Simply connect your device to the USB port and you’re ready to see your favorite smartphone apps directly on the screen.
Android phone link:
- Please scan one of QR code on right side to download the “Phonelink” app and install it to your smartphone.https://s3-ap-southeast-1.amazonaws.com/productscenter/release/venus/bootes/common/Autolink.apk
- Connect the original cable of your Smartphone, first to the car digital media player in the USB port, and then connect it to your phone.
- Now the car digital media player’s screen will do the mirror function with your smartphone and you will be able to run any application or function of your smartphone.


Using of the Icons:
- : Return to the previous step
- : Return to home page of smart devices
- : Landscape mode (Rotate the screen)
- : Exit the phone link mode
Note:
a. To unlink your smartphone from the car digital media player, just disconnect the USB cable again.b. For Android smart devices, this unit support two-way control (both by the car digital media player and connected smart devices).c. For Android smart devices, the Bluetooth must be connected, to have sound output.d. Some phones do not support Landscape mode on the home screen.
| 1. Switch to the Home Page | 10. View the Movie File List |
| 2. Clock Time | 11. Next Page |
| 3. Volume Level Adjust | 12. Previous Page |
| 4, TFT Screen Backlight Brightness Adjust | 13. Repeat Playback |
| 5. Active Media | 14, Zoom In/ Zoom Out |
| 6. Previous Movie / Fast backward | 15. Multi-Audio Language |
| 7. Play/Pause | 16. Multi-Subtitle Language |
| 8. Next Movie / Fast forward | 17. Audio Settings |
| 9. Sort the List of the Folders and Files |
Photo Playback: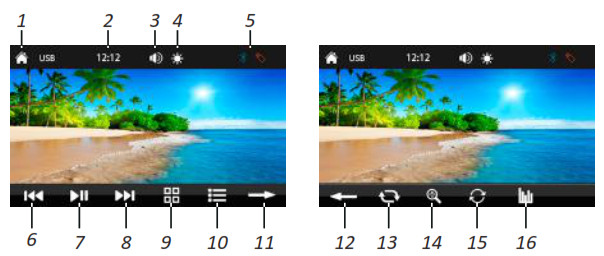
- Switch to the Home Page
- Clock Time
- Volume Level Adjust
- TFT Screen Backlight Brightness Adjust
- Active Media
- Previous Photo
- Play/Pause
- Next Photo
- Sort the List of the Folders and Files
- View the Photo File List
- Next Page
- Previous Page
- Repeat Playback
- Zoom In/ Zoom Out
- Rotate Photo
- Audio Settings
Remote Controls:
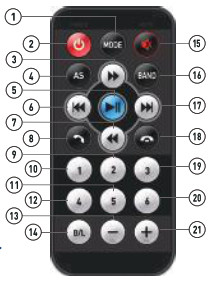
1. MODEPress it briefly to select different modes: RADIO, Bluetooth, USB and AUX IN.2. Power on/offPress it to turn the unit ON or OFF.3 & 7. ![]() In Radio mode, press any one to select each preset station that stored in the memories down or up manually.4. ASIn Radio mode, press the AS button to store stations automatically.Press and hold this button to recall each preset station that stored in the memories in each band.5.
In Radio mode, press any one to select each preset station that stored in the memories down or up manually.4. ASIn Radio mode, press the AS button to store stations automatically.Press and hold this button to recall each preset station that stored in the memories in each band.5. ![]() (Play/Pause)In USB/BT music playback mode, press it to pause playback.Press it again to start where playback stopped.6 &17.
(Play/Pause)In USB/BT music playback mode, press it to pause playback.Press it again to start where playback stopped.6 &17. ![]() In USB/8T music playback, press each one to skip to previous or next track. in Radio mode, press any one to seek tuning down or up.Press and hold anyone to search frequency up or down manually.8.
In USB/8T music playback, press each one to skip to previous or next track. in Radio mode, press any one to seek tuning down or up.Press and hold anyone to search frequency up or down manually.8. ![]() Press the
Press the ![]() button to make a call / receive a call / redial the last dialed phone number.9.2In radio mode, press this button to recall the preset station 2.10. 1In radio mode, press this button to recall the preset station 1.11.5In radio mode, press this button to recall the preset station 5.12.4In radio mode, press this button to recall the presetstation 4.13 & 21. VOL+/VOL-Use these controls to adjust the volume level.14. B/L (Back Light Setting)Press this button to turn on or off the back light of TFT screen.15. MUTEIn power on mode, press the MUTE button to toggle mute on or off.16. BANDPress BAND to select between FM1, FM2, FM3, AM1, AM2 bands.18.
button to make a call / receive a call / redial the last dialed phone number.9.2In radio mode, press this button to recall the preset station 2.10. 1In radio mode, press this button to recall the preset station 1.11.5In radio mode, press this button to recall the preset station 5.12.4In radio mode, press this button to recall the presetstation 4.13 & 21. VOL+/VOL-Use these controls to adjust the volume level.14. B/L (Back Light Setting)Press this button to turn on or off the back light of TFT screen.15. MUTEIn power on mode, press the MUTE button to toggle mute on or off.16. BANDPress BAND to select between FM1, FM2, FM3, AM1, AM2 bands.18. ![]() In BT mode, press to reject an income call or end a call.19. 3In radio mode, press this button to recall the preset station 3.20.6In radio mode, press this button to recall the preset station 6.
In BT mode, press to reject an income call or end a call.19. 3In radio mode, press this button to recall the preset station 3.20.6In radio mode, press this button to recall the preset station 6.
Bluetooth Operations:
Pairing and Connecting
- Before using a Bluetooth phone with this unit, the phone must be paired and connected.The Bluetooth signal of the unit will broadcast when the power is on.This cor digital media player will displayed as “SOUNDSTREAM” on your phone.When prompted, enter the pass code “0000” on your phone. Once paired, the Bluetooth phone should automatically connect this unit whenever the unit is in range.
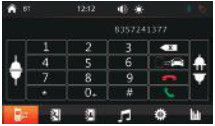
- Make a callInput the phone number by using the keypad in Bluetooth mode.
- Making and Ending a CallTap to moke a call, and tap to end a call.
- Redial tast dialed number.Tap to redial the last dialed phone number.
- Transferring AudioTap icon to transfer audio between this car bluetooth hands-free system and mobile phone.
- Disconnect or reestablish bluetooth connectionTap to disconnect the bluetooth connection.Tap to reconnect the bluetooth connection.
- Viewing Recent Call ListTap icon to view the income calls.Tap icon to view the outgoing calls.Tap icon to view the missed calls.Tap icon to refresh the recent call list.
- Contacts List (Phonebook)Tap icon to view the contacts(phonebook).Tap icon to refresh the phone book.Tap icon to and input a key-letter to retrieve the specified contacts.
- Streaming AudioIn bluetooth phone mode, tap icon to change to bluetooth music (A2DP) mode.Tap icon to skip to the previous track.Tap icon to play or pause the music.Tap icon to advance to the next track.
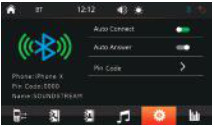
- SetupTap icon to set auto connect, auto answer and Pin Code.
- Audio SettingsTap icon to set sound effect and EQ settings.
 Input the phone number by using the keypad in Bluetooth mode.
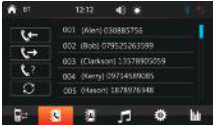

![]() SoundStream Technologies warrants this product to be free from defects in materials and workmanship under normal use and conditions, for a period of 1 year from the original date of purchase, if purchased and professionally installed by an Authorized SoundStream dealer. Any product purchased from and/or installed by others will be warranted for 90 days only. This warranty does not cover any expenses incurred in the removal or re-installation of the product, and is offered to the original purchaser only.Should service be necessary for any reason, due to a manufacturing defect or malfunction during the warranty period, SoundStream Technologies willrepair or replace, at its discretion, the defective merchandise at no charge upon delivery of the product to the address shown below, with proof of purchase. Before returning the product for service:
SoundStream Technologies warrants this product to be free from defects in materials and workmanship under normal use and conditions, for a period of 1 year from the original date of purchase, if purchased and professionally installed by an Authorized SoundStream dealer. Any product purchased from and/or installed by others will be warranted for 90 days only. This warranty does not cover any expenses incurred in the removal or re-installation of the product, and is offered to the original purchaser only.Should service be necessary for any reason, due to a manufacturing defect or malfunction during the warranty period, SoundStream Technologies willrepair or replace, at its discretion, the defective merchandise at no charge upon delivery of the product to the address shown below, with proof of purchase. Before returning the product for service:
- Enclose with the defective product a brief description of the problem with a name and daytime phone number so we may be in contact with any questions or concerns regarding the return.
- Enclose a copy of the original sales receipt for proof of purchase and installation.
- Enclose a $15.00 US certified check or money order to cover shipping and handling for return of the product. Do not include cash.
Carefully pack the product to protect it from damage during shipping and send it prepaid to:SoundStream Technologies1550 S. Maple Ave.Montebello, CA 90640Attn. Customer ServicePh: 800-724-1377 Fax: 323-722-8125
Please note, the warranty will not cover the following:
- Any product that has been misused or physically damaged.
- Any product that has been installed incorrectly. (i.e. over powered, incorrect enclosure, incorrect wiring, etc.)
- Any units that have been previously opened or repaired by a service center which is not authorized by Soundstream Technologies.
Any applicable implied warranties, including the warranty of the merchants ability, are limited in duration to a maximum of 1 year from the date of the original purchase at retail, and no warranties, whether expressed or implied, shall apply to this product thereafter. Under no circumstances shall Soundstream Technologies be liable for any loss or damage, direct or consequential arising out of the use of, or inability to use this product. (some states do not allow for limitations of implied warranties or exclusion of consequential damage therefore these restrictions may not apply.) To receive the full benefit of this warranty, fill out the included warranty card and mail it to the address shown.
Owners Registration Card.
Please complete and return immediately to the address on the reverse sideName: _____________________________________________________________________________Address: ___________________________________________________________________________City: __________________________State: ______________________ Zip: _____________________Vehicle Make/Model: _________________________________________________________________Product Model: ______________________________________________________________________Serial Number: ______________________________________________________________________Date Purchased: _____________________________________________________________________Name of Dealer: _____________________________________________________________________Dealer Address: ______________________________________________________________________City: _________________________ State: ________________________ Zip: ____________________Phone: ________________________________ Email: ______________________________________
SoundStream Technologies1550 S. Maple Ave.Montebello, CA 90640Attn. Customer Service
[xyz-ips snippet=”download-snippet”]