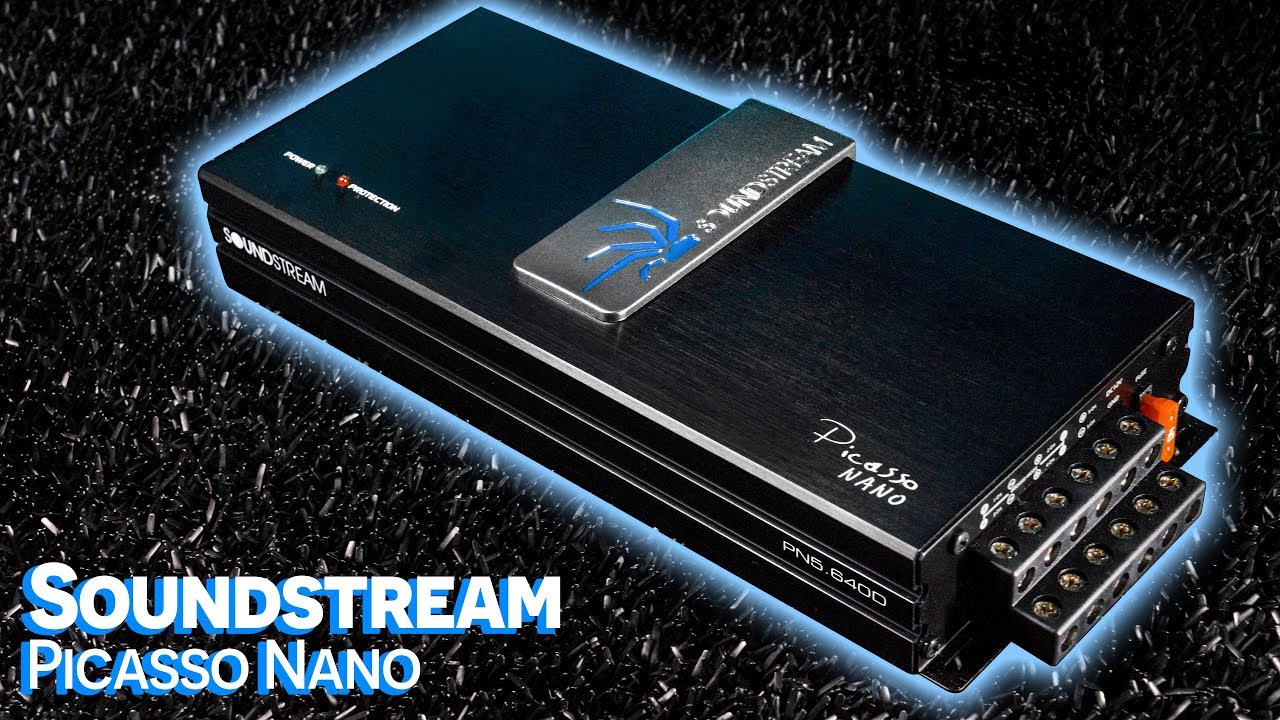

Flip-down Detachable 3.4” Monitor Built-in Bluetooth
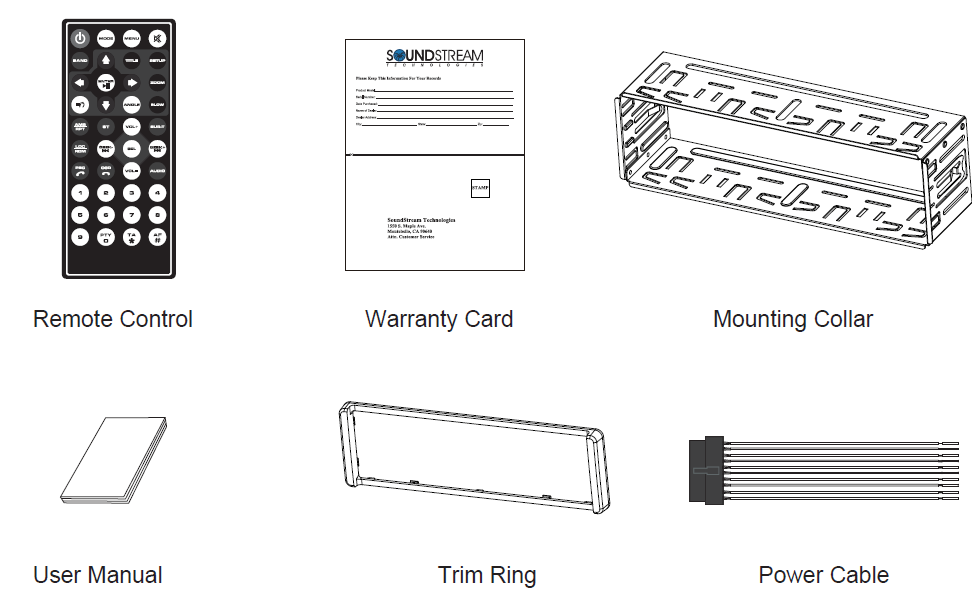
Accessories
Package contains the following accessories for installation and operation of the unit.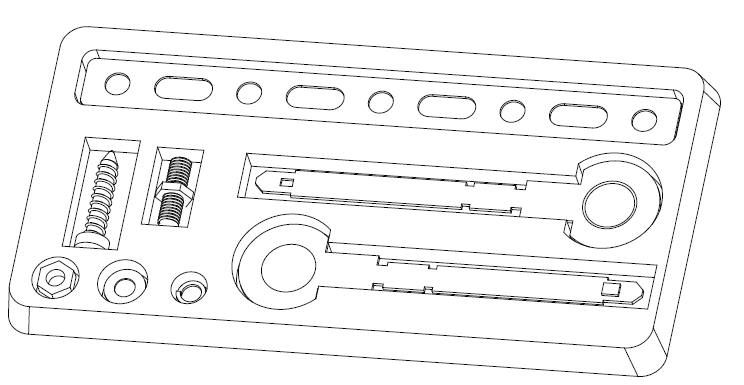
| (1) Mounting Strap | 1 |
| (2) Release Key | 2 |
| (3) Tapping Screw | 1 |
| (4) Hex Bolt (M5) | 1 |
| (5) Hex Nut (M5) | 1 |
| (6) Plain Washer | 1 |
| (7) Spring Washer | 1 |
Installation / Un-Installation
Installation
This unit can be installed in any dashboard having an opening as shown on the picture. The dashboard should be 4.75 – 5.56 mm thick in order to be able to support the unit.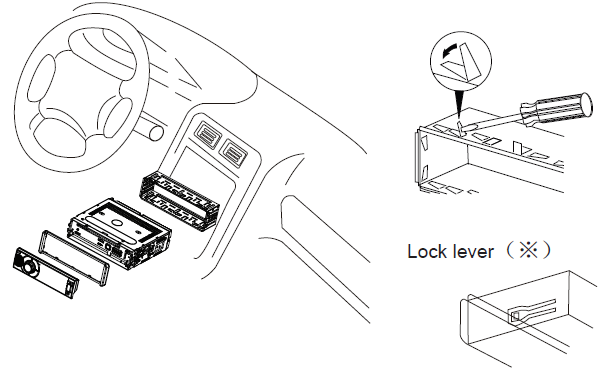
- Insert mounting collar into the dashboard, and bend the mounting tabs out with a screwdriver.Make sure that lock lever(※)is flush with the mounting collar (not projecting outward).
- Secure the rear of the unit.After fixing mounting bolt and power connector, fix the rear of the unit to the car body by rubber cushion.
- Insert trim plate.When you prepare to insert trim plate, please check its direction. Once it was up side down, it cannot be fixed.
Un-installation
Press the Open button to filp down the front panel, then remove the it from the chassis.
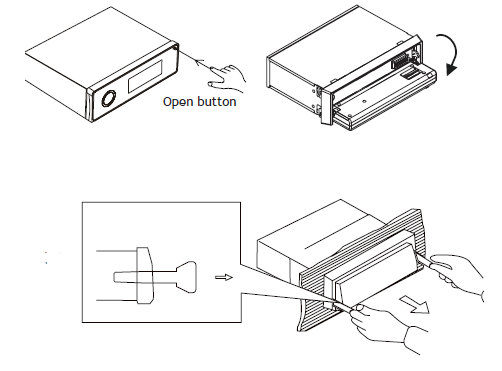
Remove Trim Ring and insert Release Keys into left and right side-end holes as shown in below picture and pull the unit out of the dashboard.
Wiring Connections
Make sure you have good chassis ground. A good ground connection will eliminate most electrical noise problems. A good chassis ground requires a tight connection to the vehicle’s metal chassis. The area around the ground connection should be clean, bare metal without rust, paint, plastic, dust, or dirt for a good electrical connection.
Caution: Do not interchange the connection of the wiring!!! For some car models you may need to modify wiring of the supplied power cord. Contact your authorized car dealer before installing this unit.
Connections
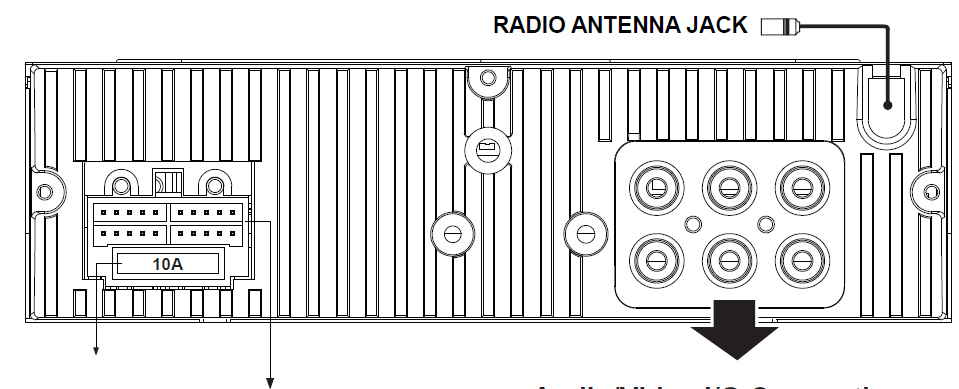
Speaker/Power ConnectionsGray: Front Right (+);Gray/Black: Front Right (-); White: Front Left (+);White/Black: Front Left (-); Violet: Rear Right (+)Violet/Black: Rear Right (-); Green: Rear Left (+);Green/Black: Rear Left (-); Red: ACC 12V (+);Yellow: BATTERY 12V (+); Black: GND (-) ;Blue: ANT (+);Orange: REVERSE (+);Pink: PARKING BRAKE (-); Brown: SWC 1;Brown/white: SWC 2;Black: SWC-GND.
Audio/Video I/O Connections
- CAM: Rear View Camera Video Input (Yellow)
- V-OUT: Video Output (Yellow)
- FL: Front Left RCA Output (White)
- FR: Front Right RCA Output (Red)
- RL: Rear Left RCA Output (White)
- RR: Rear Right RCA Output (Red)
Using the ISO Connector
- If your car is equipped with the ISO connector, then connect the ISO connectors as illustrated.
- For connections without the ISO connectors, check the wiring in the vehicle carefully before connecting, incorrect connection may cause serious damage to this unit.
- Cut the connector; connect the colored leads of the power cord to the car battery as shown in the color code table below for speaker and power cable connections.
Function
|
Function |
|
| Socket A (Power supply) | Socket B (Speakers) |
| Rear Right(+)—Violet | |
| Rear Right(-)—Violet/Black Stripe | |
| Front Right(+)—Grey | |
| Battery 12V (+)–Yellow | Front Right(-)—Grey/Black Stripe |
| Auto Antenna–Blue | Front Left(+)—White |
| Front Left(-)—White/Black Stripe | |
| ACC(+)–Red | Rear Left(+)—Green |
| Ground–Black | Rear Left(-)—Green/Black Stripe |
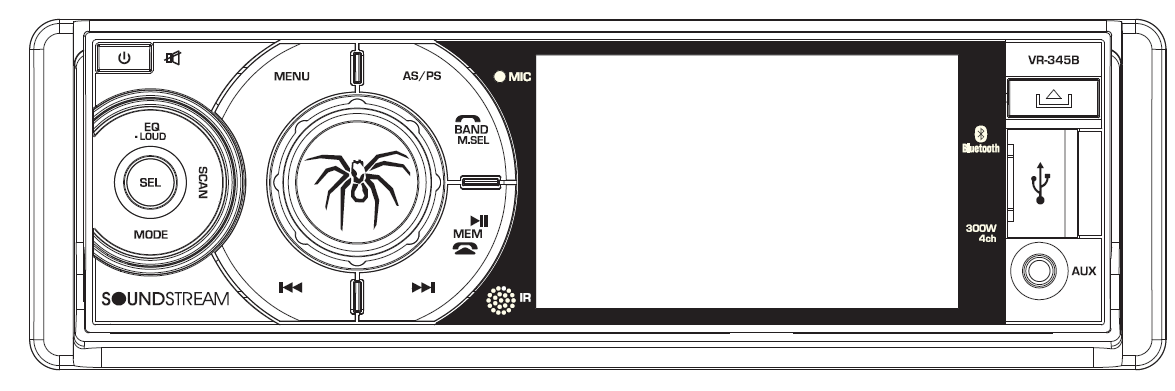
Front panel
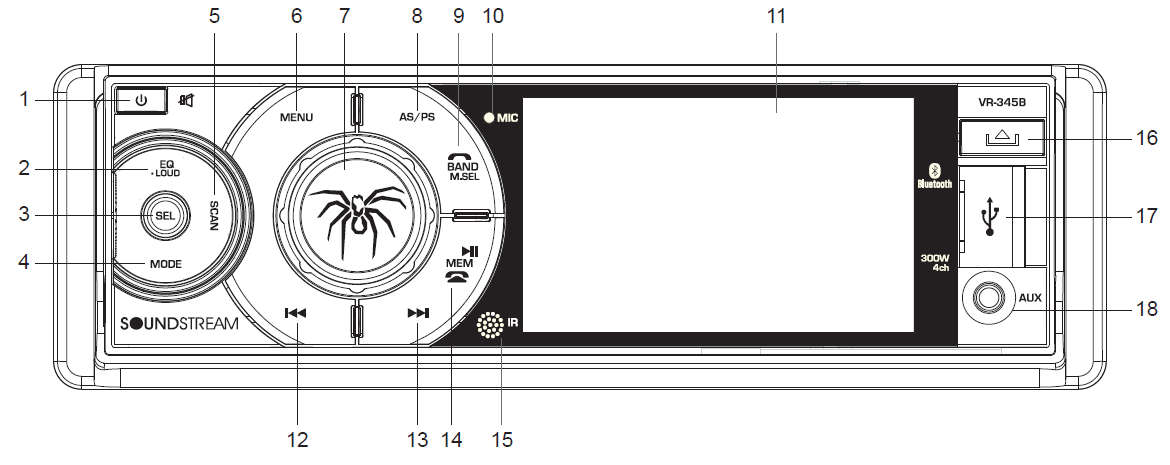
- (Power On/Off)
- EQ /LOUD button
- SEL button
- MODE button
- SCAN button
- MENU button
- Volume knob /OK button
- AS/PS button
- BAND / Setting item select /Accept button
- MIC(Hands-free Microphone)
- 3.4” TFT Screen
- Previous / Reverse button
- Next / Forward button
- Play/Pause, Memory /Reject button
- IR sensor
- OPEN button
- USB slot
- AUX IN jack
Inner panel
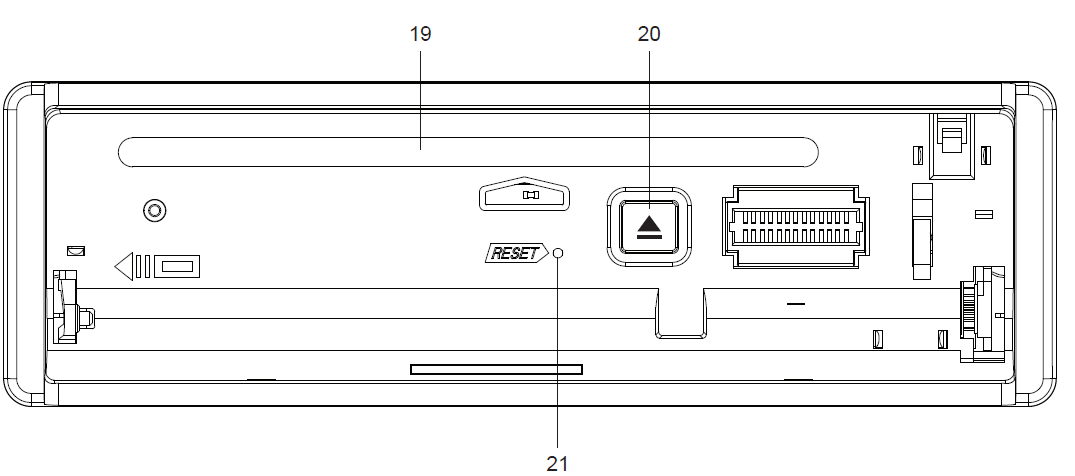
- 19) Disc slot
- 20) Eject button
- 21) Reset button (hole)
Remote control
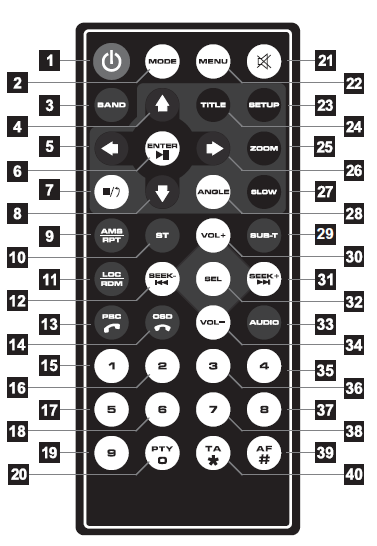
- (Power on/off) buttonPress once to turn on the unit, press again to turn off the unit.
- MODE(Mode Selector) buttonPress the button briefly to select the mode: RADIO, DISC(if there is a disc in the unit), USB(if there is a USB device in the unit), Bluetooth, AUX IN.
- BAND(Band Selector) buttonIn radio mode, press this button to change radio band: FM1, FM2, FM3, AM1, AM2.
- Cursor keys(UP, DOWN, LEFT, RIGHT)
- Cursor keys(UP, DOWN, LEFT, RIGHT)Use these arrow buttons to move the cursor to select the menu/setting item.
- R, (Play/Pause) buttonAfter selecting a item, press this button to confirm the selection or setting. In DVD/VCD/MP4/MP3, press this button to pause or resume the playback.
- (STOP), (Return) buttonIn DVD/VCD/CD mode, press this button to stop playback.In USB mode, press this button to stop playback and switch to the root level directory, then user can select to play a picture, music or movie file by using the cursor keys.
- Cursor keys(UP, DOWN, LEFT, RIGHT)
- AMS(Auto Store/Recall Preset Station) buttonIn radio mode, press and hold this button to store preset station, press this button to recall the preset stations.RPT(Repeat) buttonIn DVD mode, press this button to enter different repeating mode: REP Charpter, REP Title, Repeat ALL, Repeat OFF.In CD/MP3 disc or USB mode, press this button to enter repeating mode: REP 1(One), REP F(Folder), REP A(All), REP X(OFF).
- ST(Stereo/mono) buttonIn FM reception mode, press this button to choose STEREO or MONO audio effect.
- LOC(LOC/DX), RDM(Random) buttonIn FM reception mode, press this button to choose local or distant reception mode.In DVD/VCD/MP4/MP3 mode, press this button to play all the movie/picture/music in random order.
- SEEK-/SEEK+, /In radio mode, press the SEEK-/SEEK+ button to search radio frequency down or up. Press and hold the SEEK-/SEEK+ button to enter the manual tuning mode, then press the SEEK-/SEEK+ button to manually search radio frequency down or up.
- PBC(Playback Control),In VCD playback, press this button to choose PBC on or off. When PBC is on, the PBC interactive menu will be visible on the connected monitor, user can select a desired video or track by using the numeric keys on remote control.In BT mode, press this button to answer a call, make a call or redial the last dialed phone.
- OSD(On Screen Display), (Reject or End a call) buttonIn DVD/VCD playback, press this button repeatedly to show information such as Title number, Chapter number, Track number, elapsed time, total time etc.In BT mode, press this button to reject or end a call.
- Numeric, *, # Keypad, (PTY, TA, AF for model with RDS function only)In radio mode, press and hold the preset buttons(1~6) to store the preset stations manually. Press the preset buttons (1~6) to recall the preset stations.In DVD/VCD playback, press the numeric keys to choose the desired chapter, title or track. In BT mode, press the numeric keys to input the telephone number.
- Numeric, *, # Keypad, (PTY, TA, AF for model with RDS function only)In radio mode, press and hold the preset buttons(1~6) to store the preset stations manually. Press the preset buttons (1~6) to recall the preset stations.In DVD/VCD playback, press the numeric keys to choose the desired chapter, title or track. In BT mode, press the numeric keys to input the telephone number.
- Numeric, *, # Keypad, (PTY, TA, AF for model with RDS function only)In radio mode, press and hold the preset buttons(1~6) to store the preset stations manually. Press the preset buttons (1~6) to recall the preset stations.In DVD/VCD playback, press the numeric keys to choose the desired chapter, title or track. In BT mode, press the numeric keys to input the telephone number.
- Numeric, *, # Keypad, (PTY, TA, AF for model with RDS function only)In radio mode, press and hold the preset buttons(1~6) to store the preset stations manually. Press the preset buttons (1~6) to recall the preset stations.In DVD/VCD playback, press the numeric keys to choose the desired chapter, title or track. In BT mode, press the numeric keys to input the telephone number.
- Numeric, *, # Keypad, (PTY, TA, AF for model with RDS function only)In radio mode, press and hold the preset buttons(1~6) to store the preset stations manually. Press the preset buttons (1~6) to recall the preset stations.In DVD/VCD playback, press the numeric keys to choose the desired chapter, title or track. In BT mode, press the numeric keys to input the telephone number.
- Numeric, *, # Keypad, (PTY, TA, AF for model with RDS function only)In radio mode, press and hold the preset buttons(1~6) to store the preset stations manually. Press the preset buttons (1~6) to recall the preset stations.In DVD/VCD playback, press the numeric keys to choose the desired chapter, title or track. In BT mode, press the numeric keys to input the telephone number.
- MUTE buttonPress this button to silence the audio output, press again to resume volume level.
- MENU buttonPress this button to show main menu (Home page).
- Setup buttonPress this button to enter the setup page, user can customize the system setup of this unit.
- Title buttonIn DVD playback, press this button to enter title menu (If the DVD disc with title menu).
- ZOOM(zoom in/out) buttonIn DVD/VCD playback, press this button repeatedly to zoom in or zoom out: X2, X3, X4, X5, X1/2, X1/3, X1/4, X1(off).
- Cursor keys(UP, DOWN, LEFT, RIGHT)
- SLOW buttonIn DVD/USB playback, press this button repeatedly to play slowly: SLOW 1, SLOW 2, SLOW 3, SLOW 4, SLOW 0(off).
- ANGLE buttonIn DVD playback, press this button repeatedly to switch the viewing angle if the DVD disc is recorded with multi-angles.
- SUB-T(Subtitle language) buttonIn DVD playback, press this button repeatedly to switch the language of subtitle if the DVD disc is recorded with multi-subtitles.
- VOL+(Volume Increase), VOL-(Volume Decrease)Press VOL+ or VOL- button to increase or decrease volume level.
- same
- SELECT(Audio Settings) buttonPress this button to the sound setting menu, press again to exit the sound setting menu.
- AUDIO(Audio Language) buttonIn DVD playback, press this button repeatedly to switch the language of audio if the DVD disc is recorded with multi- languages. In VCD playback, press this button repeatedly to switch L/R or stereo sound track.
- VOL+(Volume Increase), VOL-(Volume Decrease)Press VOL+ or VOL- button to increase or decrease volume level.
Main Menu
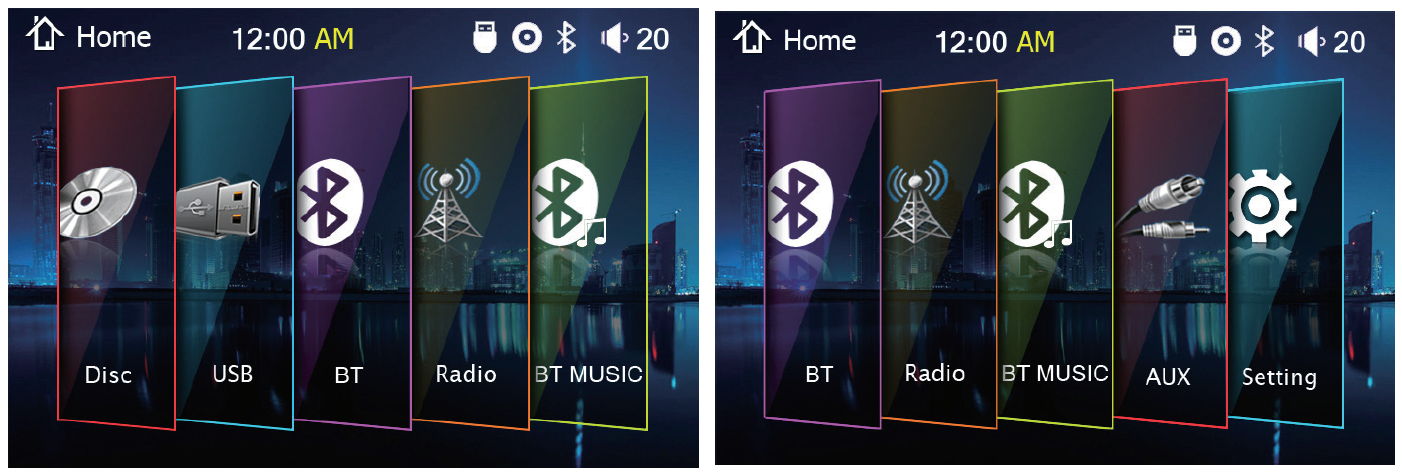
The best way to discover the program is to explore each screen in detail, and to find out how to move from one to another. Read this chapter for a guided tour.Unit starts by displaying the Main menu.This is the root of the screen hierarchy, you can simply take knowledge of the features.
General Operation
Reset the unitOperating the unit for the first time or after replacing the car battery, you must reset the unit. Press OPEN button on the panel to flip down the front panel and press RESET button to restore the unit to its original factory settings.Note: When you flip down the front panel, 30 seconds later after, the unit will be turned off.
Power on or offPress the (Power On/Off) button on panel or RC to turn on the unit.Press and hold the (Power On/Off) button on front panel or RC to power off the unit.
Mode settingPress the MODE button repeatedly to switch between inputs: (* available only if there is media device in disc, USB port and Bluetooth connection is OK.)
Volume/OKAdjust the volume level by turning the VOL knob on front panel or pressing the VOL+/VOL- button on RC.In main menu, system setting memu, rotate VOL knob to select setting item or change setting. In USB playback, rotate the VOL knob to select photo, music, video, previous page, next page, return to top-level folder, or select a desired file to play, press the OK button to confirm.
Sound Adjustments
Press the SEL button on the RC to select the audio settings consisting of following items:
EQ: Select the digital sound effect FLAT – JAZZ – CLASSIC – ROCK – POP – USERBASS: -07, -06, ~, -01, 00, +01 ,~, +06, +07TREBLE: -07, -06, ~, -01, 00, +01 ,~, +06, +07BALANCE: L07, L06, ~, L01, 00, R01 ,~, R06, R07FADER: R07, R06, ~, R01, 00, F01 ,~, F06, F07BEEP: Keypad sound setting: On / OffLOUD: Loudness setting: On / Off
Press the BAND(M.SEL) button on front panel or press the LEFT/RIGHT/UP/DOWN arrow on the RC, then rotate VOL knob on the front panel or press the UP/DOWN arrow (or VOL+/VOL- button) on RC to select any items.Rotate VOL knob on front panel or press the UP/DOWN arrow (or VOL+/VOL- button) on RC to adjust audio setting, press OK button on front panel or ENTER button on RC to confirm. Press the SEL button again to return to current mode.Note:
- If the unit is turned off, all the settings of each mode will be saved.
- If cutting off battery power or resetting the unit, all the settings will return to factory default settings.
- BASS and TREBLE settings are only enabled when EQ setting is turned off.
Mute function: Press the (MUTE) button on the front panel or (MUTE) button on RC to turn the sound off. Press it again to resume the volume level.EQ(Equliazer): Repeatedly press the EQ button on front panel or AUDIO button on RC to change the EQ setting: FLAT – JAZZ – CLASSIC – ROCK – POP – USERLoudness: Press and hold the LOUD button on the front panel or press and hold the AUDIO button on RC to set loudness ON or OFF.Menu: Press the MENU button on the front panel or RC to show main menu. In DVD mode, press and hold this button to enter title menu (Enable only if the DVD disc with title menu) .
Setup:
Press the SETUP button on the RC or the SETTING icon on the main menu to go to setup pages.
- Press the BAND(M.SEL) button on front panel or press the LEFT/RIGHT/UP/DOWN arrow on the RC to select any items.
- Rotate VOL knob on front panel or press the UP/DOWN arrow (or VOL+/VOL- button) on RC to adjust selected setting item, press OK button on front panel or ENTER button on RC to confirm.
- Press the SETUP button again to exit setup and return to current mode.
Sound
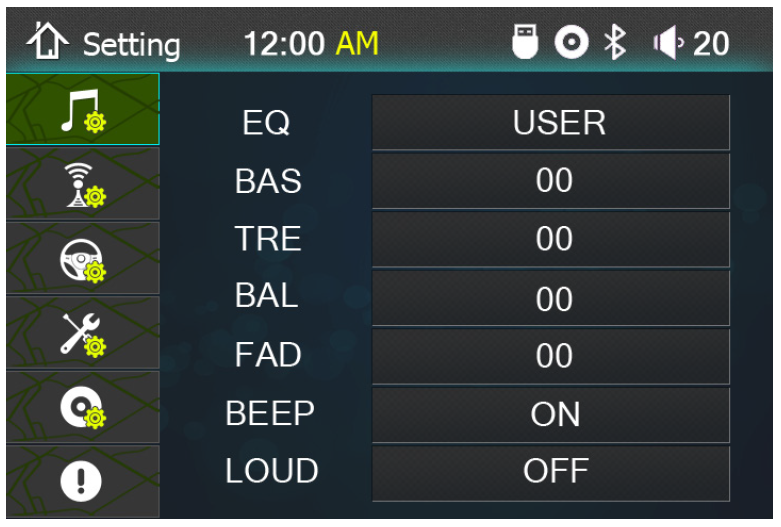
EQ: FLAT, JAZZ, CLASSIC, ROCK, POP, USERBASS: -07, -06, ~, -01, 00, +01 ,~, +06, +07Treble: -07, -06, ~, -01, 00, +01 ,~, +06, +07Balance: L07, L06, ~, L01, 00, R01 ,~, R06, R07FADER: R07, R06, ~, R01, 00, F01 ,~, F06, F07BEEP: Select keypad sound on or off.LOUDNESS: Selecting loudness ON will emphasize the low frequency output.
Radio
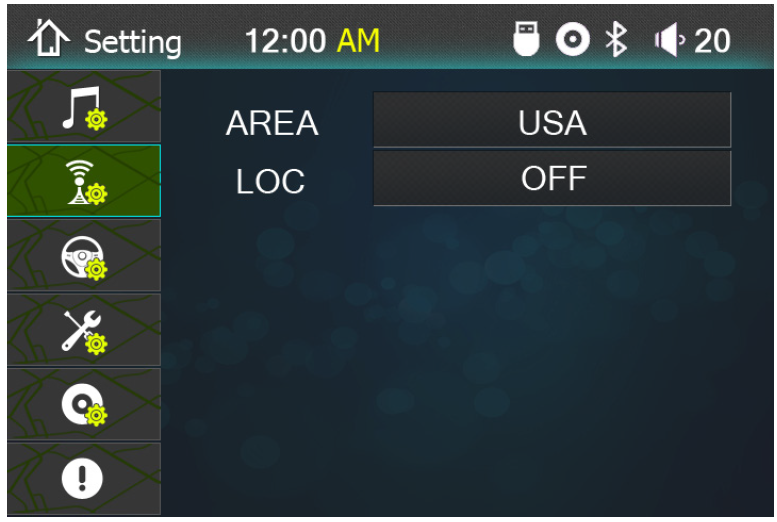
Area: Select radio broadcasting area: USA, S. America, Russia, Japan, Europe.LOC: Select ON (local broadcasting mode), OFF(Distant broadcasting mode).
SWC(Steering Wheel Control)

First, make sure the SWC connecting wires have been connected to this unit.Before learning, select the RESET button to clear all previous swc settings.Move the cursor to select a steering wheel button on left setting page by using the LEFT/RIGHT/UP/DOWN and ENTER button. Press a corresponding SWC button that you want to set on the steering wheel control.
General
DVD
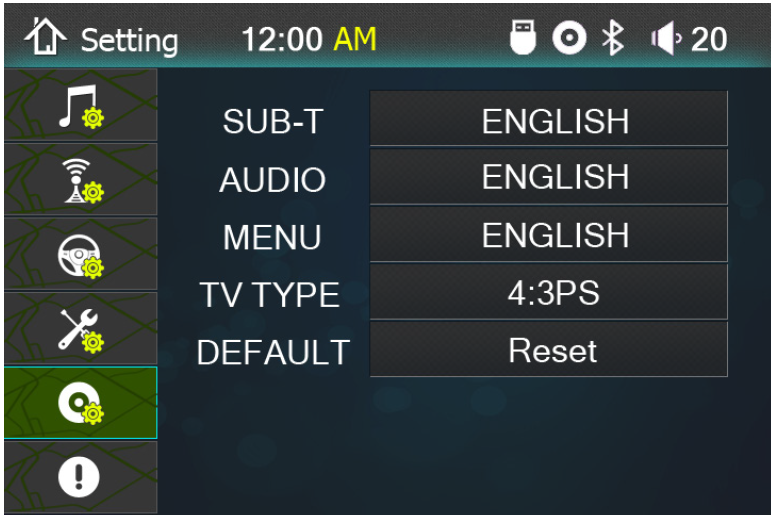
Subtitle / Audio / Menu Language Settings:ENGLISH, FRENCH, PORTUGUESE, GERMAN, LATIN, SPANISHTV Type: Select the aspect ratio image for connected different screen or monitor size: 4:3 PS(Pan Scan), 4:3 LB(Letterbox), 16:9 (Wide-screen).Default: Select RESET to restore all the values to factory default values including memory and preset stations.
System information
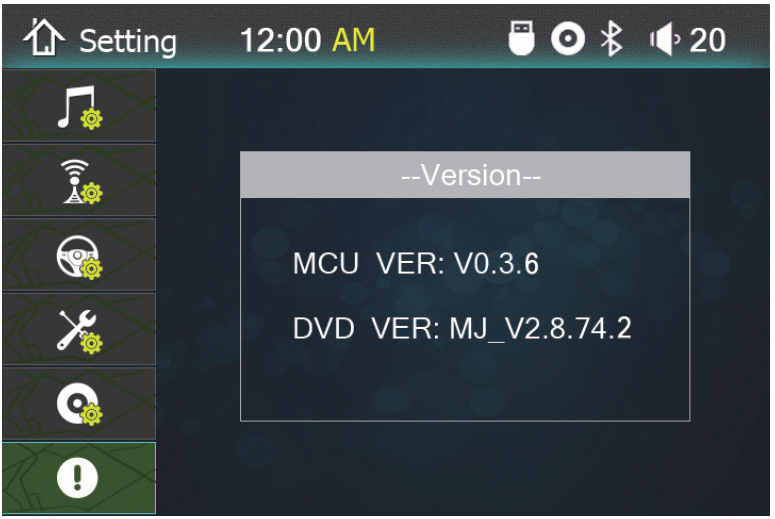
Select this item to view software version.Note: The software version is just for your reference.
AUX INConnect an AUX cable to your external auxiliary device (such as MP3 player) , then press theMODE button to switch to AUX IN mode.ParkingWhen the car is stopped and the parking brake is working, the screen can display the videoimage, and otherwise the screen display warning information.Back view cameraThis unit is equipped with back view camera output. The camera is used to observe the situation behind the vehicle when you are backing the car.Please connect your back view camera with the back car video input. And connect the reverse wire for back a car with the rear gear light. Rear view camera picture will be enabled when you are backing the car.
Radio operation
Band selectionPress the BAND button on the front panel or RC to select band in the following sequence:
Manual tuningIn radio mode, then press and hold SEEK- /SEEK+ button to enter the manual tuning mode, then repeatedly press the SEEK- /SEEK+ button to manually search radio frequency down or up.
Auto tuningIn radio mode, press the SEEK- /SEEK+ button to automatically search radio frequency down or up.In radio mode, press the OK button (VOL knob) on front panel then rotate VOL knob on front panel to select any one preset station. Press the OK button on front panel again to confirm . Or press the numeric keys (1~6) on RC to select any one preset station.
Select a preset stationIn radio mode, when you find a radio station, press the MEM button on front panel then rotate VOL knob on front panel to select the number 1~6 on radio interface, press the OK button (VOL knob) on front panel to confirm, the current radio frequency will be stored into the corresponding preset number. Or press and hold the numeric keys (1~6) on RC to store the radio frequency into the corresponding preset number.
Auto storeIn radio mode, press and hold the AS/PS button on front panel or AMS button on RC to store radio stations with the best reception to the preset number automatically.
Prese t ScanIn radio mode, press the AS/PS button on front panel or AMS button on RC to recall the preset stations.
Scan radio stationIn FM band, press the Scan button on the front panel to scan radio stations, when a station is found, each station will be played for 10 seconds before automatically moving to the next one.
Stereo/MonoIn FM band, press the ST button on the RC to select stereo or mono sound reception.
DVD/VCD/CD/USB Operation
Load DISC
- Turn the power on.
- Press the Open button on the front panel to flip it down.
- Insert the disc with the printed side facing upward into the slot and then attach the front panel.The DISC mode will be turned automatically.
- Press Open button on the panel and Eject button in the inner panel to eject the disc. If the disc
- User may also choose the DISC playing mode by using MODE button.
NOTE: The back view camera is available when the DVD mode is working.
USB Flash MemoryTo play MP3/ MP4/ WMA files from a USB flash memory, insert a USB flash memory into the USB port on the front panel. The unit will play automatically MP3/MP4/ WMA/JPEG files. Press the MODE button, user may also select USB playing mode.
Play/PauseIn DVD/VCD/CD/USB/BT mode, press the (Play/Pause) button on the front panel or RC to pause or resume the playback. Press again to resume playback.
Stop playbackIn DVD/VCD/CD mode, press the (STOP) button on RC to stop playback.In USB mode, press this button to stop playback and switch to the root level directory, then user can select to play a picture, music or movie file by using the cursor keys and the ENTER button.
Select to play video/music/photoIn DVD/VCD/MP4/MP3/BT mode, press the button on the front panel or RC to play previous or next video, music or photo.In DVD/VCD/MP4/MP3/BT mode, press the numeric keys (0~9) and ENTER button on the RC to select play a desired video, music or photo.
Random PlaybackIn DVD/VCD/MP4/MP3 mode, press this button to play all the video/photo/music in random order.
Repeat playbackIn DVD mode, press the RPT button on RC to enter different repeating mode: REP Charpter, REP Title, Repeat ALL, Repeat OFF.In CD/MP3 disc or USB mode, press the RPT button on RC to enter repeating mode: Repeat 1 (One), Repeat F(Folder), Repeat A(All), Repeat X(OFF).
OSD(On Screen Display) functionIn DVD/VCD playback, press the OSD button on RC repeatedly to show information such as Title number, Chapter number, Track number, elapsed time, total time etc.
ZOOM in/OutIn DVD/VCD/Photo playback, press the ZOOM button on RC repeatedly to zoom in or zoom out: X2, X3, X4, X5, X1/2, X1/3, X1/4, X1(off).
SLOW playbackIn DVD/USB playback, press the SLOW button on RC repeatedly to play slowly: SLOW 1, SLOW 2, SLOW 3, SLOW 4, SLOW 0(off).
Change the view angleIn DVD playback, press the ANGLE button on RC repeatedly to switch the viewing angle if the DVD disc is recorded with multi-angles.
Title menuIn DVD playback, press the TITLE button on RC repeatedly to enter title menu (If the DVD disc with title menu). Then user can select any one desired chapter by using the LEFT/RIGHT/UP/DOWN button, numeric button (0~9) and ENTER button on RC.
PBC(Playback control) functionIn VCD playback, press the PBC button on RC to choose PBC on or off.When PBC is on, the PBC interactive menu will be visible on 3.4” TFT screen or the external monitor, user can select a desired video or track by using by using the LEFT/RIGHT/UP/DOWN button, numeric button (0~9) and ENTER button on RC.Note: This PBC function is suitable for the SVCD and VCD2.0 disc.
Change the subtitleIn DVD playback, press the SUB-T button on RC repeatedly to switch the language of subtitle if the DVD disc is recorded with multi-subtitles.
Change the audio languageIn DVD playback, press the AUDIO button on RC repeatedly to switch the language of audio if the DVD disc is recorded with multi-languages.In VCD playback, press the AUDIO button on RC repeatedly to switch L/R or stereo sound track.
BLUETOOTH OPERATION
Pairing and ConnectingBefore using a Bluetooth phone with this unit, the phone must be paired and connected. The Bluetooth signal of the unit will broadcast when the power is on.This DVD player will displayed as “SOUNDSTREAM” on your phone.When prompted, enter the pass code “0000” on your phone. Once paired, the Bluetooth phone should automatically connect this DVD player whenever the unit is in range.
Make a call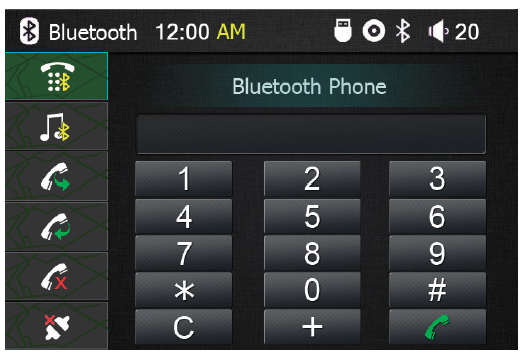 Input the phone number by using the BAND button andVOL knob on the panel or using the “0~9”, *, # and LEFT/RIGHT/UP/DOWN, ENTER button on RC in Bluetooth mode. If a number has been incorrectly input, press the BAND button on RC to delete it.
Select and press the VOL knob on panel or directly press the button on panel to make a call. Or simply press phone number and button on RC to make a call.
Streaming Audio (A2DP Music)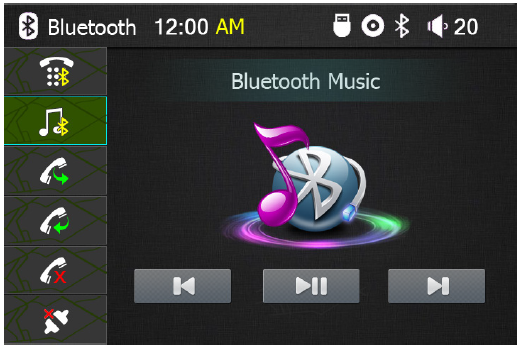
Select the “BT Music” icon on home page or select the on bluetooth mode to enter the A2DP music playback mode.
Viewing Recent Call List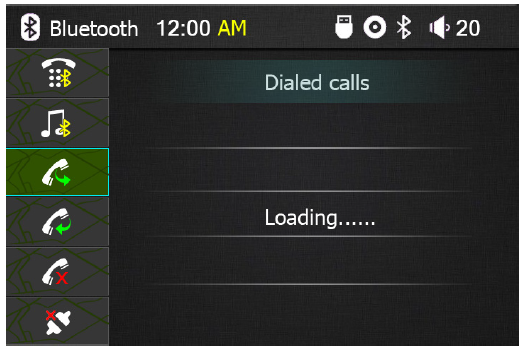 Transferring AudioPress the VOL knob on front panel or ENTER buton on RC to transfer audio between this car bluetooth hands-free system and mobile phone.
Troubleshooting guide
| Symptom | Cause | Solution |
| General No power | The car ignition is not on. The fuse is blown. | If the power supply is properly connected to the car accessory switch the ignition key to “ACC”.
Replace the fuse. |
| Disc cannot be read | Inserting the disc in upside down.
Compact disc is extremely dirty or defective. Temperature inside the car is too high. |
Insert the compact disc with the label facing upward.
Clean the disc or try to play a new one. Cool off until the ambient temperature returns to normal. |
| No sound | Volume is in minimum. Wiring is not properly connected. | Adjust volume to a desired level. Check wiring connection. |
| The operation keys do not work. | The built-in microcomputer is not operating properly due to noise.
Front panel is not properly fixed into its place. |
Press the RESET button. Reinstall the front panel. |
| Sound skips. | The installation angle is more than 30 degrees. The disc is extremely dirty or defective. | Adjust the installation angle to less than 30 degrees.
Clean the compact disc/try to play a new one. |
| The radio does not work; the radio station automatic selection does not work. | The antenna cable is not connected the signals are too weak. | Insert the antenna cable firmly select a station manually. |
Specification
| General | |
| Power supply: | 12 V DC |
| Current consumption: | Max. 10 A |
| Maximum power output: | 75W x 4 channels (Max.) |
| Compatible formats: | DVD/SVCD/VCD/HDCD/MP3/MP4/WMA/CDDA/Picture-C D/JPEG/CD-R/ -RW/DVD±R/±RW playback |
| Dimensions (W x D x H) /
weight: |
178 x 175 x 50 mm / 1.5 kg |
| ESP function: | 40 sec. for Audio CD, 120 sec. for MP3 |
| Working temperature range: | -10℃ – +60℃ |
| TFT display | |
| Screen size: | 3.4 inch |
| Resolution: | 400*234 dot |
| Aspect ratio: | 4:3/16:9 |
| Contrast ratio: | 400:1 |
| Brightness: | 250 cd/m2 |
| FM Stereo Radio | |
| Frequency range(U.S.A AREA): | 87.5 – 107.9MHz(Step 200KHz) |
| Frequency range(EUROPE AREA): | 87.5 – 108MHz(Step 50KHz) |
| Frequency range(SOUTH AMERICA AREA) | 87.5 – 108MHz(Step 100KHz) |
| Frequency range(RUSSIA AREA): | 87.5 – 108MHz(Step 50KHz) 65 – 74MHz(Step 30KHz) |
| Frequency range(JAPAN AREA): | 76 – 90MHz(Step 50KHz) |
| Preset memory stations: | 18 |
| AM/MW Radio | |
| Frequency range(U.S.A AREA): | 530kHz – 1710 KHz(Step 10KHz) |
| Frequency range(EUROPE AREA): | 522kHz – 1620 KHz(Step 9KHz) |
| Frequency range(SOUTH AMERICA AREA): | 520kHz – 1620 KHz(Step 10KHz) |
| Frequency range(RUSSIA AREA): | 531kHz – 1620 KHz(Step 9KHz) |
| Frequency range(JAPAN AREA): | 531kHz – 1620 KHz(Step 9KHz) |
| Preset memory stations: | 12 |
| Audio specification | |
| Maximum output: | 1.5Vrms (+/- 3 dB) |
| Frequency response: | 20 Hz – 20 KHz |
| S/N ratio(A-vtd): | 68 dB |
| DSP sound effect: | JAZZ – CLASSIC – ROCK – POP – USER – FLAT |
| Line out | |
| Line outs: | 4 channel RCA line-out |
| Video Output | Video Output Impedance: 75Ω Video Output Level: 1.0±0.2V (under normal video input level) |
Specifications are subject to change without notice. Mass and dimension are approximate.
[xyz-ips snippet=”download-snippet”]