SOUNDSTREAM 9 Inch Car Seatback DVD Player Owner’s Manual
Caution
![]() Warning
Warning
- Read this manual before using this product.
- This product is composed of precision components and shall not be disassembled unless approved or authorized by us, otherwise you will void your warranty
- Protect the product from moisture and shock
Check Point
- The operating temperature of this product is limted to -10°C–+60°C. Your vehicle can reach temperatures up to 80°C in the summertime.
- From time to time when your vehicle is extremely hot or cold you must allow time for your air conditioner or heater to cool or heat the vehicle and for operating temperatures to return to normal operating ranges . Your monitor will return to its normal functions when these operating ranges are achieved.
- Your optimum picture quality is achieved when you are directly in front of the monitor(+/-30 degrees).
- Do not open covers and repair yourself . Refer servicing to qualified personnel.
- DVD Players use an invisible laser beam which can cause hazardous radiation exposure . Be sure to operate the unit correctly as instructed.
- do not cut the car power supply off while a disc is playing . It can cause damage to the DVD Player.
- When a disc is brought from a cold environment to a hot one , there may be steam on the face of the disc , or water will appear on the pickup lens . It will be affected disc play.
DVD Specifications
|
Specification |
|
| Power | DC 12V |
| Screen Format | 16:9 |
| Resolution | 800(H)XRGBX480(V) |
| Color System | NTSC/PAL Auto Selection |
| AV input | 2 AV Input HDMI input |
| AV output | 2 AV output |
|
ACCESSORIES |
|
| Description | Quality |
| Power Cable | 1PC |
| Remote Control | 1PC |
| User manual | 1PC |
| Interchangeable Color Skins | 3PCS |
| Bracket | 1PC |
DVD Front panel Control

- Press shortly Fast return. Press Longly Decrease Volume
- Menu
- Press shortly Fast Forward. Press Longly Increase Volume
- Power on/off
- Last chapter
- Next chapter
- Press shortly Play/pause. Press Longly mode change
- Infrared remote control receiver
- Power and Infrared Transmitter Indicator

DVD Remote Controller
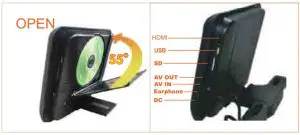
DVD Connection Diagram
Headrest mount holder installation
Interchangeable Housing Change Diagram
Removing Shroud/Screen back From The HousingWork on a soft surface to avoid damaging the plastic. Insert the supplied pry tool between the Housing and Shroud/Screen back. then press the pry tool to release the Shroud/Screen back.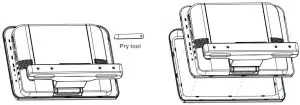 Slots to release Shroud ‘Screen back
 report this ad
Begin by hooking the area and press the Shroud/Screen back over the pod. The Shroud/Screen back will snap back in place.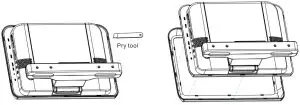
Trouble shooting
|
Symptom |
Items to check |
Actions to be Taken |
| Button does not work. | Is the power turned on? | Check the car battery capacity |
| No sound | Is the audio which is connected with the audio cable set to receive the DVD signal output? Is audio cable is connected securely? Is the monitor which is connected with the audio cable turned on? Is the digital audio output set in the correct position? | Select the correct input mode for the audio receiver.Connect the audio cable into the jacks securely. Turn on the monitor connected with the audio cable Set the Digital Audio Output to the correct position, and then turn on the DVD player again by pressing the POWER button. |
| Remote control does not work properly. | Is the remote control facing at the remote sensor? Is the distance too far? Is there any obstacle in the middle? Is the battery exhausted? | Point the remote control to the remote sensor of the product. Use the remote control within 5m Remove the obstacle. Replace with new batteries Check antenna connection. |
[xyz-ips snippet=”download-snippet”]