
![]()
Owner’s Manual
AV Center
2-Din Headunit
2 DIN 7” MonitorTouch screenMP3/MP4/USB/SDAM/FM RadioSupport CarplaySupport Android AutoSupport Bluetooth
![]()

![]()


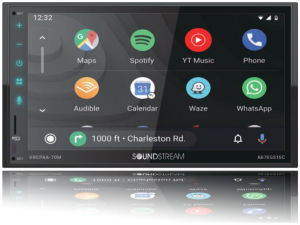
VRCPAA-70M
INTRODUCTION
Safety Warnings and Considerations (for Amplifier / DSP / Active Woofer)
- Clean only with a dry cloth or other similar materials.
- Install your product in a dry, well-ventilated location that does not interfere with your vehicle’s safety equipment.
- Do not block any ventilation openings when installing this product.
- Do not mount the product in the engine compartment of your vehicle or in any areas of extreme heat such as mufflers, silencers, exhaust pipes or other heat producting apparatus.
- Securely mount the product so that it does not come loose in the event of a collision or as a result of repeated vibrations that might occur during normal operation.
- Installation of the apparatus must be done with great care to prevent damage to your vehicle’s fuel lines, power, and other electrical wiring, hydraulic brake lines, and other systems. If possible always visit your nearest Nakamichi dealer to perform the installation.
- Do not run any wiring outside or underneath the vehicle. Keep all wires inside the vehicle.
- Take the necessary precautions when making connections to the vehicle’s battery to avoid any potential shock.
- Protect all system wires from sharp edges by carefully routing them, always use rubber grommets to protect wiring and cables whenever you are installing them through metal openings.
- Secure all wiring using cable ties or wire clamps to protect them from moving parts and sharp edges.
- This apparatus shall not be exposed to dripping or splashing, and no object filled with liquids, shall be placed on the apparatus.
- Refer all serving to qualified service personnel. Servicing is required when the apparatus has been damaged in any way, such as the power input terminals are damaged, liquid has been spilled or objects have fallen into the apparatus, the apparatus has been exposed to rain or moisture, does not operate normally, or has been dropped.
- Fuses shall be replaced only with the correct type and fuse value, and only when the apparatus is powered off.
- Exposure to high sound pressure levels may lead to permanent hearing loss. Take every precaution to protect your hearing.
- This product is designed specifically for use with 12 volt, negative-ground electrical systems only. Using this product in systems with positive ground and/or voltages other than 12V may result in damage to the product and your system.
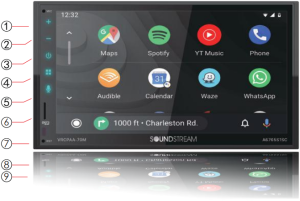
1. Microphone: Built-in Microphone.2. Volume+: long press to increase volume continuously; short press to increase volume by step.3. Volume-: long press to decrease volume continuously; short press to decrease volume by step.4. Power: when the screen open, short press into mute mode, short press once again to unmute; long press to close the screen; when the screen close and ACC&B+ ON, short press to open the screen.5. Home: Press to enter main menu.6. Voice Recognition: Press to active Siri/AA voice function.7. Micro SD: Insert Micro SD for playback.8. Remote Sensor: Receive the remote signal.9. Reset: If the unit or the connected unit fails to operate properly, the returns to factory settings when this button is pressed.
REMOTE CONTROL INTRODUCTION
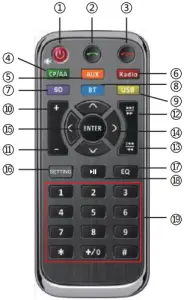
01. Long Press: Power On / Off.Short Press: Mute/Unmute.02. Short Press: CP/AA/BtPhone – Answer a call.03. Short Press: CP/AA/BtPhone – Hang up the phone.04. Short Press: Enter the CP/AA interface.05. Short Press: Enter the AV-IN interface.06. Short Press: Enter the Radio interface.07. Short Press: Enter the SD interface.08. Short Press: Enter the BTphone interface.09. Short Press: Enter the USB interface.10. Short Press: Increase volume.11. Short Press: Reduce volume.
12. Short Press: Radio – Switch to the next preset.USB/SD – Next track.CP/AA/BTphone – Next track.Long Press: Radio – Automatic seek (forward).USB/SD – Fast forward.13. Short Press: Radio – Switch to the previous preset.USB/SD – Previous track.CP/AA/BTphone – Previous track.Long Press: Radio – Automatic seek (reverse).USB/SD – Fast reverse.14. Short Press: CP/AA – Move the cursor.RADIO – (left / right)Frequency step function.15. Short Press: CP/AA – Select the function.Radio/USB/SD – Confirm the number entered.16. Short Press: Enter the setting interface and click again to enter the current mode.17. Short Press: Enter the EQ interface and click again to enter the current mode.18. Short Press: Play_pause.19. Short Press: Radio – When the input keyboard is not displayed; press the 1-6 keys, the short press function is to switch to the corresponding (1-6) radio station, and the long press function is to save the corresponding (1-6) radio station frequency.In the case of input keyboard display, the function of 0-9 keys is to input the corresponding number (0-9) BtPhone – Input the content(long press “0” indicates the input “+”)
FUNCTIONS APPLICATION
Basic Operations
Main Menu
Please refer to the actual menu display for reference.
During initial power on, the unit will show the languages setting interface, select the required country and language, then press “√” to enter the main menu.
Radio: Shows the Radio interface.Phone: Shows the Bluetooth connection interface.Android Auto/CarPlay:Shows the relevant interface based on your connected device.USB: Shows the USB playback interface for compatible files.BTMusic: Shows the music playback interface.
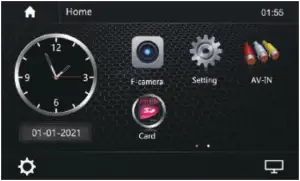
F-camera: Turn on the front camera.Setting: Shows the Settings interface.AV-In : Shows the AUX interface.Card : Shows the TF Card interface, enabling playback for compatible files.Screen off: Turns off the screen, to reactivate the screen simply press any part of the screen.
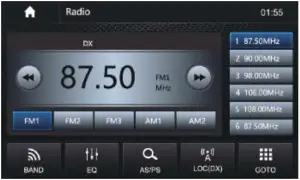
Radio
Touch “Radio” in the main menu to enter the radio interface.
[![]() ] To return to the main menu.[
] To return to the main menu.[![]() ] Switch between FM1/FM2/FM3/AM1/AM2.[
] Switch between FM1/FM2/FM3/AM1/AM2.[![]() ] Enter the EQ settings interface.[
] Enter the EQ settings interface.[![]() ] Turns the LOC function on/off.[
] Turns the LOC function on/off.[![]() ] Shows the Radio tuning input interface, input the frequency directly or selected preset stations to start playing.[
] Shows the Radio tuning input interface, input the frequency directly or selected preset stations to start playing.[![]() ] Scans for available stations, long press to automatically search and save stations with the strongest signals into the presets.
] Scans for available stations, long press to automatically search and save stations with the strongest signals into the presets.
[![]() ] Short press to search backward for stations automatically, Long press to step back.[
] Short press to search backward for stations automatically, Long press to step back.[![]() ] Short press to search forward for stations automatically, Long press to step.
] Short press to search forward for stations automatically, Long press to step.
RDS Function
RDS will allow you to display information such as traffic status, radio station name and more.The unit can automatically switch to the strongest station based on the similar program.AF: Turn on/off AF mode.TA: Turn on/off TA mode.PTY: Shows program types, and allows you to search for stations according to different programs.
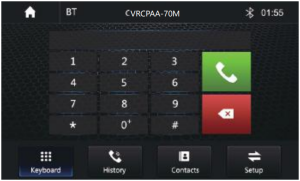
Phone
This unit allows for hands free calling, using your phone’s Bluetooth connection to the unit, you’ll be able to dial, answer, access phone book and playback music.
Enter the Bluetooth interface using the Bluetooth button.
![]() : Dial
: Dial![]() : Calls record
: Calls record![]() : Phone book
: Phone book![]() : Setup
: Setup
Pair/Connect
Connect your phone to the unit using the below steps.
- Access the Bluetooth connection interface in your phone.
- Search for Bluetooth devices from either the unit or phone.
- The device will pop up the pairing code and click “pairing” to complete the connection.
Dial
Once the phone and unit are connected successfully, you’ll be able to make calls from the unit.
Touch ![]() to make a call.
to make a call.
Touch ![]() to delete numbers one by one, long press to delete all inputted numbers.Touch
to delete numbers one by one, long press to delete all inputted numbers.Touch ![]() to show the numbers keyboard, touch again to exit.Touch
to show the numbers keyboard, touch again to exit.Touch ![]() to hang up the call.Touch
to hang up the call.Touch ![]() to switch call audio to earphone/AV receiver.Touch
to switch call audio to earphone/AV receiver.Touch ![]() to mute.
to mute.
 Note: You can also manage calls through your phone.
Calling Record
Check for dialed/answered/missed calls history. Touch ![]() icon to enter calling record interface:
icon to enter calling record interface:
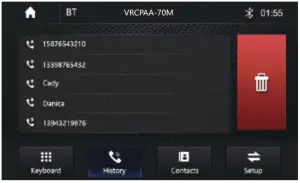
![]() : Delete dialed calls.
: Delete dialed calls.
Phone Book
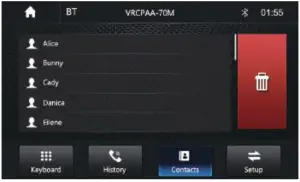
When your phone and unit are paired, the unit can automatically reach contacts from your phone and store them within the unit.
(selected phones only)
![]() :Delete Contacts.
:Delete Contacts.
External Play Device
When you connect a compatible data device to your unit, the following interface will appear.
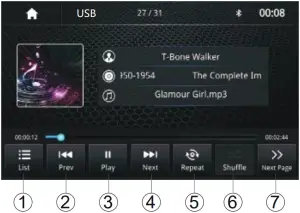
- USB List Menu
- Play previous song/media
- Play/pause current song/media
- Please next song/media
- Repeat modeRepeat all – Repeat off – Repeat single
- Random playback on/off
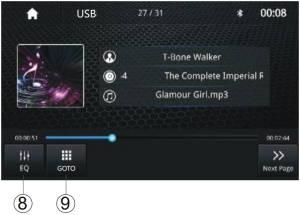
- Next page
- EQ settings
- Numbers selection playback
Music
Touch ![]() to enter music interface.EQ is the same as sound settings EQ menu.
to enter music interface.EQ is the same as sound settings EQ menu.
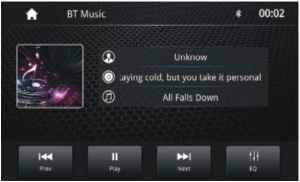
Lossless files playback supported.FLAC/WAV/APE file formats.
Settings Operation
Touch “Setting” icon from main menu to enter the settings interface.
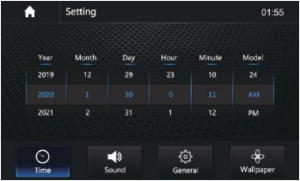
Time Setting
Touch “time” to enter time setting Up/down sliding can set year/month/date/hour/minute/time system.Time zone: Touch the Time icon to enter the time zone settings.Up/Down sliding to scan different time zones, select the correct one required.
Sound Setting
Touch “Sound Setting” to enter sound setting interface:
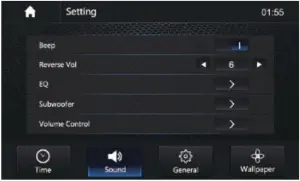
In sound setting menu, you can turn on/off keyboard sound/GPS monitor function/GPS mix sound/reverse sound/EQ.
EQ: Touch EQ icon to enter below menu:
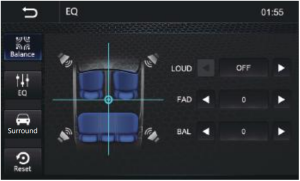
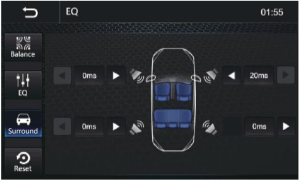
![]() : Enter sound focus control function.
: Enter sound focus control function.![]() : Fine adjustment
: Fine adjustment![]() : Fast set sound focus’s control point.
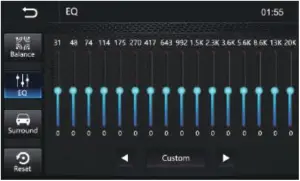
: Fast set sound focus’s control point.![]() : Up/down slide to switch EQ modes: rock/classical/jazz/etc.
: Up/down slide to switch EQ modes: rock/classical/jazz/etc.![]() : Set sound delay.
: Set sound delay.![]() : Reset to default settings.
: Reset to default settings.
General Setting
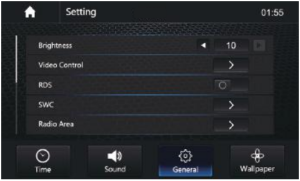
Touch ![]() To set relevant functions on/off . More items can be accessed by sliding the menu.Brightness : Left and right slide
To set relevant functions on/off . More items can be accessed by sliding the menu.Brightness : Left and right slide ![]() icon to adjust screen’s brightness.Video Control:Touch the icon to set the brightness and contrast of the screen.RDS: Touch the icon to set RDS on/off.SWC: Touch “SWC” icon to enter the steering wheel control menu. wheel control menu.Radio Area: Choose the required. radio region.Serial/Version: Touch the icon to enter serial number and version number interface, to check the needed information.(Please refer to the actual unit display)Language: Touch the icon to enter language setting interface, select the required language.Reset Factory DataOnce selected, the unit will prompt to confirm reset to factory settings. Once confirmed the system will automatically reboot.All data will be lsoot and any third party programs will be lost.Please backup your data before performing this function.MIC Switch: Touch F/R icon to change front or rear mic.Driver Position: Touch the icon to change L/R position.Driver Forbidden Watch video: Touch the icon to turn ON/OFF the Driver Forbidden Watch videoSeven Colour Light: Touch the icon to adjust the brightness mode and relevant functions.
icon to adjust screen’s brightness.Video Control:Touch the icon to set the brightness and contrast of the screen.RDS: Touch the icon to set RDS on/off.SWC: Touch “SWC” icon to enter the steering wheel control menu. wheel control menu.Radio Area: Choose the required. radio region.Serial/Version: Touch the icon to enter serial number and version number interface, to check the needed information.(Please refer to the actual unit display)Language: Touch the icon to enter language setting interface, select the required language.Reset Factory DataOnce selected, the unit will prompt to confirm reset to factory settings. Once confirmed the system will automatically reboot.All data will be lsoot and any third party programs will be lost.Please backup your data before performing this function.MIC Switch: Touch F/R icon to change front or rear mic.Driver Position: Touch the icon to change L/R position.Driver Forbidden Watch video: Touch the icon to turn ON/OFF the Driver Forbidden Watch videoSeven Colour Light: Touch the icon to adjust the brightness mode and relevant functions.
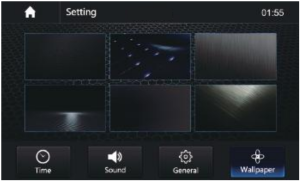
Wallpapers Setting
Choose the required wallpaper, touch “wallpaper setting” icon to enter the setting interface.
AUX In
Insert video input connector to input video’s input jack, audio input conencto to input audio’s input jack, touch “AUX-IN” icon from main menu to enter the AUX interface.
Android Auto/CarPlay
Connect Phone to the unit to enter the Android Auto interface.
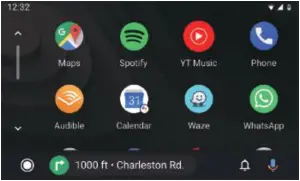
The unit can be used to call, play music, view maps, check traffic information, watch videos, return to the unit’s main interface, listen to Podcasts, read Audiobooks and so on.
Connect iPhone to the unit to enter the CarPlay interface.

The unit can be used to make calls, play music, view maps, check traffic information, watch videos, return to the unit’s main interface, listen to Podcasts, read Audiobooks and so on.
COMMON TROUBLE-SHOOTING
| Problem | Cause | Correct action |
| Cannot power on | Check fuse | Replace fuse |
| Other factors causing MPU to malfunciton | Press RES button on the panel using a sharp point then power on | |
| After ignition switch off, setting information are lost | Change battery or fuse | Reset information and save |
| Poor performance of radio station | Weak signal | Move the car to another place, then try again |
| No image | Other factors causeing MPU to malfunction | Press RES button on the panel by penpoint, then, power on |
| Cannot watch video during driving | Video viewing is not allowed during driving. | Park the car in a safe place, put the car in “P” position, pull up the hand brake, parking brake wire must be grounded. |
WIRING CONNECTION
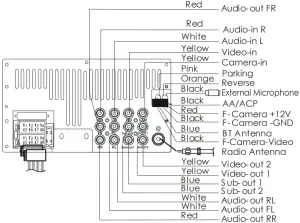
Fuse: Max. 15 AmpereVoltage: 12V DC; Negative Ground
ISO Connector
| A | Color | Fuction |
| 1 | Black | SWC- GND |
| 2 | Green | SWC-KEY1 |
| 3 | Blue | Power Antenna |
| 4 | Red | ACC |
| 5 | Brown | SWC- KEY2 |
| 6 | Yellow | BAT T |
| 7 | Orange | ILL |
| 8 | Black | GND |
| B | Color | Fuction |
| 1 | Purple | RR+ |
| 2 | Gray | FR+ |
| 3 | White | FL+ |
| 4 | Green | RL+ |
| 5 | Purple/Black | RR- |
| 6 | Gray/Black | FR- |
| 7 | White/Black | FL- |
| 8 | Green/Black | RL- |
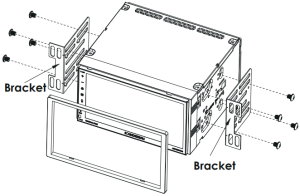
INSTALLATION $ ACCESSORIES
- Put the 2 brackets to the left and right side of the head unit.
- Use screws to fix the brackets to the unit.
Note:
- Make sure the ignition is turned off, and disconnect the cable from the vehicle battery’s negative (-) terminal. You never want electricity running white you install this 2-DIN car receiver.
- Before installation, disconnect the wire harness and the antenna.
- Attach the brackets on the both sides of the car receiver with screws as shown as the figure. Please buy from your dealer according to the drilling of holes size.
- Consult with your nearest dealer if installation requires the drilling of holes or other modification of the vehicle.
- Install the car receiver in the dashboard.
- Connect the wire harness & antenna to the car receiver being carefully not to pinch any wires or cables.
- Install the plastic outer trim ring onto the car receiver.
- Reconnect the battery and run through all of the options on this car receiver to ensure that everything is working correctly.
- Particulars will vary widely depending upon the kind of your car and the car you intend to install it in. Please choose the correct installation method according to the actual situation of your car. Always contact the car dealer or manufacturer if you have any questions.
ACCESSORIES
Package contains the following accessories for installation and operation of the unit.
| (1) Mounting Brackets | 2 | 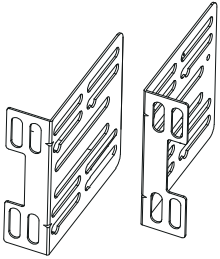 |
(3) Remote | 1 | 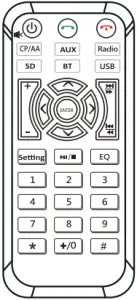 |
| (2) Screws | 8 |  |
|||
| (4) Trim Ring | 1 |  |
(5) User Manual | 1 | 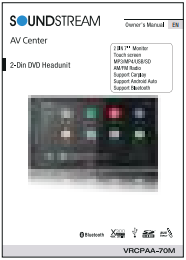 |
| (6) Power Cable | 1 |  ISO A ISO B ISO A ISO B |
(7) Warranty Card | 1 |  |
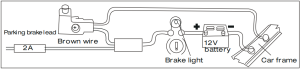
PARKING & SPEAKER CONNECTIONS:
Note: To watch video the parking wire should be connected to break signal. 2 cables are connected to a Hands-Free device (not included).
Parking wire
Note: The parking wire is connected with brake signal; for safety, the programs can be seen on the monitor after braking the car.
Connecting the reversing line to taillight on the car
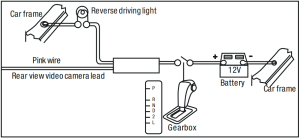
After connecting, when you start up the reverse gear, the unit will receive the picture from car rear view camera.
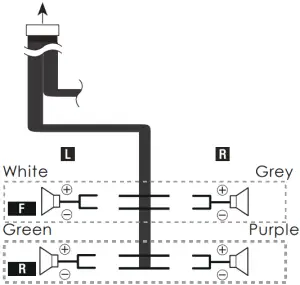
Speaker Connection
- Only use groundless loudspeakers.
- Use only loudspeakers of minimum 40 Watt, using fewer watts may result in damaging your loudspeakers at higher volumes.
- Use 4~8 Ω (Ohm impedance) loudspeakers only; using higher or lesser impedance may damage the unit.
- Loudspeaker cables and/or optional external power amplifiers must always be about 30cm away from the antenna and/or antenna extension parts.
- Do not connect the speaker leads of the power coed to car battery; otherwise, the unit will be seriously damaged.
- Before connecting the speaker leads of the power cord to the speakers, check the speaker wiring in your car.
Connect the speakers according the following diagram, incorrect connections will damage the unit or your loudspeakers
SPECIFICATION:
General
Power Supply ………………………………… DC10-16VGrounding System ………………………… Negative GroundCurrent Drain ………………………………… 15A(Max.)Speaker Impedance ………………………… 4 ohm per channelFrequency Response ……………………….. 20Hz~20kHzOperating Temperature ………………….. -20~+60°CDimensions ………………………………… 178mm(W)x168mm(D)x100mm(H)
TFT Display
TFT Screen Size …………………………………………. 7 inchResolutionn ………………………………………………… 800×480 Pixels
FM Radio
Frequency Range(USA) …………………………… 87.5~107.9MHzFrequency Range(Europe) ………………………. 87.5~108.0MHzEnable Sensitivity (S/N=30dB) ………………………… ≤15dBSN Ratio ……………………………………………………………. ≥55dBStereo Separation …………………………………………………. ≥30dB
AM Radio
Frequency Range(USA) …………………………………… 530~1710KHzFrequency Range(Europe) ………………………. 522~1620KHzEnable Sensitivity (S/N=20dB) ………………………….. ≤40dBSN Ratio ………………………………………….. ≥45dB
Line-out / Subwoofer Output
Maximum Output Level (10Kohms load) …………………….. ≥4V rmsSubwoofer Time Align …………………………. 0~18ms
[xyz-ips snippet=”download-snippet”]