
Illuminated 3-Way Light SwitchOwner’s Manual
https://www.amazon.com/sozulamp
Instructions

Failure to turn OFF electrical power at the service panel prior to removing/installing the Switch can result in electrical shock, fires, and/or death.
CAUTION: Please read all instructions and warnings before installing.
- Failure to follow these instructions can cause electrical shock, death or permanent injury.
- Do not work on live electricity.
- To be installed and/or used in accordance with appropriate electrical codes and regulations.
- Use the Switch only with copper or copper clad wire. Do not use it with aluminum wire.
- The Switch is for dry indoor locaion use only.
- The Switch is standard 3-Way and decor rocker switches with screw terminals.
- Recommended minimum wall box depth is 2-1/2″.
- If you are unsure about any part of these instructions, consult a qualfied elecrician.
Tools needed to install your switch:
![]()
![]()
Phillips Screwdriver Flathead Screwdriver
![]()

Voltage Detector Wire Cutter / Stripper
-1-
Specification:
3-Way Night Light Wall SwitchLED Power: 0.1WLED Color : Warm white(3000K), Cool white(6000K)Ground: U-Grounding screwAmperage: 15AmpVoltage: 120/277VAC.HP Rating: 1/2HP-120V, 2HP -240V-277VMax. Amp: 12AmpTermination: Quick-wire Push-In & Side wiredMaterial: ThermoplasticBody Material: ThermoplasticStrap Material: Steel
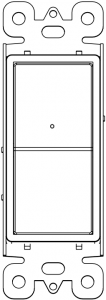
Features Diagram:


CAUTION: Power lower than 9 wattage Locator Light Bulbs may flicker or illuminate when used with the Night Light Switch. If this is a concern, the light bulb can be changed for power more than 9 wattage.
-2-
Troubleshooting
Failure to turn OFF electrical power at the service panel prior to removing/installing the Switch can result in electrical shock, fires, and/or death.
Having difficulties? Here are some tips that might help. Your Switch was individually tested and worked great when it was shipped. It is very unlikely that the Switch itself is malfunctioning. We will walk you through some issues that you might encounter.
QUICK OVERVIEW OF POSSIBLE INSTALLATION ISSUES
|
ISSUE |
TROUBLESHOOTING |
| Locator Light Bulbs does not turn on | Circuit breaker controlling the switch has been turned on. |
| Fuse has installed or fuse has tripped. | |
| Make sure the wire connections in the wall box are secure. | |
| Switch turn on. | |
| Light bulbs are burned out. | |
| Light bulbs neutral connection is not wired. | |
| LED Night Light does not turn on | Make sure Locator Light Bulbs can turn on. |
| The LED Night Light only illuminates when area is dark see “Test LED Night Light” on Page 6. | |
| Light bulbs must turn off, When the light bulbs turn on, the night light will not work. | |
|
CAUTION Power of Locator Light Bulbs must more than 9 wattage. If lower than 9 wattage the Locator Light Bulbs may flicker or illuminate. |
-3-
Installation
Installing Switch is easy, but makes sure that you:
- Understand basic wiring principles and techniques.
- Can interpret wiring diagrams
- Have circuit wiring experience
- Are prepared to take a few minutes to test your work, making sure that you have wired the switch correctly.If you do not fully understand these instructions, you should seek the assistance of a qualified electrician.
Step 1 Turn Off Power

Step 2 Preparing and connecting wires:
This Switch can be wired using side wire terminal screws or through back wire openings. Choose appropriate wire stripping specifications accordingly.
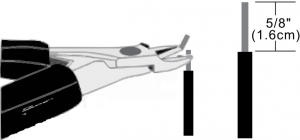
Strip Gage(measure bare wire here or use gage on back of the Switch)
Side Wire ConnectionSide wire terminals accept #14AWG solid wire copper only.

Back Wire (either hole may be used)Back wire openings use #14-12AWG solid wire copper only.Make sure that the ends of the wires from the wall box are straight (cut if necessary)
-4-
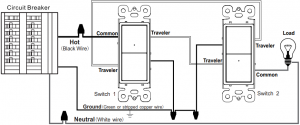
Step 3 Wiring Diagram
- 3 Way Switch Wiring Diagram

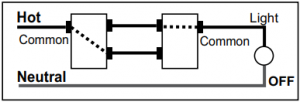
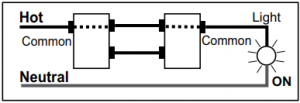
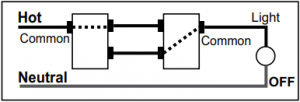
- Single Pole Switch Wiring Diagram
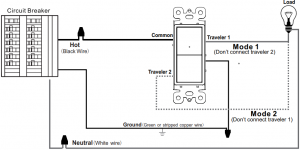
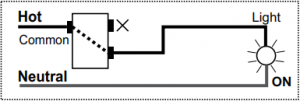
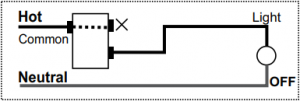
Mode 1 Mode 2


-5-
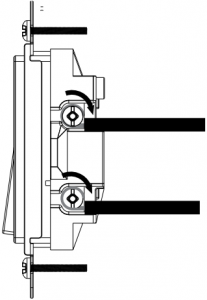
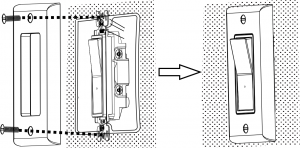
Step 4 Testing switch prior to mounting in wall box:
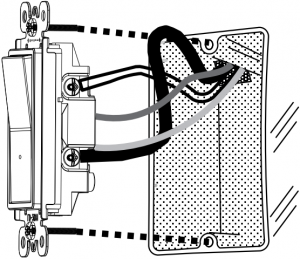
- Position all wires to provide room in wall box for device.
- Ensure that the word “Bottom” is facing down on device.
- Partially screw in mounting screws in wall box holes.
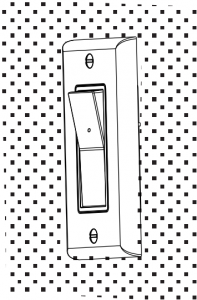
Step 5 Place wall plate: (Wall plate sold separately)Place wall plate over the switch and secure with screws.
Restore power at circuit breaker or fuse.Turn on the Locator Light Bulbs, If it does not turn on, refer to troubleshooting section.
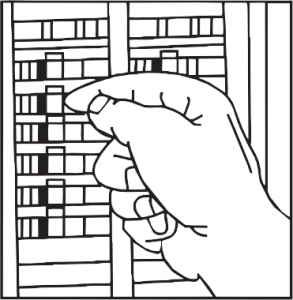
Step 6 Test LED (Locator light bulbs must turn off)
Auto turns LED’S off when the light sensor is exposed to light

Darken the room or place finger (palm) on light sensor

Auto turns LED’S on when the area around light sensor is dark
-6-
PRODUCT LIMITED ONE-YEAR WARRANTY
What this Limited Warranty Covers and For How LongWarrants that the Product accompanied by this limited warranty is free from manufacturing defects in materials and workmanship for a period of one (1) year from the date of original purchase, as shown on your invoice or sales receipt. This warranty extends only to the original consumer purchaser of the product from an authorized reseller.
Disclaimer of Implied Warranties Beyond the Limited Warranty PeriodThe limited warranty period of one (1) year also applies to any implied warranties that may exist under applicable law, including the implied warranties of merchantability and fitness for a particular purpose. There are no warranties that extend beyond the description on the face hereof. Some states do not allow limitations on how long an implied warranty lasts, so the above limitation may not apply to you.
What this Limited Warranty does not CoverThis limited warranty does not apply to defects resulting from (1) overloading, misuse, abuse, alteration, accident, neglect, improper maintenance or handling, or normal wear and tear; (2) improper installation; (3) installation in an improper environment; and (4) any use that is not under normal operating conditions or not in accordance with any product packaging, warmings, or instructions for use.
What we will doIf you believe the product is defective, please return it to us in the manner described below within the limited warranty period of one (1) year from the date of purchase. If we determine there is a defect covered by this limited warranty, we will, at its option, repair, replace the product, or refund your purchase price. This limited warranty extends to repaired and replacement products and components only through the end of the original limited warranty period.
Limitations of Remedies under this Limited WarrantyThe remedies provided herein are the exclusive remedies under this limited warranty, whether based on contract, tort or otherwise. In no event will us or any of its retailers, dealers, distributors or resellers be liable for incidental, indirect, special or consequential damages relating to the product (including any repaired or replacement product or component), its use, or its installation, including without limitation damage to, or loss of use of, any equipment, lost sales or profits or delay or failure to perform this warranty obligation. Some states do not allow the exclusion or limitation of incidental or consequential damages, so the above limitation or exclusion may not apply to you.
How State Law AppliesThis limited warranty gives you specific legal rights, and you may also have other rights which vary from State to State.
What You Must do to Get Coverage Under this Limited WarrantyTo make a claim under this limited warranty you must first contact us within the limited warranty period. You must provide proof of purchase in the form of your original sales receipt in order to obtain limited warranty coverage. We will perform the warranty obligations, if any, within 60 days of the Owner’s submission of the warranty claim.
-7-
[xyz-ips snippet=”download-snippet”]