
Spartherm S 600 INSERT / M 700 INSERT / Wood Insert User Manual
INTRODUCTION AND UNIT DESCRIPTION
SPARTHERM S600/M700 INSERT RANGE.PLEASE READ THIS ENTIRE MANUAL BEFORE YOU INSTALLYOUR S600/M700 MODULE UNIT.PLEASE READ THE MANUAL FOR OPERATING INSTRUCTIONS AND HOW TO BURNTHE FIRE THAT YOU HAVE A CLEAN AND EFFICIENT FIRE.FAILURE TO FOLLOW INSTRUCTIONS MAY RESULT IN PROPERTY DAMAGE, BODILY INJURY, OR EVEN DEATH.Save this manual and keep it in a safe place that it is easy to refer to it.“DO NOT INSTALL IN A MOBILE HOME”WARNING: DO NOT OVERFIRE.IF THE STOVE TOP OR CHIMNEY OR CONNECTOR GLOW RED, YOU ARE OVERFIRING!THIS IS DANGEROUS AND WILL VOID THE WARRENTY.This wood heater has a manufacturer-set minimum low burn rate that must not be altered. It is against federal regulations to alter this setting or otherwise operate this wood heater in a manner inconsistent with operating instructions in this manual.
This range of inserts/stoves/zero clearance inserts have been tested by…POLYTEST –Polytests Services Inc.695 B rue Gaudette,St-Jean-sur-RichelieuQuébec, Canada, J3B 7S7450.741.3636www.polytests.comAND ARE LISTED TO UL1482-2011 AND ULCS628-93.THEY ARE ALSO EPA CERTIFIED – U.S. ENVIRONMENTAL PROTECTION AGENCYCertified to comply with 2020 particulate emission standards using CORD WOOD.600 insert 1.67 g/hr700 insert 1.14 g/hrWARRANTY.PLEASE REFER TO WARRANTY CONDITIONS IN THE MANUAL.‘‘U.S. ENVIRONMENTAL PROTECTION AGENCY Certified to comply with 2020 particulate emission standards using cord wood.
SAFETY INFORMATION
![]() WARNING: IF THE INFORMATION IN THESE INSTRUCTIONS IS NOT FOLLOWED EXACTLY, A FIRE OR EXPLOSION MAY RESULT CAUSING PROPERTY DAMAGE, PERSONAL INJURY OR DEATH. IMPROPER INSTALLATION, ADJUSTMENT, ALTERATION, SERVICE OR MAINTENANCE CAN CAUSE INJURY OR PROPERTY DAMAGE, BODILY INJURY OR EVEN DEATH. PLEASE READ ENTIRE MANUAL BEFORE YOU INSTALL AND USE YOUR APPLIANCE. THIS APPLIANCE HAS NOT BEEN TESTED WITH AN UNVENTED GAS LOG SET. TO REDUCE RISK OF FIRE OR INJURY, DO NOT INSTALL AN UNVENTED GAS LOG SET INTO THE APPLIANCE.
WARNING: IF THE INFORMATION IN THESE INSTRUCTIONS IS NOT FOLLOWED EXACTLY, A FIRE OR EXPLOSION MAY RESULT CAUSING PROPERTY DAMAGE, PERSONAL INJURY OR DEATH. IMPROPER INSTALLATION, ADJUSTMENT, ALTERATION, SERVICE OR MAINTENANCE CAN CAUSE INJURY OR PROPERTY DAMAGE, BODILY INJURY OR EVEN DEATH. PLEASE READ ENTIRE MANUAL BEFORE YOU INSTALL AND USE YOUR APPLIANCE. THIS APPLIANCE HAS NOT BEEN TESTED WITH AN UNVENTED GAS LOG SET. TO REDUCE RISK OF FIRE OR INJURY, DO NOT INSTALL AN UNVENTED GAS LOG SET INTO THE APPLIANCE.
- This appliance can be very hot when burning.
- Combustible materials such as firewood, wet clothing, etc. placed too close can catch fire.
- Children and pets must be kept from touching the appliance when it is hot.
- The chimney must be sound and free of cracks. Before installingthis unit, contact the local building or fire authority and follow their guidelines.
- Operate only with the door tightly closed.
- Do not use an elevated grate or otherwise raise the fire.
- At least 14 square inches (90,3 square centimeters) of outside air must be admitted to the room or directly to the unit through a 4´´ (101,6mm) diameter pipe. Failure to provide this may starve other fuel burning appliances from an adequate air supply.
- Make sure not to create negative pressure in the installation room, e.g. by means of an exhaust fan or similar mechanical blower, as this could affect the combustion oft the wood insert or increase the possibility of smoke leakage.
- This appliance is designed to burn natural wood only. Higher efficiencies and lower emissions generally result when burning air dried
- seasoned hardwoods, as compared to softwoods or to green or freshly cut hardwoods.
- Do not burn green or freshly cut wood.
- Do not start a fire with chemicals or fluids such as gasoline, engine oil, etc.
- Do not burn treated wood, coal, charcoal, colored paper, cardboard, solvents or garbage.
- Do not let the appliance become hot enough for any part to glow red.
- KEEP THE STOVE TOP TEMPERATURE BELOW 700°F (371°C). Attempts to achieve heat output rates that exceed design specifications can result in steel distortion and damage.
![]() WARNING:HOT GLASS WILL CAUSE BURNS.DO NOT TOUCH GLASS UNTIL COOLED.NEVER ALLOW CHILDREN TO TOUCH GLASS.
WARNING:HOT GLASS WILL CAUSE BURNS.DO NOT TOUCH GLASS UNTIL COOLED.NEVER ALLOW CHILDREN TO TOUCH GLASS.
NOTICE:DO NOT DISCARD THIS MANUAL
- IMPORTANT OPERATING AND MAINTENANCE INSTRUCTIONS INCLUDED.
- READ, UNDERSTAND AND FOLLOW THESEINSTRUCTIONS FOR SAFE INSTALLATION AND OPERATION.
- LEAVE THIS MANUAL WITH PARTY RESPONSIBLE FOR USE AND OPERATION.
Safe Wood-Burning Practices
When using your wood burning appliance, follow these guidelines for safe operation:Keep flammable items, like curtains, furniture, newspapers, and books, away from your appliance.Only use newspaper, dry kindling and all-natural or organic fire starters. Never start a fire with gasoline, kerosene, or charcoal starter.Do not burn wet or green (unseasoned) wood.Many wax and sawdust logs are made for open hearth wood insert only. Check your wood stove or wood insert operating instructions before using artificial logs.If you use manufactured logs, choose those made from 100 percent compressed sawdust.Build hot fires. For most appliances, a smoldering fire is not safe or efficient.Keep the doors of your wood-burning appliance closed unless loading or stoking the live fire. Harmful chemicals, like carbon monoxide, can be released into your home.Regularly remove ashes into a covered, metal container. Store the container outdoors on a nonflammable surface.Keep a fire extinguisher handy
Do not burn:
- Garbage
- Lawn clippings or yard waste
- Materials containing rubber, including tires
- Materials containing plastic
- Waste petroleum products, paints or paint thinners, or asphalt products
- Materials containing asbestos
- Construction or demolition debris
- Railroad ties or pressure-treated wood
- Manure or animal remains
- Salt water driftwood or other previously salt water saturated materials
- Unseasoned wood
- Paper products, cardboard, plywood, or particleboard. The prohibition against burning these materials does not prohibit the use of fire starters made from paper, cardboard, saw dust, wax and similar substances for the purpose of starting a fire in an affected wood heater.Burning these materials may result in release of toxic fumes or render the heater ineffective and cause smoke.
U.S. ENVIRONMENTAL PROTECTION AGENCY Certified to comply with 2020 particulate emission standards using cordwood 600 insert 1.67 g/hr and 700 insert 1.14 g/hr, Method 28RThis wood heater needs periodic inspection and repair for proper operation. It is against federal regulations to operate this wood heater in a manner inconsistent with operating instructions in this manual.This wood heater has a manufacturer-set minimum low burn rate that must not be altered. It is against federal regulations to alter this setting or otherwise operate this wood heater in a manner inconsistent with operating instructions in this manual.600=10,613 – 47,417 btu/hr 4kg of wood burned in 52minutes efficiency 65.5%700=13,129 – 29,452 btu/hr 6.39kg of wood burned in 125 minutes efficiency 59%
Specifications Cassette 600 Insert / 700 Insert
Spartherm Cassette Insert:600 Insert, 700 InsertWeight of Insert: 149 lbs (67,5 kg), 275 lbs (124,5 kg)Insert exterior: Width/depth/height (inches): 22 1/8“ / 24 1/4“ / 16 2/3“, 24“ / 28 1/5“ / 17 5/7“Firebox interior: Width/depth/height (inches): 17,25“/8,5“/13,35“, 21“/8,937“/11,875“ (back), 14,125“ (front)Heating capacity at -20°C / -4°F, App m²/ sq. ft App m²/ sq. ft Recommended amoint of wood when fueling (lbs/kg) wood: 2-3 logs of wood of app. 9.8-12.9 inches / 25-33 cm: 1,8 kg/hr 2,1 kg/hrIntermittent operationFlue gas mass flow: grams per second, grams per secondFlue gas temperature: °C/°F, °C/°FSingle wall connector stove pipe: 6“ (153 mm) 6“ (153 mm)Optimal thermal output: 19,000 BTU, 15,000 BTU/hrMin. /Max. output (kW): 10,613 – 47,417 BTU, 13,129 – 29,452 BTU/hrMinimum stove draft pressure at above output: “WC (Pa), “WC (Pa)Tested EPA emission particulate rate: 1.67 g/hr 1.14 g/hr
INSTALLATION OVERVIEW


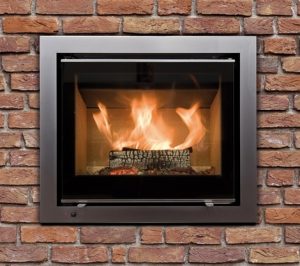
Example shown: S 600 and M 700
INTRODUCTION
The Spartherm wood insert have been tested and certified by CSA based on the following standards: UL 127 / ULCS628. EPA : U.S.ENVIRONMENTAL PROTECTION AGENCY Certified to comply with 2020 emissionstandards using cord wood. Before installing your Spartherm wood insert,PLEASE NOTE: THE LOCAL AUTHORITY HAVING JURISDICTION (MUNICIPAL BUILDING DEPARTMENT, FIRE PREVENTION BUREAU, ETC)SHOULD BE CONSULTED BEFORE INSTALLATION TO DETERMINE THE NEED TO OBTAIN A PERMIT. Please read this manual carefully before installing or using your wood insert. Incorrect installation may result in fire. To reduce the risk of fire, follow the installation instructions. Failiure to do so may result in property damage, bodily injury or even death. Keep this manual handy so you can refer to it whenever necessary
![]() WARNING:
WARNING:
- THIS APPLIANCE IS HOT WHEN OPERATED AND CAN CAUSE SEVERE BURNS IF CONTACTED.
- ANY CHANGES OR ALTERATIONS TO THIS APPLIANCE OR ITS CONTROLS CAN BE DANGEROUS AND IS PROHIBITED:
- Do not operate appliance before reading and understanding operating instructions. Failure to operate appliance according to operating instructions could cause fire or injury.
- Before installing this appliance, contact the local building or fire authority and follow their guidelines.
- This appliance must be installed by a qualified installer.
- Do not use a wood insert or other product no specified for use with this wood insert.
- Risk of burns. The appliance should be turned off and cooled before servicing.
- Do not operate without fully assembling all components.
- Risk of cuts and abrasions. Wear protective gloves and safety glasses during installation. Sheet metal edges may be sharp.
- Children and adults should be alerted to the hazards of high surface.
- temperature and should stay away to avoid burns or clothing ignition.
- Young children should be carefully supervised when they are in the same room as the appliance. Toddlers, young children and others may be susceptible to accidental contact burns. A physical barrier is recommended if there are at risk individuals in the house. To restrict access to an appliance or stove, install an adjustable safety gate to keep toddlers, young children and other at risk individuals out of the room and away from hot surfaces.
- Clothing or other flammable material must not be placed on or near the appliance. Objects placed in front of the appliance must be kept a minimum of 48” (1220 mm) away from the front face of the appliance.
- Due to high temperatures, the appliance should be located out of traffic and away from furniture and draperies.
- Ensure you have incorporated adequate safety measure to protect infants/toddlers from touching hot surfaces.
- Even after the appliance is out, the glass and/or screen will remain hot for an extended period of time.
- Check with your local hearth specialty dealer for safety screens and hearth guards to protect children from hot surfaces. These screens and guards must be fastened to the floor.
- Any safety screen or guard removed for servicing must be replaced prior to operating the appliance.
- Under no circumstances should this appliance be modified.
- This appliance must not be connected to a chimney flue pipe servicing a separate solid fuel burning appliance.
- Do not operate the appliance with glass door removed, cracked orbroken. Replacement of the glass should be done by a licensed or qualified service person.
- Do not strike or slam shut the appliance glass door.
- Only doors / optional fronts certified with the unit are to be installed on the appliance.
- Keep the packaging material out of reach of children and dispose of the material in a safe manner. As with all plastic bags, these are not toys and should be kept away from children and infants.
- If the appliance is not properly installed, a house fire may result. Do not expose the appliance to the elements (ex. rain, etc.) and keep the appliance dry at all times. Wet insulation will produce an odour when the appliance is used.
- The chimney must be sound and free of cracks. Clean your chimney a minimum of twice a year and as required.
- Do not start a fire with chemicals or fluids such as gasoline, engine oil, etc.
- Your appliance requires periodic maintenance and cleaning. Failure to maintain your appliance may lead to smoke spillage in your home.
- Lower emissions generally result when burning air dried seasoned hardwoods, as compared to softwoods or too green or freshly cut hardwoods. Burning wet unseasoned wood can cause excessive creosote accumulation. When this is ignited it can cause a chimney fire that may result in a serious house fire.
- This appliance is designed to burn natural wood only. Do not burn treated wood, coal, charcoal, coloured paper, cardboard, solvents or garbage.
- Burn wood directly on the firebricks. Do not elevate grate or otherwise raise the fire.
- Do not store wood within appliance installation clearances or within the space required for re-fueling and ash removal.
- Ashes must be disposed in a metal container with a tight lid and placed on a non-combustible surface well away from the home or structure until completely cool.
- Ensure clearances to combustibles are maintained when building a mantel or shelves above the appliance. Elevated temperatures on the wall or in the air above the appliance can cause melting, discolouration or damage to decorations, a T.V. or other electronic components.
- Do not install this wood insert in a factory- built wood insert unless certified with the wood insert.
EXAMPLE OF IDENTIFICATION PLATE
Safety Information
Listed by / Manufactured by:Spartherm Feuerungstechnik GmbHMaschweg 38D – 49324 Melle, Germany[email protected]
Solid Fuel Room Heater – For Use with Solid Wood Fuel onlyTested to Standards: UL-1482-11, ULC-S628,U.S. Enviroment Protection Agency: Certified to comply with 2020 Particulate emission standards using cord woodModel: Spartherm Cassette 600 InsertDate of ManufactureMonth/Year:11/2019Serial Number S 600 Insert
TO PREVENT HOUSE FIRES:
Contact local building or fire officials about restrictions and installation inspection in your area. Install and use only in accordance with manufacturer’s installation and operating instructions and local codes. In the absence of any local codes, installation must meet minimum requirements of NFPA 211 in the USA, and B365 in Canada. Refer to manufacturer´s instructions and local codes for precautions required for passing a chimney through a combustible wall or ceiling. Inspect and clean chimney system frequently in accordance with manufacturer´s instruction. Do not connect this insert to a chimney flue serving another appliance. Do not use grate or elevate fire. Build wood fire directly on hearth. This fireplace insert must be installed with a continuous chimney liner of 6 or 7 inches diameter extending from the fireplace insert to the top of the chimney. The chimney liner must conform to the Class 3 requirements of CAN/ULC-S635, Standard for Lining Systems for Existing Masonry or Factory-Built Chimneys and Vents, or CAN/ULC-S640, Standard for Lining Systems for New Masonry Chimneys.
TO PREVENT CREOSOTE FIRES:
Inspect and clean chimney frequently – under certain conditions ofuse, creosote buildup may occur rapidly. Do not use fuels other thanfirewood.CAUTION: Only operate the wood heater with the doors fully closed. Replace glass only with original 4 mm Robax ceramic glass. Areas of the fireplace incorporating warm or cold air ducts shall be enclosed in accordance with the manufacturer’s installation instructions. If provided with a hearth extension, the hearth extension must be installed according to the installation instructions! Air is needed for fireplace operation! At least 14 square inches (90.3 square centimeters) of outside air must be admitted to the room or directly to the unit through a 4” (101.6mm) diameter pipe. Failure to provide this may starve other fuel burning appliances from an adequate air supply. Do not obstruct air inlet and outlet in any case. Components used with fireplace must be listed. See manual. Do not use a fireplace insert or other products not specified for use with this product.CAUTION: Gas logs shall be certified for the application. This unit is not designed to burn with a log set. This wood heater needs periodic inspection and repair for proper operation. Consult the owner’s manual for further information. It is against federal regulations to operate this wood heater in a manner inconsistent with the operating instructions in the owner’s manual. Floor protection for Canada: 18″ (457mm) from unit to front of floor protector.
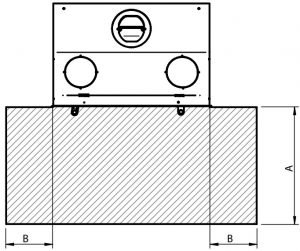
MINIMUM CLEARANCES TO COMBUSTIBLE MATERIALS
A. Min. 27” / 686mmB. 15” / 381mmC. 15” / 381mmD. Unit width and add 8” / 203mm on each sideE. 8” / 203mm on each sideF. For USA: 16” / 406mm For Canada 18” / 457mmG. 9.25” / 235mmIN FRONT OF UNITRecommended amount of wood: 1,8 kg/hrMin. / Max. output (kW): 10,613 – 47,417 BTU/hr
Not Tested – NFPA Guidelines in the USA, CAN/CSA B365-M91 in Canada. Floor protection must be minimum 3/8-inch non-combustible material extending beneath the stove, and to the front and sides from door opening and to the rear as indicated.
CAUTION: HOT WHILE IN OPERATION. DO NOT TOUCH. KEEP CHILDREN AND CLOTHING AWAY. CONTACT MAY CAUSE SKIN BURNS. SEE NAME PLATE AND INSTRUCTIONS. KEEP FURNISHINGS AND OTHER COMBUSTIBLE MATERIALS A CONSIDERABLE DISTANCE AWAY FROM THE APPLIANCE. NOT SUITABLE FOR MOBILE HOME INTALLATION. DO NOT OVERFIRE – IF HEATER OR CHIMNEY CONNECTOR GLOWS, YOU ARE OVERFIRING.DO NOT REMOVE THIS LABEL
DIMENSIONS


S 600 InsertA: 18 1/7” / 461mmB: 22 2/7” / 566mmC: 24 7/8” / 632mmD: 23” / 582mmE: 2” / 50mmF: 3 5/8” / 92mmG: 6”
Example shown: S 600
DIMENSIONS SINGLE FACED
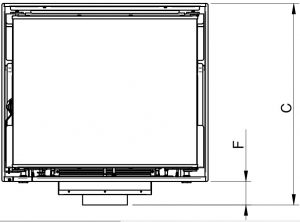

M 700 InsertA: 19 2/5” / 493mmB: 22 2/7” / 566mmC: 26 2/7” / 668mmD: 26 2/7” / 682mmE: 2” / 53mmF: 3” / 78mmG: 6”
Example shown: M 700
SPECIFICATION
Fire chamber volume: Minimum Power: Maximum power: Efficiency* Chimney type: Unit weight: ideal fuel sizeS 600 Insert: 0,95 ft3: 10 613 BTU/h: 47 417 BTU/h: 70.29 %: 6″: lbs 17″M 700 Insert: 1,58 ft3: 13 129 BTU/h: 29 452 BTU/h: 66.77 %: 6″: lbs 2″
Conversion FactorsInches to millimeters (mm): 1’’ = 25.4 mmBritish Thermal Unit BTU/h to Watt: 1BTU/h = 0.293 WattKilogramm to Pound: 1kg = 2.205 lbCubicmeter to cubicfeet:1m3= 35.314 ft3
GENERAL INSTRUCTIONS
![]() WARNING:THIS APPLIANCE HAS NOT BEEN TESTED WITH ANY VENTED OR UNVENTED GASLOG SET: TO REDUCE RISK OF FIRE OR PREVENT INJURY, DO NOT INSTALL A VENTED OR UNVENTED GAS LOG SET INTO THE APPLIANCE.
WARNING:THIS APPLIANCE HAS NOT BEEN TESTED WITH ANY VENTED OR UNVENTED GASLOG SET: TO REDUCE RISK OF FIRE OR PREVENT INJURY, DO NOT INSTALL A VENTED OR UNVENTED GAS LOG SET INTO THE APPLIANCE.
CAUTION:These inserts are not certified for gas log sets.
DO NOT CONNECT THIS APPLIANCE TO A CHIMNEY FLUE SERVING ANOTHER APPLIANCE.THIS APPLIANCE AND THE COMPONENTS ARE DESIGNED TO BE INSTALLED AND OPERATED AS A SYSTEM. ANY ALTERATION TO OR SUBSTITUTION FOR ITEMS IN THIS SYSTEM, UNLESS ALLOWED BY THESE INSTALLATION INSTRUCTIONS, WILL VOID THE LISTING AND MAY VOID THE PRODUCT WARRANTY. IT MAY ALSO CREATE A HAZARDOUS INSTALLATION. READ THROUGH THESE INSTRUCTIONS THOROUGHLY BEFORE STARTING YOUR INSTALLATION AND FOLLOW THEM CAREFULLY THROUGHOUT YOUR PROJECT.
- Before beginning your installation, consult with your local building code agency or fire officials and insurance representative to ensure compliance.
- Non-toxic smoke will be emitted during the paint curing process, to help dissipate the smoke open a window near the appliance.
- Remove any dust or debris off the top of the appliance before firing the appliance as the paint will become soft as the appliance heats up and will harden as the appliance cures. To cure the paint on your appliance burn your appliance moderately hot during the first few fires.
- To keep the gasket from sticking to the appliance as the paint is curing, periodically open the door every 5-10 minutes.
- For the first two weeks use generous amounts of fuel and burn the appliance for an hour as the appliance goes through a process of eliminating moisture in the steel and firebricks. The initial heat output will be reduced while the moisture is bring drawn from the appliance and it will be necessary to build several hot fires to remove this moisture. DURING THIS PROCESS DO NOT OVERFIRE THE APPLIANCE.
GENERAL INFORMATION
The chimney vent system used on your wood burning appliance should be designed with the least amount of restriction possible to enable the exhaust products to easily flow through it. Chimney vent systems that are too short or too long (refer to point 4.3 ”chimney installation”) can also have an adverse affect on the flow of exhaust through it. The wood burning appliance and chimney vent system also require a sufficient supply of combustion air not only to support the combustion in the combustion chamber but to replace the exhaust leaving it so it can flow freely up through the vent system and out into the atmosphere. It is the correct balance of combustion air and the chimney vent system that will ensure the appliance provides you with its optimum performance.Be sure to provide sufficient combustion air. There are many other appliances in your home competing for air such as a kitchen range hood, forced air heating devices or a bathroom exhaust fan.
 We suggest that our woodburning hearth products be installed and serviced by professionals who are certified in the U.S. by the National Fireplace Institute® (NFI) as NFI Woodburning Specialists or who are certified in Canada by Wood Energy Technical Training (WETT).
Expansion / contraction noises during heating up and cooling down cyclesare normal and to be expected.After extended periods of non-operation such as following a vacation or a warm weather season, the appliance may emit a slight odour for a few hours. This is caused by dust particles on the firebox burning off. Open a window to sufficiently ventilate the room.CALIFORNIA PROP 65 WARNING:Use of this product may produce smoke which contains chemicals known to the State of California to cause cancer, birth defects, or other reproductive harm.If you experience smoking problems, you may need to open a door, a window or otherwise provide some method of supplying combustion air to the appliance.
AIR SYSTEM
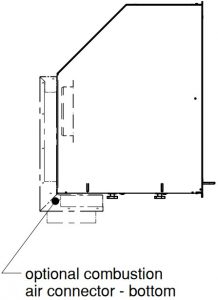
When mounting the air system ensure that the air control system provides fresh air from the outside. In order for the air system to function, you have to ensure in the structure that no vacuum occurs in the housing.If convection grates are installed, be sure not to block them. Air system (accessory) is connected to the bottom of the stove.
S 600 – backside air intake S 600 – groundside air intake
 M 700 – backside air intake
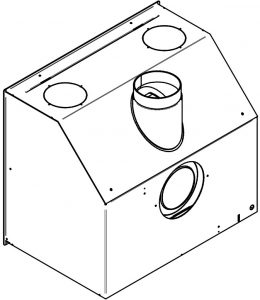 M 700 – groundside air intake
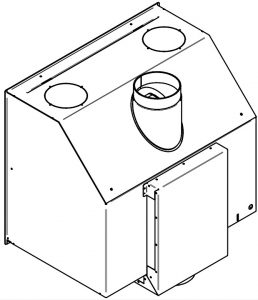
CONNECTION DIRECTLY TO THE UNIT
To connect the separate combustion air directly to the unit you need to have the right separate combustion air connector Ø 5/6”. Fix the connector directly to the unit. It can be oriented to the left side, right side or to the back.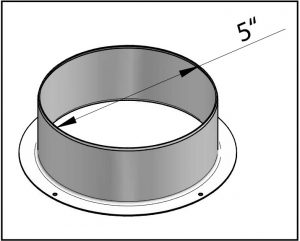 Fresh air ductsThe ducts providing the outside combustion air should be as short as possible to prevent pressure loss and to prevent making the house cold.GrillsThe combustion air ducts will be protected at the outside by a grill. The free passage section of those grills is at least equivalent to the section of the air inlet. Please note that the infiltration of water and the effect of the wind can damage the system.
backside air intake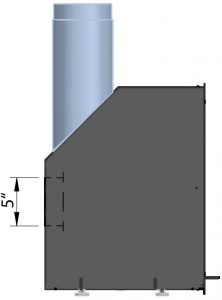 ground side air intake
Closure valve
If you decide to connect separate combustion air it is mandatory to install a closure valve to prevent condensate formation and to prevent the room from becoming cold while the stove is not in use. It should ideally be located as close as possible to the outside wall. It can be controlled from inside if it is not too far from the stove (cable length = 47”).
PLEASE NOTE: COMBUSTION AIR INTAKE REQUIREMENTS.It is recommended that the 5” Combustion air intake duct is installed in a correct manner.Please find the following information.Outside Air- ducts must…– Be protected on the outside by a grill where the free air- flow that is at least equivalent to the section of the air inlet.Please note that the infiltration of wind, weather , snow and water can effect or damage the air combustion system.– Ideally be fitted with a butterfly valve so that it can manually , be used to close the cold air from entering the firebox.Please note that the butterfly valve has to be 100% open or 100% closed and should not!!!Be used to adjust burn rate.Try to keep the butterfly valve as close to the outside wall as possible.-The air-duct should be insulated and the distance from the wood insert to the outside should be as short as possible.For 5” air duct please refer to the maximum lengths and elbows.Number of elbows4’ 4 elbows8’ 4 elbows10’ 2 elbows12’ 0 elbowIf you exceed these guidelines, you must compensate by using a larger diameter and/or a smoother duct.Careful not to crush the duct!It should ideally be located as close as possible to the outside wall.-If it is not possible to bring in combustion air to the wood insert please insure that there is sufficient air to feed the wood insert in the room –please note that this is not ideal.Please contact your dealer who offers suitable parts for air inlet ducts (pipes and damper).Make sure that the wire mesh is mounted at the combustion air inlet.
INSTALLATION PLANNING
Clean all ashes out of the inside of the existing wood insert opening. Makesure that the chimney and wood insert are free of cracks, loose mortar, creosote deposits, blockage or other signs of deterioration. If necessary, have any repair work done by a qualified professional before installing the insert.Do NOT remove bricks or mortar from the wood insert. In case of an outsideair inlet or ash dump, fill with fiberglass insulation. Adhere to minimum clearances as illustrated.
![]() WARNING:WEAR GLOVES AND SAFETY GLASSES FOR PROTECTION. CAREFULLY FOLLOW THE INSTRUCTIONS FOR ASSEMBLY OF THE PIPE AND OTHER PARTS NEEDED TO INSTALL THE APPLIANCE. FAILURE TO DO SO MAY RESULT IN A FIRE, ESPECIALLY IF COMBUSTIBLES ARE TOO CLOSE TO THE APPLIANCE OR CHIMNEY AND AIR SPACES ARE BLOCKED, PREVENTING THE FREE MOVEMENT OF COOLING AIR. DO NOT DRAW OUTSIDE AIR FROM GARAGE SPACES. EXHAUST PRODUCTS OF GASOLINE ENGINES ARE HAZARDOUS. DO NOT INSTALL OUTSIDE AIR DUCTS SUCH THAT THE AIR MAY BE DRAWN FROM ATTIC SPACES, BASEMENTS OR ABOVE THE ROOFING WHERE OTHER HEATING APPLIANCES OR FANS AND CHIMNEYS EXHAUST OR UTILIZE AIR.THESE PRECAUTIONS WILL REDUCE THE POSSIBILITY OF APPLIANCE SMOKING OR AIR FLOW REVERSAL. THE OUTSIDE AIR INLET MUST REMAIN CLEAR OF LEAVES, DEBRIS ICE AND/OR SNOW OR ANY OTHER OBSTACLES. IT MUST BE UNRESTRICTED WHILE APPLIANCE IS IN USE TO PREVENT ROOM AIR STARVATION WHICH CAN CAUSE SMOKE SPILLAGE AND AN INABILITY TO MAINTAIN A FIRE. SMOKE SPILLAGE CAN ALSO SET OFF SMOKE ALARMS. NEGATIVE PRESSURE WITHIN YOUR HOME MAY INADVERTENTLY AFFECT YOUR APPLIANCE. TO PREVENT CONTACT WITH SAGGING OR LOOSE INSULATION, THE APPLIANCE MUST NOT BE INSTALLED AGAINST VAPOUR BARRIERS OR EXPOSED INSULATION. LOCALISED OVERHEATING COULD OCCUR AND A FIRE COULD RESULT. DO NOT USE MAKESHIFT COMPROMISES DURING INSTALLATION. DO NOT BLOCK OR RESTRICT AIR, GRILLE OR LOUVRE OPENINGS. DO NOT ADD A HOOD. KEEP HAND TOOLS IN GOOD CONDITION; SHARPEN CUTTING EDGES AND MAKE SURE TOOL HANDLES ARE SECURE. ALWAYS MAINTAIN THE MINIMUM AIR SPACE REQUIRED TO THE ENCLOSURE TO PREVENT FIRES. DO NOT PACK REQUIRED AIR SPACES WITH INSULATION OR OTHER MATERIALS.COMBUSTION AIR INLET DUCTS ARE NOT TO TERMINATE IN ATTIC SPACES OR CRAWL SPACES.
WARNING:WEAR GLOVES AND SAFETY GLASSES FOR PROTECTION. CAREFULLY FOLLOW THE INSTRUCTIONS FOR ASSEMBLY OF THE PIPE AND OTHER PARTS NEEDED TO INSTALL THE APPLIANCE. FAILURE TO DO SO MAY RESULT IN A FIRE, ESPECIALLY IF COMBUSTIBLES ARE TOO CLOSE TO THE APPLIANCE OR CHIMNEY AND AIR SPACES ARE BLOCKED, PREVENTING THE FREE MOVEMENT OF COOLING AIR. DO NOT DRAW OUTSIDE AIR FROM GARAGE SPACES. EXHAUST PRODUCTS OF GASOLINE ENGINES ARE HAZARDOUS. DO NOT INSTALL OUTSIDE AIR DUCTS SUCH THAT THE AIR MAY BE DRAWN FROM ATTIC SPACES, BASEMENTS OR ABOVE THE ROOFING WHERE OTHER HEATING APPLIANCES OR FANS AND CHIMNEYS EXHAUST OR UTILIZE AIR.THESE PRECAUTIONS WILL REDUCE THE POSSIBILITY OF APPLIANCE SMOKING OR AIR FLOW REVERSAL. THE OUTSIDE AIR INLET MUST REMAIN CLEAR OF LEAVES, DEBRIS ICE AND/OR SNOW OR ANY OTHER OBSTACLES. IT MUST BE UNRESTRICTED WHILE APPLIANCE IS IN USE TO PREVENT ROOM AIR STARVATION WHICH CAN CAUSE SMOKE SPILLAGE AND AN INABILITY TO MAINTAIN A FIRE. SMOKE SPILLAGE CAN ALSO SET OFF SMOKE ALARMS. NEGATIVE PRESSURE WITHIN YOUR HOME MAY INADVERTENTLY AFFECT YOUR APPLIANCE. TO PREVENT CONTACT WITH SAGGING OR LOOSE INSULATION, THE APPLIANCE MUST NOT BE INSTALLED AGAINST VAPOUR BARRIERS OR EXPOSED INSULATION. LOCALISED OVERHEATING COULD OCCUR AND A FIRE COULD RESULT. DO NOT USE MAKESHIFT COMPROMISES DURING INSTALLATION. DO NOT BLOCK OR RESTRICT AIR, GRILLE OR LOUVRE OPENINGS. DO NOT ADD A HOOD. KEEP HAND TOOLS IN GOOD CONDITION; SHARPEN CUTTING EDGES AND MAKE SURE TOOL HANDLES ARE SECURE. ALWAYS MAINTAIN THE MINIMUM AIR SPACE REQUIRED TO THE ENCLOSURE TO PREVENT FIRES. DO NOT PACK REQUIRED AIR SPACES WITH INSULATION OR OTHER MATERIALS.COMBUSTION AIR INLET DUCTS ARE NOT TO TERMINATE IN ATTIC SPACES OR CRAWL SPACES.
MINIMUM CLEARANCES TO COMBUSTIBLES
DO NOT PLACE ANY COMBUSTIBLE MATERIALS (FURNITURE, FIREWOOD, ETC.) WITHIN 48”(1220mm) IN FRONT AND ON THE SIDES OF THE Insert.COMBUSTIBLE MATERIALS CAN’T PROTRUDE ONTO THE METAL PARTS OF THE UNIT, THEY MUST BE COVERED WITH NON COMBUSTIBLE MATERIALS.Clearance requirements to combustible surfaces A: Combustible mantle to insertB: Sidewall to insertC: Side facingD-1: Hearth extension, widthD-2: Hearth extension, lengthInformations to D-1/D-2:The floor in front of the wood insert requires thermal protection. This protection must be non-combustible. Also this floor protector must be listed to UL 1618.Do NOT install in a mobile home
Canada: USAA: 20“ for 1“ thickness/ 28“ for 8“ thickness: 20“ for 1“ thickness/ 28“ for 8“ thicknessB: 15“: 15“C: 15“: 15“D-1: unit width and add 8” on each side: unit width and add 8” on each sideD-2: 18”: 16”
Distance to furniture
The recommend minimum distance from stove to furniture is 48 inches. Note that some furniture is more easily affected by heat and may need to be moved to greater distance. This is your responsibility.In addition other combustible materials, away from the stove. In general, a distance of 48 inches must be maintained between the stove and move-able combustible item such as drying clothes, newspapers, firewood etc. Failure to meet the required clearances can endanger property and personal safety.Note:Acid ProtectionIf acid-washing the masonry around the stove, protect the stove surface with an acid-proof cover.Fresh Air InletUnless there is deemed to be insufficient residual air into the room via doorways, windos and the like, a dedicated fresh air inlet will be needed. This inlet should have 2 square inches (1250 square mm) of free air space. This is particularly important where the room is well sealed, or where an extractor hood or ventilation system disturbs the natural air pressure. Such an inlet should not be on a wall that is usually subject to negative pressure from normal wind pattern. Avoid placing the inlet directly across the room from the stove, thus causing a cold air draft.
3.1.2 PLACEMENT FROM NON COMBUSTIBLE MATERIALS
FLANGES AND ANCHOR PLATE
NOTE! The anchor plate is not included with the unit. Use only an Liner listed UL-1777, ULC S-635 or ULC S-640. Be sure to place the convection and exhaust connectors before placing the top elements of the insulation shell. The dimensions and positioning of the different air inlet and outlet are available in the table in chapter „dimensions“.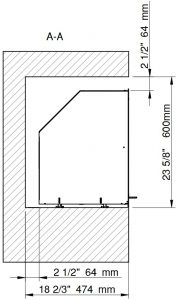
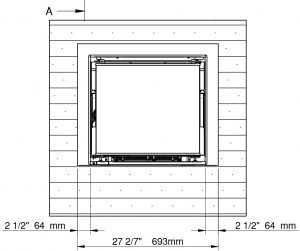
Minimum hearth requirement (Cassette Insert 600)Make sure there is enough space for the wood heater. If the wood insert is fitted with a frame (that’s conceals the contours of the recess) an additional tolerance of 1-1/2” ca be set when the recess is made.The wood heater must be able to expand freely. The brickwork or decorative materials must not enter into contact with the wood heater under any circumstances; leave a gap of at 2-1/2”.
 Minimum hearth requirement (Cassette Insert 700)Make sure there is enough space for the wood heater. If the wood insert is fitted with a frame (that’s conceals the contours of the recess) an additional tolerance of 1-1/2” ca be set when the recess is made.The wood heater must be able to expand freely. The brickwork or decorative materials must not enter into contact with the wood heater under any circumstances; leave a gap of at 2-1/2”.
INSTALLATION
HEARTH EXTENSION
![]() WARNING: INSTALL THE HEARTH EXTENSION ONLY AS ILLUSTRATED!A 20” x 12” (500mm x 300mm) minimum hearth extension made of non combustible material is required. To prevent any burning embers falling between the fireplace and the hearth extension from coming into contact with the floor, insert a metal sheet under the front of the wood insert. This sheet must extend 4” (100mm) on both sides of the wood insert and 2” (50mm) in front. You can also prevent embers from falling in the joint between the wood insert and the hearth extension by filling it with mortar grout.The non combustible material that is used must be UL 1618.
WARNING: INSTALL THE HEARTH EXTENSION ONLY AS ILLUSTRATED!A 20” x 12” (500mm x 300mm) minimum hearth extension made of non combustible material is required. To prevent any burning embers falling between the fireplace and the hearth extension from coming into contact with the floor, insert a metal sheet under the front of the wood insert. This sheet must extend 4” (100mm) on both sides of the wood insert and 2” (50mm) in front. You can also prevent embers from falling in the joint between the wood insert and the hearth extension by filling it with mortar grout.The non combustible material that is used must be UL 1618.
S 600
S 600A: 18 inches (Canada) 16 Inches (USA)B: 8” on each side
M 700

M 700A: 18 inches (Canada) 16 Inches (USA)B: 8” on each side
MANTLE MINIMUM CLEARANCESFor mantle that is 1“ deep: 20“For mantle that is 8“ deep: 28“
DISTANCE COMBUSTIBLE MANTLE

CHIMNEY INSTALLATION
This wood insert is designed and approved for installation with the followingbrands of chimneys measuring 6” and 7” (152 and 178mm) in diameter as well as a minimum of 15’ (4,6m) and maximum of 45’ (13,5m) in height.
LISTED CHIMNEYS
This appliance must be installed with a listed 6”(150mm) chimney system approved under the following standards:The chimney liner must conform to the Class 3 requirements of CAN/ULC-S635, Standard for Lining Systems for Existing Masonry or Factory-Built Chimneys and Vents, or CAN/ULC-S640, Standard for Lining Systems for New Masonry Chimneys and be installed inaccordance with the manufacturer’s installation instructions..MAINTAIN CLEARANCES TO COMBUSTIBLES AS SPECIFIED IN THE CHIMNEY MANUFACTURERSINSTALLATION INSTRUCTIONS. YOU MUST FOLLOW THE CHIMNEY MANUFACTURER’SINSTALLATION INSTRUCTIONS FOR INSTALLATION OF ALL CHIMNEY COMPONENTS.USE APPROPRIATE SUPPORTS, CAPS, FLASHING AND SHIELDS IN ACCORDANCE WITH THE CHIMNEY MANUFACTURERS INSTALLATION INSTRUCTIONS.CAUTION: THE STRUCTURAL INTEGRITY OF THE FLOOR, WALL AND CEILING/ROOF MUST BE MAINTAINED.The anchor plate is not included with the unit. Use only a chimney certified as UL 103HT or ULC S-629
CHIMNEY INSTALLATION NOTES
No other device must be added to the chimney connected to the wood insert.
- All chimney installations must include at least one support. Reducing the amount of chimney weight on the wood insert will help avoid the noise created when the wood insert expands. This can be achieved by having the chimney supported by the supports. The maximum chimney length that should be supported by the wood insert is 9 ft. (2.75 m) for 2“ Solid Pack Chimney and 12 ft. (3.7 m) for 1“ Solid Pack Chimney.
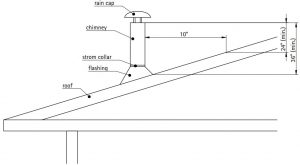
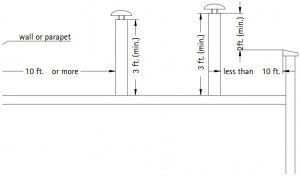
- The chimney must extend at least 3 ft. (92 cm) above its point of contact with the roof and at least 2 ft. (61 cm) higher than any wall, roof or building within 10 ft. (3.1 m) of it.
- Deviations should be avoided whenever possible, especially the most pronounced. Each deviation adds some restriction to the chimney system and may lead to draft problems.
- If the chimney extends higher than 5 ft. (1.5 m) above its point of contact with the roof, it must be secured using a roof brace.
- A rain cap must be installed on top of the chimney. Failure to install a rain cap may cause corrosion problems.
- Cut and frame square holes in all floors, ceilings and roof that the chimney will go through to provide a 2“ (51mm) minimum clearance between the chimney and any combustible materials. Do not fill this space with insulation or any other combustible material.
- Portions of the chimney which may extend through accessible spaces must be enclosed to avoid contact with combustible materials or damage the chimney.
- To limit creosote buildup, it is strongly recommended that an empty enclosure space be left between the chimney stack and the outer framing of the chimney. Make sure that at all points a minimum clearance of 2” (51 mm) separates the chimney and any combustible materials.
EXAMPLES OF TYPICAL INSTALLATIONS
 minimum chimney height
multi level roots
 pitched roof
 flat roof
This appliance must be installed with a listed 6“(150 mm) chimney system approved under the following standards: The chimney liner must conform to the Class 3 requirements of CAN/ULC-S635, Standard for Lining Systems for Existing Masonry or Factory-Built Chimneys and Vents, or CAN/ULC-S640, Standard for Lining Systems for New Masonry Chimneys and be installed in accordance with the manufacturer‘s installation instructions.MAINTAIN CLEARANCES TO COMBUSTIBLES AS SPECIFIED IN THE CHIMNEY MANUFACTURERSINSTALLATION INSTRUCTIONS. YOU MUST FOLLOW THE CHIMNEY MANUFACTURER‘S INSTALLATION INSTRUCTIONS FOR INSTALLATION OF ALL CHIMNEY COMPONENTS.USE APPROPRIATE SUPPORTS, CAPS, FLASHING AND SHIELDS IN ACCORDANCE WITH THE CHIMNEY MANUFACTURERS INSTALLATION INSTRUCTIONS.CAUTION: THE STRUCTURAL INTEGRITY OF THE FLOOR, WALL AND CEILING/ROOF MUST BE MAINTAINED.
MASONRY
TYPICAL EXISTING MASONRY
![]() WARNING:DO NOT CONNECT THIS APPLIANCE TO A CHIMNEY FLUE SERVING ANOTHER APPLIANCE. DO NOT CONNECT TO ANY AIR DISTRIBUTION DUCT OR SYSTEM.You can install your appliance using your existing masonry chimney. To do so, follow the guidelines below. If you are using a masonry chimney, it is important that it be built in compliance with the specifications of the Building Code in your region. It must normally be lined with fire clay bricks, metal or clay tiles sealed together with fire cement. (Round flues are the most efficient).Remove the wood insert damper or fasten it permanently open. We recommend the following method of sealing off the damper area around the liner:Measure the throat of the wood insert and mark this shape on a piece of 24 gauge sheet metal (flue cover); cut a six-inch (6 3/4” / 171mm) hole to lie directly below the wood insert flue opening. Allow two inches of material for a flange on all sides and cut to these measurements. Bend down the flanges. If you have never done this before, it might be a good idea to make a cardboard pattern and test it first. Fasten this flue cover in position as high as possible with two masonry screws per side through the flanges into the wood insert.In Canada: Install flexible stainless steel liner from the top of the chimney to the insert flue collar. Attach a stainless steel liner connector or elbow to the liner and insert onto the flue collar. Fasten with three screws. Secure the top of the liner to the chimney cap using a liner support and chimney flashing. Cap the top of the chimney liner assembly using an approved rain cap.IIn the United States: While it is not required, it is recommended that a chimney liner be installed that is continuous from the insert to the top of the chimney, particularly when the insert is installed in a basement. For this type of connection, use the “In Canada” installation instructions above. If a continuous liner is not installed, a “direct flue connection” must be made. The direct flue connection requires a non-combustible connector that extends from the insert into the chimney flue liner and also that the installed flue cover be sealed below the entry point of the connector to prevent dilution of combustion products in the chimney flue with air from inside the house. Cap the top of the chimney using an approved rain cap.
WARNING:DO NOT CONNECT THIS APPLIANCE TO A CHIMNEY FLUE SERVING ANOTHER APPLIANCE. DO NOT CONNECT TO ANY AIR DISTRIBUTION DUCT OR SYSTEM.You can install your appliance using your existing masonry chimney. To do so, follow the guidelines below. If you are using a masonry chimney, it is important that it be built in compliance with the specifications of the Building Code in your region. It must normally be lined with fire clay bricks, metal or clay tiles sealed together with fire cement. (Round flues are the most efficient).Remove the wood insert damper or fasten it permanently open. We recommend the following method of sealing off the damper area around the liner:Measure the throat of the wood insert and mark this shape on a piece of 24 gauge sheet metal (flue cover); cut a six-inch (6 3/4” / 171mm) hole to lie directly below the wood insert flue opening. Allow two inches of material for a flange on all sides and cut to these measurements. Bend down the flanges. If you have never done this before, it might be a good idea to make a cardboard pattern and test it first. Fasten this flue cover in position as high as possible with two masonry screws per side through the flanges into the wood insert.In Canada: Install flexible stainless steel liner from the top of the chimney to the insert flue collar. Attach a stainless steel liner connector or elbow to the liner and insert onto the flue collar. Fasten with three screws. Secure the top of the liner to the chimney cap using a liner support and chimney flashing. Cap the top of the chimney liner assembly using an approved rain cap.IIn the United States: While it is not required, it is recommended that a chimney liner be installed that is continuous from the insert to the top of the chimney, particularly when the insert is installed in a basement. For this type of connection, use the “In Canada” installation instructions above. If a continuous liner is not installed, a “direct flue connection” must be made. The direct flue connection requires a non-combustible connector that extends from the insert into the chimney flue liner and also that the installed flue cover be sealed below the entry point of the connector to prevent dilution of combustion products in the chimney flue with air from inside the house. Cap the top of the chimney using an approved rain cap.
FACTORY BUILT FIREPLACE
The following installation requirements must be observed when installing solid fuel burning inserts into factory built fireplaces.A. The factory built fireplace must be listed per UL 127 or ULC S610.B. Clearances to any combustible material surrounding this insert as identified must be followed. These clearance requirements supersede any pre-existing facing material clearances listed for the factory built fireplace.C. Installation must include a full height listed chimney liner meeting HT requirements (2100°F/1149°C) as required in UL 1777 (U.S.) or ULC S635 (Canada). The liner must be securely attached to the insert flue collar and the chimney top.D. Means must be provided to prevent room air passage to the chimney cavity of the fireplace. This may be accomplished by sealing the damper area around the chimney liner, or sealing the appliance front. E. The air flow within and around the appliance shall not be altered by the installation of the insert (i.e. no louvres or cooling air inlet or outlet ports are blocked), unless specifically tested as such for each factory built fireplace manufacturer and model line. NOTE: Using a louvered face plate (surround) complies with this requirement.F. Alteration of the appliance in any manner is not permitted with the following exceptions;1. External trim pieces which do not affect the operation of the appliance may be removed providing they can be stored on or within the fireplace for reassembly if the insert is removed.2. The chimney damper may be removed to install the chimney liner.G. Circulating air chambers (i.e. in a steel fireplace liner or metal heat circulator) shall not be blocked.H. Means must be provided for removal of the insert to clean the chimney flue.I. Inserts that project in front of the fireplace must be supplied with appropriate support means.J. A permanent metal warning label must be attached to the back of the fireplace stating that the fireplace must be restored to its original condition for safe use without the insert.
CONVECTION
Circulation of convection airThe convection air enters into the wood insert via the inlet at the bottom of the wood insert.The hot air for convection comes out of the wood insert via the front outlet.
Circulation of convection air
The convection air enters into the fireplace via the inlet at the bottom of the fireplace.The hot air for convection comes out of the fireplace via the front outlet.
FINISHING
BRICKS AND BAFFELS INSTALLATION
![]() WARNING:OPERATION OF THE APPLIANCE WITHOUT THE BAFFLES CAN RESULT IN EXCESSIVE TEMPERATURES THAT COULD DAMAGE THE APPLIANCE, CHIMNEY AND THE SURROUNDING ENCLOSURE.NOTE: DO NOT OPERATE IF BAFFLE AND MANIFOLD SHIELD ARE NOT IN POSITION.
WARNING:OPERATION OF THE APPLIANCE WITHOUT THE BAFFLES CAN RESULT IN EXCESSIVE TEMPERATURES THAT COULD DAMAGE THE APPLIANCE, CHIMNEY AND THE SURROUNDING ENCLOSURE.NOTE: DO NOT OPERATE IF BAFFLE AND MANIFOLD SHIELD ARE NOT IN POSITION.


DOOR REMOVAL / INSTALLATION
![]() WARNING:BURNING YOUR APPLIANCE WITH THE DOORS OPEN OR AJAR CREATES A FIRE HAZARD THAT MAY RESULT IN A HOUSE AND/OR CHIMNEY FIRE.DO NOT STRIKE OR SLAM DOOR.NEVER REMOVE THE DOOR WHEN THE APPLIANCE IS HOT.
WARNING:BURNING YOUR APPLIANCE WITH THE DOORS OPEN OR AJAR CREATES A FIRE HAZARD THAT MAY RESULT IN A HOUSE AND/OR CHIMNEY FIRE.DO NOT STRIKE OR SLAM DOOR.NEVER REMOVE THE DOOR WHEN THE APPLIANCE IS HOT.
Please follow the following steps to dismantle / install the fire door. Take care when carrying out these tasks as otherwise damage to the casing / door cannot be ruled out. We recommend protecting the casing / metal plates with an overlay.
Dismantling:
- Use a screwdriver or a similar tool to remove the safety clasp on the stopper side (hinge side) of the door.

- Swing the door open. Then tighten the Allen screw on the lower hinge with a 3 mm Allen key.
- Take hold of the door at the bottom. Raise the door little with a light lifting movement so that the lower pin of the hinge is exposed.
- In this position, pull the door a little forward at the bottom.
- Now allow the door to drop a little so that it comes away from the upper guidance pin and can be removed.The door is now free and can be carefully placed to one side.


 The door is now free and can be carefully placed to one side.
INSTALLATION: Installation is carried out in the reverse order:
- Firstly guide the door in a slightly inclined position onto the fixture for the hinge side of the door. In the process support the door from below so that the fireplace casing is not scratched.
- Then swing the door inwards and set the lower pin into the fixture. To ensure the fixture, move the door a little (swivel the door).
- Loosen the hexagonal socket on the lower hinge with a 3 mm key.
- Close the door and then push the safety clasp back into the pin.


OPERATION
![]() WARNING:ALWAYS OPERATE THIS APPLIANCE WITH THE DOOR CLOSED AND LATCHED EXCEPT DURING START UP AND RE-FUELING. ALWAYS WEAR GLOVES TO PREVENT INJURY. DO NOT LEAVE THE FIRE UNATTENDED WHEN THE DOOR IS UNLATCHED AS UNSTABLE WOOD COULD FALL OUT OF THE FIRE CHAMBER CREATING A FIRE HAZARD TO YOUR HOME.PLEASE USE THE GLOVE THAT IS SUPPLIED WHEN OPERATING THE Insert.NEVER EVER, NOT EVEN FOR A BRIEF MOMENT, LEAVE CHILDREN UNATTENDED WHEN THERE IS A FIRE BURNING IN THE APPLIANCE.NEVER USE GASOLINE, GASOLINE-TYPE LANTERN FUEL, KEROSENE, CHARCOAL LIGHTER FLUID, OR SIMILAR LIQUIDS TO START OR ‘FRESHEN UP’ A FIRE IN THIS APPLIANCE. KEEP ALL SUCH LIQUIDS WELL AWAY FROM THE APPLIANCE WHILE IT IS IN USE.OBJECTS PLACED IN FRONT OF THE APPLIANCE SHOULD BE KEPT A MINIMUM OF 48” FROM THE FRONT FACE.ANY MODIFICATION OF THE APPLIANCE THAT HAS NOT BEEN APPROVED IN WRITING BY THE TESTING AUTHORITY IS CONSIDERED BREACHING CSA B365 (CANADA) AND ANSI NFPA 211 (USA).Open air control if adjustable and damper if fitted before opening firing door.HOT WHILE IN OPERATION. KEEP CHILDREN, CLOTHING AND FURNITURE AWAY. CONTACT MAY CAUSE SKIN BURNS. WEAR SUITABLE GLOVES TO OPERATE YOUR APPLIANCE.NEVER OPERATE THE STOVE WITH THE GRATE COVER REMOVED.DO NOT POKE OR STIR THE LOGS WHILE THEY ARE BURNING. USE ONLY FIRELOGS THAT HAVE BEEN EVALUATED FOR THE APPLICATION IN WOOD INSERT AND REFER TO FIRELOG WARNINGS AND CAUTION MARKINGS ON PACKAGING PRIOR TO USE.”
WARNING:ALWAYS OPERATE THIS APPLIANCE WITH THE DOOR CLOSED AND LATCHED EXCEPT DURING START UP AND RE-FUELING. ALWAYS WEAR GLOVES TO PREVENT INJURY. DO NOT LEAVE THE FIRE UNATTENDED WHEN THE DOOR IS UNLATCHED AS UNSTABLE WOOD COULD FALL OUT OF THE FIRE CHAMBER CREATING A FIRE HAZARD TO YOUR HOME.PLEASE USE THE GLOVE THAT IS SUPPLIED WHEN OPERATING THE Insert.NEVER EVER, NOT EVEN FOR A BRIEF MOMENT, LEAVE CHILDREN UNATTENDED WHEN THERE IS A FIRE BURNING IN THE APPLIANCE.NEVER USE GASOLINE, GASOLINE-TYPE LANTERN FUEL, KEROSENE, CHARCOAL LIGHTER FLUID, OR SIMILAR LIQUIDS TO START OR ‘FRESHEN UP’ A FIRE IN THIS APPLIANCE. KEEP ALL SUCH LIQUIDS WELL AWAY FROM THE APPLIANCE WHILE IT IS IN USE.OBJECTS PLACED IN FRONT OF THE APPLIANCE SHOULD BE KEPT A MINIMUM OF 48” FROM THE FRONT FACE.ANY MODIFICATION OF THE APPLIANCE THAT HAS NOT BEEN APPROVED IN WRITING BY THE TESTING AUTHORITY IS CONSIDERED BREACHING CSA B365 (CANADA) AND ANSI NFPA 211 (USA).Open air control if adjustable and damper if fitted before opening firing door.HOT WHILE IN OPERATION. KEEP CHILDREN, CLOTHING AND FURNITURE AWAY. CONTACT MAY CAUSE SKIN BURNS. WEAR SUITABLE GLOVES TO OPERATE YOUR APPLIANCE.NEVER OPERATE THE STOVE WITH THE GRATE COVER REMOVED.DO NOT POKE OR STIR THE LOGS WHILE THEY ARE BURNING. USE ONLY FIRELOGS THAT HAVE BEEN EVALUATED FOR THE APPLICATION IN WOOD INSERT AND REFER TO FIRELOG WARNINGS AND CAUTION MARKINGS ON PACKAGING PRIOR TO USE.”
![]() WARNING:AVOID BURN RISK. REMOVE OPERATIONAL TOOL AFTER USE!!!
WARNING:AVOID BURN RISK. REMOVE OPERATIONAL TOOL AFTER USE!!!
![]() WARNING: THE USE OF THE PROTECTIVE GLOVE IS MANDITORY!!!
WARNING: THE USE OF THE PROTECTIVE GLOVE IS MANDITORY!!!
Your Spartherm product is designed with the most advanced technology. The appliance is extremely airtight. It has an exclusive direct outside air supply (optional kit), a safety feature designed to prevent spillage, and to keep your house free of carbon monoxide, in case of a down drafting chimney or an internal negative pressure.The first fire(s) in your appliance will be difficult to get going and keep going with little amount of heat being generated. This is a result of the moisture being driven out of the fire brick. Allow 30 hours of hot fires (temperatures in excess of 500°F / 260°C – 600°F / 316°C) before your appliance will perform normally. During the break-in period (the first 2 or 3 fires) create only small, hot fires using kindling; this will allow the firebrick to cure. Do not be alarmed if small hairline cracks develop in the firebrick. This is a normal occurrence and does not pose a safety hazard. The paint may also smell for the first few fires as it cures and It is recommended to open a door or window to alleviate the smell.To start, a brisk fire is required. Place loosely crumpled paper on the floor of the appliance and cover with dry kindling. Light the paper and leave the door slightly ajar (one inch) until all kindling is burning. To maintain a brisk fire, a hot coal bed must be established and maintained.Slowly add larger wood (2×4 size pieces). Lay the pieces lengthwise from side to side in the hot coal bed with a shallow trench between, so that the primary air can flow directly into this trench and ignite the fuel above. When the fire seems to be at its peak, medium sized logs may be added. Once these logs have caught fire, carefully close the door. (Closing the door too quickly after refuelling will reduce the firebox temperature and result in an unsatisfactory burn.) Remember it is more efficient to burn medium sized wood, briskly, and refuel frequently than to load the appliance with large logs that result in a smouldering, inefficient fire and dirty glass. As soon as the door is closed, you will observe a change in the flame pattern. The flames will get smaller and lazier because less oxygen is getting into the combustion chamber. The flames, however, are more efficient. The flames will remain lazy but become larger again as soon as the firebricks have been heated thoroughly and the chimney becomes heated and provides a good draft. At this point, the roaring fire that you see when the door is opened is wastefully drawing heated room air up the chimney — certainly not desirable. Always operate with the door fully closed once the medium sized logs have caught fire.You can now add larger pieces of wood and operate the appliance normally. Once the appliance is entirely hot, it will burn very efficiently with little smoke from the chimney. There will be a bed of orange coals in the firebox and secondary flames flickering just below the top firebrick. You can safely fill the firebox with wood up to the air inlet on the backside of the firebox or, if not present, up to 50% of the fireboxes backside height and will get best burns if you keep theappliance pipe temperatures between 250°F (120°C ) and 450°F (270°C ). A surface thermometer placed on the front top will help regulate this.Without an appliance thermometer, you are working blindly and have no idea of how the appliance is operating! An appliance thermometer offers a guide to performance.
Can’t get the fire going?Use more kindling and paper. Assuming the chimney and vent are sized correctly and there is sufficient combustion air, the lack of sufficiently dry quantities of small kindling is the problem. Thumb size is a good gauge for small kindling diameter.Can’t get heat out of the appliance?One of two things may have happened. The appliance door may have been closed prematurely and the appliance itself has not reached optimum temperature. Reopen the door and/or draft control to re-establish a brisk fire. The other problem may have been wet wood. The typical symptom is sizzling wood and moisture being driven from the wood.ADJUSTING THE COMBUSTION AIR.Spartherm Inserts are equipped with an air control System that is easy and effective to use.The air control system is designed to give you the ability to adjust the “COMBSUTION AIR” in such a way that you have a fire that burns clean and well.It is important to ensure that the combustion air used to create a clean burning fire… as per the following INFORMATION.Air Wash system:This combustion air is designed to keep the glass clean and to feed the fire with combustion air to burn. The further the lever is to the right the more air is made available for the fire. As an example this setting would be used when you first light the fire or when you reload the fire. Depending on the type of fire that you require you would adjust the air to either slow down the fire – moving to the right-MIDWAY. – or to slow the fire even more as you move to the left past the midway mark. It is important not to “choke” the fire – do not starve the fire of air as it can create smoke and a dirty burn. It can also result in dirty glass and an inefficient fire.Secondary Air system:This air is used to burn off the gasses that are released when the fire burns. The secondary air is also linked to the lever and is adjusted as you adjust the fire.
Caution:Never close the air lever of the air control completely or before the fire has started to burn efficiently as it will create smoke and the fire would be inefficient and the energy from the wood is wasted.The door should be closed during operation.Please follow the instructions in the manual to get the best results from your insert.WARNING!!!HOT GLASS – WILL CAUSE BURNS.DO NOT TOUCH GLASS UNTIL COOLEDNEVER!!! ALLOW CHILDREN TO TOUCH THE GLASS.
PLEASE NOTE.The tool that has been provided is for the operation of the air control lever and for opening and closing the wood insert door.WARNING!If this tool is not used there is a risk of BURNS.
A – Air supply open:(when lighting the fire or adding new wood). The control lever is pushed completely to the right. The firebox will now receive the maximum volume of combustion air and secondary air.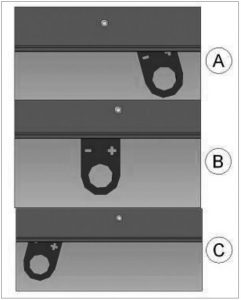 B – Controlled burning:Control lever approx. 20 mm further than the closed air supply position. This ensures that the fire does not receive too much air and the wood does not burn too quickly. The secondary air flows over the panel ventilation system to the ceramic glass panel and prevents, as far aspossible, any sooting of the glass panel.C – Air supply closed:Control lever in the limit position of the 20 mm wide spacer. The firebox receives no combustion air in this setting.
![]() WARNING: The combustion-air damper should NOT be altered for increased firing for any reason!
WARNING: The combustion-air damper should NOT be altered for increased firing for any reason!

Door
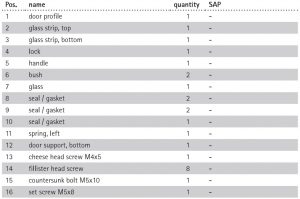
DOOR ASSEMBLY.-SPARE PARTS.ROBAX 4MM CERAMIC GLASS.USE ONLY AS PER MANUFACTURERS STANDARD AND SPARE PARTS. 7
FIRE EXTINGUISHERS / SMOKE DETECTORS
All homes with a solid fuel burning appliance should have at least one fire extinguisher in a central location, known to all, and at least one smoke detector in the room containing the appliance. If it sounds an alarm, correct the cause but do not de-activate or relocate the smoke detector.
![]() WARNING:THIS APPLIANCE IS DESIGNED TO BURN NATURAL WOOD ONLY. DO NOT BURN TREATED WOOD, COAL, CHARCOAL, COLOURED PAPER, CARDBOARD, SOLVENTS OR GARBAGE. THIS APPLIANCE HAS NOT BEEN TESTED WITH AN UNVENTED GAS LOG SET. TO REDUCE RISK OF FIRE OR INJURY, DO NOT INSTALL AN UNVENTED GAS LOG SET INTO THE APPLIANCE.HIGHER EFFICIENCIES AND LOWER EMISSIONS GENERALLY RESULT WHEN BURNING AIR DRIED SEASONED HARDWOODS, AS COMPARED TO SOFTWOODS OR TOO GREEN OR FRESHLY CUT HARDWOODS. DO NOT BURN GREEN OR FRESHLY CUT WOOD.BURNING WET UNSEASONED WOOD CAN CAUSE EXCESSIVE CREOSOTE ACCUMULATION. WHEN IGNITED IT CAN CAUSE A CHIMNEY FIRE THAT MAY RESULT IN A SERIOUS HOUSE FIRE.DO NOT STORE FUEL WITHIN THE CLEARANCE TO COMBUSTIBLES, OR IN THE SPACE REQUIRED FOR RE-FUELLING AND ASH REMOVAL.When loading the appliance, ensure that the upper fibre baffles are not forced out of position. For maximum efficiency, when the appliance is throughly hot, load it fully to the line of air inlet nozzles at the backside of the firebox or, if not present, to 50% of the fireboxes backside height and burn at a medium low setting. The whiteness of the bricks and the cleanliness of the glass are good indicators of your operating efficiency. Not enough heat is produced when only a few pieces of wood are burned or the wood may not burn completely. Fuel for the appliance must not be stored closer than the required clearances to combustibles (heat sensitive material).NEVER STORE WOOD IN THE ASH PAN COMPARTMENT (IF APPLICABLE).NOTE: WHEN LOADING THE APPLIANCE, ENSURE TO KEEP FUEL BACK FROM THE GLASS. IF COALS ARE TO ACCUMULATE ON THE FRONT LIP, THERE IS A CHANCE THEY WILL FALL OUT WHEN THE DOOR IS OPENED.Burn only dry, clean unpainted wood that has been seasoned. It produces more heat and less soot or creosote. Freshly cut wood contains about 50% moisture while after proper seasoning only about 20% of the water remains. As wood is burned, this water boils off consuming energy that should be used in heating. The wetter the wood, the less heat is given off and the more creosote is produced. Dry firewood has cracks in the end of the grain. Both hardwood and softwood burn equally well in this appliance but hardwood is denser, will weigh more per cord and burn a little slower and longer.
WARNING:THIS APPLIANCE IS DESIGNED TO BURN NATURAL WOOD ONLY. DO NOT BURN TREATED WOOD, COAL, CHARCOAL, COLOURED PAPER, CARDBOARD, SOLVENTS OR GARBAGE. THIS APPLIANCE HAS NOT BEEN TESTED WITH AN UNVENTED GAS LOG SET. TO REDUCE RISK OF FIRE OR INJURY, DO NOT INSTALL AN UNVENTED GAS LOG SET INTO THE APPLIANCE.HIGHER EFFICIENCIES AND LOWER EMISSIONS GENERALLY RESULT WHEN BURNING AIR DRIED SEASONED HARDWOODS, AS COMPARED TO SOFTWOODS OR TOO GREEN OR FRESHLY CUT HARDWOODS. DO NOT BURN GREEN OR FRESHLY CUT WOOD.BURNING WET UNSEASONED WOOD CAN CAUSE EXCESSIVE CREOSOTE ACCUMULATION. WHEN IGNITED IT CAN CAUSE A CHIMNEY FIRE THAT MAY RESULT IN A SERIOUS HOUSE FIRE.DO NOT STORE FUEL WITHIN THE CLEARANCE TO COMBUSTIBLES, OR IN THE SPACE REQUIRED FOR RE-FUELLING AND ASH REMOVAL.When loading the appliance, ensure that the upper fibre baffles are not forced out of position. For maximum efficiency, when the appliance is throughly hot, load it fully to the line of air inlet nozzles at the backside of the firebox or, if not present, to 50% of the fireboxes backside height and burn at a medium low setting. The whiteness of the bricks and the cleanliness of the glass are good indicators of your operating efficiency. Not enough heat is produced when only a few pieces of wood are burned or the wood may not burn completely. Fuel for the appliance must not be stored closer than the required clearances to combustibles (heat sensitive material).NEVER STORE WOOD IN THE ASH PAN COMPARTMENT (IF APPLICABLE).NOTE: WHEN LOADING THE APPLIANCE, ENSURE TO KEEP FUEL BACK FROM THE GLASS. IF COALS ARE TO ACCUMULATE ON THE FRONT LIP, THERE IS A CHANCE THEY WILL FALL OUT WHEN THE DOOR IS OPENED.Burn only dry, clean unpainted wood that has been seasoned. It produces more heat and less soot or creosote. Freshly cut wood contains about 50% moisture while after proper seasoning only about 20% of the water remains. As wood is burned, this water boils off consuming energy that should be used in heating. The wetter the wood, the less heat is given off and the more creosote is produced. Dry firewood has cracks in the end of the grain. Both hardwood and softwood burn equally well in this appliance but hardwood is denser, will weigh more per cord and burn a little slower and longer. Firewood should be split, stacked in a manner that air can get to all parts of it and covered in early spring to be ready for burning that fall. Dry firewood has cracks in the end grain.Cut the wood so that it will fit horizontally, front to back, making for easier loading and less of a likelihood that the wood will roll onto the glass.Manufactured firelogs made by compressing 100% natural wood fibre can be safely used as fuel. Do not use manufactured firelogs if they contain additives such as paraffin, wax, binders etc. Never burn more than two manufactured firelogs at a time.
Do’s:
- Build a hot fireUse only dry wood.
- Several pieces of medium sized wood arebetter than a few big pieces.
- Clean chimney regularly.
- Refuel frequently using medium sized wood.
Dont’s
- Take ash out immediately. Let it accumulate to a depth of at least one inch. A good ash layer provides for a longer lasting and better burning fire.
- Burn wet wood
- Close the door too soon or damper down too quickly. Burn one large log rather than two or three smaller, more reasonably sized logs.
- Burn at continually “low setting”, if glass door is constantly blackened. This means the Firebox temperature is too low and energy is wasted by incomplete combustion.
LIGHTING A FIRE
Lighting the fire in your wood insert is very easy if you follow the instructions given below:
- A fire may only be started in the wood insert when the firebox lining has been correctly installed.
- Turn off any air extraction ventilation (kitchen, bathroom, WC etc.). This will avoid low pressure building up in the installation room that can affect the extraction of flue gasses from the wood insert. Check the combustion air supply (if required, open the cover flap)!
- Adjust the combustion air regulator to the far right, and open the firebox door (swing open).
- Place chopped wood into the middle of the firebox using the funeral pyre method (use softwood).Caution: The height of the wood pile must not exceed the lower marking on the deflector plate!
- Place standard firelighter cubes under the wood pyre to help start the fire.(paper is not recommended because it burns too quickly and causes ash to circulate).
- Never use methylated spirits, petrol, oil or other easily combustible liquids.
- Light the fire using the firelighter cubes and, if required, leave the firebox door open by approx. 3-5 cm. The fire should now light, burning brightly and intensively.
- When the kindling wood is burning well, add smaller hardwood logs or larger softwood logs using the funeral pyre method and close the door.
- When the wooden logs are burning well, the air control lever can be set to a position in the middle.
- You can find out more about the correct volume of wood to add to the fire in the section ‘‘Volume of wood to add per hour’’.
- When the wood has been completely burnt and only embers are remaining from the initial wood added to the fire, new wood can now be added as required (hardwood is ideal).
- Depending on the weather conditions, adjust the control lever towards the middle setting or a little over.The correct setting is always based on experience and the current local conditions.
- Always open the firebox door slowly. This will ensure that you avoid sudden low pressure in the firebox and prevent exhaust gases leaking into the living room.
- This will prevent any possible smoke leakage through the opened door when adding new wood during the ember phase.
- Never consistently add more wood than the recommended amount.Caution: The height of the wood pile must not exceed the lower marking on the deflector plate!
FLASH FIRE
A flash fire is a small fire burned quickly when you don’t need much heat. After your kindling has “caught”, load at least 3 pieces of wood, stacked loosely. Burn with the draft control fully open if adjustable or open the door upward with 1.5 inches for 3 minutes if required.
6.3.2 EXTENDED FIRE
Load your larger pieces of wood compactly, packed close enough to prevent the flames from penetrating it completely.DO NOT OVERFIRE THE APPLIANCE!OVERFIRING CAN OCCUR BY:A. Burning large amounts of smaller wood pieces such as furniture scraps, skids or treated wood.B. Operating the appliance with a poor gasket seal on the main door.C. Overfilling your appliance. Go by the following specifications:
Appliance: Wood consumed per hourS 600: 1,8 kg/hrM 700: 2,1 kg/hr
6.3.3 SMOKING
A properly installed appliance should not smoke. If yours does, check the following:
- Has the chimney had time to get hot?
- Is the smoke passage blocked anywhere in the appliance, chimney connector or chimney?
- Is the room too airtight and the air intake not connected to the outside? Try with a window partly open.
- Is the smoke flow impeded by too long a horizontal pipe or too many bends?
- Is it a weak draft perhaps caused by a leaky chimney, a cold outside chimney, too large a diameter of a chimney, too short a chimney, or a chimney too close to trees or a higher roof?
- Has a direct flue connection been used rather than a chimney liner continuous from cap to appliance flue collar.
MAINTENANCE
![]() WARNING:
WARNING:
APPLIANCE MAY BE HOT, DO NOT SERVICE UNTIL APPLIANCE HAS COOLED. DO NOT USE ABRASIVE CLEANERS.Check your chimney and chimney connector for creosote and soot buildup weekly until a safe frequency for cleaning is established.If accumulation is excessive, disconnect the appliance and clean both the chimney and the appliance. You may want to call a professional chimney sweep to clean them. Both have to be cleaned at least once a year or as often as necessary.Remove fire baffles and clean above them once a year. Replace any broken bricks.
ASH REMOVAL PROCEDURES
![]() WARNING:IMPROPER DISPOSAL OF ASHES RESULTS IN FIRES. DO NOT DISCARD ASHES IN CARDBOARD BOXES. DUMP IN BACK YARDS, OR STORE IN GARAGES.IF USING A VACUUM TO CLEAN UP ASHES, BE SURE THE ASHES ARE ENTIRELY COOLED. USING A VACUUM TO CLEAN UP WARM ASHES COULD CAUSE A FIRE INSIDE THE VACUUM.NEVER OPERATE YOUR APPLIANCE WITH THE ASH PLUG (IF APPLICABLE) REMOVED.FAILURE TO ACHIEVE A GOOD SEAL BETWEEN THE ASH OPENING, ASH PLUG OR ASH WELL DOOR WILL RESULT IN AN OVER FIRE CONDITION THAT COULD CAUSE DAMAGE TO THE APPLIANCE.Allow the ashes in your firebox to accumulate to a depth of two or three inches; they tend to burn themselves up. When the fire has burned down and cooled, remove any excess ashes but leave an ash bed approximately 1” (25mm) deep on the firebox bottom to help maintain a hot charcoal bed.Shovel some ashes out through the door into a metal container with a tight fitting lid. Leave an ash bed approximately 1” (25mm) deep on the firebox bottom to help maintain a hot charcoal bed. Keep the closed container on a noncombustible floor or ground, well away from all combustible materials. The ashes should be retained in the closed container until all cinders have thoroughly cooled. Cold wood ashes can be used on the garden or in the compost.
WARNING:IMPROPER DISPOSAL OF ASHES RESULTS IN FIRES. DO NOT DISCARD ASHES IN CARDBOARD BOXES. DUMP IN BACK YARDS, OR STORE IN GARAGES.IF USING A VACUUM TO CLEAN UP ASHES, BE SURE THE ASHES ARE ENTIRELY COOLED. USING A VACUUM TO CLEAN UP WARM ASHES COULD CAUSE A FIRE INSIDE THE VACUUM.NEVER OPERATE YOUR APPLIANCE WITH THE ASH PLUG (IF APPLICABLE) REMOVED.FAILURE TO ACHIEVE A GOOD SEAL BETWEEN THE ASH OPENING, ASH PLUG OR ASH WELL DOOR WILL RESULT IN AN OVER FIRE CONDITION THAT COULD CAUSE DAMAGE TO THE APPLIANCE.Allow the ashes in your firebox to accumulate to a depth of two or three inches; they tend to burn themselves up. When the fire has burned down and cooled, remove any excess ashes but leave an ash bed approximately 1” (25mm) deep on the firebox bottom to help maintain a hot charcoal bed.Shovel some ashes out through the door into a metal container with a tight fitting lid. Leave an ash bed approximately 1” (25mm) deep on the firebox bottom to help maintain a hot charcoal bed. Keep the closed container on a noncombustible floor or ground, well away from all combustible materials. The ashes should be retained in the closed container until all cinders have thoroughly cooled. Cold wood ashes can be used on the garden or in the compost.
CREOSOTE FORMATION AND REMOVAL
When wood is burned too slow, it produces tar and other organic vapors, which combine with expelled moisture to form creosote. The creosote vapors condense in the relatively cooler chimney flue of a slow-burning fire. As a result, creosote residue accumulates on the flue lining. When ignited this creosote makes an extremely hot fire. The chimney connector and chimney should be inspected at least once every two months during the heating season to determine if a creosote buildup has occurred. If creosote has accumulated it should be removed to reduce the risk of a chimney fire.
RUNAWAY OR CHIMNEY FIRE
![]() WARNING:
WARNING:
A CHIMNEY FIRE CAN PERMANENTLY DAMAGE YOUR CHIMNEY SYSTEM. THIS DAMAGE CAN ONLY BE REPAIRED BY REPLACING THE DAMAGED COMPONENT PARTS. CHIMNEY FIRES ARE NOT COVERED BY THE WARRANTY.
CAUSES:
- Using incorrect fuel, or small fuel pieces which would normally be used as kindling.
- Leaving the door ajar too long and creating extreme temperatures as the air rushes in the open door.
- Improperly installed or worn gaskets.
- Creosote build up in chimney.SOLUTIONS:
- Do not burn treated or processed wood, coal, charcoal, coloured paper or cardboard.
- Do not burn green or freshly cut wood.
- Be careful not to overfire the appliance by leaving the door open too long after the initial start-up. A thermometer on the chimney connector and/or appliance top helps.
- Replace worn, dried out (inflexible) gaskets.
- Have chimney regularly cleaned.IN CASE OF A CHIMNEY FIRE:
- Have a well understood plan for evacuation and a place outside for everyone to meet. Prepare to evacuate to ensure everyone’s safety.
- Close air control on appliance.Call local fire department. Have a fire extinguisher handy. Contact local authorities for further information on how to handle a chimney fire.
- After the chimney fire is out, clean and inspect the chimney or chimney liner for stress and cracks prior to lighting another fire. Also check combustibles around the chimney and the roof.
CHIMNEY CLEANING
Both the chimney and the appliance must be inspected and cleaned atleast once a year.For serious wood burners, chimney cleaning must be done as needed to avoid chimney fires; the venting systems for controlled combustion appliances may need cleaning as often as once a month. These rates, however, depend on the burning habits of the individual operating the appliance. For example, it is possible to clog a solid fuel appliance chimney in a few days if slow, smoldering fires are burned and the chimney is cold. NOTE: Appliances burned consistently without hot fires may result in significant creosote accumulations in the chimney
Certain items and considerations are important in chimney cleaning:
- Proper tools should be used, including a brush specifically designed for chimney cleaning.
- The chimney connector and dampers as well as the chimney should be cleaned.
- The appliance’s firebox and baffle system should be cleaned if needed.
- The chimney should be inspected and repairs made if needed, preferably by a qualified chimney sweep or mason.
GLASS REPLACEMENT
![]() WARNING:DO NOT USE SUBSTITUTE MATERIALSGLASS MAY BE HOT, DO NOT TOUCH GLASS UNTIL COOLED.CARE MUST BE TAKEN WHEN REMOVING AND DISPOSING OF ANY BROKEN DOOR GLASS OR DAMAGED COMPONENTS. BE SURE TO VACUUM UP ANY BROKEN GLASS FROM INSIDE THE APPLIANCE BEFORE OPERATION.DO NOT STRIKE, SLAM OR SCRATCH GLASS. DO NOT OPERATE APPLIANCE WITH GLASS REMOVED, CRACKED, BROKEN OR SCRATCHED.Installation:Remove the door from the stove and remove the glass retainer. Position the 4 mm ceramic Schott Robax glass in the door, make sure that the glass gasketing will properly seal your unit, and replace the retainer, it should rest on the gasket not the glass. Tighten securely, but do not wrench down on the glass as this may cause the glass to break. Replacement Glass Part as for unit.
WARNING:DO NOT USE SUBSTITUTE MATERIALSGLASS MAY BE HOT, DO NOT TOUCH GLASS UNTIL COOLED.CARE MUST BE TAKEN WHEN REMOVING AND DISPOSING OF ANY BROKEN DOOR GLASS OR DAMAGED COMPONENTS. BE SURE TO VACUUM UP ANY BROKEN GLASS FROM INSIDE THE APPLIANCE BEFORE OPERATION.DO NOT STRIKE, SLAM OR SCRATCH GLASS. DO NOT OPERATE APPLIANCE WITH GLASS REMOVED, CRACKED, BROKEN OR SCRATCHED.Installation:Remove the door from the stove and remove the glass retainer. Position the 4 mm ceramic Schott Robax glass in the door, make sure that the glass gasketing will properly seal your unit, and replace the retainer, it should rest on the gasket not the glass. Tighten securely, but do not wrench down on the glass as this may cause the glass to break. Replacement Glass Part as for unit.
CARE OF GLASS
If the glass is not kept clean permanent discolouration and / or blemishes may result. Normally a hot fire will clean the glass. The most common reasons for dirty glass include: not using sufficient fuel to get the appliance thoroughly hot, using green or wet wood, closing the draft so far that there is insufficient air for complete combustion.
![]() WARNING:HOT GLASS WILL CAUSE BURNS.DO NOT TOUCH GLASS UNTIL COOLED.NEVER ALLOW CHILDREN TO TOUCH GLASS.
WARNING:HOT GLASS WILL CAUSE BURNS.DO NOT TOUCH GLASS UNTIL COOLED.NEVER ALLOW CHILDREN TO TOUCH GLASS.
If it is necessary to clean the glass, buff lightly with a clean dry cloth and non-abrasive cleaner.DO NOT CLEAN GLASS WHEN HOT! Clean the glass after the first 10 hours of operation with a suitable stove glass cleaner. Thereafter clean as required.The glass is very strong but do not let burning fuel rest or fall against it and always close the door gently. NEVER FORCE IT SHUT!If the glass should ever crack or break while the fire is burning, do not open the door until the fire is out and do not operate the appliance again until the glass has been replaced, available from your Authorized dealer.DO NOT USE SUBSTITUTE MATERIALS.
CLEANING THE GLASS CERAMIC SHEET
![]() WARNING:THE GLASS CERAMIC SHEET MAY ONLY BE CLEANED WHEN COLD (wood insert NOT BURNING AND COOLED DOWN; NO HOT ASH IN THE FIRE CHAMBER).
WARNING:THE GLASS CERAMIC SHEET MAY ONLY BE CLEANED WHEN COLD (wood insert NOT BURNING AND COOLED DOWN; NO HOT ASH IN THE FIRE CHAMBER).
![]() WARNING:All Spartherm inserts are supplied with Robax glass in the door. Robax is a ceramic glass.Do not use substitute glass and order replacement glass from Spartherm through your dealer.
WARNING:All Spartherm inserts are supplied with Robax glass in the door. Robax is a ceramic glass.Do not use substitute glass and order replacement glass from Spartherm through your dealer.
CARE OF PLATED PARTS
If the appliance is equipped with plated parts, you must clean fingerprints or other marks from the plated surfaces before operating the appliance for the first time. Use a glass cleaner or vinegar and towel to clean. If not cleaned properly before operating for the first time, the marks can cause permanent blemishes on the plating. After the plating is cured, the fingerprints and oils will not affect the finish and little maintenance is required, just wipe clean as needed. Prolonged high temperature burning with the door ajar may cause discolouration on plated parts.
NOTE: The protective wrap on plated parts is best removed when the assembly is at room temperature but this can be improved if the assembly is warmed, using a hair dryer or similar heat source.
REPLACEMENTS
Contact your dealer or the factory for questions concerning prices and policies on replacement parts. Normally all parts can be ordered through your Authorized dealer / distributor. FOR WARRANTY REPLACEMENT PARTS, A PHOTOCOPY OF THE ORIGINAL INVOICE WILL BE REQUIRED TO HONOUR THE CLAIM. When ordering replacement parts always give the following information:
- Model & Serial Number of appliance
- Installation date of appliance
- Part number
- Description of part
- Finish
* IDENTIFIES ITEMS WHICH ARE NOT ILLUSTRATED. FOR FURTHER INFORMATION, CONTACT YOUR AUTHORIZED DEALER.
![]() WARNING:FAILURE TO POSITION THE PARTS IN ACCORDANCE WITH THIS MANUAL OR FAILURE TO USE ONLY PARTS SPECIFICALLY APPROVED WITH THIS APPLIANCE MAY RESULT IN PROPERTY DAMAGE OR PERSONAL INJURY
WARNING:FAILURE TO POSITION THE PARTS IN ACCORDANCE WITH THIS MANUAL OR FAILURE TO USE ONLY PARTS SPECIFICALLY APPROVED WITH THIS APPLIANCE MAY RESULT IN PROPERTY DAMAGE OR PERSONAL INJURY
For chamotte replacement see chapter 5.1
EXPLODED VIEW
NOTICE: Please refer to the following drawing and specify the spare part number and WHICH UNIT SIZE YOU HAVE FOR REPLACEMENTS
- Frame
- Firebox door with ceramic glass
- Firebox lining
- Firebox
- Exhaust gas sockets, rotatable (vertically or horizontally)
- Convection air jacket
- Combustion air sockets, outlet to rear
- Combustion air sockets, oulet below
TROUBLESHOOTING
![]() WARNING:APPLIANCE MAY BE HOT, DO NOT SERVICE UNTIL APPLIANCE HAS COOLED.DO NOT USE ABRASIVE CLEANERS.
WARNING:APPLIANCE MAY BE HOT, DO NOT SERVICE UNTIL APPLIANCE HAS COOLED.DO NOT USE ABRASIVE CLEANERS.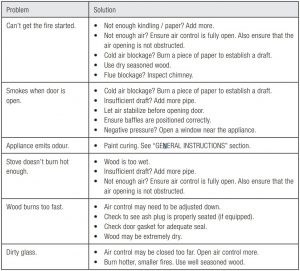
GENERAL WARRANTY TERMS AND CONDITIONS
GENERAL INFORMATION
This quality manufactured product is state of the art. The materials used were meticulously selected and are constantly checked, as is our entire production process.Setting up or installing this product requires specialized knowledge. Our products may therefore only be installed and commissioned by specialized firms and in compliance with statutory regulations as amended.
WARRANTY PERIOD
The General Warranty Terms and Conditions apply only within the USA and Canada. The warranty period and scope of the warranty in accordance with these terms and conditions shall apply apart from the statutory guarantee, which remains unaffected.Spartherm Feuerungstechnik GmbH gives a 5-year warranty on:
- Basic body wood insert
Spartherm Feuerungstechnik GmbH gives a 24-month warranty on elevating mechanisms, operating devices such as handles, adjustment levers,shock absorbers, electronic and electrical components such as exhausters, governors, original spare parts, all purchased parts and safety devices.Spartherm Feuerungstechnik GmbH gives a 6-month warranty on wearing parts around the fire, such as fireclay bricks, vermiculite, fire grates, seals and glass ceramics.
REQUIREMENT OF EFFECTIVENESS FOR THE WARRANTY
The warranty period starts on the date of delivery to the dealer / intermediary. This must be verified from a document such as an invoice with the dealer/intermediary’s confirmation of delivery. The warranty certificate relating to the product must be produced by the claimant when making a warranty claim.If such proof is not produced Spartherm Feuerungstechnik GmbH shall not be obliged to honour the warranty
WARRANTY EXCLUSIONS
The warranty does not cover:
- wear and tear to the product
- Fireclay bricks/ vermiculite:These are natural products subjected to expansion and contraction during the heating process. This may create cracks. For as long as the linings remain in position in the fire chamber and do not break up, they remainfully functional
- the Surfaces:Discoloration of the enamel or galvanized surfaces caused by thermal stress or overload.
- the elevating mechanism:If the installation instructions are not correctly followed, resulting in overheating of the pulleys and bearings.
- the seals:Reduced sealing due to thermal stress and hardening.
- the glass panesceramics:Soiling caused by soot or burnt-in residues of burnt materials as well as visibly changed colour or other aspects due to thermal stress.
- improper transport and/or incorrect storage• improper handling of fragile components such as glass and ceramics
- improper handling and/or use
- lack of maintenance
- incorrect installation or connection of the unit
- Non-observance of the installation and operating instructions
- technical modifications to our the unit by third parties
- installation that does not comply with industry practice on installation instructions
NOTE
Your specialist dealer/contractor will gladly advise and assist you in matters not covered by our warranty terms and conditions and undertakings. We particularly advise you to have your wood insert/ stove serviced regularly by a stove fitter.Technical data subject to change errors and omissions excepted.
FOR YOUR INFORMATION

SERVICE HISTORY
Appliance Service HistoryThis heater must be serviced annually depending on usage.
SPARTHERMTHE GLOBAL BRAND FOR YOUR LIVING ROOMSpartherm Feuerungstechnik GmbH · Maschweg 38 · D-49324 MellePhone +49 (0) 5422 94 41-0 · Fax +49 (0) 5422 9441-14 · www.spartherm.com
Spartherm S 600 INSERT / M 700 INSERT / Wood Insert User Manual – Spartherm S 600 INSERT / M 700 INSERT / Wood Insert User Manual –
[xyz-ips snippet=”download-snippet”]