speco technologies H6HRN14TB 6 Channel Hybrid Digital Video Recorder User Guide
Welcome!
Thank you for purchasing this DVR.This guide is designed to be a quick reference for installing the system.Please read this guide carefully before installing and operating the unit.For more detailed information, please refer to the user manual.If technical assistance is needed, please contact Speco Technologies Technical Support.
Important Safeguards and Warnings
- Speco Technologies assumes no liability or responsibility for any fires or electrical shock caused by improper handling or installation.
- Speco Technologies is not liable for any problems caused by unauthorized modifications or attempted repair
Note: All of the installation and operations here should conform to your local electric safety rules.
Contents
Check Unit and Accessories
After unpacking the unit, please check for any visible damage. Then check to make sure that all accessories are included. Check that the model number and serial number that’s listed on the label on the unit are the same as what’s listed on the package label.
Connections
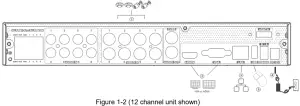
To quickly get started, connect the following to your recorder in the following order, please refer to Figure 1-2 (H12HRN shown for reference).
- Connect analog cameras to the video input ports (BNC) of the recorder.
- Connect a monitor to the recorder via VGA or HDMI cable (not included).
- Connect the included optical mouse into any USB port of the recorder.
- Connect the power adapter to the recorder and plug power cord into a 120VAC 50/60Hz outlet.
- Connect recorder to network (optional)

Set Password and Security Questions
Enter a password
Note: You will be prompted to set a Password and security questions upon initial boot up. See Fig 2-1
The default login ID and administrator username is: admin
The password strength indicator can be used as a reference. Re-enter the password to confirm. Remember this password.
Enter answers for two security questions.
You can select which security questions to provide answers for. It is important that you remember the answers for these questions or you will not be able to reset your password and be locked out.
Note: These questions must be answered in exact form when resetting the password and is case-sensitive.
Update Firmware (if necessary)
Speco will continuously make improvements, please check the website to ensure you are running the latest firmware version.
Check firmware version on recorder
You can click Start→Settings→System→Information→Basic go to “About this machine” and click on “view”. You will then be able to see the firmware version number and build date. Now go to www.specotech.com, then click on Support, then Recorder Software updates and follow the prompts until you find the model of your recorder. Then compare the release date of the firmware on the website with the recorder’s firmware build date. See Figure 3-2 and 3-3.

If the web has a more recent firmware version than your recorders build date, then please update your device to the latest firmware.
Updating Firmware
- Copy the upgrade software into the USB storage device.
- Insert the USB storage device into the USB interface of the DVR.
- Click Start→Settings→System→Maintenance→Upgrade to go to “Upgrade” interface. Select the USB device in “Device Name” option and go to the path where the upgrade software exists. Select the upgrade software and then click “Upgrade”. The system may automatically restart during upgrading. Please wait for a while and do not power off the DVR during upgrading.
After firmware is updated, the unit will restart. You can now remove the USB disk from the unit.
EZ Setup
After the system boots up, the EZ Setup wizard is displayed. See Figure 4. If not, right click, and select EZ Setup.
Tip: Check the “Enable EZ Setup next time” box to display the EZ Setup wizard every time the device is rebooted.
General Settings – Date & Time
When booting up for the first time, the device will prompt you for time settings or go to Settings→System→Date and Time for Figure 4-1
- System Time: Set the time and date format of the system
- DST: Toggle Daylight Saving Time On or Of.
- Time format: Choose between 24-hour mode or 12-hour mode.
- NTP: Specify an NTP server to synchronize the time (optional)

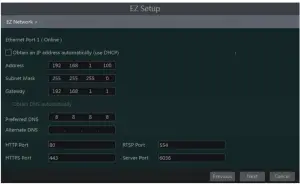
EZ Network Setup
- Next, set the network of the DVR. Go to Start → Settings → Network →TCP/IP. Input IP address, subnet mask, gateway, etc. If using DHCP, please enable DHCP in both the DVR and the router.
- Go to Start → Settings → Network → Port. Input HTTP port (the default value is 80), server port (the default port is 6036)
UPnP Configuration
- By UPnP you can access the DVR through IE client which is in WAN via router without port mapping.
- Hit next or Click Start→Settings→Network→UPnP to go to the interface as shown below.
- Make sure the router supports UPnP function and the UPnP is enabled in the router.
- Set the DVR’s IP address, subnet mask and gateway and so on corresponding to the router.
- Check “Enable” in the interface as shown below and then click “Apply” button.
Click “Refresh” button to refresh the UPnP status. If the UPnP status were still “Invalid UPnP” after refreshing it for many times, the port number may be wrong. Please change the mapping type to “Manual” and then click ![]() to modify the port until the UPnP status turns to “Valid UPnP”. Refer to the following picture. You can view the external IP address of the DVR. Input the external IP address plus port in the address bar to access the DVR such as http://183.17.254.19:81.
to modify the port until the UPnP status turns to “Valid UPnP”. Refer to the following picture. You can view the external IP address of the DVR. Input the external IP address plus port in the address bar to access the DVR such as http://183.17.254.19:81.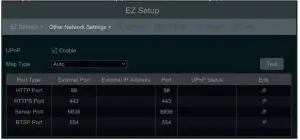
DDNS Settings
The DDNS is used to control the dynamic IP address through domain name. Speco Technologies provides free DDNS service with US-based servers. You can access to the DVR easily if the DDNS is enabled and configured. Click Start→Settings→Network→DDNS to go to the interface as shown below. The default DDNS type will be “specoddns.net”. The default domain name will be shown. If invalid or taken, please select another domain name. Click on test to check if ok. If so, you may now go to [your domain name].specoddns.net with Internet Explorer and access your recorder remotely.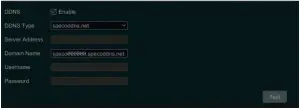
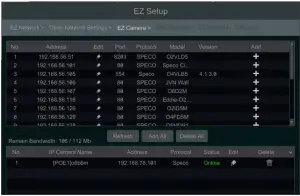
EZ Camera Setup
- Add Camera. Click “Refresh” to refresh the list of online IP cameras which are in the same local network with DVR and then click to add the searched camera. Click “Add All” to add all the cameras in the list. Click to delete the added camera. Click “Delete All” to delete all the added cameras. See Figure 4-2
- Click to edit an IP camera as shown on the below left. Input the new IP address, subnet mask, gateway, username and the password of the camera. You can check “Sync to IPC” to modify the IP address of the IP camera via different network segments for being in the same network segment with the DVR. Click “OK” to save the settings.
- Click to edit the added camera as shown on the above right. Input the new camera name, IP address, port, username and the password of the camera. You can click “Test” to test the effectiveness of the input information. Click “OK” to save the settings. You can change the IP camera name only when the added camera is online. Click “Next” to continue.

Disk Settings
Disk Settings. You can view the disk number, disk capacity of the DVR and serial number, Read/Write status of the disk. Click “Formatting” to format the disk. Click “Next” to continue.
Record Settings
Record Settings. Two record modes are available: auto and manual.
Auto Mode: Select one auto mode in the interface as shown below and then click “Next” button to save the settings. Click “Advanced” to self-define record mode.
Manual: Set the “Sensor Record”, “Motion Record” and “Schedule Record” of each camera. Click “OK” to save.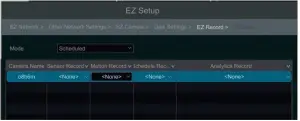
QR Code for Remote App Viewing
QR Code. Enable the NAT function in the interface or set it in the network configuration after exiting the wizard (please refer to manual for details). You can scan the QR Code through the Speco Blue App available for iOS and Android to easily and securely view your cameras.

Web Browser Access
Click Start→Settings→Network→NAT to go to the interface for NAT configuration and check “Enable”. Click “Apply” to save the settings and make note of the QR code number under the QR code. Via Internet Explorer, go to connect.specotech.cloud, input the QR code number, your username and password to login.
Playback
Click Start→Playback to go to the playback interface as shown below (click on the tool bar at the bottom of the live preview interface to set the default playback time).
On panel on the right will show you’re the channel number and their recorded data coded by color. The bar that runs across them represents the playback time being viewed. You can move this bar around. To export, highlight a section of the desired recording, click export and follow the prompts. You can export single or multiple channels at the same time.
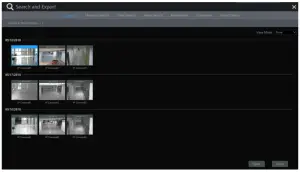
EZ search
EZ Search– Quickly search an instance using video thumbnails.
- Click Start→Search and Export→EZ search. There are two view modes: by time and by camera. In the time view mode, a maximum of 64 camera thumbnails can be showed.
- Select one camera in the interface and then click “Open” button.
- Click the image box to play the record in the small playback box on the left side of the interface (the box which has image inside indicates that the record data exist).
- Refer to the picture below. Drag the color blocks on the time scale to select the record data and then click “Backup” button to pop up the “Record Backup” window as shown below. Select the device name, backup format and path and then click “Backup” button to start the backup.
For detailed operation information, please refer to the user’s manual.
Contact
 report this ad
Phone: 1-800-645-5516 option 3Email: [email protected]
References
[xyz-ips snippet=”download-snippet”]