User Manual
![]()

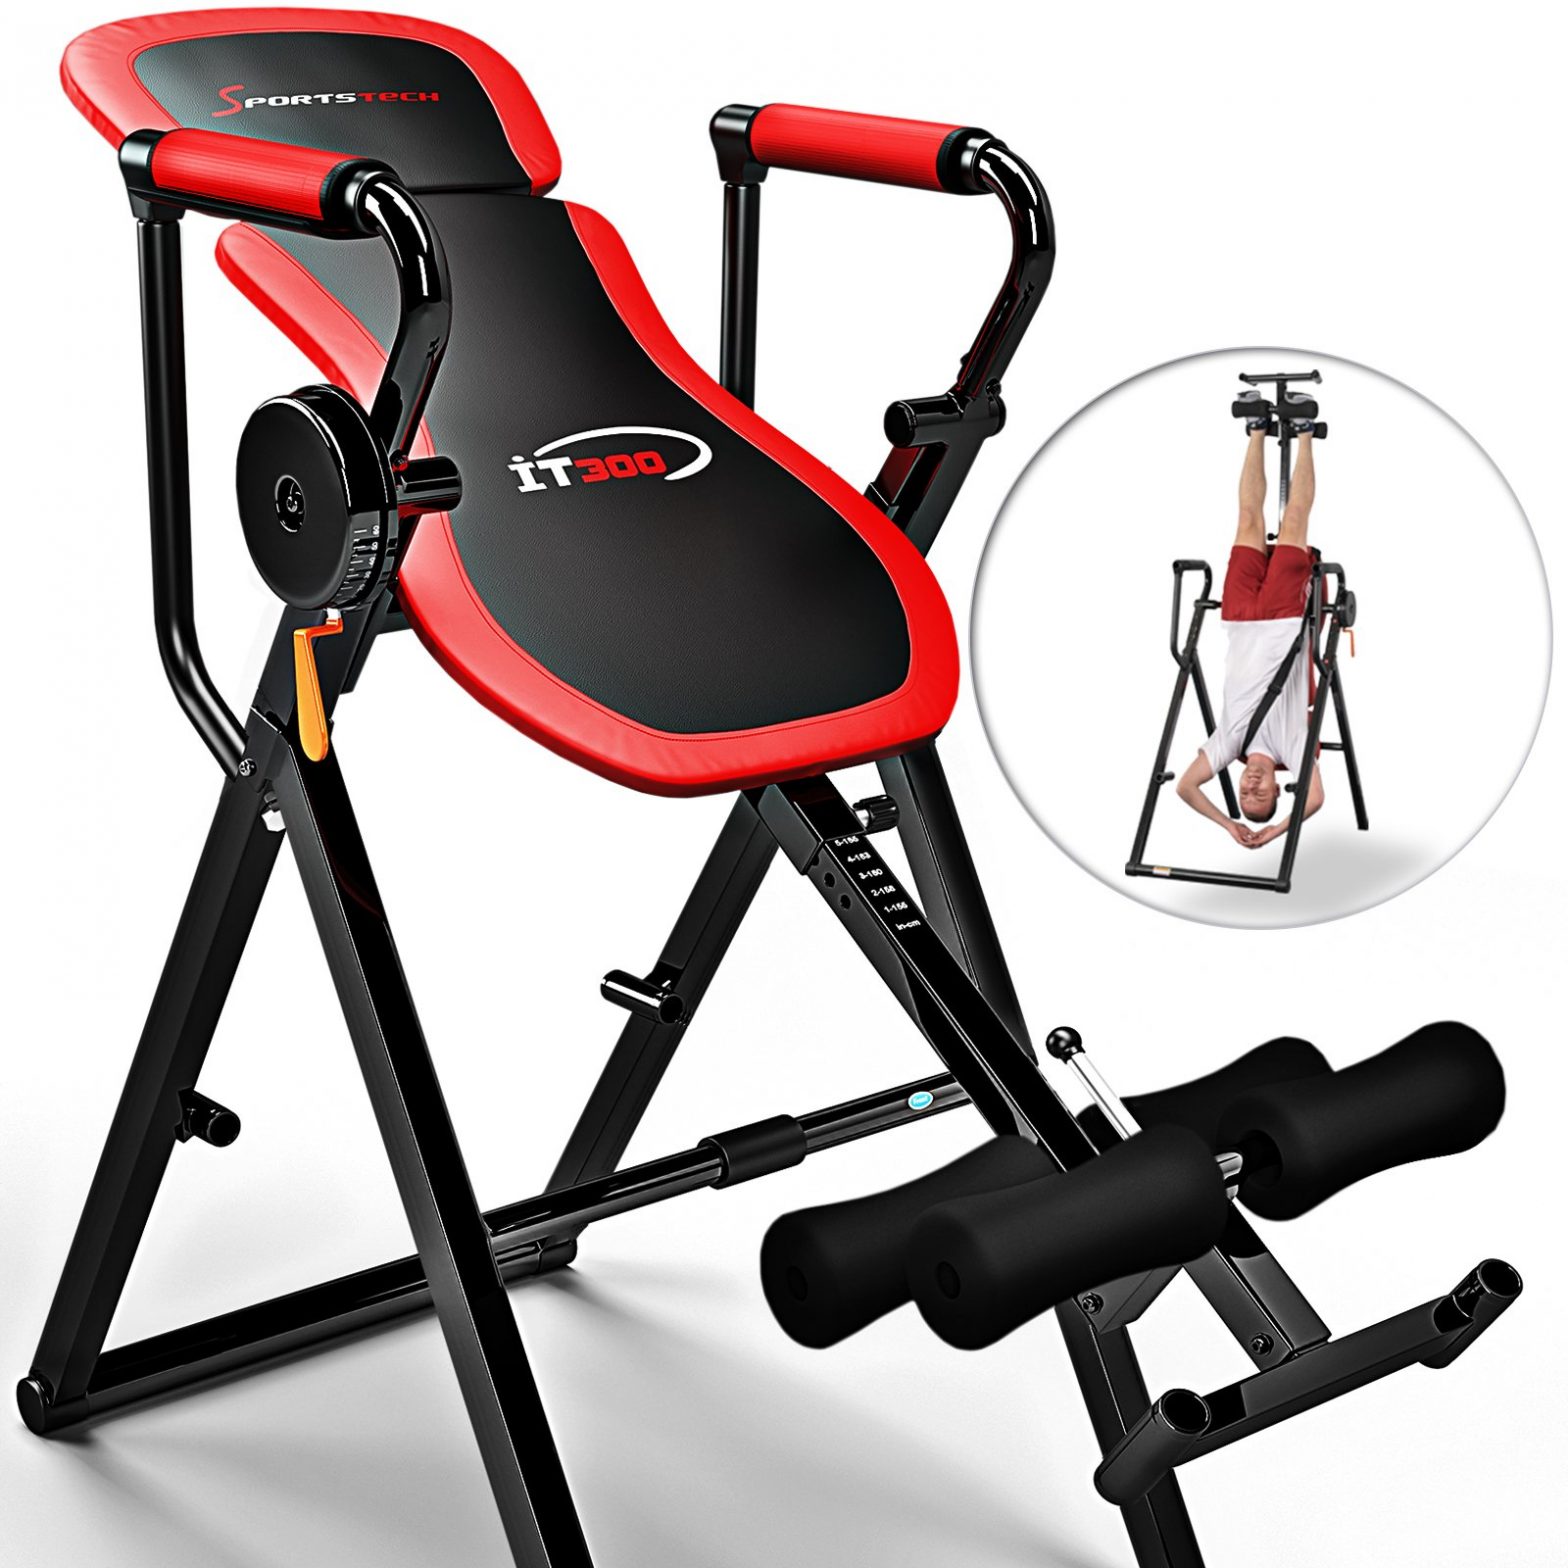
SPORTSTECH 6-in-1 Inversion Bench
Dear customer,We are pleased you chose a device from the SPORTSTECH product range. SPORTSTECH sports equipment offers you high quality and new technology.
In order to fully use the potential of your device and be able to enjoy it for many years, please read this manual carefully before starting up and beginning of training, and use the device according to the instructions. The operational safety and function of the device can only be guaranteed if the safety instructions in this user manual are observed. We shall not assume any liability for damages resulting from improper use or incorrect operation.
 Please ensure that all persons using the device have read and understood the usermanual.
Keep the user manual in a safe place to be able to access it at any time if needed.
Link to the videos:https://service.innovamaxx.de/it200_video
We are also on social media!
Get the latest product information, training content and much more on our:

1. SAFETY INSTRUCTIONS
![]() Read the manual in its entirety before assembly and use. Please keep this manual for future reference.
Read the manual in its entirety before assembly and use. Please keep this manual for future reference.
- Before using the inversion table, please consult your health care professional. If you‘re on medication for heart rate, blood pressure or cholesterol levels please follow doctor‘s advice.
- Be aware of your body‘s signals when using this machine. Please stop exercising if you experience any of below symptoms: pain, tightness in chest, irregular heartbeat, shortness of breath, feeling light headed, dizziness or nausea. Proceed only after doctor’s clearance.
- This inversion table is for adults only. Keep children and pets away from this equipment
- Always use this machine on a solid, flat surface. Cover the floor or carpet with an exercise mat to protect from damage. To ensure safety, make sure all obstacles are at least 18 inches (0,5 m) away from the equipment.
- Make sure all screws, nuts and bolts are tightened before use.
- Please follow the manual while in use. If you find any issue during assembly or follow up maintenance, or hear any unusual noise while using, please stop operating immediately.
- Avoid loose clothing that could possibly get stuck in machine.
- Prevent your arms and legs from coming near the product´s moving components. Do not put any obtects into any openings on the product.
- Adjust the inclination angle to less than 30° the first time using the machine.
- Warm up slowly and limit your exercise to 5 minutes the first time using machine.
- Reduce the inclination angle if you feel uncomfortable. Stop if it doesn‘t help.
- Do not use inversion table too soon after eating.
- This product is intended for private use and is not suitable for medicinal, therapeutic or commercial purposes.
- The maximum permissible weight for user is 120 kg.
- The product relaxes and relieves back muscles as well as the entire backbone, especially thespinal discs. Working out with this invertion table can prevent and alleviate back pain.
Do not alter the product in any way and use only original replacement parts. Have allrepairs carried out in a professional workshop or from similary qualified persons. Improper repairs can lead to serious risks for the user. Use the product for the intended purposes as described in this user manual only. Shield the invertion table from spraying water, moisture, high temperatures and direct sunlight.
INFORMATION ON ASSEMBLY
- Assembly of this product must be carried out carefully by an adult person. Ask for the assistance of an other person with technical insight in case of doubt.
- Before beginning assembly of the product, read all assembly steps carefully and review the diagram.
- Remove all packaging materials and place all individual components on a free surface. Shield the assembly surface from filith and scratching by laying down suitable padding.
- Check the components against the components list to make sure all are present. Do not dispose of the packaging materials until assembly is complete.
- After assembling the product according to the instructions, make sure that all screws, bolts and nuts are installed correctly and tightened.
- Place and use the device on a dry, even and non-slip surface with at least 0,5 meters spacearound it.
- The device is intended exclusively for home use and not for commercial purposes.
- Never place the unit on a surface if it blocks the ventilation openings.
- To protect the floor or carpet from damage or discoloration, place a special floor mat under the unit.
- It is recommended to assemble the device with two people present.
2. EXPLODED DRAWING/SPARE PARTS LIST
At the following link you will find the exploded drawing and the spare parts list:

3. ASSEMBLY INSTRUCTIONS
![]() Firmly tighten all component parts and pre-assembled parts!
Firmly tighten all component parts and pre-assembled parts!
STEP 1
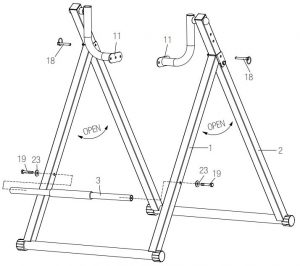
- Open the front and rear main frame (1, 2) into a stand and insert the locking pin (18).
- Install the boundary bar (3) on the front main frame (1) with the washers (23) and the screws (19).
STEP 2

- Install the support tube for the backrest (4) on the Z swivel joints (11) of the main frame. Use 2 washers (23), 1 screw (21) and 1 nut (26) for each hole.
- Mount the headrest (14) at the upper end of the back support tube (4) with 2 screws (22).
STEP 3
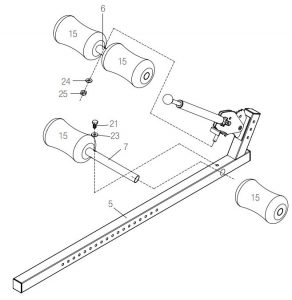
- Insert the tube (7) for the foam rollers into the underside of the rail (5) for body size adjustment and fix the tube with the washer (23) and the screw (21). Slide the foam rollers (15) on to both sides of the tube.
- Now put the pipe (6) on the front part of the rail over the threaded pin and fasten it with a washer (24) and a nut (25). Slide the foam rollers (15) on to both sides of the tube.
STEP 4
 Install the footrests (8) on the rail (5) for body size adjustment with the screws (19), washers (23) and nuts (26).
STEP 5
 Insert the rail for the size adjustment (5) into the rail of the backrest (17) and secure it with a locking pin (17) and the locking pin screw (27) on the right side of the rail. Tighten the screw! Attach the U-tube shoulder rest (12) to the rail of the backrest (4) with the handle screw (18).
STEP 6
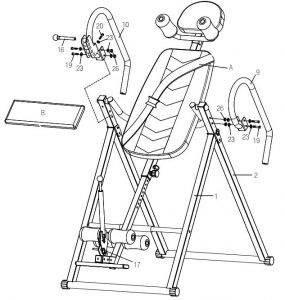
- Mount the Left Armrest (9) on to the Rear Bracket (2) in the direction shown in the illustration using the bolts (19), the washers (23) and the nuts (26).
- Attach the Right Armrest (10) to the Rear Bracket (2) in the direction shown in the illustration. Use the screws (19), (20) and the washers (23) and nuts (26).
- The locking pin (16) is inserted into the corresponding hole on the right armrest (10).
- Insert the locking pin (17) in use and after clamping the foot into the corresponding hole on the toothed disc to secure the position.
- Inflate the lumbar support cushion (B) as needed.
- Buckle up with the seat belt (A) before each workout.
Note: Always use this equipment on a flat, solid surface. Use an exercise mat toprotect floor. To ensure safety, make sure no obstacles are within at least 18 inches(0,5m) of the equipment.

4. PERSONAL ADJUSTMENTS
Height adjustmentYou can adjust the foot rest length setting for your desired body height at any time by releasing the Loop Pin (17) and Spring Pin (27). Move the Adjustable Boom (5) to the correct position, tighten the Spring Pin (27) and lock with Loop Pin (17).
Hold the boom (5) firmly during adjustment to prevent it from falling out and thus damaging the floor!

Foot rest adjustmentBefore use, adjust the foam leg rollers on the foot rest according to the following diagrams so that your legs are not squeezed but still have sufficient support. To do so, pull the leg tube adjustment button, set the desired distance and then refasten the leg adjustment button. Secure the position with the locking pin.

Incline adjustment
![]() Make sure that neither your fingers nor clothing get wedged between t ! he frame while inverting!
Make sure that neither your fingers nor clothing get wedged between t ! he frame while inverting!
You will find the locking mechanism on the handle on the right side. Slide the locking pin into the selected opening in the desired position and turn the pin into the thread to hold the position. Important! The pin must be securely screwed in so as not to fall out!

5. WORKOUT INSTRUCTIONS
The inversion table operates like a balanced pendulum on an exle.It reacts to small changes in weight distribution. When you begin using the unit, take special care that you have selected the correct maximum incline angle (if desired). Asking for the assistance of a second person to stabilize and rotate the table may be helpful the first time you exercise with the unit.
Advantages of useInversion training can have many advantages, just a few of which are listed in the following:
- Relief of back painIn most cases, gravity is a factor in back pain. Pressure on spinal discs decreases the distance between vertebrae, restricting mobility and increasing the risk of pinched nerves. Inversion therapy is an easy way to prevent this from happening and to counteract the negative effects of gravity. Hanging upside down at an angle of 20°- 90° eases pressure and allows your spinal discs to return to their natural form and your vertebrae to an optimal distance from one another.
- Improved postureWhen a vertebra slips, the ligaments and muscles that support it prevent it from returningto its original position. Lying down, the pressure on your vertebrae is reduced to 25% of its normal intensity. The pressure can be reduced to zero by lying on the inversion table at an angle of 60°. Reducing pressure to the vertebrae and slightly streching can correctly align your vertebrae. In addition, inversion also relieves joints, improving the supply of nutrients and oxygen.
- Counteract shrinking due to gravitySpinal discs absorb and release moisture. In the course of a day, spinal discs are squeezed and dehydrated like a sponge. In fact, ahealthy spinal disc will shrink up to 20% each day. During sleep, spinal discs recover due to the relief of lying down. As a person progresses in age, permanent shrinking may occur. Inversion can help to return moisture to spinal discs by reducing the pressure they are subject to.
Exercise caution during useDespite its many advantages, invresion therapy or using an inversion table is not right for everyone. If you have one of the following symptoms, consult a physician before using the product (the following list contains only examples and is in no way exhaustive):
- Use of anticoagulants (substances that thin blood such as aspirin)
- Weak or fractured bones: The pressure of body weight may worsen these conditions.
- Conjunctivitis due to a virus or bacterial infection
- Glaucoma (constant excess intraocular pressure)
- Cardiovascular problems: Consult your physician before using the product if you haveany circulatory disorders.
- Inguinal hermia or diaphragmatic hernia
- High blood pressure (above 140/90)
- Infection of the middle ear
- Pregnancy
- Retinal detachment
- Spinal injuries
- Stroke
- Transient ischemic attacks
The inversion table is designed for a maximum user weight of 120 kg.
![]() IMPORTANT: While on the inversion table, always adjust your weight and makemoverments carefully and calmly, as the table may tip over if you move suddenly,leading to serious injury.
IMPORTANT: While on the inversion table, always adjust your weight and makemoverments carefully and calmly, as the table may tip over if you move suddenly,leading to serious injury.
General notesAlways wear appropriate clothing and footwear when working out. Keep children away from the unit at all times, especially while it is in use.
Directions for useBefore use, adjust the foot rest lenght setting so that the table could remain in a horizontal position without being held by handles when you are lying with your arms by your sides. Your body weight is then balanced and you can adjust the incline by slightly moving one or both of your arms. As a general rule in inversion training, the greater the incline angle, the shorter the duration.
Make sure that the foot rest plate is correctly adjusted and securely screwed. Lay your head on the head rest and your arms first at your sides and then on your chest, as depicted. If your head is now lower than your feet, lengthen the foot rest by one hole and try again. If your feet do not move, shorten the foot rest by one hole and try again.

While lying on the inversion table, gentle and even movements can improve the effect of inversion on muscles, ligaments and joints. For example, you can stretch, rotate or attempt to tuck up your legs. Only do sit-ups in a secured position however.

Return from inversion to your initial position using the handlebar grips. As your body may have been stretched slightly during inversion, the initial position may no longer be balanced. Bend your knees to relocate your body´s center or gravity toward your feet. Do not lift your head and / or try to sit up.

Advanced users can hang from the foot rests. To do so, rotate the table completely, as depicted, grasp the back rest behind your shoulder with one hand and the crossbar on the front frame with the other. You can use your arms to rotate the table a few degrees past the hanging point. Return from inversion to your initial position using the handlebar grips. Bend your knees to relocate your body´s center of gravity toward your feet. Do not lift your head and /or try to sit up.

6. MAINTENANCE. CLEANING AND CARE
- Make sure that all bolts/nuts are correctly tightened after assembly and before use.
- Clean the unit regulary with a slightly damp cloth and a mild cleaning agent. Do not use any solvents to clean the unit.
- This applies to the padding and handles especially since these parts are in constant contact with your body during training. You can cover the pads with a towel during training to protect them.
- Check all rollers for ease of movement before use. Rollers that move with difficulty result in excessive wear and / or damage to the cables. If one or more rollers is tight, make sure they are installed correctly. Never grease the contact area between the roller and the cable! If in doubt, please do not hesitate to contact our customer service.
- Maintain the weight guide tube regularly using a little silicone oil.
- You should grease the axles of all moving parts once every one or two years. You can use an off-the-shelf grease to do so.
 Recycling loopPackaging material can be conveyed back to the raw material cycle. Dispose of packaging material in accordance with legal provisions. Information can be retrieved from the return or collections systems of your community.
Distributed by
Sportstech Brands Holding GmbHPotsdamer Platz 1110785 Berlin
![]() +49 30 220 663 520
+49 30 220 663 520
SPORTSTECH 6-in-1 Inversion Bench User Manual – SPORTSTECH 6-in-1 Inversion Bench User Manual –
Questions about your Manual? Post in the comments!
References
[xyz-ips snippet=”download-snippet”]