
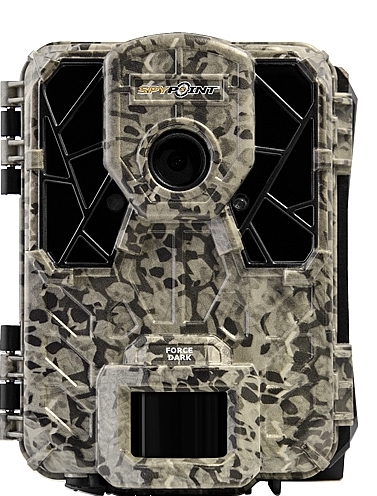
SPYPOINT Force-Dark Trail Cam
IN THE BOX
- 1x Camera
- 1x 16 GB SD card
- 1x SD card reader
- 1x Mounting bracket
- 1x Installation strap
- 1x Quick Start Guide
NOTEBatteries sold separately.User Manual, software updates & FAQs available at: www.spypoint.com/support.
COMPONENTS
- Photo lens
- Test light
- Detection lens
- 12 V jack
- Microphone
- BUSY light
- Battery compartment
- Slot for installation strap
- Screw-thread for standard ¼”-20
- Locking latch
- LED
- OK Button
- Navigation buttons
- Viewing screen
- SD card slot

The specifications and characteristics of similar models may vary. Refer to the website or packaging for details.
PREPARATION
SELECT A POWER SOURCE
Three types of power sources are available to the user:8 AA batteries inserted in the battery compartment.
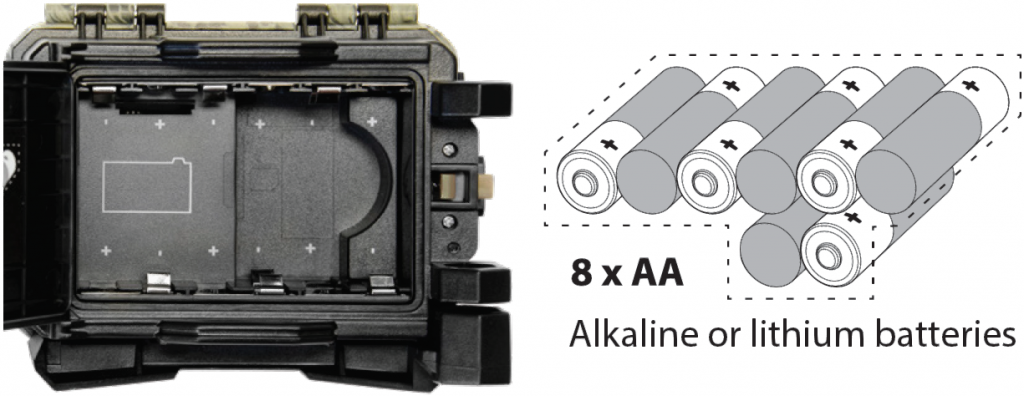
Make sure to insert the AA batteries according to their polarity (+) and (-).
FOR MAXIMUM PERFORMANCE AND WITHOUT LEAKING BATTERIES
- Use new batteries.
- Use ONLY alkaline or ONLY lithium batteries.
- Do not mix new and old batteries.
- Do not use rechargeable AA batteries, as their lower voltage may cause operating difficulties.
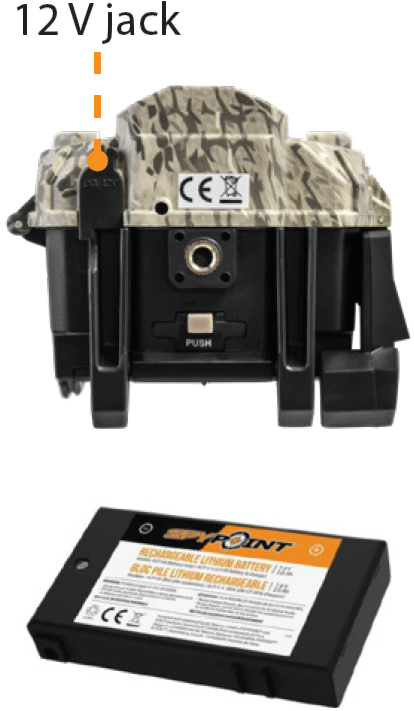
- An external 12 V battery (#BATT-12V sold separately) plugged into the 12 V socket on the bottom of the camera, behind a protective rubber cap.
- A rechargeable lithium battery pack #LIT-09 (sold separately), to insert in the camera’s battery compartment.
The camera was designed to draw its energy in the following priority order:
- 12 V battery plugged in the 12 V camera socket.
- AA batteries/lithium battery pack.
For more information about the different power sources for your camera, please refer to the User Manual at www.spypoint.com/support.
INSTALLING AN SD CARD
The camera was designed to operate with an SD card, class 10, between 2 and 32 GB of memory.
INSERT AN SD CARD
- Make sure the camera is turned OFF.
- Locate the SD card slot. It is on the right, above the viewing screen (see diagram).
- Insert an SD card (up to 32 GB) in the slot and make sure to respect the direction indicated in the diagram.
- The card is inserted correctly when a click is heard.

FORMAT YOUR SD CARD
Before inserting the SD card in your camera, it must be formatted to ensure proper operations. Visit www.spypoint/support if you need help formatting your SD card.
CONFIGURATION
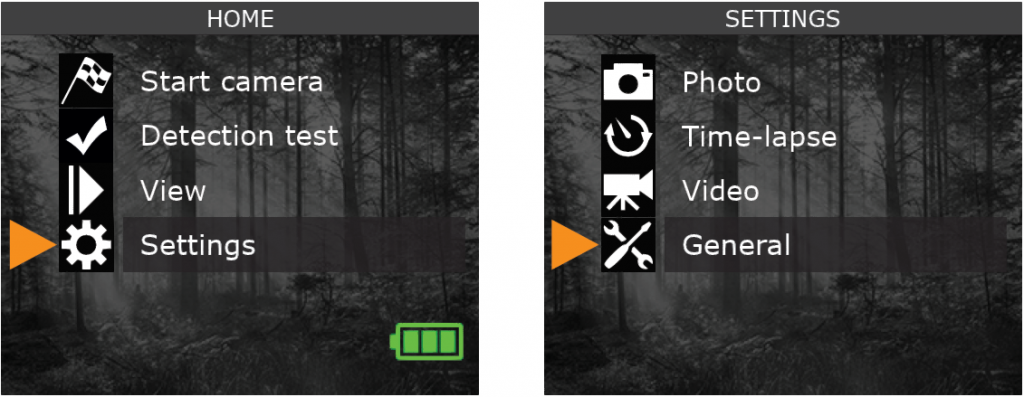
Use the UP and DOWN buttons to navigate the menus and change options, the OK button to select and the BACK button to return to the previous menu.
GENERAL SETTINGS SETUP
- To turn the camera ON/OFF, press and hold the OK button.
- Choose the language. By default, the camera menu is in English. If you want to use another language, after turning the camera ON, choose SETTINGS, GENERAL, then LANGUAGE. Choose one of the 3 languages available: English, Deutsch (German), or Français (French).

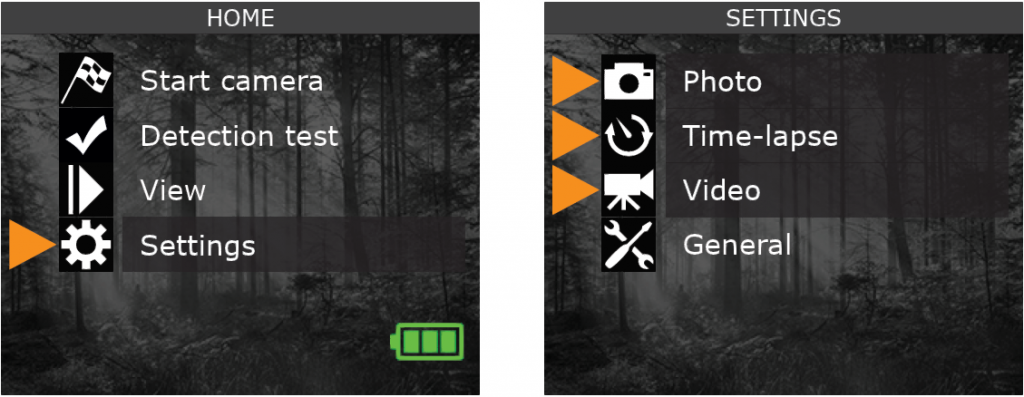
- From the home menu, select SETTINGS, then GENERAL to access the general configuration menu:
- Set the Date (MM/DD/YY or DD/MM/YY).
- Set the Time (hour/minute).
- Set the Nighttime (best option for photos).
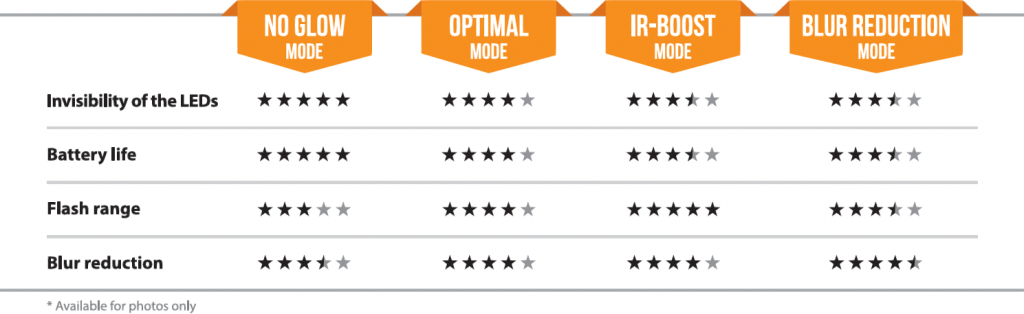
COMPARISON OF HYBRID ILLUMINATION MODES*
CONFIGURING THE SETTINGS FOR THE 3 OPERATING MODES
From the home menu, select SETTINGS, then PHOTO, TIME-LAPSE, or VIDEO to access the respective mode configuration menu.
PHOTO
- Delay: Sets the time interval between each detection before the camera takes the next photo.
- Multi-shot: Takes up to 6 consecutive shots at each detection with a 5 second delay between each photo.
TIME-LAPSE
- Interval: This option allows the camera to take photos at regular preset intervals without movement detection.
VIDEO
- Delay: Sets the time interval between each detection before the camera records the next video.
- Video length: Allows the user to select the duration of the recording.
- Photo first: When this option is enabled, a photo is taken immediately before each video.
SUGGESTED PHOTO MODE CONFIGURATION

INSTALLING YOUR CAMERA
MOUNTING BRACKET AND STRAP
Install your camera against a tree, using either:
- The strap and the mounting bracket together.
- Only the strap inserted directly into the camera.
When the camera is installed using the mounting bracket, it can be removed to access the battery compartment without disturbing the installation.

MOUNTING BRACKET
To remove the camera from the mounting bracket:
- Push the tab to release the camera from the mounting bracket.
- Remove the camera.

INSTALLATION WITH THE SUPPLIED STRAP
The dimensions of the included strap are 2.5 cm (1’’) X 152 cm (60’’).
- Thread the strap through the strap slot found on the back of the camera.
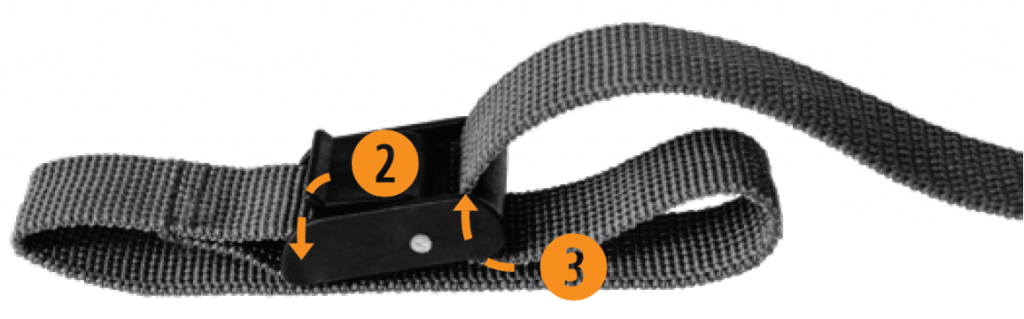
- Wrap the strap around the tree then press and hold down the latch.
- Thread the strap through the latch from behind, as shown below.
Recommended height of installation:The camera must be installed at the height of the center line of the animal’s body.
Ideal setup for high-quality images and videos:The target animal should be 7.5 m from the camera to get a better line of sight.
To produce brighter photos at night, there should be items reflecting the camera’s flash in the background.Please note that the camera should never be directly pointed at the sun to avoid back lighting and faulty detection.
TESTING THE CAMERA’S MOTION DETECTION CAPABILITY
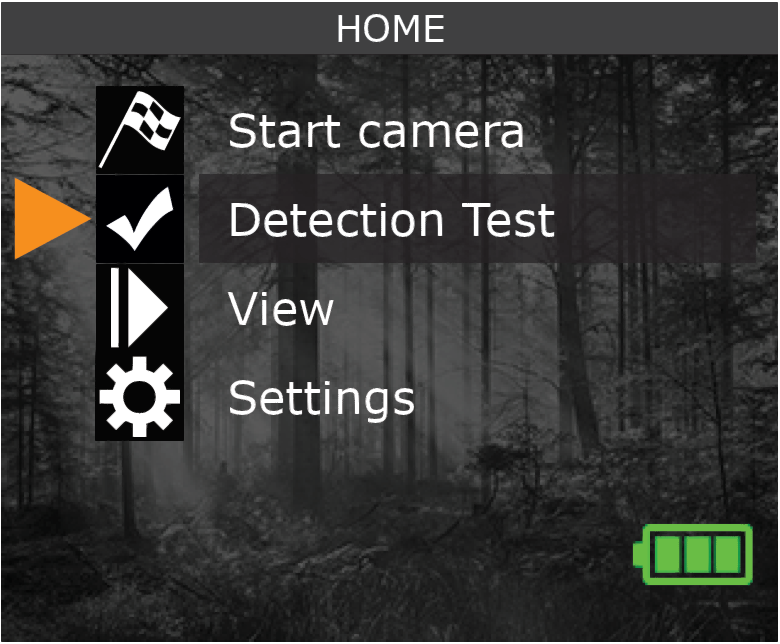
The test light blinks when the camera detects motion. If the system does not detect motion, increase the detection sensitivity using the “Sensitivity” option in the SETTINGS/GENERAL menu. Adjust the camera’s position as needed. In the TEST mode, you can take a photo by pressing the OK button. The photo will be saved and displayed in the VIEWING mode.
STARTING THE CAMERA
After choosing START CAMERA in the HOME menu, select the desired operating mode (PHOTO, TIME-LAPSE, or VIDEO) from the mode menu by pressing OK.

When the mode is selected, the test light on the front of the camera will blink for 30 seconds to allow the user to leave the area without being photographed or filmed.

THE SPYPOINT EXPERIENCE
(Online scouting tools)To ensure that you use your trail camera optimally and that it precisely meets your needs and ultimately to ensure greater success as a hunter, SPYPOINT offers you a range of useful additional digital features.For more details on the SPYPOINT EXPERIENCE, refer to the following website www.spypoint.com/en/spypoint-experience.
THIS DEVICE COMPLIES WITH PART15 OF THE FCC RULES.Operation is subject to the following two conditions:
- This device must not cause harmful interference.
- This device must accept any interference received, including interference that may cause undesired operation.
DISPOSAL
ONLY USE ORIGINAL SPARE PARTS AND ACCESSORIES
If, one day, your camera has been used so intensively that it has to be replaced, or if you no longer have any use for it, you are obliged to dispose of it at a recycling center.Information on return points for your electrical appliance can be obtained from your local waste disposal company or from your local administrative offices.Electrical appliances not only contain valuable recyclable raw materials, but also substances which, if disposed of improperly, can affect public health and the environment. Help ensure that valuable raw materials are recycled by returning your old appliance to a central collection point.The WEEE (Waste Electrical and Electronic Equipment Directive) symbol represents the obligation of the labeled camera to be sent to a separate center for the proper recycling of electrical and electronic equipment.
WARRANTY
Sit back and relax as this device is covered by the “Know you’re covered” 2-year warranty. We strive to provide our customers with a positive experience and an outstanding service.
For a complete list of specifications, features, and settings, visit our FORCE-DARK page at www.spypoint.com.
FAQ, User Manual & latest firmware available at www.spypoint.com/support
Live chat support at www.spypoint.com or email support at [email protected]
![]()
References
[xyz-ips snippet=”download-snippet”]