![]()
V 1.6QUICKSTART GUIDE


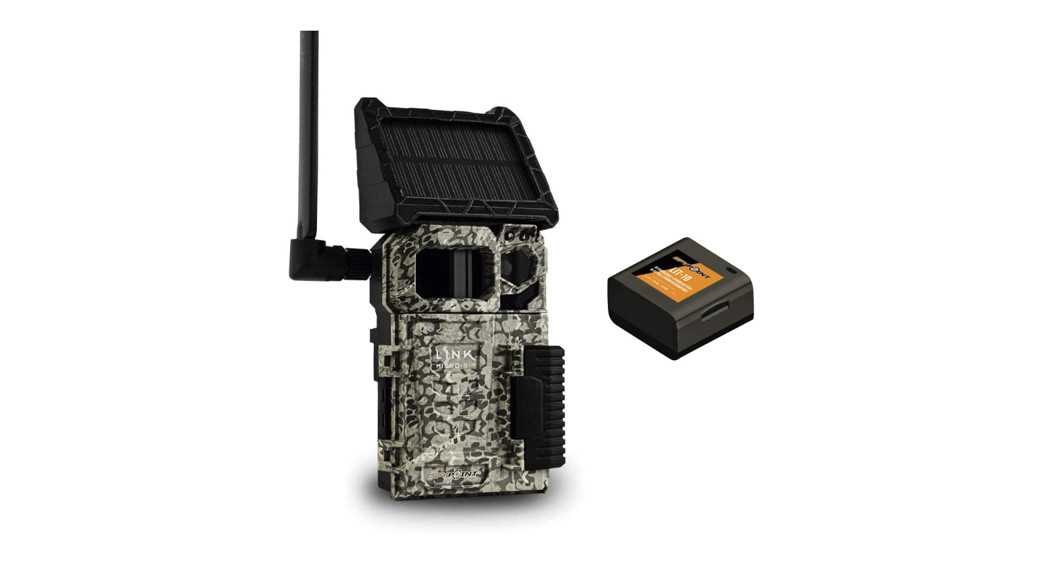
IN THE BOX
1x LINK-MICRO-S-LTE camera1x LIT-10 lithium battery pack1x Micro-USB cable1x SIM card (preactivated and inserted in the camera)1x Antenna holder1x Installation strap1x Quick Start Guide
NOTEMemory card is sold separately.User Manual, latest firmware, and the FAQ available at:www.spypoint.com/en/support
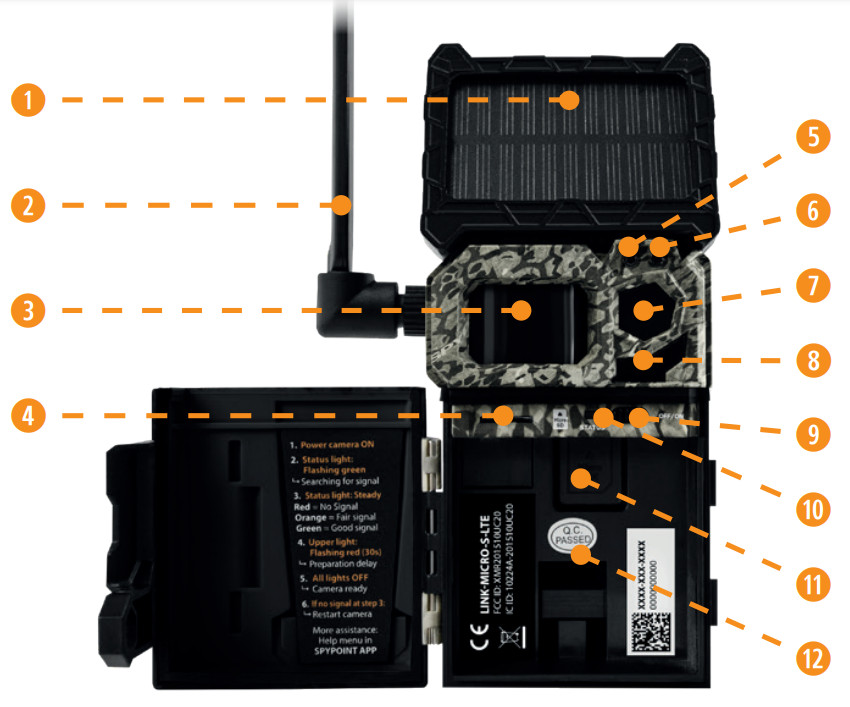
COMPONENTS
| 1. Solar panel2. Antenna3. Detection lens4. MicroSD card slot5. Light sensor6. Delay light7. Photo lens8. LED9. OFF/ON switch10. STATUS light | 11. SIM card slot12. Battery compartment13. Lithium battery pack14. Slot for installation strap15. Door16. Locking latch17. Cable lock hole18. 12 V jack19. Screw-thread for standard ¼”-20 tripod mount |

GETTING STARTED
CHARGING THE LITHIUM BATTERY
- Remove the lithium battery pack from the packaging. It is shipped with the camera.
- Using the included micro-USB cable and a 5 V wall outlet charger (not included), recharge the battery pack for about 12 hours.

- Once the lithium pack is fully charged, the red light will turn green.
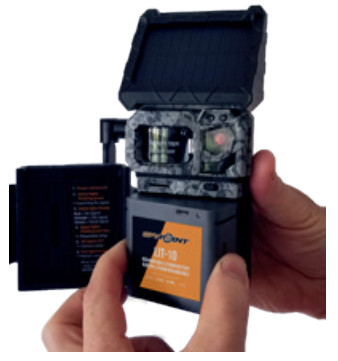
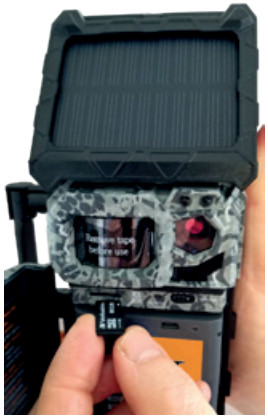
- After unlocking the latch and opening the camera door, insert the battery pack in the compartment (see photo).

 Do not insert AA batteries into the lithium battery compartment, as this could damage the camera.
MANAGE DIFFERENT POWER SOURCES FOR YOUR CAMERA
- The main power source of your camera is the lithium battery pack (#LIT-10 included), which provides a long charge time, more than double that of AA batteries.• The solar panel is designed to maintain the battery pack’s charge. The camera will be energy self-sufficient under ideal conditions (an energy-efficient configuration and a sunny environment).• When the battery pack’s charge level is low, you will receive a notification in your app.• If your battery pack runs out, the camera will shut down.• If the camera turns OFF, the solar panel will continue to power the battery pack. However, for quick and complete recharging, connect the battery pack to a wall outlet using the supplied micro-USB cable and a USB power adapter.• When you restart your camera, after recharging the battery pack, it will return to the settings you previously selected.
- Moreover, the camera was designed to recognize and use an optional power source other than the lithium battery pack:• If you choose to plug an external 12 V battery (#KIT-12V, sold separately) into your camera, it becomes your camera’s new primary power source. The lithium battery pack will only be used once the 12 V battery is depleted.• Simply plug the 12 V cable into the 12 V jack of the camera and connect the other cable end to the 12 V battery.
You can check the battery level using your SPYPOINT app.However, for an accurate reading, it is important to select the correct battery type in the app settings.
PLEASE NOTE
- Using an external 12 V battery source does not recharge the lithium battery pack.
- The camera solar panel will not recharge an external 12 V battery.
LITHIUM BATTERY PACK SPECIFICATIONS
This lithium battery is compatible with all SPYPOINT LINK-MICRO cameras and the CELL-LINK.
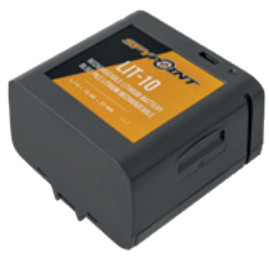
| Charging time | ≈ 12 hours (with USB cable) |
| Operatingtemperature | -30°C to 50°C (-22°F to 122°F) |
| Storagetemperature | -40°C to 60°C (-40°F to 140°F) |
| Voltage | 3.7 V |
| Capacity | 10,200 mAh |
CAUTIONThe LIT-10 contains safety and protective devices which, if damaged, may generate heat, rupture, or ignite and cause serious injuries.Be sure to follow the safety rules below:
- Do not modify the battery.
- Do not place the battery in a fire or near a heat source exceeding 60°C (140°F). Avoid placing it in direct sunlight or inside a vehicle in hot weather.
- If the battery is leaking or emitting an odor, it mustbe immediately removed from any flame. The leaking electrolyte can ignite and cause a fire or explosion.
- Do not charge the battery if it looks abnormal in any way (discolored or deformed). If the battery is in use or being recharged, it must be removed immediately from the camera or charger and must not be used again.
- Keep out of reach of children.
CHARGING INSTRUCTIONS FOR THE LIT-10 BATTERY PACK
- Recharge the battery pack ONLY with a 5 V wall charger and using the micro-USB cable included in the package.
- Turn the camera OFF and remove the battery pack, if applicable.
- Charge the battery at room temperature or near-room temperature: avoid charging it in extreme temperatures.
- Stop using the charger and/or the battery pack if the battery pack becomes abnormally hot.
- Quickly charge your battery pack before storing it (40-50%).
INSTALLING A MICROSD CARD
The memory card is sold separately. You must first purchase a class 10 microSD card between 2 GB and 32 GB of memory.Before inserting the microSD card in your camera, it must be formatted to ensure proper operations. Visit www.spypoint.com/en/support if you need help formatting your microSD card.
INSERTING A MICROSD CARD
- Make sure the camera is turned OFF.
- Find the microSD card slot. It is located on the left, above the battery compartment (see photo).
- Insert a microSD card (up to 32 GB) in the microSD card slot with the metal contacts facing down.
- The card is inserted correctly when a click is heard.
CLEAR THE ANTENNA
The camera comes with an antenna mount that holds and protects the antenna during shipping.You have to remove it. This will allow you to move and point your antenna in the desired direction. Save and reuse the mount to protect your antenna duringfuture trips.

ACTIVATE YOUR CAMERA
Before you can use your camera, you must activate itTo do so, you will need the activation code.
FINDING THE ACTIVATION CODEThe activation code is located inside the LINK-MICRO-S-LTE’s battery compartment.

To activate your camera, you have two choices: you can either do it via the SPYPOINT app or via our website www.spypoint.com.
 SPYPOINT APPIf you choose to use the SPYPOINT app to activate your device, follow these steps:
- On Google PlayTM or the App Store, search for “SPYPOINT app”.
- Download and install the app on your smartphone or tablet.
- Start the app. Select “ACTIVATE A DEVICE”. In the list, select “LINK-MICRO-S-LTE” then follow the steps to create an account.
- When complete, a confirmation email with instructions on how to finalize the creation of your account will be sent to you.
- Log in to the SPYPOINT app using your email address and password.
SPYPOINT.COM WEBSITEIf you choose to use our SPYPOINT website toactivate your device, follow these steps:
- On the www.spypoint.com, select “LOGIN” in the top navigation menu. On the displayed “SPYPOINT” page, select“REGISTER”, fill out the required fields, then log in.
- Select the + sign on the far right of the page; in the list, select “LINK-MICRO-S-LTE” then follow the steps.
- When complete, a confirmation email with instructions on how to finalize the creation of your account will be sent to you.
- On the SPYPOINT website, log in to your account using your email address and password.
CHOOSING A PHOTO TRANSMISSION PLAN FOR YOUR CAMERAGo to www.spypoint.com/en/spypoint-experience/plans to read the latest offers and choose the plan that suits you.
CONFIGURING YOUR CAMERA
Both the SPYPOINT app and website let you configure all the camera settings remotely. They also provide basic information on your camera – such as: cellular signal strength, battery level, and microSD card space used. This information is based upon the latest connection with your camera.New settings take effect every time the camera connects with app or website.Note that for 15 minutes after the camera is turned ON, it will communicate with the server every time it takes a photo and will also apply the settings you have chosen. Afterward, it will communicate according to the default settings (transfer frequency/ first transfer time) or those you chose to apply.Below are the most basic settings you will configure.
CONFIGURATION: MAIN SETTINGSDelay: This allows you to set the time interval between each detection before the camera records the next photo or video.Multi-shot: This allows you to set the number of photos per detection (up to 2) with a 5-second delay between each photo.Sensitivity: This allows you to set the detection sensitivity of the camera.Camera name: This allows you to name each owned camera.CELLULAR SETUPFirst transfer time: This allows you to choose the time when the camera makes its first transfer of the day.Transfer frequency: This allows you to choose the number of daily transfers.ADVANCED OPTIONS/CONFIGURATIONSchedule: This allows you to set the period of operation for each day of the week. For a 24-hour operation mode, both the start and stop times must be 12 AM.
NOTECamera transfers are set by default to 4-hour intervals determined from the time you activated your camera.For example, if your camera was activated at 1:42 p.m., the next transfer will take place at 5:42 p.m.
STARTING YOUR CAMERA
- Turn ON the camera.
- The green STATUS light will flash while searching for a signal (can take a few minutes).
- The STATUS light will light up in one of the following 3 colors:Red: Insufficient signalOrange: Acceptable signalGreen: Optimal signal
- When the top right light flashes red, 30 seconds remaining before the photo mode is turned ON. This allows you to leave the area without being photographed.
- The camera is ready for use when all the lights turn OFF.
- If the light is red during step 3, you should:• Turn your camera OFF and then back ON.• Retry while pointing the antenna at different angles.• Try moving it to a spot with a better signal.• Try our #CA 01 long range cellular antenna (sold separately), which could help improve signal strength.
INSTALLING YOUR CAMERA
- Mount the camera using the installation strap.
- The camera should be at the same height as the animal’s mid-body.
- The targeted animal should be at 25 feet (7.5 meters) away from the camera.
- To produce brighter photos at night, there should be items reflecting the camera’s flash in the background.
DISPOSAL
ONLY USE ORIGINAL SPARE PARTS AND ACCESSORIES.If, one day, your camera has been used so intensively that it has to be replaced, or if you no longer have any use for it, you are obliged to dispose of it at a recycling center.Information on return points for your electrical appliance can be obtained from your local waste disposal company or from your local administrative offices.Electrical appliances not only contain valuable recyclable raw materials but also substances that, if disposed of improperly, can affect public health and the environment. Help ensure that valuable raw materials are recycled by returning your old appliance to a central collection point.The WEEE (Waste Electrical and Electronic Equipment Directive) symbol represents the obligation for the labeled camera to be sent to a separate center for the proper recycling of electrical and electronic equipment.
![]()
FREQUENCY
FREQUENCY RANGE:800/850/900/1900/2100 MHzMAXIMUM TRANSMISSION POWER:
| FREQUENCY | MAX. |
| GSM850 | 33DBM±2DB |
| EGSM900 | 33DBM±2DB |
| DCS1800 | 30DBM±2DB |
| PCS1900 | 30DBM±2DB |
| GSM850 (8-PSK) | 27DBM±3DB |
| EGSM900 (8-PSK) | 27DBM±3DB |
| DCS1800 (8-PSK) | 26DBM±3DB |
| PCS1900 (8-PSK) | 26DBM±3DB |
| UMTS 2100 | 24DBM+1.7/-3.7DB |
| UMTS 1900 | 24DBM+1.7/-3.7DB |
| UMTS 900 | 24DBM+1.7/-3.7DB |
| UMTS 850 | 24DBM+1.7/-3.7DB |
| UMTS 800 | 24DBM+1.7/-3.7DB |
 THIS DEVICE COMPLIES WITH PART 15 OF THE FCC RULES.Operation is subject to the following two conditions:
- This device must not cause harmful interference.
- This device must accept any interference received, including interference that may cause undesired operation.
THANK YOU FOR CHOOSING
![]()
WARRANTY
Sit back and relax as this device is covered by the “Know you’re covered” 2-year warranty. We strive to provide our customers with a positive experience and outstanding service.For a complete list of specifications, features, and settings, visit our LINK-MICRO-S-LTE page at www.spypoint.comFAQ, User Manual & latest firmware available at www.spypoint.com/supportLive chat support at www.spypoint.comor email support at [email protected]
Join the community

References
[xyz-ips snippet=”download-snippet”]