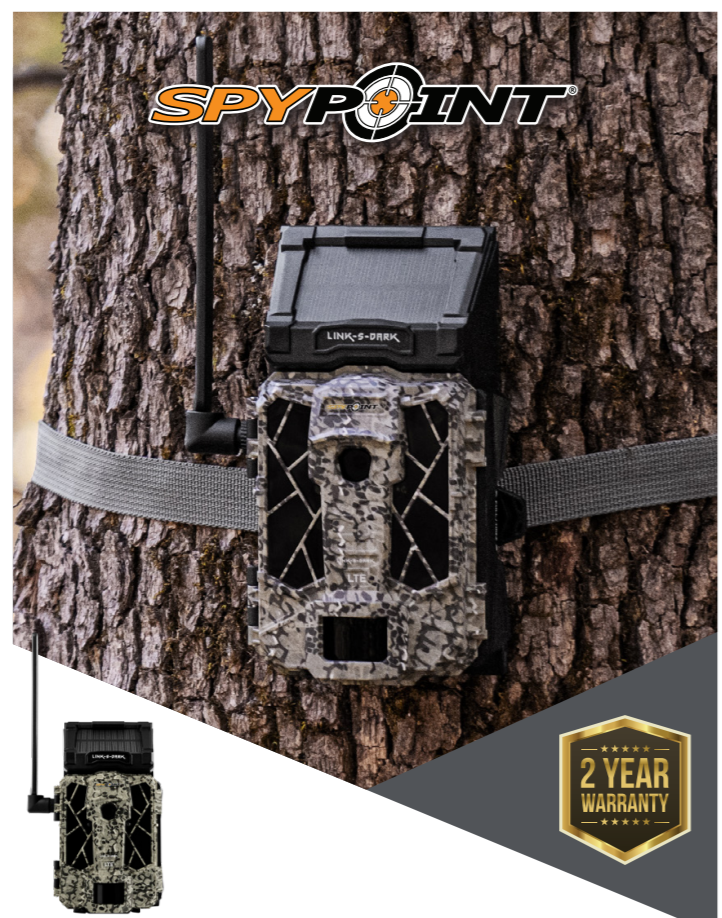
SPYPOINT LINK-S-DARK Solar Verizon 4G LTE IR Infrared Cellular Trail

IN THE BOX
- 1x Camera 1x Micro SIM card (preactivated and inserted in the camera)
- 1x 12V-USB cable
- 1x Mounting bracket
- 1x Installation strap
- 1x Quick Start Guide
NOTEThe SD card and the AA batteries are sold separately.User Manual, software updates & FAQs available at: www.spypoint.com/support.
COMPONENTS
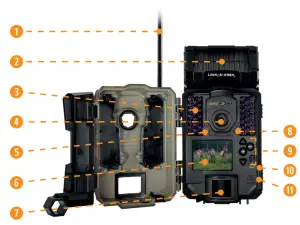

- Antenna
- Solar panel
- LEDs
- Photo lens
- Light sensor
- Viewing screen
- Detection lens
- Test light
- Navigation buttons
- ON/OFF switch
- SD card slot
- Slot for installation strap and stand
- Locking latch
- Cable lock hole
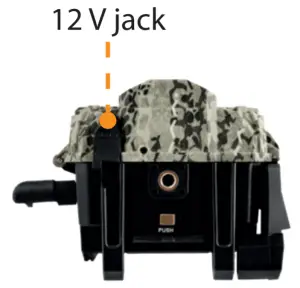
- 12 V jack
- Microphone
- Screw-thread for standard ¼”-20
- Battery compartment opening button and SIM card slot (inside)
PREPARATION
RECHARGING THE INTERNAL LITHIUM BATTERY

- Turn the camera OFF.
- Turn the solar panel downwards sothat it does not interfere with the charging process via the 12V-USB cable.
- Plug the 12V-USB cable (included) into the 12 V jack on the bottom of the unit, then connect the other end to a 5 V wall outlet charger (not included).
- Charge the camera for 24 to 48 hours before use.
NOTE
- Once the camera is plugged in, its screen will light up and the battery charge level will be displayed for 10 seconds.
- You can press the OK button at any time during the charging process to display the battery charge level.
MANAGE DIFFERENT CAMERA POWER SOURCES
1. The main power source of your camera is the internal lithium battery.
- The solar panel’s function is to recharge the internal battery.
- The camera will be energetically self-sufficient under ENGLISH ideal conditions (a low energy configuration and a sunny environment).
- Make sure there are not objects obstructing the reception of light or covering the solar panel.
- When the charge level of the internal battery is low, you will receive a notification in your application.
- If the internal battery charge level becomes insufficient, the camera will shut down or switch to an auxiliary power source, if you provided one.
- If the camera shuts down, the solar panel will recharge the internal battery and the camera will restart by itself once it is sufficiently charged, and it will retain the settings you previously selected.
2. Additional power sources can be used:
- 12 V external battery (#KIT-12V, sold separately): As soon as it is plugged in, this battery will become the main power source. The internal battery will only be used once the 12 V battery is drained. To connect it to the camera, plug the 12 V cable into the 12 V socket on the camera and connect the other end of the cable to the 12 V battery.
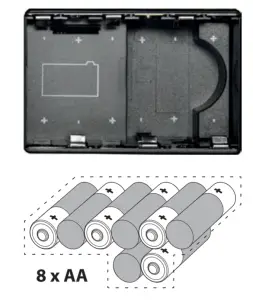
- 8 AA batteries:Using alkaline or lithium batteries is strongly recommended. Do not mix the 2 battery types (lithium and alkaline), install new batteries and respect their polarity (+) and (-).
- Rechargeable AA batteries are not recommended as their voltage is inferior and may cause operational issues.

- Lithium Battery Pack:The camera can be powered by a rechargeable lithium battery pack LIT-09 (sold separately). You can insert it in the battery compartment. This kind of battery is less affected by the cold and offers up to 2 times the performance of alkaline batteries.

NOTE
You can verify the battery charge level in 2 ways:
- By referring to the icon in the lower right corner of your camera’s home screen. This icon indicates, alternately, the charge level of the camera’s different power sources.
- By having a look at your SPYPOINT application in the “Status” section.For accurate playback, it is important that you select the correct battery type in the application settings.
INSTALLING AN SD CARD
| The SD card is sold separately. You must therefore first get a class 10 SD card between 2 and 32 GB of memory. |
The SD card is sold separately. You must therefore first get a class 10 SD card between 2 and 32 GB of memory.Before inserting the SD card in your camera, it must be formatted to ensure proper operation. Visit the www.spypoint.com/support if you need help formatting your SD card.
INSERTING AN SD CARD
- Make sure the camera is turned OFF.
- Locate the SD card slot. It is located on the lower right side (see diagram).
- Insert an SD card (up to 32 GB) into the SD card slot with the metal contacts facing the back.
- The card is correctly inserted when you hear a click.
ACTIVATING YOUR CAMERA
 |
Before you can use your camera, you must activate it. To do so, you will need the activation code. |
WHERE IS THE ACTIVATION CODE LOCATED
The activation code can be found inside the battery compartment of your LINK-S-DARK.
Activation code To activate your camera, you have two choices: you can do it via the SPYPOINT application or via our website www.spypoint.com.
SPYPOINT APPLICATION
If you choose to use the SPYPOINT app to activate your camera, follow these steps:
- On Google PlayTM or the App Store™, search for “SPYPOINT”.
- Download and install the app on your smartphone or tablet.
- Open the app. Select “ACTIVATE A DEVICE”. In the list,select “LINK-S-DARK”, then follow the steps.
- Once completed, a confirmation email with instructions on how to finalize the creation of your account will be sent to you.
- Log in to the SPYPOINT app using your email and password.
 SPYPOINT.COM WEBSITEIf you choose to use the SPYPOINT website to activate your camera, follow these steps:
- On the SPYPOINT website, select “LOGIN” in the top navigation menu. On the displayed page, select “REGISTER”, fill out the required fields, then log in.
- Select the + sign on the far right corner of the page; in the list, select “LINK-S-DARK”, then follow the steps.
- Once completed, a confirmation email with instructions on how to finalize the creation of your account will be sent to you.
- On the SPYPOINT website, log in to your account using your email and password.
CHOOSING A PHOTO TRANSMISSION PLAN FOR YOUR CAMERA
Go to www.spypoint.com/en/spypoint-experience/plans to read the latest offers and choose the plan that suits you.
STARTING UP THE DEVICE
You can configure your camera settings in 3 ways:
- Directly from the camera screen. After turning it on, choose “configuration” from the main menu.
- Through the SPYPOINT application, in the “Settings” section.
- By the SPYPOINT web app. You will first need to create an account and then log in. Use the “Settings” section.
Both the SPYPOINT app and website allow you to remotely configure all of your camera’s parameters and to obtain the status of its main elements, including cellular signal strength, battery power level and space used on the SD card.
Your new settings will be applied the next time your camera communicates with the serve via the cellular network.
Note that during the 15 minutes after starting up your camera, it will communicate with the server each time it takes a photo and it will also apply the settings you previously chose. Afterwards, the camera will communicate according to the default settings (transfer frequency/first transfer time) or those you chose. You will find below the basic settings you can configure.
The default language of your camera menu is English. To change the language, from the camera’s home screen, use the navigation buttons and choose SETTINGS, GENERAL, LANGUAGE. Choose one of the 3 languages available: English, Deutsch (German), or Français (French). Press OK to confirm your choice.
CONFIGURATION: MAIN SETTINGS
PHOTO MODEDelay: Allows you to choose the time interval before the camera detects again and can save the next photo.Multi-shot: Allows you to set the number of photos per detection (up to 6) with a 5 seconds delay between each photo detection.
TIME LAPSE MODEInterval: Allows you to take pictures at predefined regular intervals, without motion detection.
VIDEO MODEDelay: Allows you to choose the time interval before the camera detects again and can record the next video.Photo first: When this option is enabled, a photo is immediately taken before each video and transmitted to your application.Video length: Allows you to configure the recording time of video sequences.
TRANSFER SETTINGS
First transfer time: Allows you to choose the time at which the camera will perform its first transfer of the day. Transfer frequency: Allows you to choose the number of transfers performed each day.
NOTECamera transfers are set by default to four-hour intervals, determined from the time you activated your camera. For example, if your camera was activated at 1:42 p.m., the next transfer will take place at 5:42 p.m.
CONFIGURATION OF ADVANCED OPTIONS
Night mode: Allows you to set the best option for night photos.
Operating period: Allows you to program the camera’s operating period for each day of the week. For continuous operation, both the start and stop times should be 12:00.
STARTING YOUR CAMERA
- Turn the camera ON.
- The screen will light up and display “Network Search”. This search may take a few minutes.
- Once the cellular network has been found, the signal strength will appear as bars at the top of the screen.
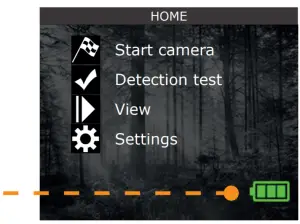
- From your screen, using the navigation buttons, select “Start Camera”, then choose the desired operating mode (PHOTO, TIME-LAPSE, OR VIDEO) and press OK.
- Once the mode is selected, the test light on the front of the camera will blink red for 30 seconds to allow you to leave the area without being photographed or filmed.
- The camera is now ready to take pictures or videos and to transmit them to your application the next time you transfer them.Note that the signal bars may not be identical to those on your other cellular devices, as there is no industry standard nor practical way to label the dBm values at a specific number of bars.
NOTEIf the camera can’t find a cellular network, we suggest that you:
- Turn your camera OFF and ON again.
- Try again while pointing your antenna in different directions.
- Move your camera to a place where the signal is better.
- Try our long range cellular antenna (#CA-01, sold separately), which could improve signal reception.
INSTALLING THE CAMERA
- Install the camera using the installation strap, with or without the mounting bracket.
- The camera should be installed at the same height as the center of the body of the animal you are monitoring.
- The targeted animal should be 25 feet/7.5 m away from the camera.
- To get brighter pictures at night , make sure there are elements in the background to reflect the camera’s IR flash.
DISPOSAL
USE ONLY ORIGINAL SPARE PARTS AND ACCESSORIES
If, one day, your camera has been used so intensively that it has to be replaced, or if you no longer have any use for it, you are obliged to dispose of it at a recycling center.
Information on return points for your electrical appliance can be obtained from your local waste disposal company or from your local administrative offices.
Electrical appliances not only contain valuable recyclable raw materials, but also substances which, if disposed of improperly, can affect public health and the environment. Help ensure that valuable raw materials are recycled by returning your old appliance to a central collection point.
The WEEE (Waste Electrical and Electronic Equipment Directive) symbol represents the obligation of the labeled camera to be sent to a separate center for the proper recycling of electrical and electronic equipment.
FREQUENCY
FREQUENCY RANGE:800/850/900/1900/2100 MHz
MAXIMUM TRANSMISSION POWER:
| FREQUENCY | MAX |
| GSM850 | 33 DBM ± 2 DB |
| EGSM900 | 33 DBM ± 2 DB |
| DCS1800 | 30 DBM ± 2 DB |
| PCS1900 | 30 DBM ± 2 DB |
| GSM850 (8-PSK) | 27 DBM ± 3 DB |
| EGSM900 (8-PSK) | 27 DBM ± 3 DB |
| DCS1800 (8-PSK) | 26 DBM ± 3DB |
| PCS1900 (8-PSK) | 26 DBM ± 3DB |
| UMTS 2100 | 24 DBM + 1.7/-3.7 DB |
| UMTS 1900 | 24 DBM + 1.7/-3.7 DB |
| UMTS 900 | 24 DBM + 1.7/-3.7 DB |
| UMTS 850 | 24 DBM + 1.7/-3.7 DB |
| UMTS 800 | 24 DBM + 1.7/-3.7 DB |
 THIS DEVICE COMPLIES WITH PART 15 OF THE FCC RULES.Operation is subject to the following two conditions:
- This device must not cause harmful interference.
- This device must accept any interference received, including interference that may cause undesired operation.
WARRANTY
Have peace of mind, because this camera is covered by our 2-year “You are covered” warranty. We strive to provide all our customers with a positive experience and outstanding service.
For a complete list of specifications, features, and settings, visit our LINK-S-DARK page at www.spypoint.com.
FAQ, User Manual & latest firmware available at www.spypoint.com/support
Live chat support at www.spypoint.com
Join the community
References
[xyz-ips snippet=”download-snippet”]