PRODUCT GUIDE
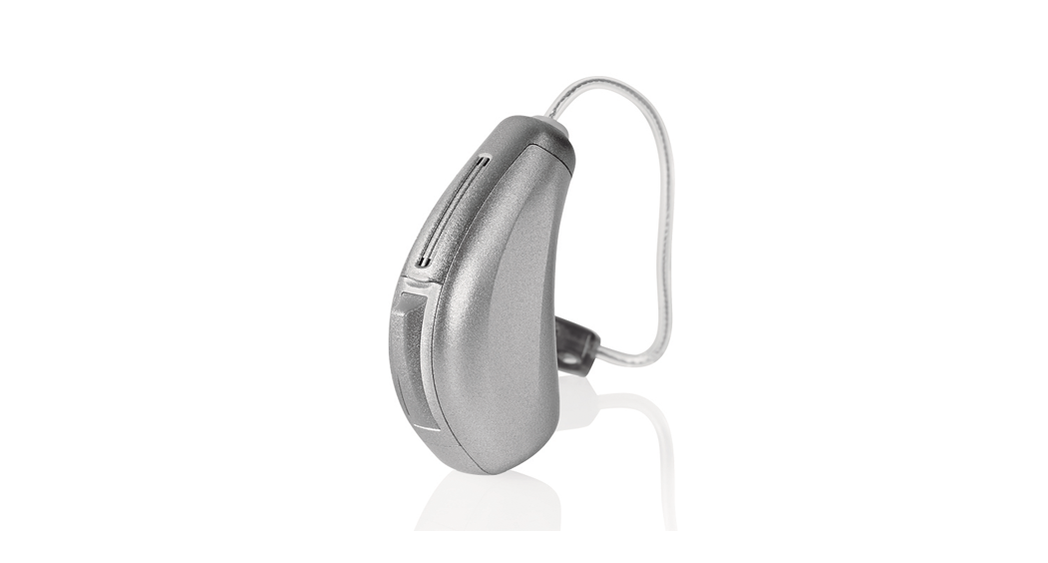
Receiver-In-CanalRechargeable (RIC R) With Earbud
Your new hearing aids offer Starkey’s most advanced technology with supreme sound quality and features. They are customizable to fit your unique hearing needs, helping you to stay connected to the people and things you love most.
Hearing Aid Parts
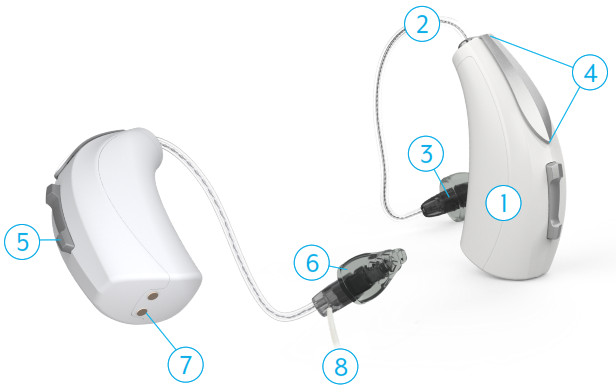
| 1. Hearing Aid | 5. Rocker Switch User Control |
| 2. Cable | 6. Comfort Bud Earbud |
| 3. Receiver | 7. Charging Contacts |
| 4. Microphone | 8. Retention Lock |
Insertion and Removal
To insert the hearing aid:
- Gently wrap the hearing aid over your ear until it rests securely behind your ear.
- Insert the earbud into your ear canal.
- Place the lock into the bowl of your ear.
- The earbud should not be visible and the cable should be snug against the head.

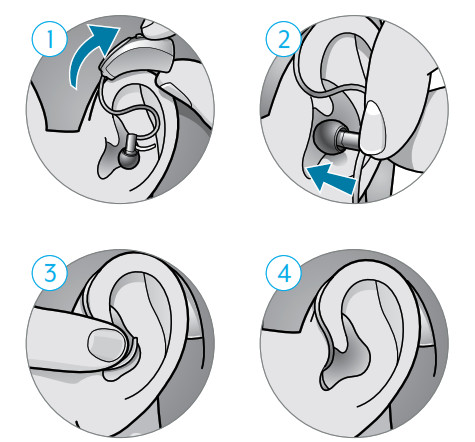
To remove the hearing aid:
- Gently grasp the cable at the opening of the ear canal with your thumb and forefinger.
- Gently pull the earbud out of your ear canal.
- Remove the hearing aid from behind your ear.
Charging Your Hearing Aids
Your hearing aid uses a rechargeable battery as its power source. To charge the battery:
- Plug your charger into an outlet.
- Place your hearing aids in the charging ports with the earbuds resting inside the case.
- Your hearing aids will turn off automatically and begin to charge.
- The front of the charger is equipped with two LED indicators to provide information about hearing aid charging. The front LED indicators will glow green to indicate successful charging.
- When the hearing aids are fully charged (approx 3.5 hrs charge time), the front LED indicators will be solid green.
- Your hearing aids will automatically power on when removed from the charger.
Battery Indicator
You will hear an indicator through your hearing aid when battery voltage is low and the battery needs charging.
Hearing Aid Charger Parts
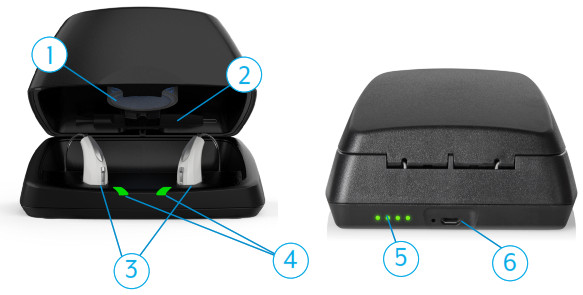
| 1. Desiccant Puck Holder | 4. Hearing Aid Charging LEDs |
| 2. Cleaning Brush | 5. On-board Battery LEDs |
| 3. Charging Ports | 6. Power Cord Port |
Desiccant PuckThe desiccant puck will be effective for 36 months depending on moisture in the hearing aids and humidity. The color will fade from blue to white, indicating a need for replacement.
On-board Battery
- The back of the charger is equipped with four LED indicators to provide information about the status of the on-board battery. The onboard battery allows charging of the hearing aids up to three times while the charger is away from a power source.
- When away from a power source, the back LED indicators will be solid green indicating the amount of charge available for the on-board battery. The LED indicators will turn off after 10 seconds to preserve power.
- One blinking LED on the back of the charger indicates that the on-board battery is low and the charger should be connected to a power source.
- When plugged into a power source, the back LED indicators will glow green to indicate successful on-board battery charging.
Hearing Aid Care
Cleaning Your Hearing Aids
- Use the cleaning brush or soft cloth to clean debris from around the user control, microphone, charging contacts, receiver and earbud.
- Replace the earbud if it becomes misshapen or no longer fits comfortably in your ear.
- Never use water, solvents, cleaning fluids or oil to clean your hearing aid.
Cleaning Your Charger
- Use the provided cleaning brush to keep the charging ports clear of debris.
- Do not use water, solvents or cleaning fluids to clean the charging ports.
- Keep lid closed as much as possible to avoid dust and debris build up.
- Store your charger in a clean and dry location, such as a dresser or shelf rather than the bathroom or kitchen.
To ensure the longest life of your rechargeable hearing aid batteries and the batteries in the charger:
- Fully charge hearing aid batteries every night.
- Do not expose to excess heat such as a window sill or in a hot car.
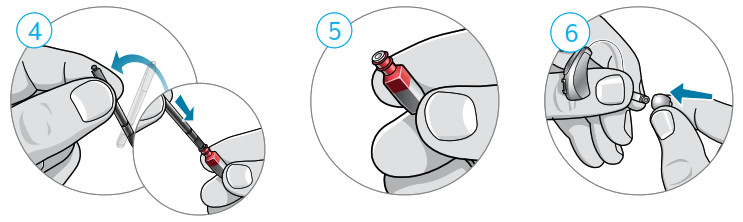
Changing Hear Clear Wax Guards
- Hold onto the cable where it enters the receiver. With the other hand, pull firmly on the earbud until it separates from the receiver.
- Insert the empty end of the application stick straight into the used wax guard in the receiver.
- Pull the stick straight out to remove the used wax guard (do not twist).
- Use the opposite end of the stick to firmly insert the clean wax guard straight into the receiver.
- Pull the stick straight out (do not twist) and discard the stick.
- To attach the earbud, place the end of the receiver into the cylinder-shaped opening in the middle of the earbud. Push firmly to ensure the earbud is secure. The earbud should be pushed on far enough so that the threaded portion of the receiver is inside of the earbud.
How-to Video For more help, visit Starkey.com/Support
The Starkey logo and Starkey are registered trademarks of Starkey Laboratories, Inc.©2021 Starkey. All Rights Reserved. 3/21 FLYR3841-00-EE-GS
References
[xyz-ips snippet=”download-snippet”]