![]()
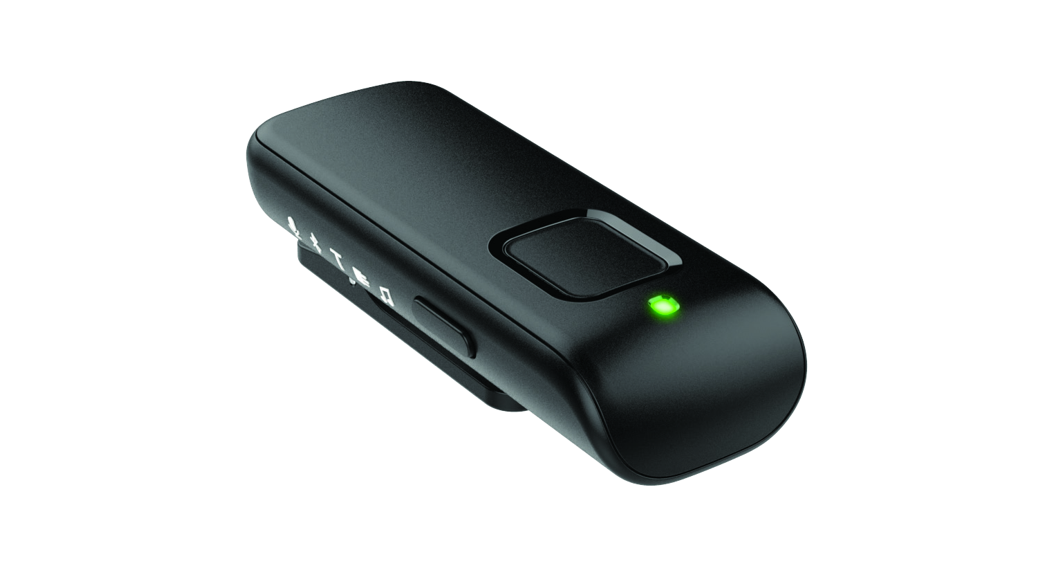
Remote Microphone +OPERATIONS MANUAL
Overview
The Remote Microphone + is designed to stream audio from different audio sources directly to your 2.4 GHz wireless hearing aids.When worn by a distant speaker in noisy environments, the Remote Mic + functions as an assistive listening device. The Remote Mic + can alsointerface with the following audio sources:
- Bluetooth A2DP profile (for example, music)
- Bluetooth Handsfree profile (phone calls)
- Loop systems
- FM systems
- Line-in audioStreaming – Audio or sound transmitted wirelessly from the Remote Mic + directly to your hearing aids.
Package Contents
- Remote Mic +
- Power Adapter
- USB-to-micro USB cable
- Operations Manual
Optional Accessories
- European FM receiver
- Line-In Cable (part #91259-000)
- Lanyard (part #91324-000)
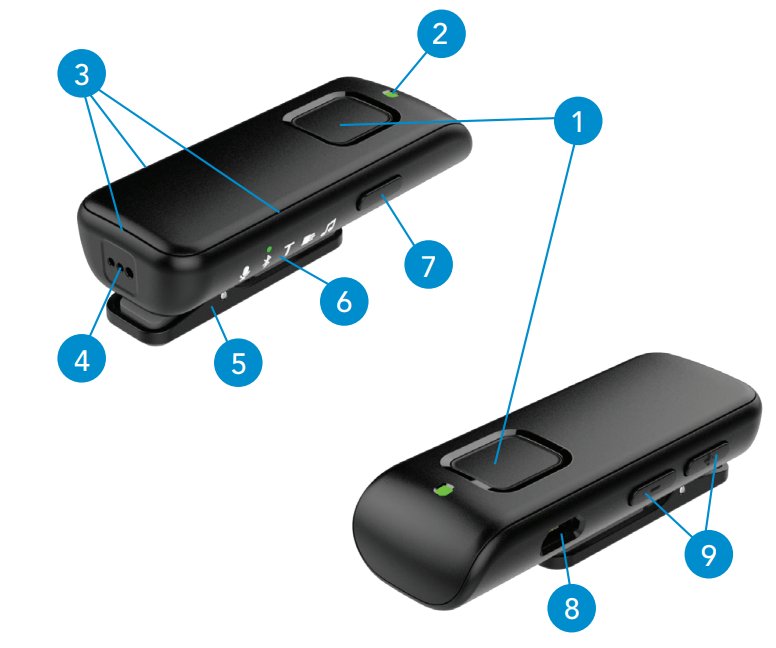
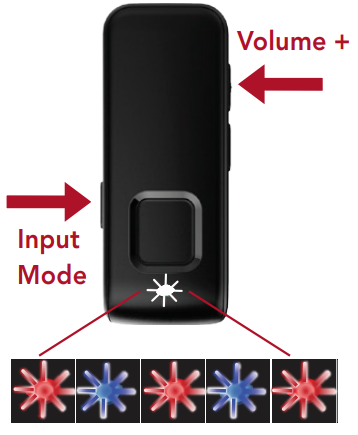
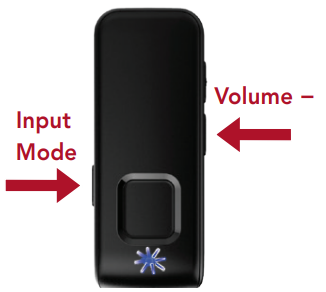
| 1. Multi-Function Button | 6. Input Mode LEDs |
| 2. Status Indicator LED | 7. Input Mode Button |
| 3. Microphones | 8. MicroUSB Jack |
| 4. FM Receiver Jack | 9. Volume Buttons |
| 5. Clip |
- Multi-Function Button• Controls operational state of the Remote Microphone +
- Status Indicator LED• Identifies the operational state of the Remote Mic +
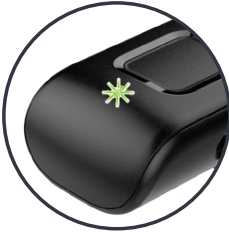
LED OPERATIONAL STATE Off Power is off Slow PulsingGreen Power is on, but no active Bluetooth connection
Slow PulsingBlue Power is on plus an active Bluetooth connection
Slow Pulsing Red
Low battery condition Solid Red Possible fault condition - Microphones• Picks up speaker’s voice during remote mic use• Picks up your voice during Bluetooth phone calls
- FM Receiver Jack•Accepts European FM Receivers
- Clip• Affixes Remote Mic + to clothing or lanyard
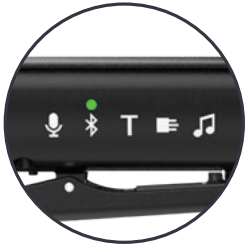
- Input Mode LEDs• Identifies the audio source
ICON AUDIO SOURCE 
Remote Microphone (refer to page 14)
Bluetooth Phone and Audio (refer to page 15) Loop (refer to page 17) FM System (refer to page 17) Line-In (refer to page 17) - Input Mode Button• Changes audio source
- MicroUSB Jack•Recharges via USB-to-micro USB cable• Plays line-in audio via optional cable
- Volume Buttons• Adjusts stream volume

Tip: Stream Volume can also be adjusted via the Thrive Hearing Control app, 2.4 GHz Remote, and/or hearing aid user controls. Review your hearing aid operation manual or contact your hearing professional for details on your particular system setup.
Basic Use
| 1. To turn on the Remote Microphone +, press themulti-function button for 3 seconds and release whenthe green LED appears. |
|
| 2. Ensure your hearing aids are powered on.• Note: Prior to streaming audio for the first time, your hearing aids will need to be paired to the Remote Mic +. Refer to Pairing with Hearing Aids on page 11. | |
| 3. To start audio streaming,• Open Thrive Hearing Control app and select Start Streaming from the Accessories screen.• Refer to Start/Stop Audio Streaming on page 18 for additional options. | |
| 4. To change the audio source, press and release the input mode button. Repeat until you reach the desired input mode. | 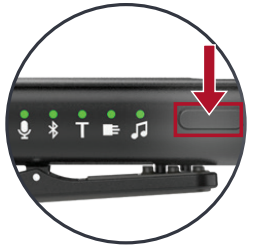 |
| 5. To access audio from a Bluetooth device, itmust be connected to the Remote Mic + (denotedby a slow pulsing blue status indicator LED).• Note: Prior to streaming Bluetooth audio for the first time, pair your Bluetooth device with the Remote Mic +. Refer to Pairing with Bluetooth Devices on page 13. | 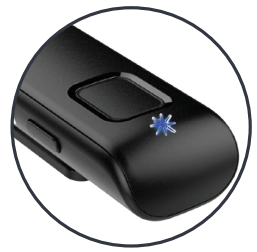
|
| 6. To adjust the stream volume,press the + or – button. | 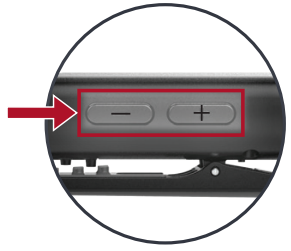 |
| 7. To stop streaming, do one of the following:• Turn off the Remote Mic +.• Open Thrive Hearing Control app and select Stop Streaming from the Accessories screen.• Refer to Start/Stop Audio Streaming on page 18 for additional options. |
Daily Use
| Power OnPress the multi-function button for 3 seconds and release when the LED illuminates. | 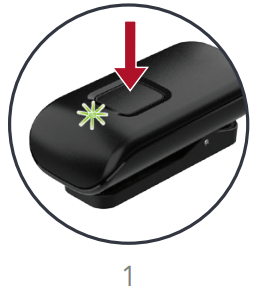 |
| Power OffPress the multi-function button for 2 seconds and release when the LED turns off. | 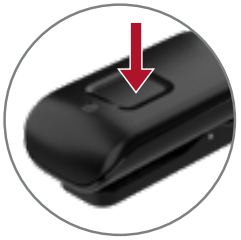 |
| Battery LowLED slowly pulses red. Provides an audible indicator tone to hearing aids every 5 minutes. | 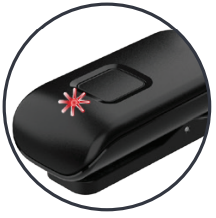 |
| Battery RechargeAttach the micro USB end of the charging cable to the micro USB jack on the Remote Microphone +.Attach the USB end of the charging cable to a female USB jack on the enclosed power adapter. | 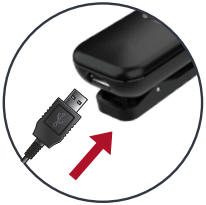
|
Recharging Status
| Power | Charge State | LED |
| Off | Recharging | Solid Green |
| Off | Complete | Off |
| On | Recharge | Solid green briefly interruptedby other LED status behaviors |
| On | Complete | Off |
Tip: Recharging the Remote Mic + can take longer while streaming audio. Recharging will be faster when the Remote Mic + is off.
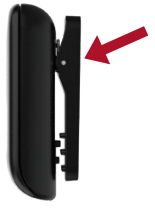
Wearing the Remote Mic +The Remote Microphone + can be affixed to clothing or worn on a lanyard. When your audio source is the Remote Mic or a Bluetooth device in phone mode, the Remote Mic + should be within 8 inches (20cm) of the speaker’s mouth.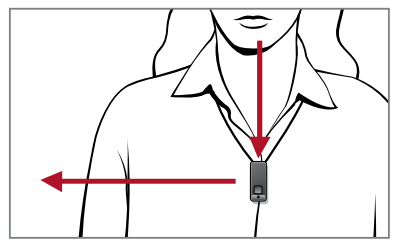 Clip – Press the clip as shown. Slide clip opening onto clothing and release clip. Ensure the Remote Mic + is securely affixed to the clothing.
Lanyard (optional) –

- Press the clip as shown.
- Insert lanyard loop into clip opening and lift loop toward the top of the clip. Release clip. Ensure the lanyard is securely attached to the Remote Mic +.
- Place lanyard around the neck.
Pairing with Hearing Aids
For the Remote Microphone + to interact with your hearing aid(s), you must first pair the Remote Mic + with each hearing aid. You only need to perform this action one time, as they should automatically recognize each other when both are powered on and within wireless operating range.*
To pair the Remote Mic + with your hearing aid(s):
- Ensure your hearing aids are not connected to nearby Bluetooth devices. To do this,• Disable Bluetooth on your mobile phone.• Power off any nearby 2.4 GHz TV or Remote Mic + accessories, which you previously paired to your hearing aids.
- Power off, then power on your hearing aids.• Note: For a CROS hearing aid system, power off both your hearing aid and CROS transmitter. Power on only your hearing aid, ensuring the CROS transmitter remains powered off.
- Place your hearing aids within 6 inches (15 cm) of the Remote Mic +.*Typical operating range is up to 10 meters (~30 feet). Operational range may be reduced by environmental factors, such as obstructions, interference, and human body positioning. Larger operational distances are achievable, though audio quality and connectivity may decrease.
- Press the Input Mode and Volume Up (+) buttons simultaneously for 7 seconds until the LED status indicator alternately blinks blue and red.
- For a set of hearing aids:
First LEDblink SecondLED blink Pairing Result Next Step Both hearing aidspaired Complete Only one hearingaid paired Repeat steps1 — 5 n/a No hearing aidspaired Repeat steps1 — 5 - For a single hearing aid:

| LED blink | Pairing Result | Next Step |
| Successful | Complete | |
 |
Unsuccessful | Repeat steps1 — 4 and 6 |
Pairing with Bluetooth Devices
For the Remote Microphone + to wirelessly receive audio from your Bluetooth device, you must first pair them:
- Ensure the Remote Mic + is powered on and not Bluetooth-connected to other devices (the green LED will be slowly pulsing).
- Press the Input Mode and Volume Down (-) buttons simultaneously for 7 seconds until the LED status indicator rapidly blinks blue.
- Put your Bluetooth device into pairing mode. When Remote Mic + appears, select it.• Note: Review your Bluetooth device operations guide for more details.
- The Remote Mic + LED provides the pairing status:• Successful – green LED for 2 seconds• Unsuccessful – red LED for 2 seconds
View Current Audio SourceIf Input Mode LED is off, press the button to temporarily illuminate the LED.
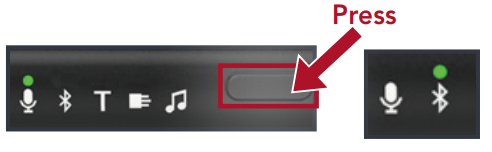
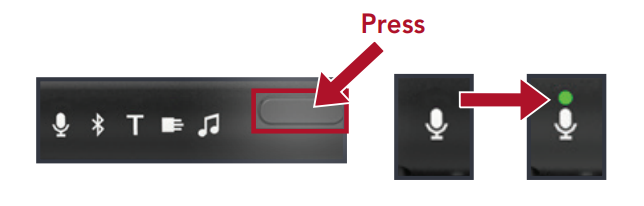 Change to Different Audio SourceWhile Input Mode LED is illuminated, press the button to move to the next available audio source.
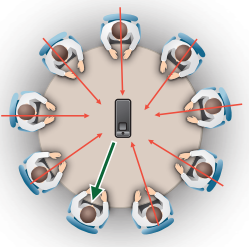
![]() Remote MicrophoneThe Remote Microphone + automatically optimizes the microphone settings based on its physical orientation.
Remote MicrophoneThe Remote Microphone + automatically optimizes the microphone settings based on its physical orientation.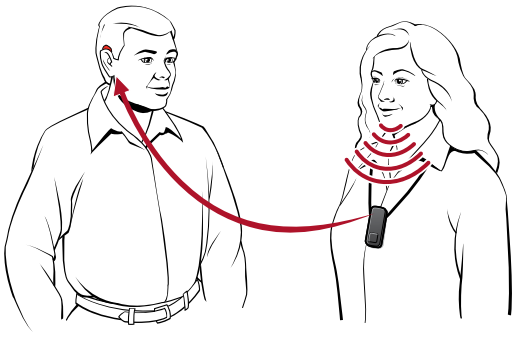
Focus on one person when background noise is presentWhen worn by a speaker, the RemoteMic + automatically prioritizes sound from above while reducing sound levels from other directions.Listen to multiple nearby speakers in quiet environmentsWhen placed horizontally on its clip,it receives sound from all directions.
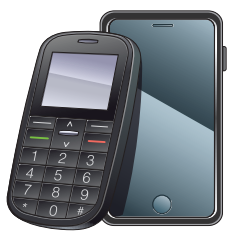
![]() Bluetooth Phone and AudioConduct Phone Calls (Handsfree Profile) (A) You hear the phone call in your hearing aids. (B) The Remote Microphone + picks up your voice and transmits it back to the mobile phone.
Bluetooth Phone and AudioConduct Phone Calls (Handsfree Profile) (A) You hear the phone call in your hearing aids. (B) The Remote Microphone + picks up your voice and transmits it back to the mobile phone.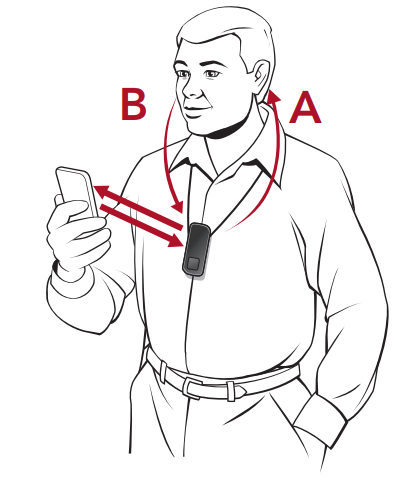 Listen to Music (A2DP Profile) You hear the streamed audio in your hearing aids.
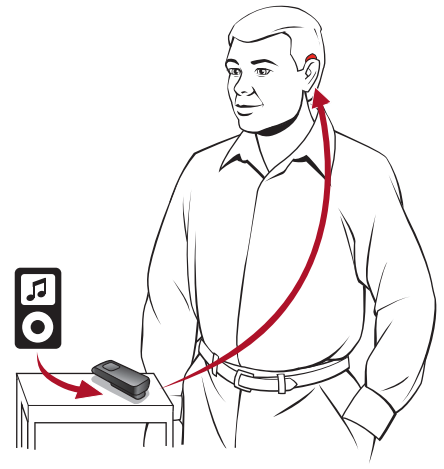
General Bluetooth Functionality
| Pair with Bluetooth devices | Remote Mic + can pair with up to 8 Bluetooth devices. |
| Connect with Bluetooth Device | When both are powered on and within the wireless operating range, the RemoteMic + and paired Bluetooth device should automatically connect and the LED status indicator slowly pulses blue. The RemoteMic + can connect with up to 2 Bluetooth devices at a time. |
| Listening to Music (or Other Streamed Audio) | Ensure your input mode is Bluetooth on the Remote Mic +. Play audio on your Bluetooth device and it will be automatically routed to your hearing aids. |
Phone Call Features
| Change to Bluetooth Audio SourceChange to Bluetooth Audio Source |
When the Remote Microphone + detects an incoming or outgoing phone call, it automatically changes to the Bluetooth audio source. |
|
| Accept Incoming Call | When you hear the ringtone in your hearing aids, briefly press the multi-function button. | 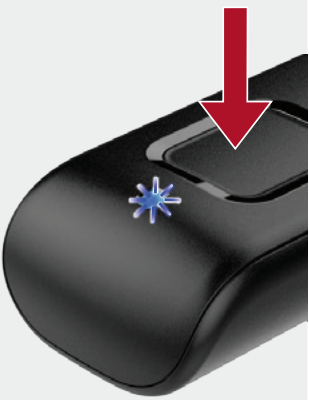 |
| Reject Incoming Call | When you hear the ringtone in your earing aids, press the multi-function button for more than 2 seconds. Release the button after the ringtone stops. | |
| End Call | During the active phone call, briefly press the multifunction button. | |
| Transfer Call between mobile phone and Remote Mic + | During an active phone call, press the multi-function button for more than 2seconds. This lets you directly conduct the call on the phone itself. Re-press the button for more than 2 seconds to move the call back to the Remote Mic +. | |
| Make an Outgoing Call | Dial the phone number on your Bluetooth device. The phone call will be automatically routed to your hearing aids. |
Loop System/FM System/Line-In
TLoop SystemThe Remote Microphone + can receive audio from a Loop system (available in some public buildings). Wearing the Remote Mic + in a vertical orientation provides the best performance. In this mode, the Remote Mic + disables Bluetooth connections.Upon exiting this mode, the Remote Mic + will attempt to re-establish a Bluetooth connection. Manual reconnection may be necessary. Review your Bluetooth device operations guide for more details.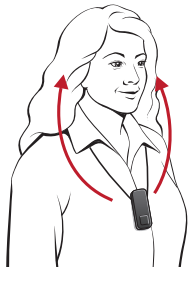
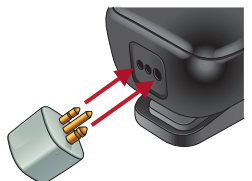
![]() FM SystemWhen an optional FM transmitter is attached via the European connector, the Remote Microphone + can receive audio from an FM system.In this mode, the user can wear the Remote Mic + or place the Remote Mic + on a nearby stable surface.
FM SystemWhen an optional FM transmitter is attached via the European connector, the Remote Microphone + can receive audio from an FM system.In this mode, the user can wear the Remote Mic + or place the Remote Mic + on a nearby stable surface.
![]() Line-InWhen an optional Line-In cable is attached via the micro USB jack, the Remote Microphone + can obtain the audio from a non-Bluetooth-enabled mobile phone, MP3 player, tablet, or computer. In this mode, the user typically places the Remote Mic + on a nearby stable surface.
Line-InWhen an optional Line-In cable is attached via the micro USB jack, the Remote Microphone + can obtain the audio from a non-Bluetooth-enabled mobile phone, MP3 player, tablet, or computer. In this mode, the user typically places the Remote Mic + on a nearby stable surface.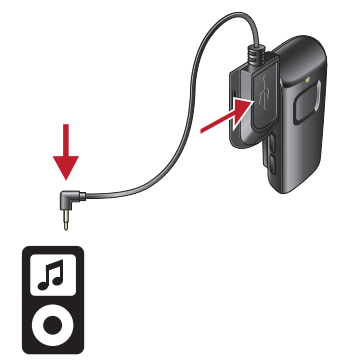
Start/Stop Audio Streaming
Audio streaming from the Remote Microphone + may be started (or stopped) in a variety of ways:
- Turn On the Remote Mic +: Audio streaming automatically starts in the hearing aid.
- Thrive Hearing Control app: Open the App on your mobile phone or tablet. Select the option to start/stop streaming from the Accessories screen.
- 2.4 GHz Remote: If preconfigured by your hearing professional, press the Favorite button.Hearing aid user control: If preconfigured byyour hearing professional, a specific gesture (e.g. a Long Press on a user control) can start/ stop streaming.
 Hearing aid user control: If preconfigured byyour hearing professional, a specific gesture (e.g. a Long Press on a user control) can start/ stop streaming.
Audio streaming will also stop when:
- An incoming audio signal is not detected while in the Bluetooth input mode.
- The Remote Mic + is turned off.An audible indicator may play in your hearing aids to signal the start/stop of audio streaming.
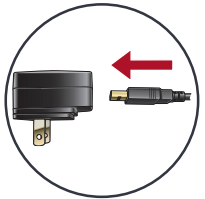
Assembling the Power AdapterThe Remote Microphone + may include a variety of plug configurations for use in different countries. If the power adapter requires assembly:
| 1. Select the appropriate plug configuration used in your country. | 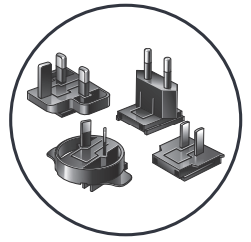 |
| 2. Slide the plug onto the power adapter until it snaps into place. |  |
| 3. To remove the plug, press the tab and slide the plug away from the cable. |  |
Troubleshooting
| SYMPTOM | POSSIBLE CAUSES | SOLUTIONS |
| One (or both) hearing aids unexpectedly drops out of audio streaming. | Hearing aids may be on the edge of wireless range. | Move closer to Remote Mic +. |
| The battery level in the hearing aid can no longer support audio streaming. | • Replace the hearing aid battery with a new one.• Recharge your hearing aid, if applicable. | |
| A large object, such as furniture or a wall, maybe a degrading the signal. | For best performance, your hearing aids should be within line-of-sight of Remote Mic +. | |
| Wireless connection with Remote Mic + was lost. | To restart the audio stream, follow the steps in the Start/Stop Audio Streaming section. | |
| Streamed audio quality is distorted. | Low battery level in Remote Mic +. | Recharge Remote Mic +. |
| The volume of the audio source is not optimal. | Adjust the volume level of the audio source until better sound quality is achieved. | |
| The streaming audio quality is inconsistent. | Bluetooth Mode:|Bluetooth device may be on the edge of wireless range. | Move Bluetooth device closer to Remote Mic +. |
| Loop Mode:Remote Mic + may not be positioned for optimal streaming. | Re-orient Remote Mic + into a vertical position. |
| Audio stream is too loud or too soft. | Volume streamed from Remote Mic + to hearing aid not optimal. | Press volume + or – button on Remote Mic +. |
| The volume of the audio sources is not optimal. | Adjust volume level of audio source until better sound quality is achieved. | |
| Remote Mic Mode: Difficult to hear speaker in noisy environments | Remote Mic + may be too far from the speaker. | Move Remote Mic + closer to the speaker’s mouth. |
| Remote Mic + may be covered by clothing or poorly positioned. | Provide clear access from Remote Mic + to the speaker’s voice. | |
| Bluetooth Mode: Caller cannot hear your voice during phone calls. | Remote Mic + may be too far from your mouth. | Move Remote Mic + closer to your mouth or speak louder. |
| Loop Mode: Phone calls are not heard in hearing aids. | Bluetooth connections with mobile phones are disabled while in Loop mode. | Move to another audio source. Reestablish your Bluetooth connection, if necessary. |
| LED is slowly pulsing green or blue, but no streamed sounds are heard in the hearing aids. | Hearing aids are not ready to receive audio streams. | To start the audio stream, follow steps in the Start/ Stop Audio Streaming section. |
| LED is slowly pulsing green or blue, but no streamed sounds are heard in the hearing aids. | Hearing aids are not paired with Remote Mic +. | Follow steps in Pairing with Hearing Aids section. |
| No incoming audio signal is available. | • Turn on the electronic audio source.• Unmute or increase volume on electronic audio sources.• Ensure loop or FM systems present. | |
| LED is solid red. | Possible error condition. | Turn off Remote Mic +, wait 30 seconds, and then turn it on. |
| Input Mode LED is rapidly blinking. | Something is absent from the current audio source. | Attach line-in cable, attach FM receiver, or reestablish your Bluetooth connection. |
| Input Mode LED is not illuminated. | Input Mode LED is turned off to conserve battery power. | Press Input Mode button to illuminate the Input ModeLED. |
| Desired Input Mode not available. | Something is missing from desired input. |
Attach line-in cable, attach FM receiver, or reestablish your Bluetooth connection. |
| Unable to pair with more than one Bluetooth device. | Remote Mic + is already in an active Bluetooth connection. | Follow steps in the Pairing with Bluetooth Devices section. |
| Unexpectedlylose TV (optional product) audio while LED is slowly pulsing blue on Remote Mic +. | Some Bluetooth device sounds are higher priority than TV Streamer audio. | Move out of Bluetooth input mode on Remote Mic +. |
Safety Information
Required Information![]() Waste from electronic equipment must be handled according to local regulations.Instructions for Disposal of Old ElectronicsStarkey Hearing Technologies encourages, and your local community laws may require, that your Starkey Hearing Technologies Remote Microphone + be disposed of via your local electronics recycling/disposal process.The below instructions are provided for the benefit of disposal/recycling personnel. Please include this manual when disposing of your Remote Mic +.For Disposal/Recycling Personnel OnlyThis product contains a Lithium-Ion Polymer battery. To remove this battery:
Waste from electronic equipment must be handled according to local regulations.Instructions for Disposal of Old ElectronicsStarkey Hearing Technologies encourages, and your local community laws may require, that your Starkey Hearing Technologies Remote Microphone + be disposed of via your local electronics recycling/disposal process.The below instructions are provided for the benefit of disposal/recycling personnel. Please include this manual when disposing of your Remote Mic +.For Disposal/Recycling Personnel OnlyThis product contains a Lithium-Ion Polymer battery. To remove this battery:
- Power off the Remote Mic +.
- Pry apart the housing halves with a small screwdriver.
- Cut the battery wires from the circuit board to prevent accidental shorting.
- Pry the battery away from the housing using a wide flat blade.
Intended UseThe Remote Mic + is an accessory to a 2.4 GHz wireless air conduction hearing aid.It is intended as a wireless transmitter of sound from a variety of audio sources to air conduction hearing aids. When worn by a distant speaker in noisy environments, it functions as an assistive listening device. It also connects to loop signals, FM signals when a European FM receiver is attached, analog line-in audio, and standard Bluetooth audio.The Remote Mic + is classified as a Type B applied part under the IEC 60601-1 medical instrument standard.The Remote Mic + is designed to comply with the most stringent standards of International Electromagnetic Compatibility. However, it is still possible that you may experience interference caused by power line disturbances, airport metal detectors, electromagnetic fields from other medical devices, radio signals and electrostatic discharges.The Remote Mic + is designed to be cleaned with a damp cloth moistened with soapy water.
If you use other medical devices or wear implantable medical devices such as defibrillators or pacemakers and are concerned that your Remote Mic + might causeinterference with your medical device, please contact your physician or the manufacturer of your medical device for information about the risk of disturbance.The Remote Mic + should not be used during an MRI procedure or in a hyperbaric chamber. The Remote Mic + is not formally certified to operate in explosiveatmospheres such as may be found in coal mines or certain chemical factories.Use on Aircrafts The Remote Mic + should not be used on aircraft unless specifically permitted by the flight personnel.International UseThe Remote Mic + is approved to operate at radio frequencies that are specific to your country or region and might not be approved for use outside your country or region.Be aware that operation during international travel may cause interference with other electronic devices, or other electronic devices may cause interference with your Remote Mic +.Your Remote Mic + is designed to operate and be stored within the temperature range of -10˚C (14˚F) to 45˚C (113˚F) and relative humidity range of 10%-95%.We are required by regulations to provide the following warnings:WARNING: Use of the Remote Mic + directly next to other electronic equipment should be avoided because it could result in improper performance. If such use is necessary, note whether your hearing aids and the other equipment are operating normally.WARNING: Use of accessories, components, or replacement parts other than those provided by the manufacturer of the Remote Mic + could result in increasedelectromagnetic emissions and decreased electromagnetic immunity and could result in degradation of performance.WARNING: If Portable Radio Frequency communications equipment is used closer than 30 cm (12 inches) from your Remote Mic +, degradation of theperformance of your hearing aid could result. If this occurs, move away from the communications equipment.
Although the Remote Mic + is not formally certified (IP rated) for protection against dust or water ingress, per IEC 60529, it has been tested to the IP 5X level. This means that the Remote Mic + is protected from dust.The battery in your Remote Mic + is not replaceable. Do not attempt to replace the battery. The Remote Mic + does not contain any user-serviceable parts. Do not open or modify it.Do not connect the Remote Mic + to any devices not described in this manual. The expected service life of the Remote Mic + is 3 years.Wireless Technical DescriptionStarkey Hearing Technologies Remote Mic + operates in the 2.4- 2.4835 GHz band with a maximum effective radiated power of 8 dBm with transmission modulation type of 1M12FXD and 1.1 MHz bandwidth. The receiver section of the radio has a bandwidth of 2 MHz.The Remote Mic + has been tested to, and has passed, the following emissions and immunity tests:
- IEC 60601-1-2 radiated and conducted emissions requirements for a Group 1 Class B device as stated in CISPR 11.
- Harmonic distortion and voltage fluctuations affecting the power input source as stated in Table 2 of IEC 60601-1-2.
- RF radiated immunity at a field level of 10 V/m between 80 MHz and 2.7 GHz as well as higher field levels from communications devices as stated in Table 9 of IEC 60601-1-2.
- Immunity to power-frequency magnetic fields at a field level of 30 A/m.
- Immunity to ESD levels of +/- 8 kV conducted discharge and +/- 15 kV air discharge.
- Immunity to electrical fast transients on the power input at a level of +/- 2 kV at a 100 Hz repetition rate.
- Immunity to surges on the power input of +/- 1 kV line to line.
- Immunity to conducted disturbances induced by RF fields on the power input as stated in Table 6 of IEC 60601-1-2.
- Immunity to voltage dips and interruptions on the power input as stated in Table 6 of IEC 60601-1-2.
Regulatory NoticesFCC ID: EOA-24MFAIC: 6903A-24MFA (Model 900)FCC/IC NoticeThis device complies with part 15 of the FCC rules and with ISED Canada’s license-exempt RSS standard(s). Operation is subject to the following two conditions:(1) This device may not cause harmful interference, and (2) this device must accept any interference received, including interference that may cause undesired operationof the device.NOTE: The manufacturer is not responsible for any radio or TV interference caused by unauthorized modifications to this equipment. Such modifications could void the user’s authority to operate the equipment.Note FCC/ICHereby, Starkey Hearing Technologies declares that Starkey Hearing Technologies Remote Microphone+ is in compliance with the essential requirements and other relevant provisions of Directive 2014/53/EU. A copy of the Declaration of Conformity can be obtained from the following addresses and from docs.starkeyhearingtechnologies.com

| This device produces radiofrequency energy. Interference may occur in the vicinity of equipment marked with the following symbol. | |
| Class II device | |
| Dispose of properly | |
| Consult operations manual |  |
The Starkey logo, Starkey Hearing Technologies, and Thrive aretrademarks of Starkey Laboratories, Inc.© 2019 Starkey. All Rights Reserved. 86165-007 12/19 BKLT3010-03-EE-S
[xyz-ips snippet=”download-snippet”]