
Starkey BROC2818 Livio AI Quick Start Guide
Livio Edge AI | Livio AI | Livio
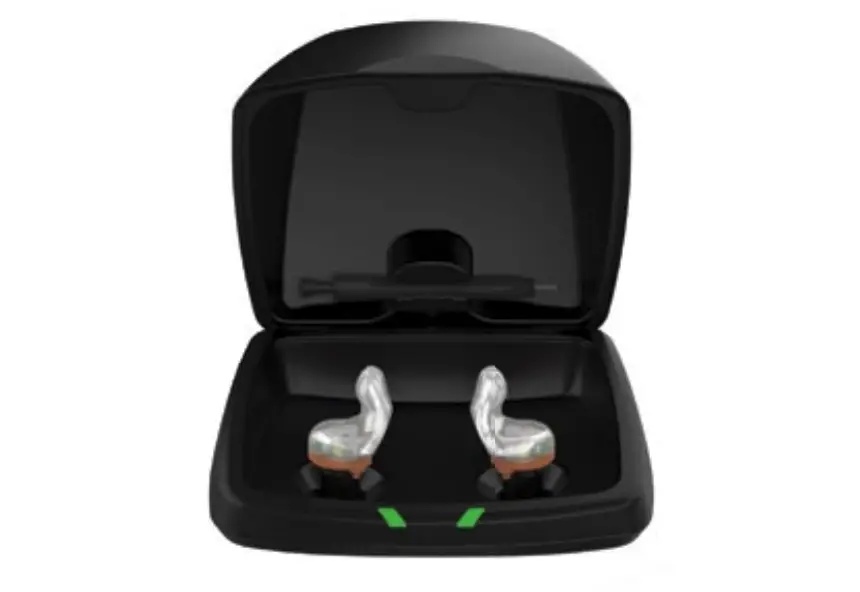
Rechargeable Custom Products
At Starkey, we believe that to hear better is to live better.
Livio Edge AI, Livio AI and Livio Custom Rechargeable hearing aids help you stay connected to the people and things you love most. These 2.4 GHz hearing aids offer Starkey’s most advanced technology with supreme sound quality and features, customizable to fit your unique hearing needs.
Get the most out of your hearing aids
Please visit starkey.com/care for additional tools and resources including:
- Instructional videos
- Operations manuals
- Product brochures

Charging Your Hearing Aids
- Place your hearing aids in the charger with the faceplate facing downward so battery contacts on hearing aid align with charging posts within charger.
- Your hearing aids will turn off automatically and begin to charge.
- Note: The LEDs corresponding to each hearing aid:
- Glowing Green = Charging
- Solid Green = Fully Charged
- Blinking Red = Fault State. To reset, remove the hearing aids from charger, wait until LED turns off and re-insert aids. If Fault State continues, call your hearing professional.
- When charging without the charger cord, the LEDs turn off when the hearing aids are fully charged to preserve the on-board battery.
- Charging occurs with the lid open or closed; hearing aids will be fully charged in under 3 1/2 hours.
- It is safe to store hearing aids in the charger after they are fully charged and any time that you are not wearing them.
- Hearing aids will automatically power on when removed from the charger.
- To illuminate LEDs when the charger is not plugged in, remove a hearing aid from its charging post for three seconds and then reinsert it. LEDs illuminate for 10 seconds before turning off.
- If you will not be wearing your hearing aids for an extended period of time (i.e, weeks), remove both the plug from the charger and the hearing aids from the charging posts. You will need to manually power off the hearing aids by pressing the user control on each hearing aid for three seconds.
Power On & Off
ON – The hearing aids will power on automatically after removing them from the charger. There is a delay that allows you time to insert your hearing aid into your ear.
ON – If the hearing aid is manually powered off, pressing the user control for three seconds will power it on. The delay still exists, to give you time to insert the hearing aid into your ear.
OFF – The hearing aids will power off automatically when placed on the charger post. Charging will proceed.
OFF – The hearing aids can be powered off manually by pressing the user control for three seconds.
System Care
HEARING AID CARE
Keep your hearing aid clean. Heat, moisture and foreign substances can result in poor performance.
- Use a cleaning brush or soft cloth to clean debris from around the user control, microphone and battery compartment.
- Inspect the receiver, earbud and wax guard regularly.
- Never use water, solvents, cleaning fluids or oil to clean your hearing aid.
CHARGER CARE
Keep your charger clean. Heat, moisture and foreign materials can result in poor performance.
- Use the provided cleaning brush to keep the charging posts and hearing aid microphones clear of debris.
- Do not use water, solvents or cleaning fluids to clean the charging posts.
- Keep lid closed as much as possible to avoid dust and debris buildup.
- Store your charger in a clean and dry location i.e., a dresser or shelf rather than the bathroom or kitchen.
To ensure the longest life of your rechargeable hearing aid batteries and the batteries in the charger:
- Fully charge hearing aid batteries every night.
- Do not expose to excess heat, i.e., do not store on a window sill or in a hot car.
Helpful Hints
- Do not take apart your hearing aids or insert the cleaning tools inside them.
- When not in use, place your hearing aid in the storage container and store:
- In a dry, safe place
- Away from direct sunlight and heat to avoid extreme temperatures
- Where you can easily fi nd them
- Safely out of reach from children and pets
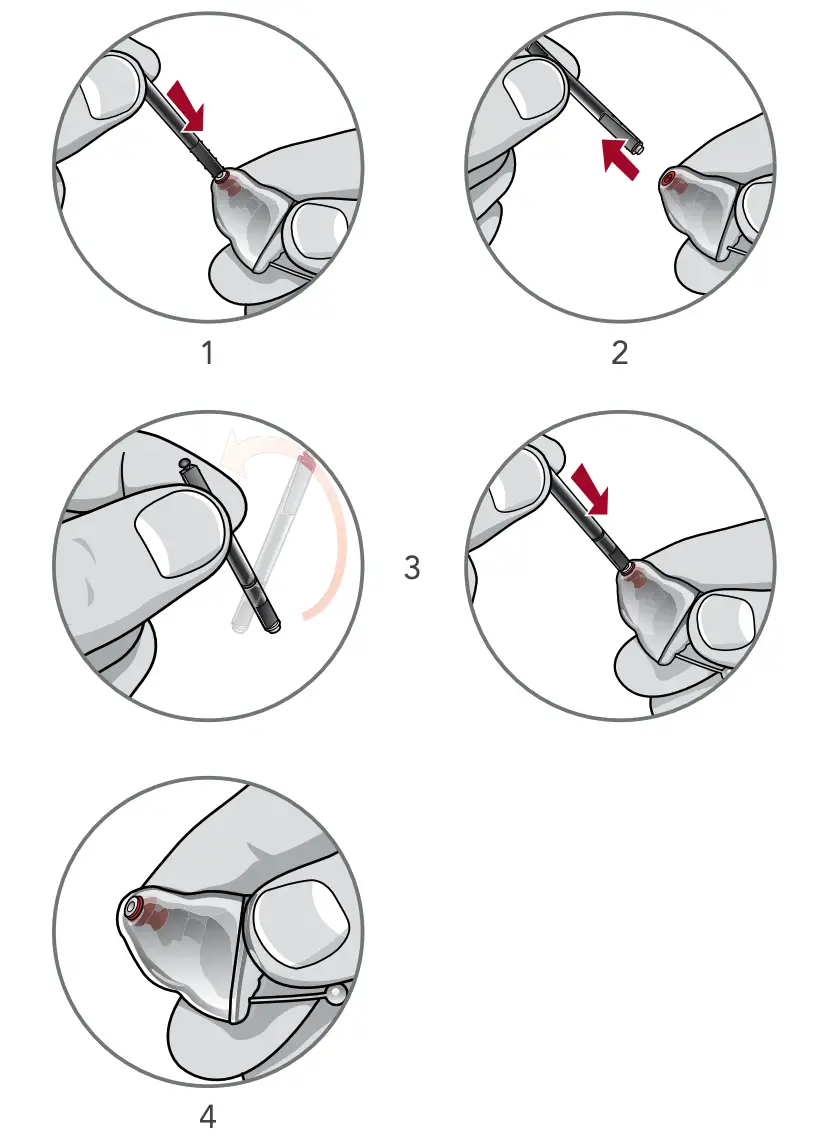
Hear Clear ReceiverWax Guards
Custom hearing aids integrate disposable Hear Clear earwax protection. The innovative wax guards prevent earwax accumulation in the hearing aid receiver. When you need to replace your wax guards, please follow the instructions below.
- Insert empty end of the application stick straight into used wax guard in hearing aid.
- Pull straight out (do not twist) on stick to remove used wax guard.
- Use opposite end of stick to firmly insert clean wax guard straight into hearing aid.
- Pull straight out (do not twist) to remove stick and discard.
 Download and Connect to the Thrive Hearing Control App
 Download and Connect to the Thrive Hearing Control App
The Thrive Hearing Control app makes it easy to control and adjust your 2.4 GHz rechargeable hearing aids with your compatible Apple® or Android™ device. Downloading and connecting to the app is easy; refer to the Thrive Hearing Control app User Guide or visit starkey.com/thrivesupport for additional information, such as:
- Integrated sensors and artificial intelligence features*
- Automatic and custom memories
- Geotags
- SoundSpace
- Tinnitus management
- Find My Hearing Aids
- Alerts
Visit starkey.com/thrivesupport for compatibility information.*Available with Livio Edge AI and Livio AI hearing aids only.
Hearing Aid Information
M/T Ratings

For Thrive Hearing Control app and iOS/Android compatibility information, please visit starkey.com/thrivesupport.
Apple, the Apple logo, iPhone, iPad and iPod touch are trademarks of Apple Inc., registered in the U.S. and other countries. App Store is a registered service mark of Apple Inc.
Android and Google Play are trademarks of Google LLC.
The Starkey Logo, Livio, Starkey, Thrive and SoundSpace are registered trademarks of Starkey Laboratories, Inc.
The Thrive logo is a trademark of Starkey Laboratories, Inc.
![]()
©2020 Starkey. All Rights Reserved. 86373-000 2/20 BKLT3092-00-EE-ST
References
[xyz-ips snippet=”download-snippet”]