
![]() Starkey Hearing Technologies Remote Microphone +
Starkey Hearing Technologies Remote Microphone +
Pairing
The Remote Microphone + must be paired to interact with compatible 2.4 GHz hearing aids on the Thrive platform. Pairing occurs once, then the hearing aids and Remote Microphone + will automatically recognize each other. The Remote Microphone + can be paired within Inspire X or outside of Inspire X. The Remote Microphone + can pair with up to 8 Bluetooth® devices.*
Pairing within Inspire X
 Launch Inspire X, connect, and detect hearing aids.
- Select Accessories on the left navigation bar.
- Ensure the Remote Microphone + is powered on.
- Place the hearing aids within 6 inches of the Remote Microphone +.
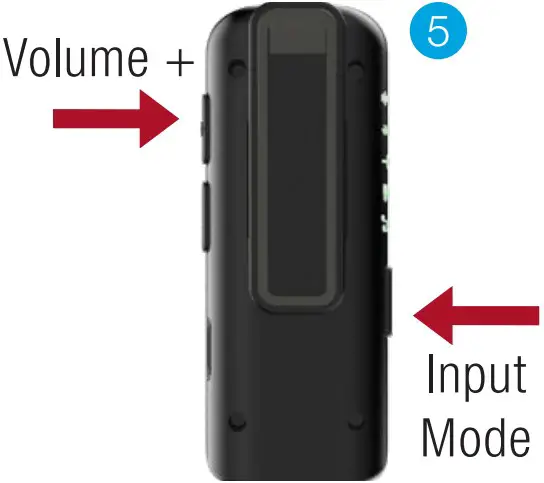
- Place the Remote Microphone + in pairing mode by pressing the Input Mode and Volume Up buttons simultaneously until the LED status indicator alternately blinks blue and red.
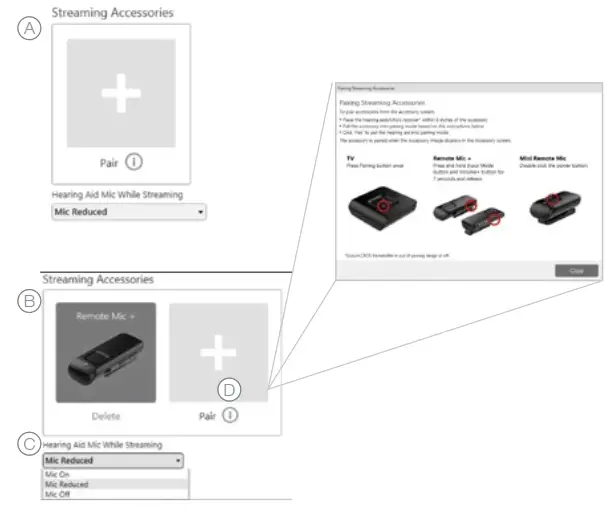
- Select Pair to put the hearing aids into pairing mode A .
- Pairing is successful when the Remote Microphone + image displays in the accessory screen B.
- Use the drop-down menu below the streaming accessories box to set “Hearing Aid Mic While Streaming”. Mic Reduced (50%) is the default C.
- Select the Information icon for pairing instructions if needed D.
 Launch Inspire X, connect, and detect hearing aids.
Pairing outside of Inspire X
- Power off any mobile phone or other accessories that were previously paired with the hearing aids.
- Ensure the Remote Microphone + is powered on.
- Power off, then power on the hearing aids to place in pairing mode.
- Place the hearing aids within 6 inches of the Remote Microphone +.
- Press the Input Mode and Volume Up buttons simultaneously for 7 seconds until the LED status indicator alternately blinks blue and red.
- A green LED will blink for each hearing aid to confi rm a successful pairing.
Pairing Remote Microphone + to Bluetooth Devices
- Power off any mobile phone or other accessories that were previously paired with the hearing aids.
- Ensure the Remote Microphone + is powered on.
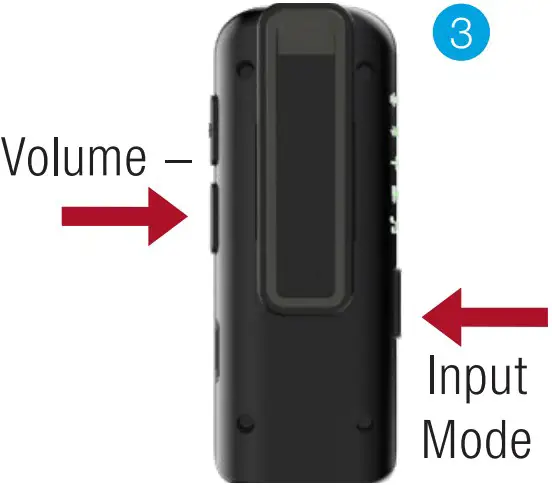
- Press the Input Mode and Volume Down buttons simultaneously for 7 seconds until the LED status indicator rapidly blinks blue.
- Put the Bluetooth® device into pairing mode.
- When the Remote Microphone + appears, select it on the Bluetooth device.
- The Remote Microphone + LED will turn green for 2 seconds with successful pairing.
Use
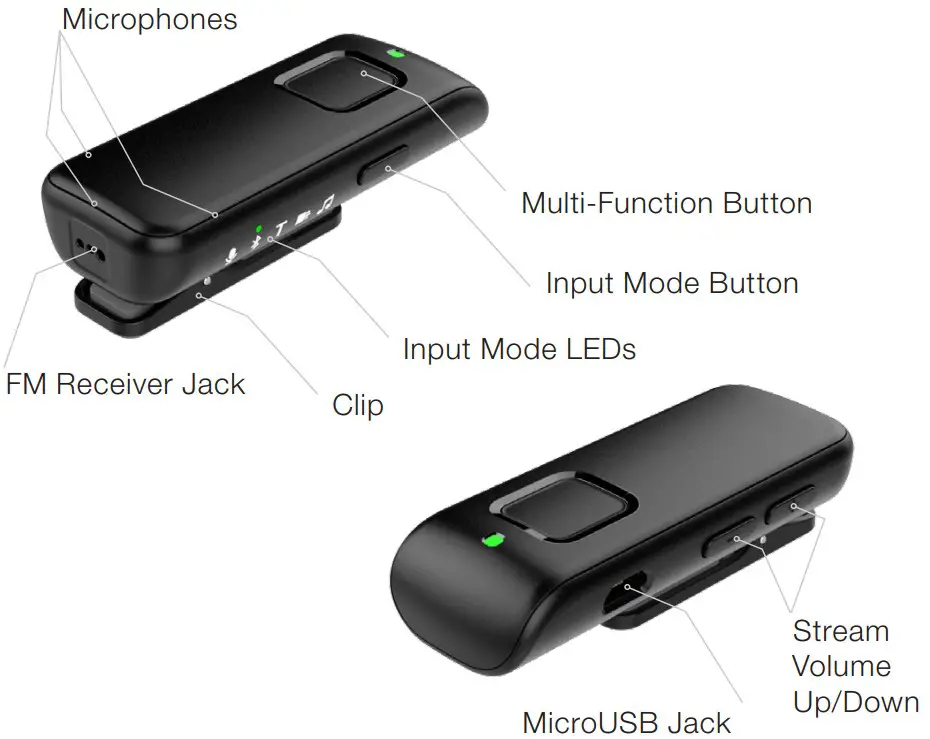
- Press the Multi-function button for 2 seconds to power the Remote Microphone + on or off.
- The Remote Microphone + can be clipped to clothing or worn on a lanyard.
- Remote Microphone + operating range is up to 30 feet (10m). If the user walks out of range of the Remote Microphone + audio stream, streaming stops and will need to be manually restarted.
- The Remote Microphone + can stream for up to 10 hours on a full charge.
- The Remote Microphone + reaches a full charge in 3 hours.
- The LED status indicator will blink red and an audible indicator tone will play in the hearing aids every 5 minutes when the Remote Microphone + battery is low.
- The Remote Microphone + will momentarily mute if it is dropped and will resume streaming once the device is stabilized.
- The Start/Stop streaming function, as well as the streamed audio volume level, can be adjusted via the Remote Microphone +, hearing aid user controls, the 2.4 GHz Remote Control or the Thrive Hearing Control app.
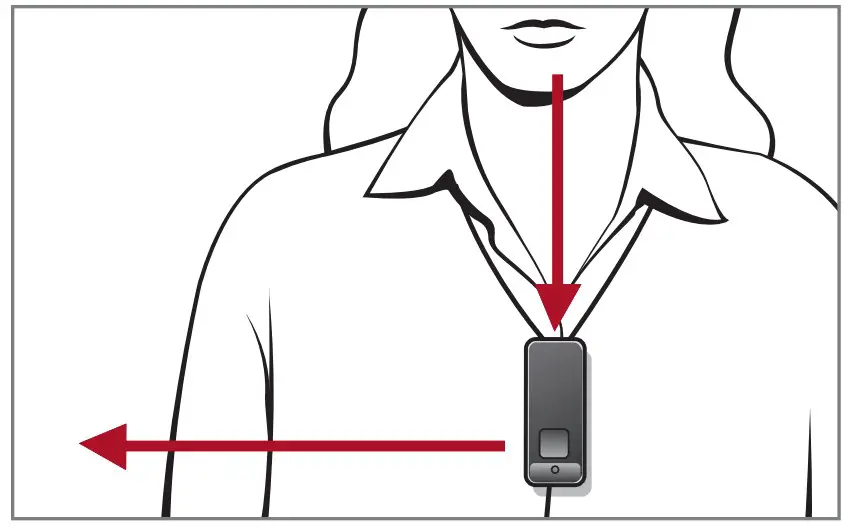
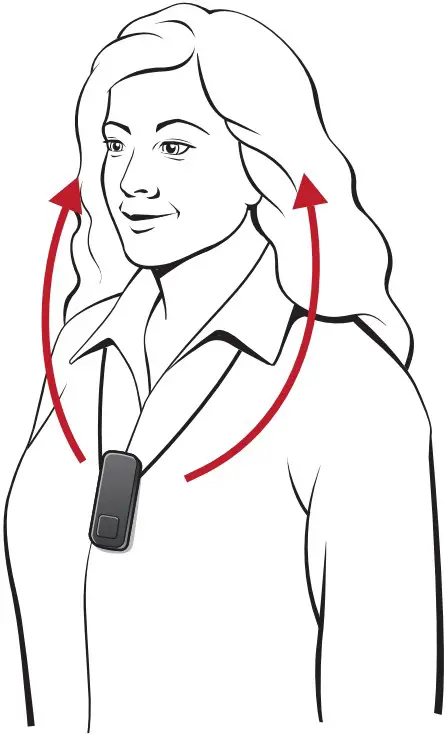
- When the audio source is set to Remote Mic or to Bluetooth for phone streaming, the RemoteMicrophone + should be within 8 inches (20cm) of the speaker’s mouth. Wearing the Remote Microphone + in a vertical position provides the best performance A.
Input Mode
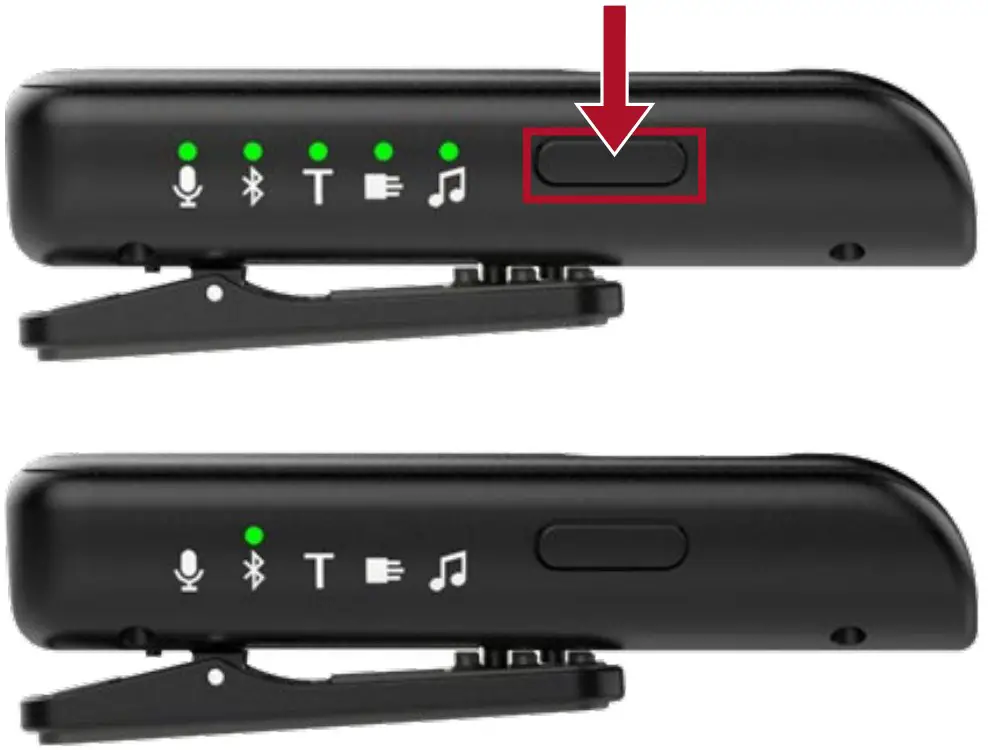
- Press the Input Mode button to advance to the next available audio source. When cycling through input modes, the FM System and Line-In optionswill only be available when physically attached to the Remote Microphone +.
- If the Input Mode LED is off, press the Input Mode button to temporarily illuminate the LED.
- When the Remote Microphone + is powered off, it will remember the input mode that was last used and will return to that position when powered back on.
Audio Source Options
![]() Remote Microphone:
Remote Microphone:
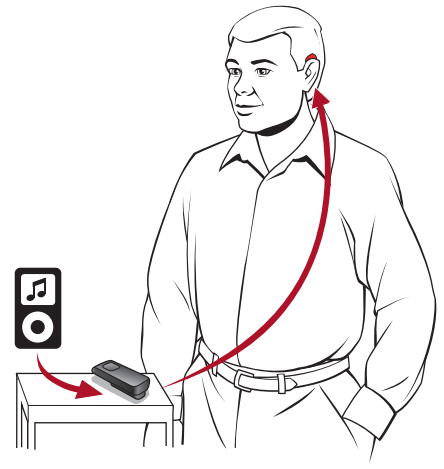
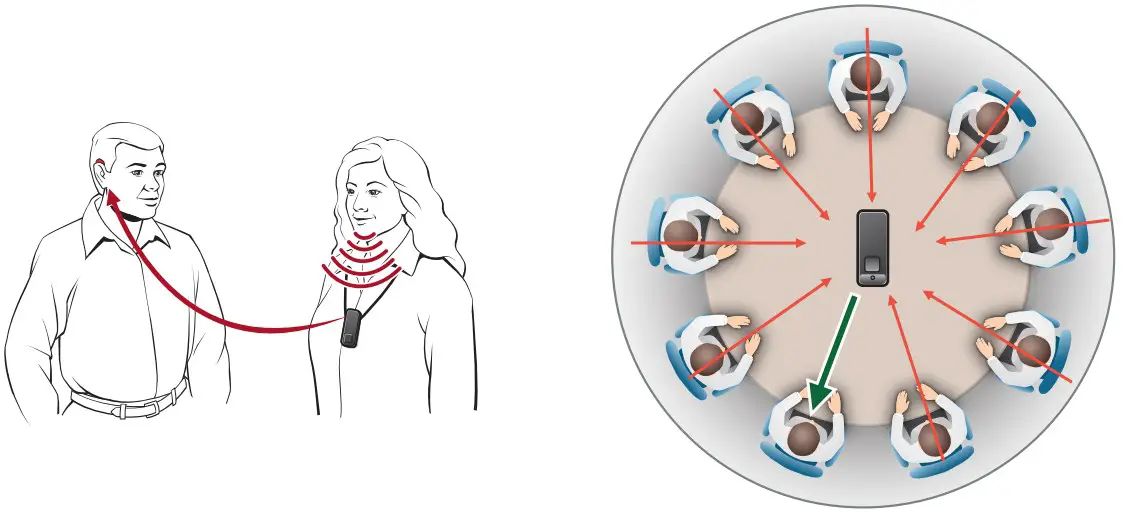 Remote Microphone + automatically optimizes the microphone settings based on its physical orientation. Sound is received equally from all directions (omnidirectional) when used tabletop and prioritizes sound from above while reducing sound from other directions (directional) when worn on the body.
To use the Remote Mic function:
- Ensure the Remote Microphone + is powered and the input mode is set to Mic.
- Streaming starts automatically in the hearing aids.
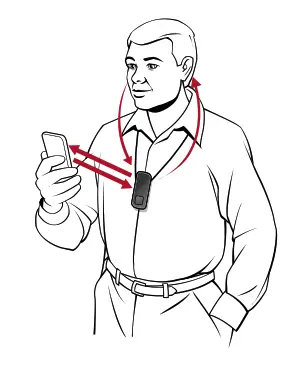
![]() Incoming/Outgoing Phone Call Streaming:
Incoming/Outgoing Phone Call Streaming:
- Ensure the Remote Microphone + is powered on and the status indicator LED is blue.
- The input mode does not matter as a phone call will interrupt other audio input modes.
- Press the Multi-function button to accept the incoming call.
- For an outgoing call, dial the number on the mobile phone. Streaming starts automatically in the hearing aids.
- Press the Multi-function button to end a phone call.
- Once the phone call has ended, the Remote Microphone + will automatically return to the previous input mode.
- To reject a phone call, press the Multi-function button for more than two seconds.
- Phone calls will interrupt the Remote Microphone + audio stream. After the phone call concludes, all streaming stops. If desired, the Remote Microphone + audio stream will need to be manually restarted.
 Ensure the Remote Microphone + is powered on and the status indicator LED is blue.
![]() Other Audio Streaming
Other Audio Streaming
- Ensure the Remote Microphone + is powered on.
- Set the input mode to Bluetooth. The LED indicator will be blue when connected to a Bluetooth device.
- Start music or other audio on your Bluetooth device. Streaming starts automatically in the hearing aids.
 Ensure the Remote Microphone + is powered on.
Audio Source Options
T Loop System
Remote Microphone + can receive audio via a built-in telecoil when using a Loop System. Wearing the Remote Microphone + in a vertical orientation provides the best performance.To stream Loop audio:
- Ensure the Remote Microphone + is powered on and the input mode is set to Loop.
- Streaming starts automatically in the hearing aids.
![]() FM System
FM System
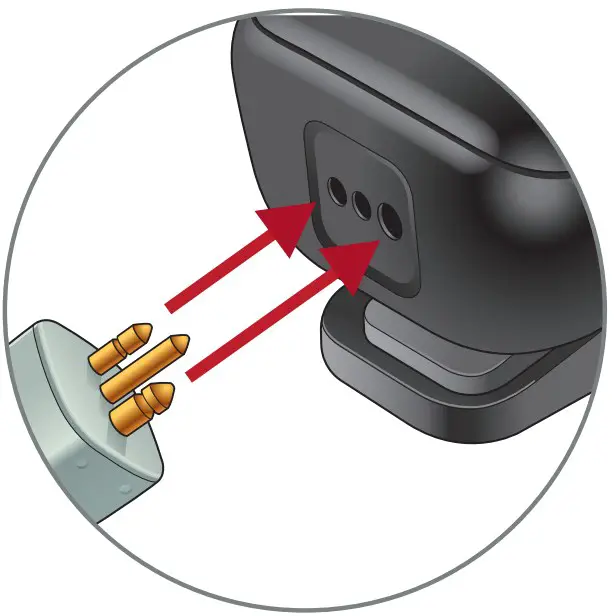
- Insert the FM system transmitter into European Jack.
- Ensure the Remote Microphone + is powered on and the input mode is set to an FM system.
- Streaming starts automatically in the hearing aids.
![]() Line-In
Line-In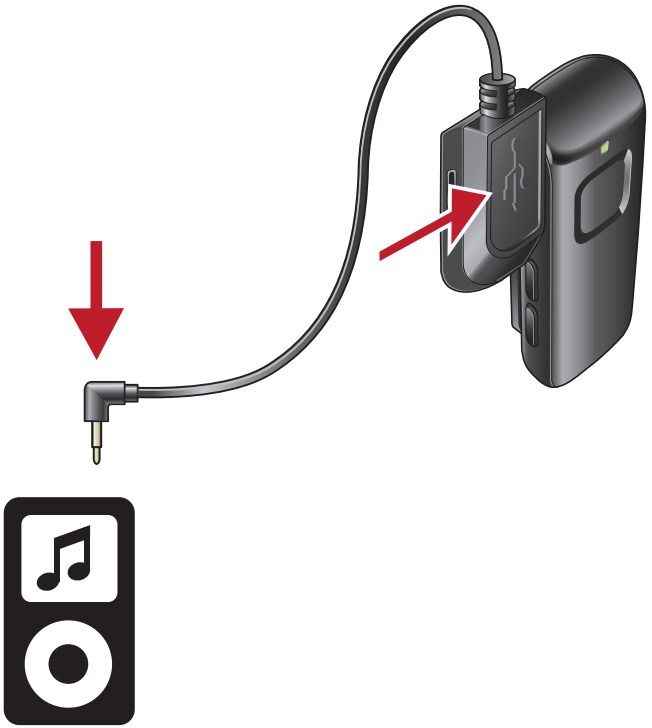 When a Line-In cable is attached via the micro USB Jack, the Remote Microphone + can receive audio from a mobile phone that’s not using Bluetooth technology, MP3 player, tablet, or computer.
To stream Line-In audio:
- Insert the Line-In cable into the micro USB Jack.
- Ensure the Remote Microphone + is powered on and the input mode is set to Line-In.
- Start music or other audio on your electronic audio source. Streaming starts automatically in the hearing aids.
* Accessories only pair to hearing aid (not to iPhone/app).The Bluetooth® word mark and logos are registered trademarks owned by Bluetooth SIG, Inc. and any use of such marks by Starkey is under license.The Starkey logo, Starkey Hearing Technologies, Thrive and Inspire are trademarks of Starkey Inc.© 2019 Starkey. All Rights Reserved. 12/19 FLYR3405-04-EE-SG
[xyz-ips snippet=”download-snippet”]