StarTech 4-Port USB 3.0 KVM Switch
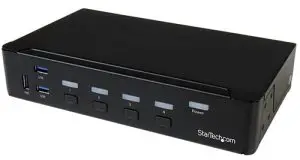
Product Diagram (SV431HU34K6)
Front View
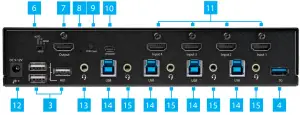
Rear View
| Port | Function | |
| 1 | Port Selection LED Indicators |
|
| 2 | Power LED |
|
| 3 | Console USB HID Ports |
|
| 4 | Console USB Hub Ports |
|
| 5 | Port Selection Buttons |
|
| 6 | HDCP Switch |
|
| 7 | Console HDMI Output Port |
|
| 8 | EDID LED Indicator |
|
| 9 | EDID Button |
|
| 10 | Firmware Upgrade Port |
|
| 11 | PC HDMI Input Ports |
|
| 12 | Power Input Port |
|
| 13 | Console Audio Port |
|
| 14 | PC USB Ports |
|
| 15 | PC Audio Ports |
|
Requirements
For the latest requirements and to view detailed instructions on all product functionality in a full user manual, please visit:www.startech.com/SV431HU34K6.
Source PCs
- Computers (HDMI enabled) x 4
- HDMI Cables x 4
- SuperSpeed USB 5Gbps (USB 3.2 Gen 1) Cables (Type-A Male to Type-B Male) x 4
- (Optional) 3.5 mm Audio Cables (Male to Male) x 4
Console
- HDMI Display x 1
- HDMI Cable x 1
- USB Keyboard x 1
- USB Mouse x 1
- (Optional) Audio Device (e.g. Headphones, Microphone, etc.) x 1
- (Optional) USB HID Devices x 2
- (Optional) SuperSpeed USB 5Gbps (USB 3.2 Gen 1) Peripheral Devices x 2
Installation
Connect the Console
- Power off your HDMI Display and any Peripherals before connecting to the KVM Switch.
- Connect an HDMI Display to the Console HDMI Output Port on the rear of the KVM Switch.
- Connect a USB Keyboard and a USB Mouse to the Console USB HID Ports on the rear of the KVM Switch.
- (Optional) Connect an additional USB HID Device to the remaining Console USB HID Port on the front of the KVM Switch.
- (Optional) Connect the Audio Device to the Console Audio Port on the rear of the KVM Switch.
- (Optional) Connect up to two SuperSpeed USB 5Gbps (USB 3.2 Gen 1) Peripheral Devices to the Console USB Hub Ports on the front and rear of the KVM Switch.
Connect the PCs
- Power off your Computer and any Peripherals before connecting to the KVM Switch.
- Connect an HDMI Cable from the HDMI Port on the Computer to the PC 1 HDMI Input Port on the rear of the KVM Switch.
- Connect a SuperSpeed USB 5Gbps (USB 3.2 Gen 1) Cable (Type-A Male to Type-B Male) from the USB-A Port on the Computer to the PC 1 USB Port on the rear of the KVM Switch.Note: A SuperSpeed USB 5Gbps (or better) Cable is recommended for optimal performance.
- (Optional) Connect a 3.5 mm Audio Cable from the Audio Port on your Computer to the corresponding PC Audio Port on the rear of the KVM Switch.
- Repeat steps 1 to 4 for Source PCs 2-4.
Operation
Power-On Sequence
- Connect the Universal Power Adapter from a Wall Outlet to the Power Input Port on the rear of the KVM Switch.
- Power on all Peripherals.
- Select PC 1 and power on the corresponding Computer.Note: Ensure that the Computer connected to the PC 1 ports has fully booted to the operating system before proceeding.
- Repeat step 3 for Source PCs 2-4.
FCC Compliance StatementThis equipment has been tested and found to comply with the limits for a Class A digital device, pursuant to part 15 of the FCC Rules. These limits are designed to provide reasonable protection against harmful interference in a residential installation. This equipment generates, uses and can radiate radio frequency energy and, if not installed and used in accordance with the instructions, may cause harmful interference to radio communications. However, there is no guarantee that interference will not occur in a particular installation. If this equipment does cause harmful interference to radio or television reception, which can be determined by turning the equipment off and on, the user is encouraged to try to correct the interference by one or more of the following measures:
- Connect the equipment into an outlet on a circuit different from that to which the receiver is connected.
- Consult the dealer or an experienced radio/TV technician for help
This device complies with part 15 of the FCC Rules. Operation is subject to the following two conditions: (1) This device may not cause harmful interference, and (2) this device must accept any interference received, including interference that may cause undesired operation. Changes or modifications not expressly approved by StarTech.com could void the user’s authority to operate the equipment.
Industry Canada StatementThis Class A digital apparatus complies with Canadian ICES-003.This device complies with Industry Canada licence-exempt RSS standard(s). Operation is subject to the following two conditions: (1) This device may not cause interference, and (2) This device must accept any interference, including interference that may cause undesired operation of the device.Use of Trademarks, Registered Trademarks, and other Protected Names and SymbolsThis manual may make reference to trademarks, registered trademarks, and other protected names and/or symbols of thirdparty companies not related in any way to StarTech.com. Where they occur these references are for illustrative purposes only and do not represent an endorsement of a product or service by StarTech.com, or an endorsement of the product(s) to which this manual applies by the third-party company in question. StarTech.com hereby acknowledges that all trademarks, registered trademarks, service marks, and other protected names and/or symbols contained in this manual and related documents are the property of their respective holders.
Warranty Information
This product is backed by a two-year warranty. For further information on product warranty terms and conditions, please refer to www.startech.com/warranty.
Limitation of LiabilityIn no event shall the liability of StarTech.com Ltd. and StarTech.com USA LLP (or their officers, directors, employees or agents) for any damages (whether direct or indirect, special, punitive, incidental, consequential, or otherwise), loss of profits, loss of business, or any pecuniary loss, arising out of or related to the use of the product exceed the actual price paid for the product. Some states do not allow the exclusion or limitation of incidental or consequential damages. If such laws apply, the limitations or exclusions contained in this statement may not apply to you.
 report this ad
Safety Measures
- If product has an exposed circuit board, do not touch the product under power.
StarTech.com Ltd.45 Artisans Cres London, Ontario N5V 5E9 Canada
StarTech.com LLP4490 South Hamilton Road Groveport, Ohio 43125 U.S.A.
StarTech.com Ltd.Unit B, Pinnacle 15 Gowerton Rd, Brackmills Northampton NN4 7BWUnited Kingdom
FR: fr.startech.comDE: de.startech.comES: es.startech.comNL: nl.startech.comIT: it.startech.comJP: jp.startech.com

References
[xyz-ips snippet=”download-snippet”]