![]()
Monitor Riser with Integrated Qi Charging PadProduct Diagram (MONSTADQI)
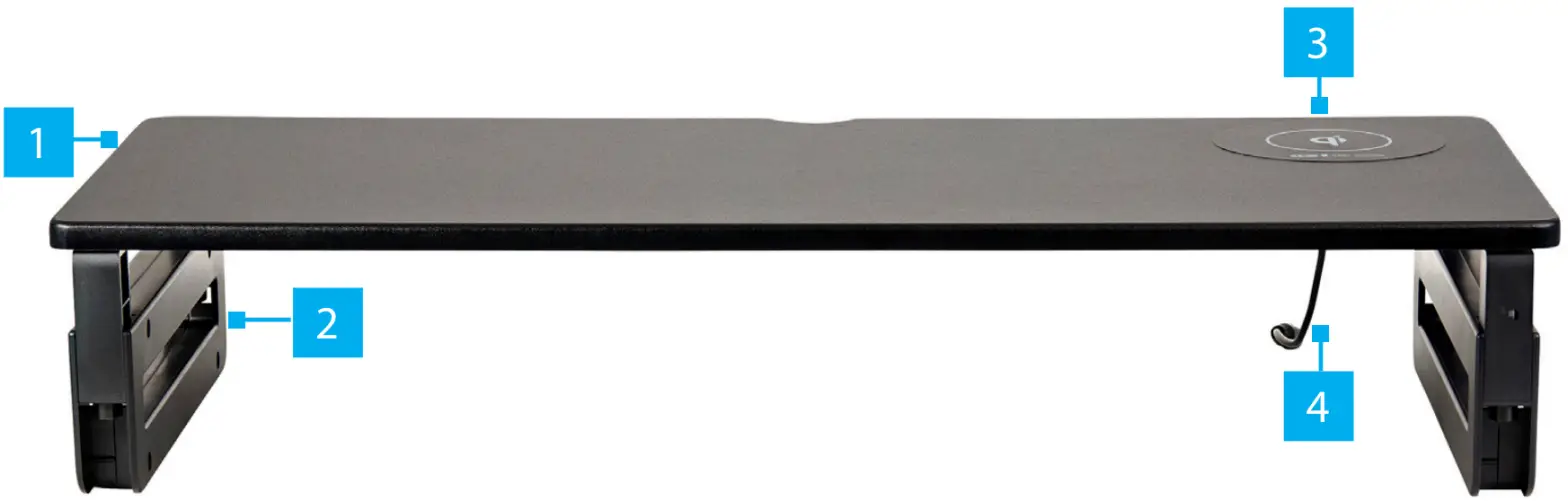
|
Component |
Function |
|
| 1 | Stand Top with Integrated Qi Charger |
|
| 2 | Legs |
|
| 3 | Qi Charger |
|
| 4 | Power Cable |
|
Requirements
For the latest requirements and full manual, please visit www.startech.com/MONSTADQI.
- Mobile Device with Wireless Charging Capabilities x 1
- Clean, Flat, and Stable Surface
Installation
Assembling the Monitor Riser
- Determine the desired height for the Stand Top.
- (Optional — Increase the height of the Monitor Riser Legs) Rotate the Height Adjustment Arms found on the sides of the legs out and up. The Height Adjustment Arms pivot from a single point in the Legs. Ensure all four Height Adjustment Arms have been fully rotated out and up before proceeding to the next step. (Figure 1)

- Place the Stand Top, top side down, onto a Clean, Flat, and Stable Surface.
- Align the two Pegs on one of the Legs with the two Holes in the Stand Top.(Figure 2)
- Firmly press the two Pegs on one of the Legs into the two Holes in the Stand Top.
- Repeat steps 4-5 to install the second Leg.
- Flip the Monitor Riser Assembly upright and position it on a Clean, Flat, and Stable Surface for use.
- .Connect the Power Adapter to the Power Cable and to an available Power Source.


To view manuals, FAQs, videos, drivers, downloads, technical drawings, and more, visit www.startech.com/support.
Operation
Charge a Mobile DeviceNote – if your Mobile Device is housed within an external Case: Check with the manufacturer of your Case to determine if the Mobile Device with Wireless Charging Capabilities can be Qi charged with the Case installed.
- Place a Mobile Device with Wireless Charging Capabilities onto the center of the Qi Charger found on the right-side of the Stand Top with Integrated Qi Charger.(Figure 3)

Adjusting the Height of the Monitor Riser
- Remove the Monitor, Mobile Device with Wireless Charging Capabilities, and Notebook/Paper Documents from the Monitor Riser Assembly.
- Disconnect the Power Adapter from the Power Source and the Power Cable.
- Place the Monitor Riser Assembly, top side down, onto a Clean, Flat, and Stable
- Remove the Legs from the Stand Top. Wiggle the Legs back and forth while pulling them up and out of the Stand Top.Warning: Always exercise caution while removing the Legs. The Legs should always be slowly yet firmly shifted back and forth while removing them to prevent any damage to the Legs or Stand Top.
- Rotate the Height Adjustment Arms found on the sides of the legs out and up to increase the height or out and down to decrease the height. The Height Adjustment Arms pivot from a single point in the Ensure all four Height Adjustment Arms have been fully rotated before proceeding to the next step.
- Follow steps 4-6 from to reinstall the
- Flip the Monitor Riser Assembly upright and position it on a Clean, Flat, and Stable Surface for use.
- Connect the Power Adapter to the Power Cable and to an available Power Source.
Warning Statements
Make sure that you assemble this product according to the instructions.Do not exceed the weight capacity of this product. Overloading this product might result in injury or property damage.This product can support the following weight: 33 lb. (15 kg).This product is intended for indoor use only and should not be used outdoors.Use of Trademarks, Registered Trademarks, and other Protected Names and SymbolsThis manual may make reference to trademarks, registered trademarks, and other protected names and/or symbols of third-party companies not related in any way to StarTech.com. Where they occur these references are for illustrative purposes only and do not represent an endorsement of a product or service by StarTech.com, or anendorsement of the product(s) to which this manual applies by the third-party company in question. StarTech.com hereby acknowledges that all trademarks, registered trademarks, service marks, and other protected names and/or symbols contained in this manual and related documents are the property of their respective holders.
Warranty Information
This product is backed by a two-year warranty.For further information on product warranty terms and conditions, please refer to www.startech.com/warranty.
Limitation of Liability
In no event shall the liability of StarTech.com Ltd. and StarTech.com USA LLP (or their officers, directors, employees, or agents) for any damages (whether direct or indirect, special, punitive, incidental, consequential, or otherwise), loss of profits, loss of business, or any pecuniary loss, arising out of or related to the use of the product exceed the actual price paid for the product.Some states do not allow the exclusion or limitation of incidental or consequential damages. If such laws apply, the limitations or exclusions contained in this statement may not apply to you.
StarTech.com Ltd.45 Artisans Cres London, Ontario N5V 5E9CanadaStarTech.com LLP2500 Creekside Parkway Lockbourne, Ohio 43137The U.S.A.StarTech.com Ltd.Unit B, Pinnacle 15 Gowerton Rd,Brackmills Northampton NN4 7BWUnited KingdomFR: fr.startech.comDE: de.startech.comES: es.startech.comNL: nl.startech.comIT: it.startech.comJP: jp.startech.com
![]()
References
[xyz-ips snippet=”download-snippet”]