
17 – REMOTE CONTROL OPERATION INSTRUCTIONS
A. REMOTE ICON IDENTIFICATION
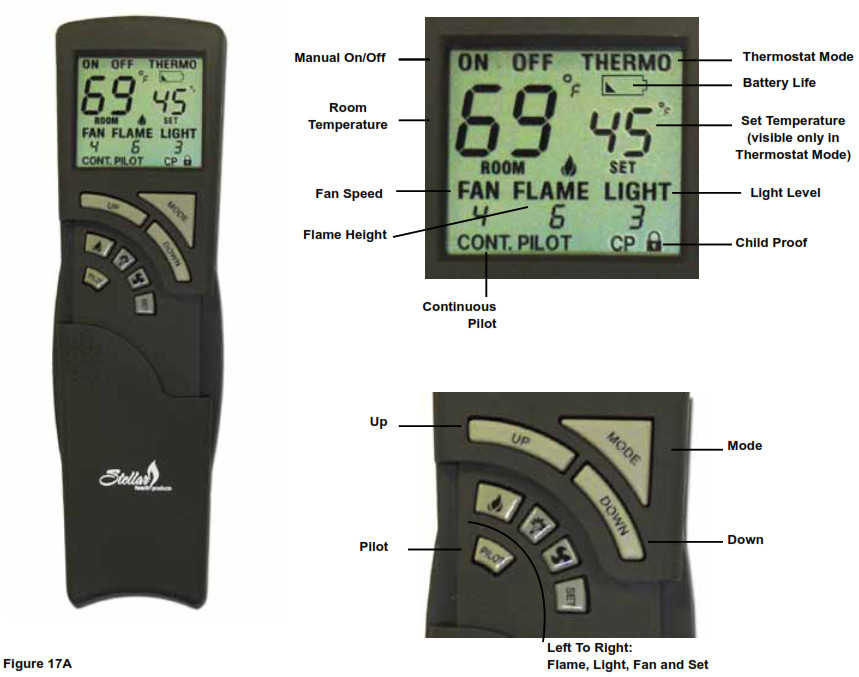
B. REMOTE CONTROL INFORMATION
 IMPORTANT ELECTRICAL WARNING AND INFORMATION
Electrical wiring must be installed by a licensed electrician.
- Do NOT wire 110V to wall switch.
- Uninterrupted or continuous power is required at all times in IPI systems EXCEPT when using battery back-up.
- Incorrect wiring will override IPI safety lockout and may cause an explosion.
- Disconnect 110V before servicingA double receptacle box cover and (3) wire nuts are supplied in the fireplace components packet to be used when hardwiring to the electrical box located under firebox on the right side of the fireplace.
IMPORTANT ELECTRICAL WARNING AND INFORMATION
THIS SYSTEM GOES THROUGH A CALIBRATION MODE WHEN SWITCHING FROM ‘ON’ TO ‘THERMO’ TO ‘OFF’ MODES, CREATING A HUMMING SOUND WHICH IS A NORMAL PART OF OPERATION.
17 – REMOTE CONTROL OPERATION
C. CONTINUOUS PILOT – FOR VERY COLD CONDITIONS
The IPI gas control system has the option of a continuous (standing) pilot feature. This allows you to change from a spark-to-pilot system to a standing pilot system during cold weather conditions. By having the pilot on continuously, the firebox will remain warm and a draft is established in the vent, allowing the main burner to turn on with less air-flow disruption.
When continuous pilot mode is activated, the pilot will spark and light. When fireplace is turned OFF, the pilot will remain lit when main burner has been turned OFF.
This pilot feature can be activated or de-activated by the hand held remote control transmitter or the switch on the module. Instructions on following page.
D. OPERATION USING BATTERY POWER
IMPORTANT NOTEWhen operating fireplace in this capacity, the only function available is flame modulation.
- This fireplace has an optional battery operation if electrical power is lost (see Page 45, Figure 16B). Position battery pack with four “AA” size batteries installed between valve and front of fireplace. This is the coolest location under firebox, ensuring longer battery life.
- Next locate the fireplace’s control module (see Page 45, Figure 16A). The “Remote/Off” slide switch on the back side of the module must be slid into the “Off” position to allow the battery pack to function.
- Once accomplished, the fireplace can be turned fully on or off using the On/Off Rocker Switch located on the front bracket of the valve assembly below.
NOTE: When in Battery Mode, the only functions available are turning the fireplace on or off.No flame adjustments are available nor will the remote control be available for the fan, ember lights, thermostat, etc.
E. MATCHING SECURITY CODES
Before matching security codes make sure 120V AC is connected and powered to fireplace, and hand held remote control is installed with (2) batteries. It may be necessary to program main control module to LEARN the security code of the hand held remote control upon initial use, if batteries are replaced, or if a replacement remote control is purchased from your dealer.
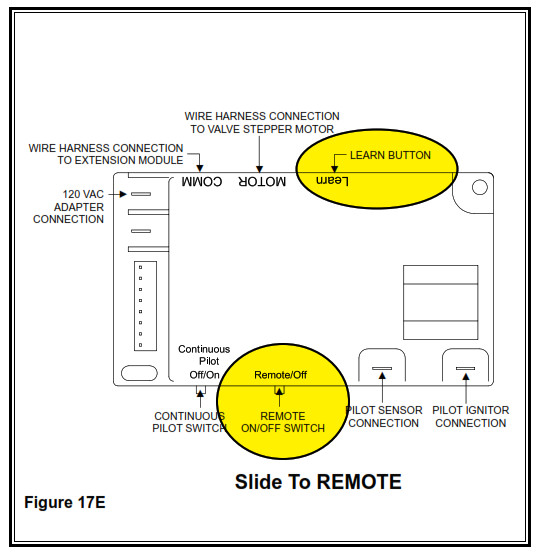
- When matching security codes, be sure slide button on main control module is in REMOTE; the code will not “LEARN” if slide is in OFF.
- Program main control module to LEARN a new security code by pushing in LEARN button on main control module using a pencil point for 2 seconds and let go (you should hear a series of ‘beeps’ letting you know module is ready to learn a new code).
- Immediately press MODE button on hand held remote control (you should hear four ‘beeps’ in rapid succession in main control module, indicating remote control’s code has been programmed into the main control module). When an existing main control module is introduced to a new hand held remote control, the new security code will overwrite the old one.
If it ever becomes necessary to clear the memory from the handheld remote control, simply push and hold the LEARN button for 10 seconds (you should hear three long beeps in succession). You may now follow steps outlined above to ‘RE-LEARN’ security codes.
17 – REMOTE CONTROL OPERATION
F. INITIAL SET-UP
Plug Extension Module and AC Adaptor into receptacles.
Install (4) AA batteries into battery compartment of Backup Battery Pack , making sure batteries are installed in proper direction. Position betweenvalve and front of stove. A Velcro strip has been attached to help secure in place.The Hand Held Remote operates on (2) AAA batteries. We recommend always using ALKALINE batteries to extend battery life and improve operational performance.
IMPORTANT NOTE
This system is sent to you set up for Natural Gas and temperature units readable in Fahrenheit.
This system allows for gas type conversion and temperature unit conversion by following the setup procedure outlined below.
G. GAS TYPE CONVERSION
Press and hold Learn Button on Main Control Module for 20 seconds. A beep will be heard letting you know the procedure has been completed.
- If converting from NAT to LP gas: (1) one second long beep
- If converting from LP to Nat gas: (3) three second long beep
Continue with gas type conversion by following instructions included with gas conversion kit.
H. CELSIUS/FAHRENHEIT CONVERSION
Press UP and DOWN keys simultaneously to choose Celsius or Fahrenheit.
I. IMPORTANT SAFETY FEATURE
This system has a maximum room temperature limit of 95° F (35° C) in both manual and thermostat modes. When room temperature is at or above this point the system will shut down and the hand held remote control will read OFF. If you turn the system ON when room temperature is still at or above this temperature, the system will again shutdown after 2 minutes when room temperature is recalculated.
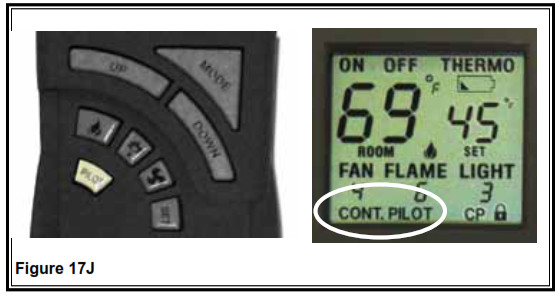
J. CONTINUOUS PILOT FEATURE
Activation of this optional feature is accomplished by pressing the PILOT button once. The continuous pilot icon will appear on the LCD screen. Pressing PILOT button again will de-activate this feature.
This feature can also be activated via CONTINUOUS PILOT switch on Main Control Module.
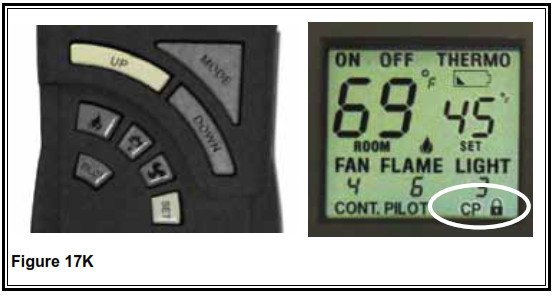
K. CHILDPROOF FEATURE
Activation of this optional feature is accomplished by pushing SET & UP buttons simultaneously for 5 seconds. The childproof icon will appear on the screen. When a transmitter button is pressed the icon will flash on screen, but no signal will be transmitted. Pressing and holding these same two buttons again for more than 5 seconds will de-activate this function.
This feature controls only manual functions of the hand held remote, automatic functions (thermostat mode) will not be affected.
17 – REMOTE RECEIVER INFORMATION
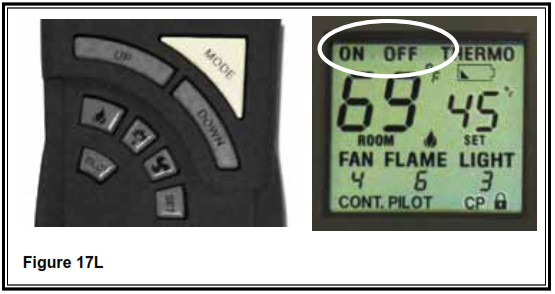
L. MANUAL MODE
This remote can be manually or thermostatically operated.Press MODE button for manual ON. The flame icon will appear on the LCD screen. Press MODE button again to put the control into THERMO mode. Pressing MODE again will turn fireplace OFF.
IMPORTANT NOTE
The MODE button operates in a series that will cycle from ON to THERMO to OFF.
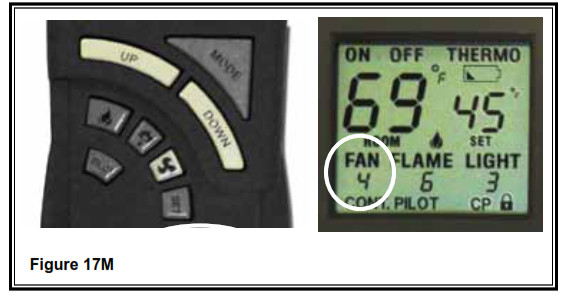
M. FAN MODE
This remote will operate the fan, allowing for (6) different speed levels. When the FAN button is pressed, FAN level setting will flash on the LCD screen. Press UP or DOWN buttons to select desired fan speed level. If no adjustment is made within 7 seconds, the control will exit function setting mode and LCD display will return to normal view.
IMPORTANT NOTE
Delayed ON/OFF – The fan will not turn on until fireplace has been burning for 5 minutes and will not turn off for 12 minutes after fireplace has been turned off.EXCEPTION: If fireplace is turned back on during 12 minute offdelay time frame, the fan will remain on. This applies to MANUAL and THERMO modes.
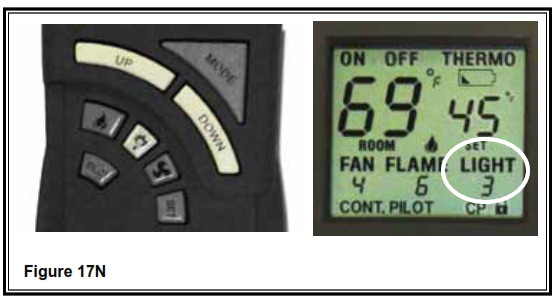
N. LIGHTING MODE
This remote will operate the lights, allowing for (6) different light levels. When LIGHT button is pressed, LIGHT level setting will flash on the LCD screen. Press UP or DOWN buttons to select desired light level. If no adjustment is made within 7 seconds, the control will exit function setting mode and LCD display will return to normal view.
IMPORTANT NOTE
Fireplace does not have to be burning to operate the lights.
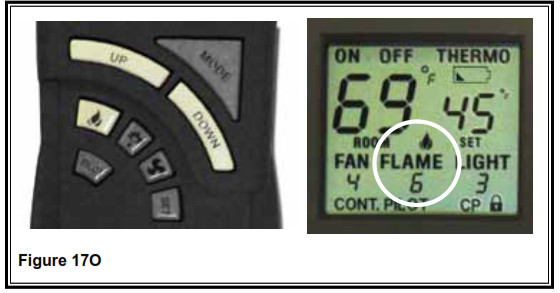
O. FLAME MODE
This remote will operate the flame, allowing for (6) different flame height levels. When MAIN FLAME button is pressed, FLAME level setting will flash on the LCD screen. Press UP or DOWN buttons to select desired flame level. If no adjustment is made within 7 seconds, the control will exit function setting mode and LCD display will return to normal view.
IMPORTANT NOTE
The fireplace will initially light at the highest level. After 5 seconds the flame will adjust to last chosen level before the fireplace was turned OFF.This applies to MANUAL and THERMO modes.
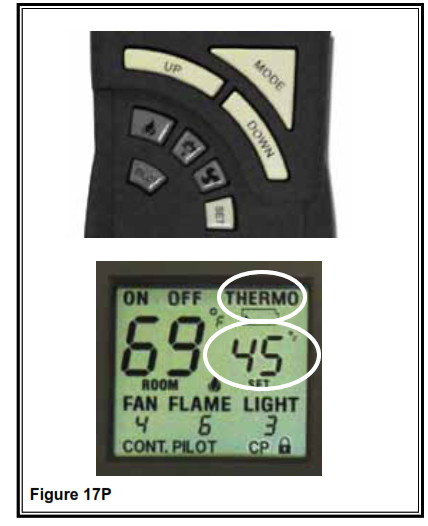
P. THERMO (THERMOSTAT) MODE
This remote feature allows you to thermostatically control the fireplace when hand held remote is set to THERMO mode.
Set Temperature Range: 45˚F (7˚C) to 90˚F (32˚C).
Set remote to THERMO mode by pressing MODE button. The smaller SET window of numbers appears on the LCD screen. The first SET number will read 45˚F. Press UP button to desired set room temperature. Within 5 seconds fireplace will operate to that Set Temperature. The FLAME, ON and THERMO icons will appear on the LCD screen. By pressing UP or DOWN buttons a new set temperature may be attained.
SET Temperature will only appear when THERMOSTAT MODE is activated, but is implemented in all MODES with the exception of MANUAL MODE.
IMPORTANT NOTE
The flame height can adjust up to (6) different height levels according to amount of heat required. This range however is dictated by the Flame Level setting (see previous page). When desired temperature is met, the fireplace will shut off until more heat is required.
To exit THERMO mode press the MODE button. This also shuts fireplace OFF.
IMPORTANT NOTE
When in THERMO mode the fireplace will not turn on until room temperature falls below SET TEMPERATURE.
Q. SYSTEM OPERATION WITHOUT HANDHELD REMOTE
This system is designed to operate with the handheld remote or a thermostat, but in the unlikely event that it is required to be operated without the handheld remote or a thermostat, follow this simple procedure.
Slide REMOTE /OFF switch on the main control module to OFF. The fireplace can now be lit and shut off by use of the ON/OFF rocker switch located next to the module.
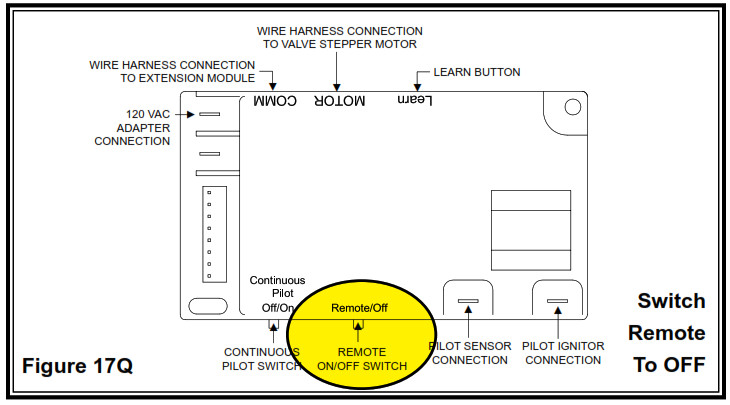
IMPORTANT NOTE
When operating fireplace in this capacity, the only function available is burner operation on HI.
17 Remote Control Instruction Manual – 17 Remote Control Instruction Manual –
[xyz-ips snippet=”download-snippet”]