
Streetwize In Car DAB Radio Adapter SWDAB2 Installation Guide

Intention For Use
Thank you for purchasing this In-Car DAB Radio Adaptor With Bluetooth Connectivity from Streetwise. This product is intended for motorists that want to listen to their favorite DAB radio stations in their vehicle. This device also comes with Bluetooth connectivity for connecting your smartphone for answering & rejecting calls hands-free and play music stored on your device or via streaming services such as Spotify, Amazon Prime & YouTube.
before using this product, we recommend reading all the information in this document. please keep this document for future reference.
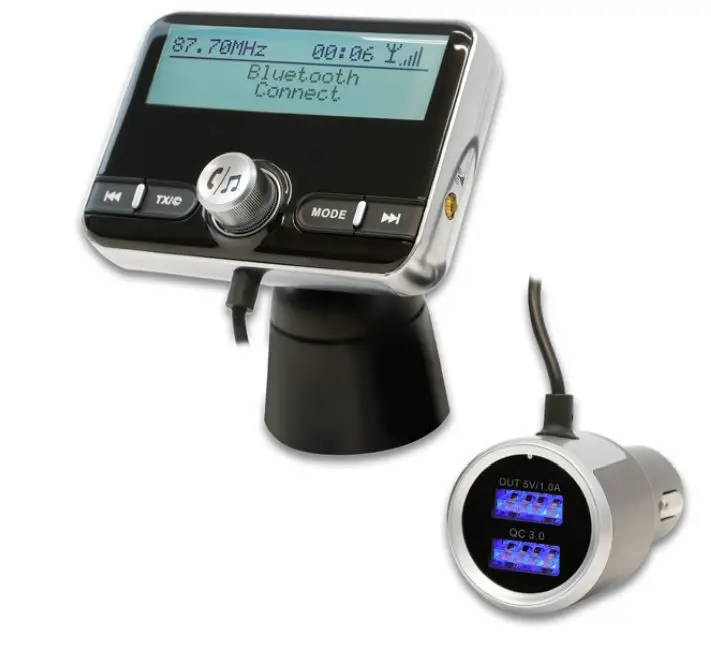
Product Elements

- Centre console fixed leg
- Air vent clip
- Rotary shaft setting
- Clip adjust place
- TF card slot
- Audio output
- MIC
- LCD display
- Previous button
- TX Button (CH ≠activation/DAB automatically searching)
- Answer/Play/Volume adjustment
- Mode shift (DAB/Bluetooth/TF card)
- Next button 14. Antenna jack
- Power adaptor
- USB output: 5V/1A
- USB output: QC3.0
- Antenna
- AUX cable
Set Up & Installation
To operate this DAB adaptor, you will need to securely fit the antenna onto your vehicle’s windscreen, and then connect the antenna to the DAB adaptor via anthenna jack. Please follow the instructions below:
- Remove the product out of its packaging and dispose of the packaging in the correct manner.
- Open the driver side door of your vehicle and carefully remove the interior panel from the right-hand frame of the windscreen. This will reveal a metal pillar.Important: Please refer to your vehicle’s handbook for safe and proper removal of the interal panel.
- With the antenna, carefully remove the protective paper from both the clear adhesive film and the black adhesive film. Discard bothprotective papers in the correct manner.
- Then attach the black adhesive film to the metal pillar and the transparent film onto the windscreen. Please ensure that you attachthe antenna properly so that you can reinstall the panel later.
- Thread the antenna’s wiring along the metal pillar, towards the bottom and allow the connector-end of the wire to rest on your vehicle’s dashboard. Ensure you have enough wire to connect the DAB adaptor when mounted on either the dashboard or air vent mount.Important: Becareful not to overstrech the wire when doing so.
- Reinstall the panel back. Important: Please refer to the vehicle handbook for safe and proper installation.
- Mount the antenna to either the air vent or dashboard (see Mounting The DAB adaptor).
- Connect the antenna to the DAB adaptor.
- Plug in the DAB adaptor to your vehicle’s 12V socket and switch on your vehicle to turn on the DAB adaptor.
Mounting the DAB Adaptor
Vent Clip
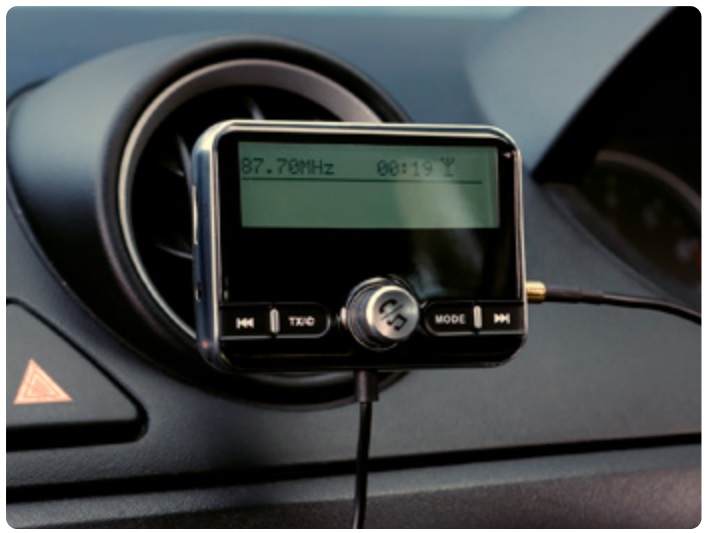
To attach the vent clip, loosen the rotary shaft, then insert the ball joint of the vent clip into the socket. Once inserted, tighten the rotaryshaft to secure the vent clip in place.To mount the DAB adaptor using the vent clip, press the button to open the clip so that it can be slotted into the vehicle’s air vent. Once the vent clip is in the air vent, release the button to secure in place.
Dashboard/Windscreen
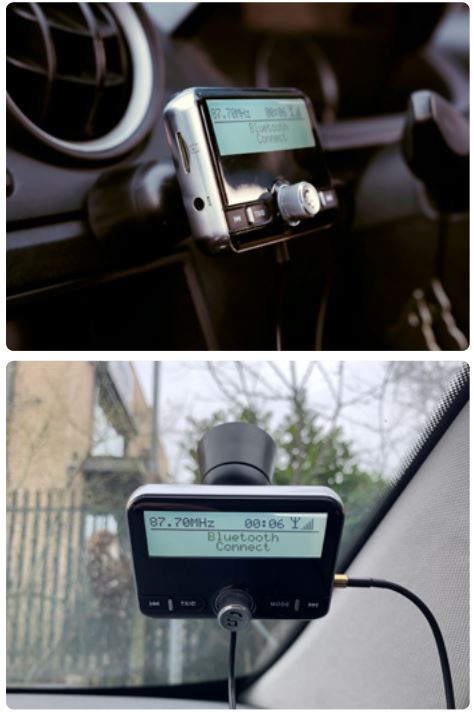
To mount the DAB adaptor to your dashboard or windscreen, you will need to attach the vent clip to the DAB adaptor (see section above). With the vent clip in place, insert the clip onto the central fixing console.
Important: If you intend to mount the DAB adaptor using the central fixing console, please note that the adhesive backing can only be used once. We advise that you first position the console in different places on your windscreen/dashboard before peeling off the white protective film.
Once you have found your desired position to mount the console, carefully peel off the white protective film from the reverse side of thecentral fixing console to reveal the adhesive backing and secure the console onto your dashboard/windscreen.
Using The DAB Adaptor
Setting FM Frequency To Link The DAB Adaptor
1. With the DAB adaptor switched on, press & hold the TX button for the adaptor to prompt you to set the FM frequency to link the adaptor to your vehicle’s FM stereo. See Figure 1.

2. Press either ![]() or
or ![]() to set your desired frequency.Long pressing
to set your desired frequency.Long pressing ![]() /
/ ![]() will change the frequency quickly,short press will change the frequency slowly.You can also rotate the
will change the frequency quickly,short press will change the frequency slowly.You can also rotate the ![]() knob to change the frequency.3. You can set the frequency anywhere from 87.5MHz to 108MHz.Important: When selecting your frequency, please ensure that your chosen frequency is empty.4. Then, switch on the vehicle’s FM stereo and adjust the radio’s frequency so that it matches the FM frequency that you’ve set in your DAB adaptor.
knob to change the frequency.3. You can set the frequency anywhere from 87.5MHz to 108MHz.Important: When selecting your frequency, please ensure that your chosen frequency is empty.4. Then, switch on the vehicle’s FM stereo and adjust the radio’s frequency so that it matches the FM frequency that you’ve set in your DAB adaptor.
Using The DAB Adaptor

Scanning/Listening to DAB Radio Stations
To scan and listen to DAB radio stations, please follow the instructions:
- Press the Mode button until you enter DAB mode.
- To search for DAB stations, press the TX button and the adaptor will start to scan DAB stations. See Figure 2.
- Once the DAB scan has been complete, you can select your channel by pressing either
 or .
or . - You can adjust the volume by rotating the knob.
Connecting Your Smartphone to the DAB Adaptor Via Bluetooth
To link your smartphone or tablet device to the DAB adaptor via Bluetooth, please follow the instructions below:
- On the adaptor, press the Mode button until you have entered Bluetooth mode.
- To connect your smartphone/tablet to the adaptor, please make sure your Bluetooth is enabled on your smartphone/tablet device.
- Then, on your smartphone/tablet, search for ‘DAB-CarKit’ when searching for nearby Bluetooth devices. Select ‘DAB-CarKit’ to pair your device with the adaptor.
- The adaptor will sound a confirmation tone and the LCD display will show ‘Bluetooth Connected’. See Figure 3
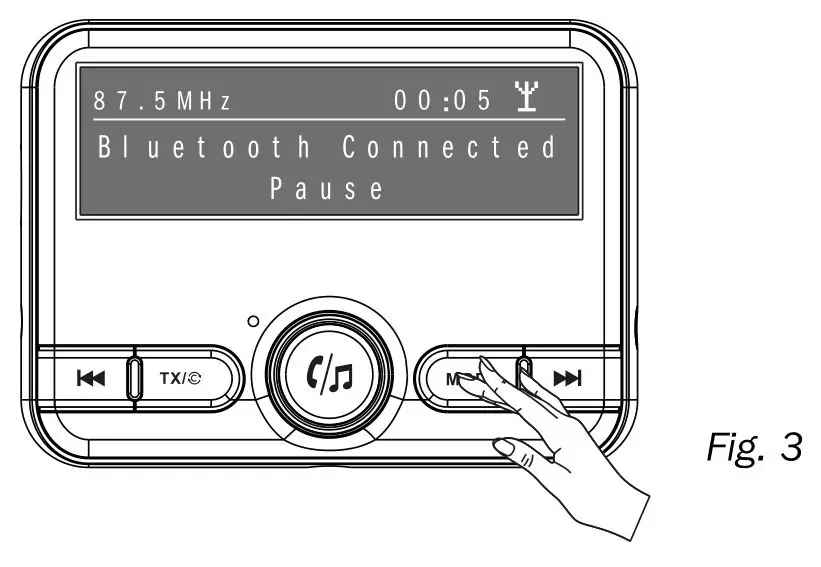
Playing Music From Your Phone/Tablet
To link your smartphone or tablet device to the DAB adaptor via Bluetooth, please follow the instructions below:Once your device is connected to the adaptor via Bluetooth, you are able to play music from your smartphone to your vehicle’s stereo system. You can play music stored on your device or you can play music from streaming services such as Spotify, Amazon Prime &YouTube.When playing music from your device you can press to ![]() play or pause the audio track.And you can skip/change tracks by pressing either
play or pause the audio track.And you can skip/change tracks by pressing either ![]() or
or ![]() .Plus, you can adjust the volume by rotating the
.Plus, you can adjust the volume by rotating the ![]() knob.
knob.
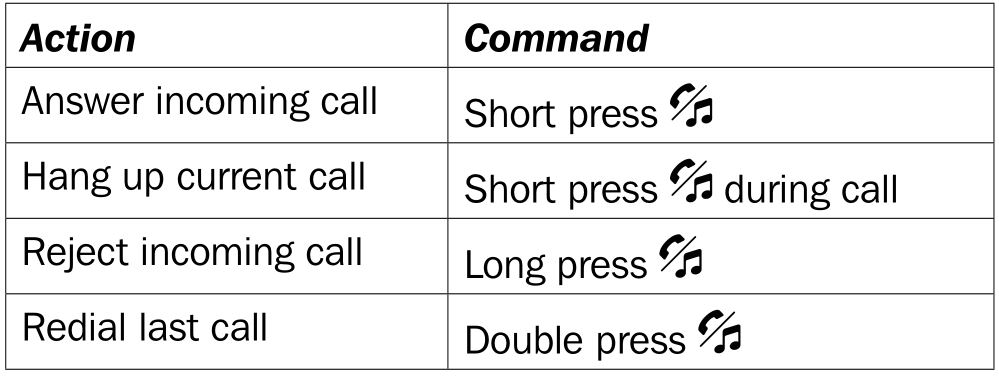
Handsfree Calling
When your phone is connected via Bluetooth, you can answer, reject, hang up and redial the last call via the adaptor. Please see Table 1 for instructions:
Table 1
TF (Micro SD) Card Mode
You can also play music stored on a TF card (Micro SD card). To do so, please follow theinstructions below:
- Insert the TF card into the slot located on the left side of the DAB adaptor.
- On the DAB adaptor, press the Mode button until you’ve entered TF mode. Entering this mode will enable the adaptor to read the TF card.
- To play/pause music, press . To change track press either or .
AUX Input
Using the supplied AUX cable, connect one of the cables to the 3.5mm output jack port of your audio device (i.e. portable MP3 player) and the other end of the cable to the input AUX jack on the DAB adaptor.When a connection via AUX has been made, you will see the headphone icon appear on the LCD display.
Please note: You can only play/pause music and change tracks via the audio device. You can’t change tracks or play/pause via the DAB adaptor itself.
Charging Devices Via 12V USB Charge Ports

The 12V plug that powers the DAB adaptor features two USB charge ports (see Figure 4). These USB charge ports are suitable for charging your smartphone, tablet or any other portable USB deviceTo charge a device, connect the DAB adaptor’s plug into your vehicle’s 12V socket. Switch on your vehicle and then connect your device via the USB ports to commence charge.
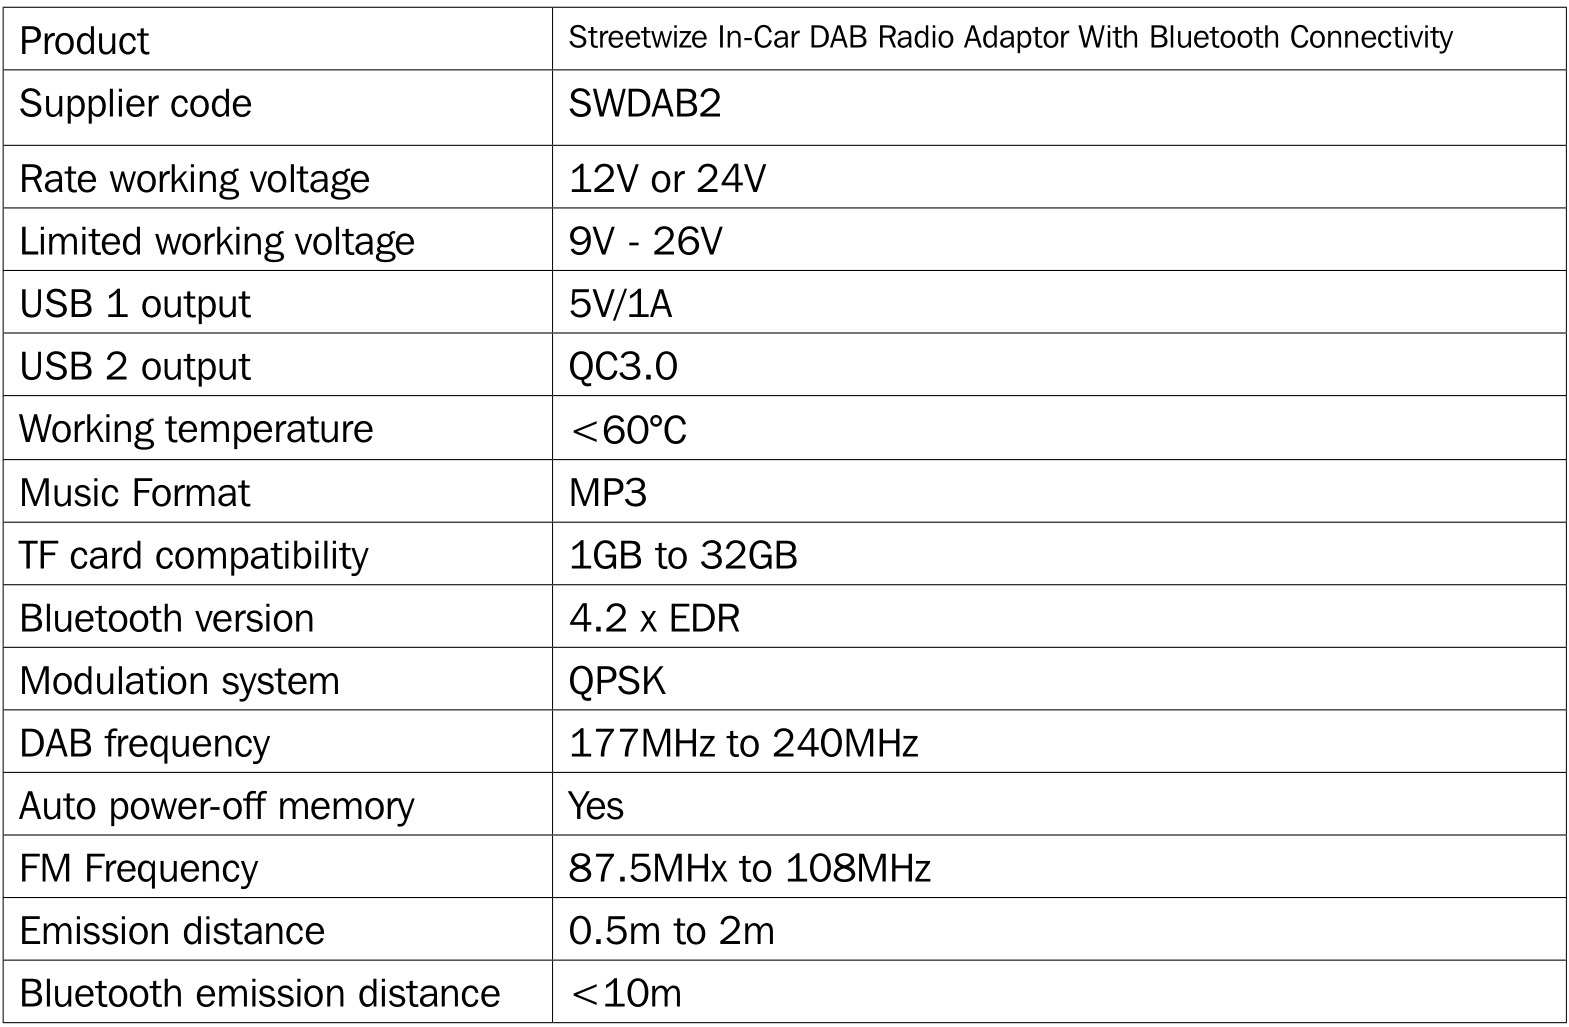
Technical Support & Spare Parts
If you require any technical support or spare parts for your product within the warranty period, please contact us on [email protected] and provide the product name and supplier code (see Technical Specifications) along with the technical query and proof of purchase.
Technical Specification
Streetwize: Ashburton Road West, Trafford Park, Manchester, M17 1RY
For Product Support:E: [email protected]T: +44 (0)161 447 8597
For Trade Enquiries:E: [email protected]essories.comT: +44 (0)161 447 8580
![]()
 report this ad
EU Registered Address: Ace Supply Co (Europe) Ltd, 25 Herbert Place, Dublin 2, D02 A098 Republic of Ireland.
References
[xyz-ips snippet=”download-snippet”]