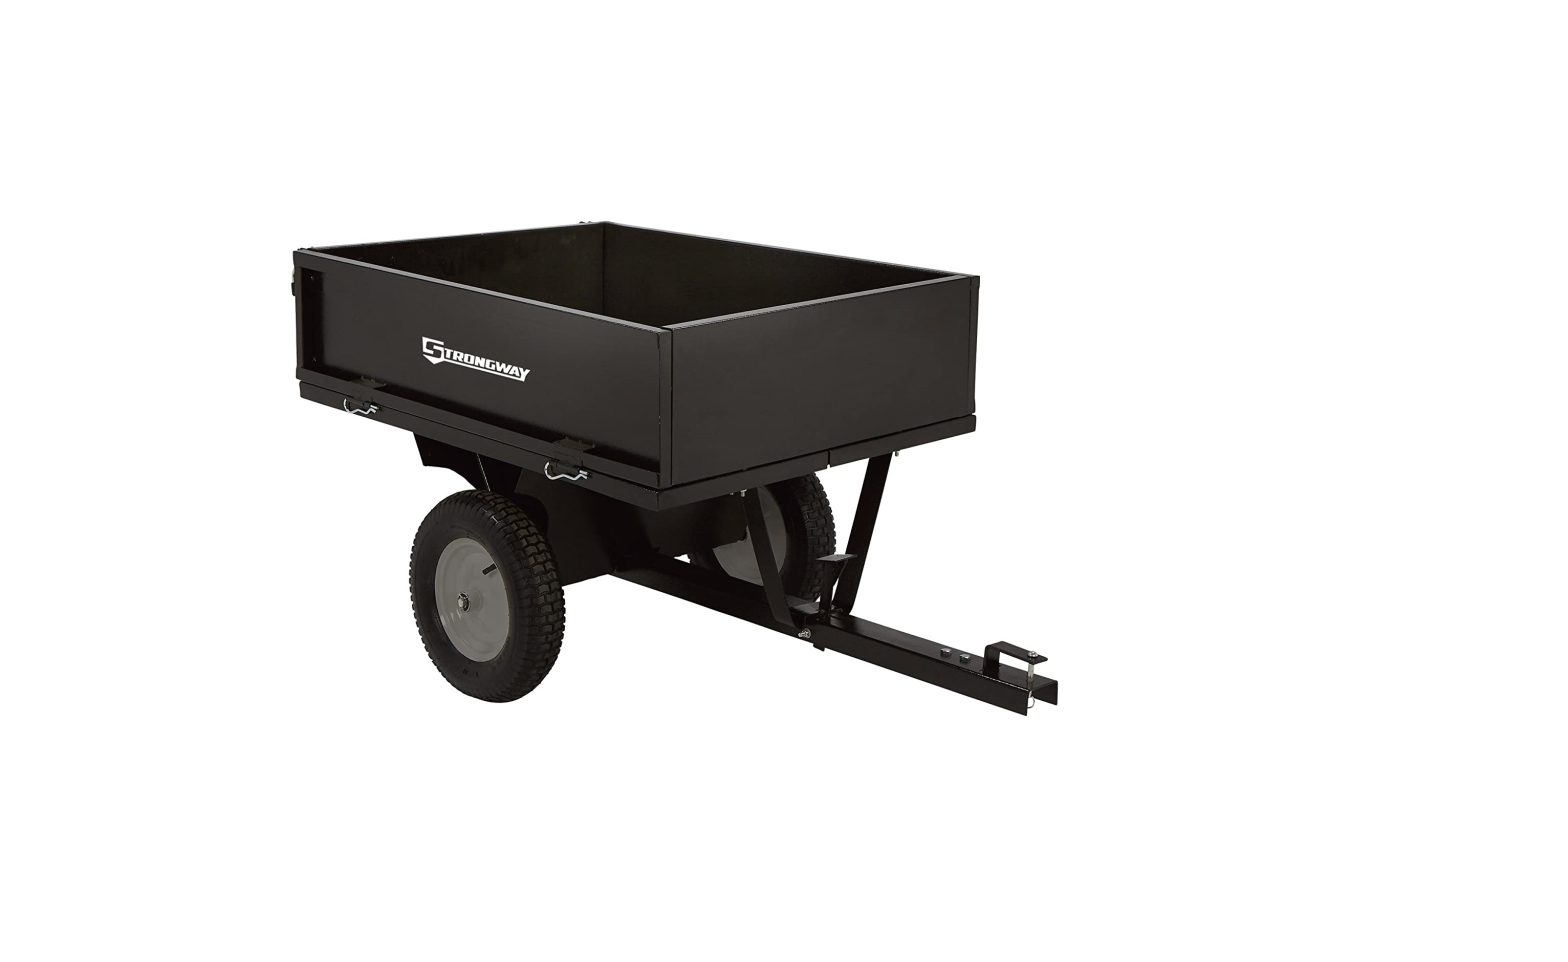
STRONGWAY 500-LB Capacity Dumb Cart Owner’s Manual
![]() WARNING: Read carefully and understand all ASSEMBLY AND OPERATION INSTRUCTIONS before operating. Failure to follow the safety rules and other basic safety precautions may result in serious personal injury.
WARNING: Read carefully and understand all ASSEMBLY AND OPERATION INSTRUCTIONS before operating. Failure to follow the safety rules and other basic safety precautions may result in serious personal injury.
Thank you very much for choosing an Ironton™ product. For future reference, please complete the owner’s record below:Model: _______________ Purchase Date: _______________
Save the receipt, warranty and these instructions. It is important that you read the entire manual to become familiar with this product before you begin using it.
This item is designed for certain applications only. The distributor cannot be responsible for issues arising from modification. We strongly recommend this item not be modified and/or used for any application other than that for which it was designed. If you have any questions relative to a particular application, DO NOT use the kit until you have first contacted the distributor to determine if it can or should be performed on the product.
For technical questions please call 1-800-222-5381.
INTENDED USE
Industrial-grade Jumbo Wagon handles heavy loads up to 1400 lbs. Perfect for hauling patio blocks, firewood, gardening supplies and much more. Front, rear and side panels fold away or detach completely for easy loading and unloading.
TECHNICAL SPECIFICATIONS
| Item | 46442 |
| Capacity | 500 lbs. (10 cubic feet) |
| Tires | 16 x 4.50-8 |
| Construction | Steel |
| Production Dimensions | 58 1/4in.L x31 7/8in. W x 30 1/8in.H |
GENERAL SAFETY REGULATIONS
![]() WARNING: Read and understand all instructions. Failure to follow all instructions listed below may result in serious injury.
WARNING: Read and understand all instructions. Failure to follow all instructions listed below may result in serious injury.
![]() AUTION: Do not allow persons to operate or assemble this dump cart until they have read this manual and have developed a thorough understanding of how thedump cart works.
AUTION: Do not allow persons to operate or assemble this dump cart until they have read this manual and have developed a thorough understanding of how thedump cart works.
![]() WARNING: The warnings, cautions, and instructions discussed in this instruction manual cannot cover all possible conditions or situations that could occur. It must be understood by the operator that common sense and caution are factors that cannot be built into this product, but must be supplied by the operator.
WARNING: The warnings, cautions, and instructions discussed in this instruction manual cannot cover all possible conditions or situations that could occur. It must be understood by the operator that common sense and caution are factors that cannot be built into this product, but must be supplied by the operator.
- Keep the work area clean and dry. Damp or wet work areas can result in injury.
- Keep children away from work area. Do not allow children to handle this product.
- Store idle equipment. When not in use, tools and equipment should be stored in a dry location to inhibit rust. Always lock up tools and equipment, and keep out of reach of children.
- Use the right tool for the job. Do not attempt to force small equipment to do the work of larger industrial equipment. There are certain applications for which this equipment was designed. It will do the job better and more safely at the capacity for which it was intended. Do not modify this equipment, and do not use this equipment for a purpose for which it was not intended.
- Check for damaged parts. Before using this product, carefully check that it will operate properly and perform its intended function. Check for damaged parts and any other conditions that may affect the operation of this product. Replace damaged or worn parts immediately.
- Do not overreach. Keep proper footing and balance at all times to prevent tripping, falling, back injury, etc.
- DO NOT use the equipment when tired or under the influence of drugs, alcohol, or medication. A moment of inattention while operating this equipment may result in serious personal injury. 1 of 7
- Industrial applications must follow OSHA requirements.
SPECIFIC OPERATION WARNINGS
- Do not modify the cart in any way. Unauthorized modification may impair the function and/orsafety and could affect the life of the equipment. There are specific applications for which the yard cart was designed.
- Always check for damaged or worn out parts before using the yard cart. Broken parts will affect the dump cart operation. Replace or repair damaged or worn parts immediately.
- Store idle dump cart. When dump cart is not in use, store it in a secure place out of the reach of children. Inspect it for good working condition prior to storage and before re-use.
- Do not at any time carry passengers sit or stand on the cart.
- Do not exceed maximum load capacity of 500 lbs.
- Avoid large holes and ditches when transporting loads.
- Be careful when operating on steep grades; the cart may tip over.
- Always operate at reduced speed in rough terrain.
- Do not operate close to creeks, ditches and public highways.
- To avoid personal injury and/or equipment damage, DO NOT EXCEED 10 MPH.
- Always use caution when loading and unloading the cart.
- Only tow with recommended vehicles (Lawn/Garden Tractors and ATVs).
- Always secure and lock dump cart to the vehicle hitch before operating.
ASSEMBLY
Take all parts out of the shipping crate and inspect components to ensure there are no missing pieces before starting to assemble the utility dump cart follow steps 1 through 8.
- Left Bottom Panel 1pc

- Front Panel 1pc
- Wheel 2pcs
- Right Bottom Panel
- Rear Panel
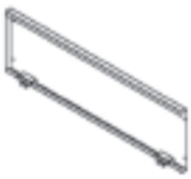
- Tongue Support 1pc
- Right Side Panel 1pc
- Wheel Axle 1pc
- Wheel Axle Support 2pc
- Support Tube 2pcs
- Left Side Panel 1pc
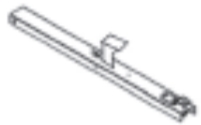
- Hitch Tongue 1pc
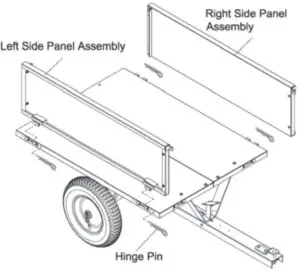
- Hinge Pin 6pcs
- Screw M8x40 8pcs
- Screw M8x20 8pcs
- Screw M8x50 4pcs
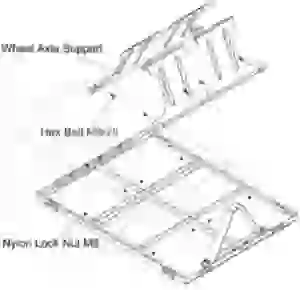
- Nylon Lock Nut M8 21pcs
- R Pin 04 2pcs
- Flat Washers 016 2pcs


Tool Required
- Pliers
- Screwdriver
- Wrench
STEP 1 Attach Bottom Panels and Support Tubes
- Put the left bottom panel and right bottom panel together.
- Attach the support tubes to the panels using eight sets of M8x40 screws and M8 nylon lock nuts.Loosely tighten the nuts.

STEP 2: Attach Tongue Support
1. Attach the tongue support to the bottom panels using four sets of M8x50 screws and M8 nylon lock nuts. Loosely tighten the nuts.
 STEP 3: Attach the Wheel Axle Support
- Put together the two wheel axle support stands, attached them to the bottom panels using eight sets of the M8x20 hex bolts and M8 nylon lock nuts. Loosely tighten the nuts.
STEP 4: Attach Wheel Axle
- Center the hitch tongue assembly in the wheel axle support.
- Insert the axle through the hole and slide it through both the axle support and the hitch tongue assembly.
- Tighten all hardware through steps 1 to 3.

STEP 5: Attach the Wheels
- Put an Ø16 flat washer on the axle; slide the wheel over the end, followed by the second Ø16 flat washers and secure with Ø3 R-pin.
- Repeat the process for the other side of the axle.

STEP 6: Attach Side Panel
- Attach the left and right side panel assemblies to the bottom panel using the four hinge pins.
STEP 7: Attach the Front Panel
- Attach the front panel to the bottom panel and secure using the using the two hinge pins.
- Lock the left and right side panel assemblies in place using the handle.

STEP 8: Attach the Rear Panel
- Slide the rear panel through the slots on the back side panels.
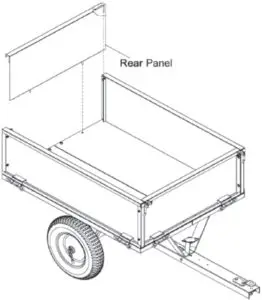
NOTE: The rear panel pins must go through the holes on the side panels to lock the panel in place.
OPERATION
![]() WARNING: Before using the utility dump cart, review the instructions below and safety information. Failure to follow these instructions may result in property damage or injury to the operator or bystanders.
WARNING: Before using the utility dump cart, review the instructions below and safety information. Failure to follow these instructions may result in property damage or injury to the operator or bystanders.
USING YOUR UTILITY DUMP CART
- DO NOT exceed rated capacity of 500 lbs. (227kgs).
- ALWAYS secure and lock the utility cart to the vehicle hitch before operating.
- ONLY use approved vehicles when towing the dump cart (Lawn/Garden Tractors and ATVs)
- NEVER tow the utility dump cart with box raised.
- DO NOT over fill the utility dump cart. Overflow loads can cause the cart and towing vehicle to lose traction and skid out of control.
- ONLY fill the dump cart to a comfortable dumping load. Extremely heavy loads will be difficult to operate and dump.
- ALWAYS use the dump cart for its intended purpose.
- ALWAYS make sure that the tow vehicle and the combined weight of the operator are greater than the load of the cart weight for proper control.
- DO NOT use cart on public highways or roads.
- NEVER exceed 10mph when towing the dump cart.
- DO NOT make sharp turns that may cause the Lawn/Garden Tractor or ATV tires to rub against the utility dump cart.
- ALWAYS slow down before turning.
- ALWAYS use caution when backing the utility cart. To avoid the cart from “jack-knifing” always back up in a straight line.
MAINTENANCE
- Maintain your dump cart. It is recommended that the general condition of any dump cart be examined before it is used. Keep your dump cart in good repair by adopting a program of conscientious repair and maintenance. Have necessary repairs made by qualified service personnel.
- After each use clean material out of the cart box.
- Rinse/dry inside and outside of the dump cart after each use.
- Before operating make sure the tires have the RECOMMENDED TIRE PRESSURE OF 25 PSI.
- Regularly grease the axle and the wheel bearing area or when needed.
- Periodically check all fasteners for tightness.
- Annually clean and lightly lubricate parts.
- Use a glossy enamel spray paint to touch up scratched or worn painted metal surfaces.
- Never exceed load capacity rating of 500 lbs. (227kgs); doing so will damage the utility dump cart.
STORAGE
- Never allow material to remain in the utility dump cart for extended periods of time.
- Before storing make sure the cart is clean and dry for years of trouble free service.
- Store indoors or protected area during severe weather and winter months.
- When storing outside always keep the tongue a little higher than the back of the cart to allow the moister to easily run out the back and will not accumulate in the box.
DIAGRAM AND PARTS LIST
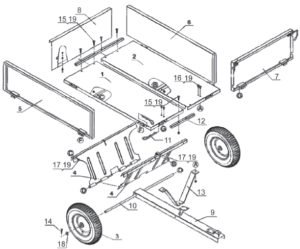
| Part No. | Description | Q’ty | Part No. | Description | Q’ty |
| 1 | Left Bottom Panel | 1 | 11 | Hinge Pin | 6 |
| 2 | Right Bottom Panel | 1 | 12 | Support Tube | 2 |
| 3 | Wheel | 2 | 13 | Tongue Support | 1 |
| 4 | Wheel Axle Support | 2 | 14 | R Pin 04 | 2 |
| 5 | Left Side Panel | 1 | 15 | Screw M8x40 | 8 |
| 6 | Right Side Panel | 1 | 16 | Screw M8x50 | 4 |
| 7 | Front Panel | 1 | 17 | Hex Bolt M8x16 | 8 |
| 8 | Rear Panel | 1 | 18 | Flat Washer 016 | 4 |
| 9 | Hitch Tongue | 1 | 19 | Nylon Lock Nut M8 | 21 |
| 10 | Wheel Axle | 1 |
For technical questions and replacement parts, please call 1-800-222-5381.
WARRANTY
One-Year Limited Warranty
 report this ad
Distributed byNorthern Tool + Equipment Co., Inc.Burnsville, MN 53306-6936NorthernTool.comMade in Vietnam
[xyz-ips snippet=”download-snippet”]