STUNTCAMS SC-GCWIFI HD 1080P Clear Eye Glasses WiFi IP Covert Hidden Camera
Product structure
➀ Camera➁ Micro SD card slot➂ Indicator light➃ On/Off button➄ Microphone➅ USB port➆ Reset Button
Getting started
Step 1: Download and install the phone APPSearch for and download the app called “HDSmartIPC” in your App store.
Step 2: Turn the camera on and wait for about 1 minute for the WiFi to be enabled.Step 3:Connect to the cameras WiFi
Set camera name and private code
Set name: Press the ![]() after the camera and select Device settings, select Set name, insert name like Office, Room……
after the camera and select Device settings, select Set name, insert name like Office, Room……
Set new Password: Press the ![]() after the camera and select Device settings, select Set new password and change it to new one. Default one is 8888.
after the camera and select Device settings, select Set new password and change it to new one. Default one is 8888.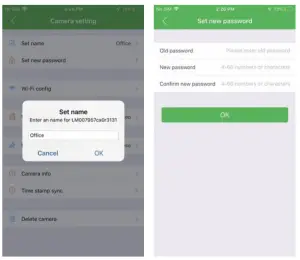
- Open smartphone settings, search and connect to the camera’s wireless signal named “AI/LM……”,wait Wi-Fi connected, and phone status bar appear Wi-Fi
 symbol.
 - Enter APP, app will add just connected camera automatically, Camera Online then;
- .Press the gear icon after the camera and select Device settings ,select Wi-Fi Config.
- Select the router Wi-Fi and input the password, the camera will then connect to the router, enabling you to view the live feed while outside of your home network.
- Close the APP and the camera will restart automatically and will come back online in 30 seconds.
- Open the APP to view live video locally or remotely.


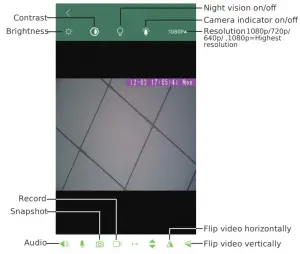
APP introduction

Live video page – Click camera to check
Charging your camera
Using the included USB cable and a 1AMP or greater wall charger, please charge the camera for at least 2 hours. The LED on the camera will turn green when connected to power. The LED will turn off once the camera is fully charged.
Inserting micro SD card
The camera requires the use of a Micro SD card up to 128GB. Before turning your camera on, please insert your Micro SD card into the camera. The micro sd card front of the card faces out when inserting into the micro sd card slot.
Recording with your camera
To turn the camera on, press the power button. You will see the blue and red LED turn on simultaneously. Once you see the blue and red LED start to flash, you can connect to the camera’s WiFi and use the phone app below. Once connected to WiFi, add the device and press the play button icon to see a live view. Once the live view appears, press the video record button to start recording. To display the recording time, simply tap the live view screen to display the time counter.To disable the blinking LED lights on the camera, press the light bulb on the app as shown below.Note: You must record the first file for the time increment that is in the camera settings.
Troubleshooting
Device will not charge or display green LEDConnect the power cable and press the RESET button with the small pin then disconnect the charger and re-connect it.
WiFi not showing up or forgot WiFi password?Press and hold the reset button for 10 seconds.
Live view is stuttering/lagging?If connected to the camera’s WiFi, make sure you are close enough to the camera. The WiFi range when using P2P mode is around 40ft.
report this adVideo will not playback with audioPlease use VLC Media Player for playback.
[xyz-ips snippet=”download-snippet”]