
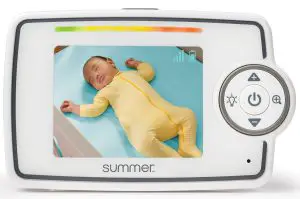
Summer Infant 36190A Glimpse Digital Color Video Monitor

Thank you for purchasing the Glimpse™ Digital Color Video Monitor by Summer Infant. Please read the following instructions and warnings carefully. Keep this instruction manual for future reference.
SET-UP
Charge the Handheld
Charge for 7 hours before first use.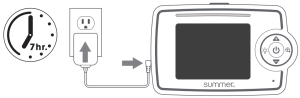
Install the Camera
For best picture focus, place camera 6 to 8 ft. from crib. Plug in camera.Place camera on a flat surface, such as a tabletop, or shelf or mount the camera on a wall using the screw and wall anchor provided.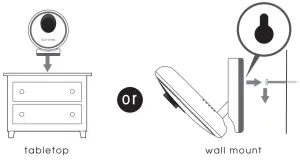
Secure the Camera Cord NEVER place the camera or cords within 3-feet of the crib.Secure the cord to your wall using the 6 security clips included to keep the cord away from baby’s reach.
Read all warnings prior to using this product.
|
|
STRANGULATION HAZARD: 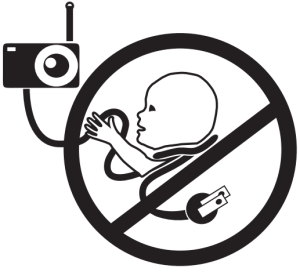 Children have strangled in cords. Keep this cord out of the reach of children (more than 3 ft. (0.9m) away). Children have strangled in cords. Keep this cord out of the reach of children (more than 3 ft. (0.9m) away). |
Power on the Camera and Handheld
Push the power/nightlight button on the camera and hold for 3 seconds. A green light will appear near the lens.Push and hold the power button on the handheld unit for 3 seconds. The handheld will automatically sync with the camera. (The handheld unit and the camera are paired at the factory for privacy reasons. If the handheld and camera are not synced with each other for any reason, see Adding a Camera in the user guide.)
Congratulations! You are now ready to use your Glimpse™ Digital Color Video Monitor!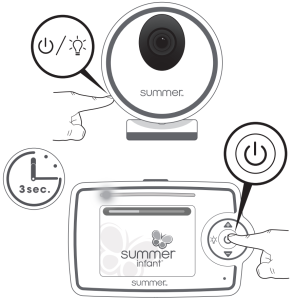
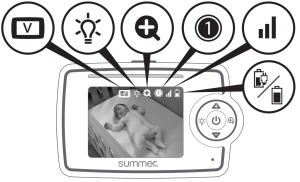
Screen Icons
 |
Vox Indicator |
 |
Nightlight |
 |
Zoom |
 |
Camera Selection |
 |
Reception |
 |
Battery Life/ Plugged In |
 |
Video |
 |
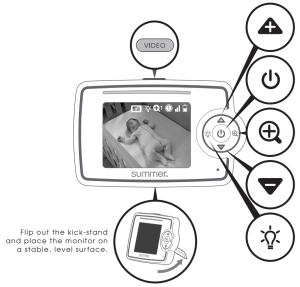
Power/Menu |
 |
Volume Up |
 |
Volume Down |
 |
Nightlight |
 |
Zoom |
USING THE HANDHELD
Volume
Use the UP/DOWN arrow bottons to increase and decrease the volume.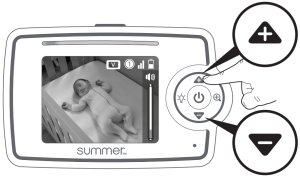
Zoom
Press the ZOOM button to magnify the screen. Press the button again to zoom out.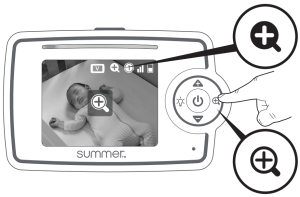
Vox (Voice Activated Video) On/Off
The Vox feature, when on, will turn on your screen when it is in power save mode and the camera picks up a sound. To turn Vox mode off, press the POWER/MENU button to enter menu screen. Using the DOWN button, highlight vox ON/OFF.Vox icon is displayed on indicator bar when active.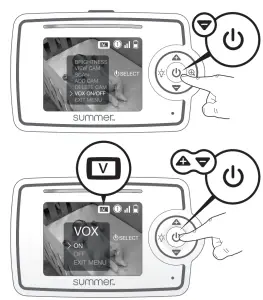
Sound Activated Lights
The LED light bar on the top of the handheld will light up as it picks up noises, even in power save mode. When battery is low, the first LED flashes red and handheld beeps.
Video On/Off Power Save
To conserve battery power, turn off the handheld’s video by pressing the VIDEO button. The screen will go dark. This feature allows you to preserve battery life when not plugged into A/C adapter. The audio feature will remain activated allowing you to monitor sounds. Press the VIDEO button again to resume video monitoring. When handheld is not plugged in, screen will automatically turn off after 30 seconds.Press the video button to turn screen back on. If Vox feature is on, video will turn on automatically when sound is detected.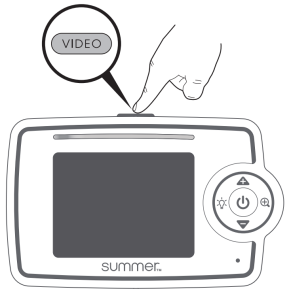
Brightness
Adjust the handheld screen brightness by pressing the POWER/MENU button. Select BRIGHTNESS from the menu. Use the UP and DOWN arrow buttons to adjust the brightness.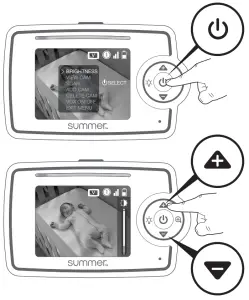
Selecting Camera to View
Tap the POWER/MENU button to enter menu screen. Using the DOWN button, highlight VIEW CAM and press the POWER/MENU button.Use the UP/DOWN buttons to select an available camera (blue color indicates synched cameras). Press POWER/MENU button to confirm selection.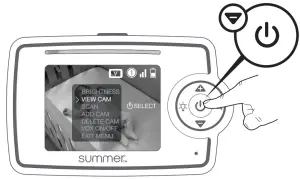

The video will appear on the handheld screen. An icon showing camera number will appear on the screen for 3 seconds. Camera number on indicator bar will change to selected camera.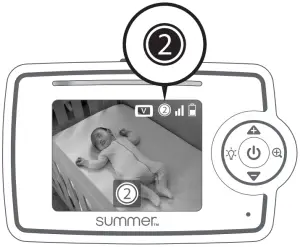
Scanning Camera
When using multiple cameras, to enter scan mode, press the POWER/MENU button to enter menu screen. Using the DOWN button, select SCAN, and press the POWER/MENU button. Scanning cameras will begin. It will cycle through each active camera every 8 seconds. To stop scanning, press the POWER/MENU button.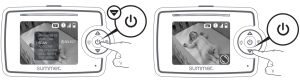
Adding a Camera
Make sure the power is on for the camera you would like to add. Press the POWER/MENU button to enter menu screen. Using the DOWN button, scroll to ADD CAM and press the POWER/MENU button to select. Using the UP or DOWN buttons, scroll to the camera number you would like to add and press POWER/MENU button to select. Press the SYNCH button on the back of the camera. Three bars will appear next to the camera icon to indicate that it is synching.
(Note: This product accepts up to 4 cameras and operates on audio and video auto-scan to view each camera on an 8-second rotation. To order an additional camera (item #29980), please contact our Consumer Relations Team by phone at: 401-671-6551 or via email at: www.summerinfant.com/contact for details.)
Deleting a Camera:
Press the POWER/MENU button to enter menu screen. Using the DOWN button, highlight DELETE CAM. Use the UP/DOWN buttons to highlight the camera you would like to delete. Press the POWER/MENU button to delete that cam.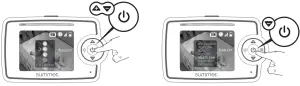
Nightlight
Press the NIGHTLIGHT button on the handheld to activate the soft glow nightlite on the camera. The light will glow. Nightlights are comforting to little ones, especially toddlers who become scared in a pitch black room. Press the NIGHTLIGHT button again to turn off.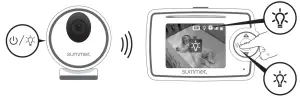
The nightlight can also be turned on or off from the camera by pressing the POWER/NIGHTLIGHT button.
Tools required for wall mount: Screwdriver and drill (not included).For adult use only.
![]() WARNING Adult assembly required. Keep small parts away from children when assembling.
WARNING Adult assembly required. Keep small parts away from children when assembling.
![]() WARNING
WARNING
THIS PRODUCT CANNOT REPLACE RESPONSIBLE ADULT SUPERVISION.
- STRANGULATION HAZARD – Children have STRANGLED in cords. Keep this cord out of reach of children (more than 3 feet (0.9 m) away from the crib).Use enclosed Security Clips to help secure cord away from baby’s reach.Never use extension cords with AC Adapters. Only use the AC Adapters provided.
- When an AC Adapter is plugged into an electrical outlet, do not touch the exposed end.
- Test monitor before first use, periodically, and when changing location of the Camera.
- Do not use monitor near water (such as bathtub, sink, etc.).
- Keep monitor away from heat sources (such as stoves, radiators, etc.).
- Make sure there is proper ventilation around all monitor components. Do not place on sofas, cushions, beds, etc. which may block ventilation.
- This product is not a toy. Do not allow children to play with it.
- This product contains small parts. Adult assembly required. Exercise care when unpacking and assembling the product.
![]() BATTERY WARNING
BATTERY WARNING
- Use only the original rechargeable battery provided. Please contact Summer Infant, Inc. for replacement battery. Contact information can be found on the back page of these instructions or on the battery itself.
- Do not short-circuit supply terminals.
- Only the recommended battery or equivalent are to be used, volts and size.
- Remove battery when product is stored for long periods of time or when battery is exhausted.
- Dispose of exhausted battery properly.
- Keep all batteries away from children.
FCC INFORMATION
This device complies with part 15 of the FCC Rules. Operation is subject to the following two conditions: (1) This device may not cause harmful interference, and (2) this device must accept any interference received, including interference that may cause undesired operation.
CAUTION: Changes or modifications not expressly approved by Summer Infant may void the users authority to operate this equipment.
NOTE: This equipment has been tested and found to comply with the limits for a Class B digital device, pursuant to part 15 of the FCC Rules. These limits are designed to provide reasonable protection against harmful interference in a residential installation. This equipment generates, uses and can radiate radio frequency energy and, if not installed and used in accordance with the instructions, may cause harmful interference to radio communications. However, there is no guarantee that interference will not occur in a particular installation. If this equipment does cause harmful interference to radio or television reception, which can be determined by turning the equipment off and on, the user is encouraged to try to correct the interference by one or more of the following measures:
- Reorient or relocate the receiver
- Increase the separation between the equipment and the receiver
- Connect the equipment into an outlet on a circuit different from that to which the receiver is connected.
- Consult the dealer or an experienced radio/TV technician for help
CAUTION:
- To comply with FCC RF exposure compliance requirements, a separation distance of at least 20 cm must be maintained between the antenna of this device and all persons.
- This transmitter must not be co-located or operating in conjunction with any other antenna or transmitter.
Summer Infant, Inc. Monitor Warranty PolicySummer Infant, Inc. will repair or replace (at our option) your unit free of charge for 12 months from the date of purchase if the unit is defective in workmanship or materials. To claim your repair/replacement, the product must be returned to Summer Infant along with a copy of the original purchase receipt. In the absence of the purchase receipt, the warranty will be 12 months from the date of manufacture. This warranty does not apply to normal wear or damage from misuse, abuse, improper storage and handling, installation, accident, unauthorized repair or alteration. Please contact our Customer Service Department by phone at 401-671-6551 or via e-mail at summerinfant.com/contact for details. For sale and use in the USA. The warranty is null and void if used outside its intended territory.
IMPORTANT SAFETY INSTRUCTIONS
- Read Instructions – All the safety and operating instructions should be read before the product is operated.
- Retain Instructions – The safety and operating instructions should be retained for future reference.
- Heed Warnings – All warnings on the product and in the operating instructions should be adhered to.
- Follow Instructions – All operating and use instructions should be followed.
- Cleaning – Unplug this product from the wall outlet before cleaning. Do not use liquid cleaners or aerosol cleaners. Use a damp cloth for cleaning.
- Attachments – Do not use attachments not recommended by the product manufacturer as they may cause hazards.
- Water and Moisture – Do not use this product near water – for example, near a bath tub, wash bowl, kitchen sink, or laundry tub; in a wet basement; or near a swimming pool; and the like.
- Accessories – Do not place this product on an unstable cart, stand, tripod, bracket, or table. The product may fall, causing serious injury to a child or adult, and serious damage to the product. Use only with a cart, stand, tripod, bracket, or table recommended by the manufacturer, or sold with the product. Any mounting of the product should follow the manufacturer’s instructions, and should use a mounting accessory recommended by the manufacturer.
- Ventilation – Slots and openings in the cabinet are provided for ventilation and to ensure reliable operation of the product and to protect it from overheating, and these openings must not be blocked or covered. The openings should never be blocked by placing the product on a bed, sofa, rug, or other similar surfaces. This product should not be placed in a built-in installation such as a bookcase or rack unless proper ventilation is provided or the manufacturer’s instructions have been adhered to.
- Power Sources – This product should be operated only from the type of power source indicated on the marking label. If you are not sure of the type of power supply to your home, consult your product dealer or local power company. For products intended to operate from battery power, or other sources, refer to the operating instructions.
- Power-Cord Protection – Power-supply cords should be routed so that they are not likely to be walked on or pinched by items placed upon or against them, paying particular attention to cords at plugs, convenience receptacles, and the point where they exit from the product.
- Power Lines – An outside antenna system should not be located in the vicinity of overhead power lines or other electric light or power circuits, or where it can fall into such power lines or circuits. When installing an outside antenna system, extreme care should be taken to keep from touching such power lines or circuits as contact with them might be fatal.
- Overloading – Do not overload wall outlets, extension cords, or integral convenience receptacles as this can result in a risk of fire or electric shock.
- Object and Liquid Entry – Never push objects of any kind into this product through openings as they may touch dangerous voltage points or short-out parts that could result in a fire or electric shock. Never spill liquid of any kind on the product.
- Servicing – Do not attempt to service this product yourself as opening or removing covers may expose you to dangerous voltage or other hazards. Refer all servicing to qualified service personnel.
- Damage Requiring Service – Unplug this product from the wall outlet and refer servicing to qualified service personnel under the following conditions:a) When the power-supply cord or plug is damaged,b) If liquid has been spilled, or objects have fallen into the product,c) If the product has been exposed to rain or water,d) If the product does not operate normally by following the operating instructions. Adjusting only those controls that are covered by the operating instructions as an improper adjustment of other controls may result in damage and will often require extensive work by a qualified technician to restore the product to its normal operation,e) If the product has been dropped or damaged in any way, andf) When the product exhibits a distinct change in performance – this indicated a need for service.
- Replacement Parts – When replacement parts are required, be sure the service technician has used replacement parts specified by the manufacturer or have the same characteristics as the original part. Unauthorized substitutions may result in fire, electric shock, or other hazards.
- Safety Check – Upon completion of any service or repairs to this product, ask the service technician to perform safety checks to determine that the product is in proper operating condition.
- Wall or Ceiling Mounting – The product should be mounted to a wall or ceiling only as recommended by the manufacturer.
- Heat – The product should be situated away from heat sources such as radiators, heat registers, stoves, or other products (including amplifiers) that produce heat.
PROBLEM SOLVING
No picture or sound
- Make sure the camera and handheld monitor unit are turned on
- Make sure the camera and handheld monitor unit are synced
- Make sure the AC adapters are plugged in
- Make sure the outlets are working
Sound but no picture
- Press the Video On-Off Button once to turn on video mode
- Check to make sure nothing is blocking the camera
- Test reception by moving the handheld unit and/or camera to different locations
- Make sure the camera and handheld monitor unit are paired.
Picture but no sound
- Power the handheld completely off, then turn handheld back on.
- Turn up the volume using Volume Control.
Picture not clear
- Position the handheld unit closer to the camera.
- Move the handheld unit away from other electronic devices, cordless phones, etc.
- Adjust the brightness using the Brightness Control
- Test reception by moving the handheld unit and/or camera to different locations
- Place camera 6 to 8 ft. from crib for optimized focus. Make sure to follow instructions and warnings for camera placement.
Squealing sound coming from speaker on Handheld Unit
- Move the handheld unit and camera further away from each other
- Turn the volume down using Volume Control
- Power the handheld completely off, remove and re-insert the battery then turn handheld back on.
Video keeps coming on when screen should be off
- Follow instructions to turn off Vox (Voice Activated Video) feature
Handheld is beeping
- If no video, turn on camera.
- If battery is low, charge battery.
Temperature listed as LL or HH
- Room temperature is outside of the thermometer limits. The thermometer is effective in between 32°F – 100°F (0°C – 38°C). If you receive a false error message, please contact our consumer relations.
Camera isn’t syncing with handheld
- Delete camera and add it back.
REPLACEMENT PARTS
REPLACEMENT PARTSIf you need to order a replacement part or want to order an Extra Camera, you can contact our Customer Relations Department at 401-671-6551 or via email at www.summerinfant.com
- Camera AC Adapter: #30564
- Handheld AC Adapter: #30564
- Extra Camera: #29980
- Rechargeable Ni-MH AAA size 4.8V 800mAh battery: #29600-10
If you experience a problem that is not noted in this manual, please do not return the product to the store. Our Customer Service Department may have a simple solution to your problem. Please contact us at 401-671-6551 or email us at summerinfant.com.
CONTACT US
Summer Infant stands behind all of its products. If you are not completely satisfied or have any questions, please contact our Consumer Relations Team at 401-671 6551 or www.summerinfant.com
Summer Infant (USA), Inc.1275 Park East Drive Woonsocket, RI 02895 401-671-6551
 report this ad
Summer Canada, Ltd.200 First Gulf Blvd., Unit C Brampton, Ontario, Canada L6W 4T5 905 456-8484
© 2020 Summer Infant (USA), Inc.Colors and styles may vary.Please retain information for future reference.MADE IN CHINA. 10/20

References
[xyz-ips snippet=”download-snippet”]