24V-HCSWP-LTE Cordless Telescoping Pole + Pruning Saw
ROPERATOR’S MANUALA Division of Snow Joe®, LLC
ENCORDLESS TELESCOPING POLE + PRUNING SAW250W | 4000 RPM | 5″ BAR + CHAIN LENGTH
Model 24V-HCSWP-LTE
Form No. SJ-24V-HCSWP-LTE-880E-M
IMPORTANT!Safety InstructionsAll Operators Must Read These Instructions Before UseAlways follow these safety guidelines. Failure to do so may result in serious bodily injury or death.General Safety mWARNING! This appliance is not intended for useby children or by unassisted, unsupervised persons whose physical, sensory or mental capabilities prevent them from using it safely. Children should be supervised to ensure that they do not play with the appliance.Before starting up your machine, please check it carefully for any defects. If you find any, do not start up your machine. Contact your authorized Snow Joe® + Sun Joe® dealer or call the Snow Joe® + Sun Joe® customer service center at 1-866-SNOWJOE (1-866-766-9563).mWARNING! When using the power tool, basic safetyprecautions should always be followed to reduce the risk of fire, electric shock, and personal injury. These include:1. Keep work area clean and well-lit Cluttered, dark areas invite accidents. Always inspect the area where the pole + pruning saw is to be used.2. Avoid dangerous environments Do not use the power tool in rain, in damp or wet locations, or in bad weather, especially when there is a risk of lighting. This decreases the risk of being struck by lighting. Do not operate the power tool in gaseous or explosive atmospheres or use the power tool near flammable or combustible liquids. Motors in these tools may spark, and the sparks might ignite fumes.3. Know your product Know how to start and stop the machine. Be thoroughly familiar with the controls.4. Keep children, bystanders, and pets away All spectators, including pets, should be kept a safe distance away from the work area.5. Dress properly Do not wear loose clothing or jewelry. They can get caught in moving parts. Protective rubber gloves and non-slip footwear are recommended when working outdoors.
6. Avoid Slipping Exercise caution to avoid slipping or falling. Wear protective footwear that will protect your feet and improve your footing on slippery surfaces.7. Stay alert Watch what you are doing. Use common sense. Do not operate the power tool when you are tired, or under the influence of alcohol or drugs.8. Do not overreach Keep proper footing and balance at xall times.9. Prevent unintentional starting Do not pull the trigger before connecting to battery pack, picking up or carrying the appliance. Do not carry the pole + pruning saw with your finger on the trigger.10. Use the right appliance Do not use the power tool for any applications other than those for which it was intended.11. The chain is sharp Don’t grasp the exposed chain or cutting edges when picking up or holding the power tool.12. Use two hands Hold the telescoping pole and handle with both hands to avoid loss of control.13. Remove the battery Remove the battery from the power tool when it is not in use, before servicing it, when changing accessories, and when performing any other maintenance task.14. Use safety glasses Also use safety footwear, snug-fitting clothing, protective gloves, hearing and head protection.15. Use head protection Always use head protection when operating the power tool overhead. Falling debris can result in serious personal injury.16. Do not force the tool It will perform better with less likelihood of personal or mechanical injury if it is used at the rate for which it was designed.17. Check for damaged parts Before further use of the appliance, all guards and parts should be carefully checked to determine that it will operate properly and perform its intended function. Check for alignment of moving parts, binding of moving parts, breakage of parts, mounting, and any other condition that may affect its operation. A guard or other part that is damaged should be properly repaired or replaced. Contact the Snow Joe® + Sun Joe® customer service center at 1-866-SNOWJOE (1-866-766-9563) for assistance.18. Maintain the power tool with care Keep the cutting edges sharp and clean for optimal performance and to reduce the risk of injury. Keep the handles dry, clean, and free from oil and grease. Follow the additional recommendations described in the maintenance section of this manual.
© 2022 by Snow Joe®, LLC All rights reserved. Original instructions.
SAVE THESE INSTRUCTIONS 1
19. Store indoors When not in use, the power tool should be stored indoors in a dry and high or locked-up place out of the reach of children.20. Do not use the power tool if the trigger does not turn it on and off. Any power tool that cannot be controlled is dangerous and must be repaired.21. Keep all parts of the body away from the chain. Do not remove cut material or hold material to be cut while the chain is moving. Make sure the switch is off when clearing jammed material. The chain will continue moving for a while after the tool is turned off. A moment of inattention while operating the power tool may result in serious personal injury.22. Carry the power tool by the handle with the chain stopped. When transporting or storing the power tool, always keep the chain and guide bar in the bar sheath. Proper handling of the pole + pruning saw will reduce the chance of personal injury.23. Hold the product by insulated surfaces only. In the event that the chain comes into contact with hidden wiring, exposed metal parts of the product may become “live” and give the operator an electric shock.24. The unit has not been designed to provide protection from electric shock in the event of contact with overhead electric lines. Never use the power tool near any electrical power lines. Contact with or use near power lines may cause serious injury or electric shock resulting in death. Maintain a minimum clearance of 50 ft (15 m) from all power lines.mWARNING! Before inspecting, cleaning, or servicingthe machine, remove the battery and wait for all moving parts to stop. Failure to follow these instructions can result in serious personal injury or property damage.mWARNING! Do not use this appliance without readingthis instruction manual.mWARNING! Do not use the appliance within range ofpersons unless they are wearing protective clothing.mWARNING! Do not operate the cordless power tool in atree, on a ladder, or on scaffolding. Using the tool under such circumstances is extremely dangerous.mWARNING! Do not let familiarity with this type of toolprevent you from taking all necessary precautions. Remember that a careless fraction of a second is sufficient to inflict serious injury.mWARNING! The cordless pole + pruning saw must befully assembled before operation! Do not use the tool that is only partly assembled or assembled with damaged parts!mWARNING! Starting, stopping, and restarting an electricmotor repeatedly within a few seconds can generate a great deal of heat and damage the motor. To protect the life of your cordless power tool, always wait at least five seconds after stopping before restarting the unit.
mWARNING! Electrical Shock Hazard Before startingup your machine, please check it carefully for any defects. If you find any, do not start up your machine and contact your distributor.NOTE: Take care of small parts that are removed during assembly or when making adjustments. Keep them secure to avoid loss.Please contact an authorized Snow Joe® + Sun Joe® dealer or call the Snow Joe® + Sun Joe® customer service center at 1-866-SNOWJOE (1-866-766-9563) for all maintenance or operations not foreseen in this manual. Any operation performed in an unauthorized service center or by unqualified personnel will completely invalidate the warranty.mWARNING! For your safety and that of others:· Correct maintenance is essential to maintain the original efficiency and safety of the machine over time.· Keep all nuts, bolts, and screws tight to be sure the equipment is in safe working condition.· Never use the machine with worn or damaged parts. Damaged parts are to be replaced and never repaired.mWARNING! Always wear protective gloves duringmaintenance operations.mWARNING! Use only original manufacturer’sreplacement parts, accessories and attachments. Failure to do so can cause possible injury and poor performance. To order genuine replacement parts or accessories for the Sun Joe® iON+ cordless pole + pruning saw, please visit sunjoe.com or contact the Snow Joe® + Sun Joe® customer service center at 1-866-SNOWJOE (1-866-766-9563).Cleaning the Tool mWARNING! Never let any liquid get inside the motorhousing and NEVER immerse any part of the housing in liquid. 1. Stop the motor and remove the battery.2. Clean dirt and debris from the body of the tool, using a damp cloth with a mild detergent.NOTE: Do not use any strong detergents on the plastic housing or the handle, as they can be damaged by certain aromatic oils such as pine and lemon, and by solvents such as acetone.Storage mWARNING! Do not at any time let brake fluids, gasoline,petroleum-based products, penetrating oils, solvents, etc., come in contact with plastic parts. Chemicals can damage, weaken, or destroy plastic which may result in serious personal injury.1. Stop the motor and remove the battery.2. Clean the pole + pruning saw thoroughly before storing.
2
3. Always place the bar sheath on the guide bar before storing or transporting the pole + pruning saw. Use caution to avoid the sharp chain.4. Store the pole + pruning saw indoors, in a dry place that is inaccessible to children. Keep away from corrosive agents such as garden chemicals and de-icing salts.5. We recommend using the original package for storage or covering the product with a suitable cloth or enclosure to protect it against dust.Specific Safety Warnings for Pole + Pruning saw1. Only the pole + pruning saw operator should be in the work area.2. Do not use the pole + pruning saw to cut down trees.3. Always use two hands when operating the pole + pruning saw. Grip the pole + pruning saw securely with one hand on the trigger and the other hand on the pole.4. Before starting the pole + pruning saw, make sure that the saw chain is not in contact with any object.5. Do not allow the pole + pruning saw to make contact with grounded objects such as pipes, fences, and metal posts.6. Do not force the pole + pruning saw while cutting. Apply light pressure. It will perform more effectively and safely if it is used at the rate for which it was designed.7. Use extreme caution when cutting a limb that is under tension. When wood tension is released, the limb could spring back and strike the operator, causing severe injury or death.8. During transport, hold the pole at its balance point, with the guide bar and chain facing to the rear.9. Do not cut small brush and saplings with the pole + pruning saw. Small branches may catch in the chain and be whipped towards the operator, which could pull the operator off balance.10. Never stand directly under the limb you are trimming. Always position yourself outside the path of falling debris.11. Keep a firm, steady pressure on the pole + pruning saw while cutting. Do not try to cut limbs larger in diameter than the length of the guide bar.12. Keep other people and pets away from the cutting end of the pole + pruning saw and at a safe distance away from the work area.KickbackmWARNING! Kickback may occur when the nose or tipof the guide bar touches an object, or when the wood closes in and pinches the saw chain in the cut.
AVOID CONTACTING THE GUIDE BAR TIP WITH ANY OBJECT. In some cases, when the tip makes contact with an object, the saw may rapidly kick up and back towards the operator. Material pinching the chain may also push the saw back rapidly towards the operator. Either of these reactions may cause you to lose control of the pole + pruning saw, which could result in serious personal injury. Follow the necessary precautions indicated below to avoid kickbacks.· Always use two hands when operating the pole + pruning saw, one hand gripping the trigger and the other hand gripping the pole. Use a firm grip. Thumbs and fingers must wrap around the trigger and the pole.· Keep all guards in place on the pole + pruning saw. Make sure they are in proper working order.· Do not overreach or extend arms above shoulder height. · Keep solid footing and balance at all times. · Never try cutting through two branches at the same time.Only cut one at a time.· Do not bury the guide bar nose or try to cut by boring the guide bar nose into the wood.· Watch for shifting of wood or other forces that may pinch the chain.· Use extreme caution when re-entering a previous cut. · Use the chain and guide bar supplied with this pole +pruning saw. Only use genuine Snow Joe® + Sun Joe® replacement parts designed specifically for use with this pole + pruning saw.· Never use a dull or loose chain. Keep the chain sharp and properly tensioned.Battery & Charger Safety InstructionsWe pay a great deal of attention to the design of every battery pack to ensure that we supply you with batteries that are safe, durable and have a high energy density. The battery cells have a wide range of safety devices. Each individual cell is initially formatted and its electrical characteristic curves are recorded. This data is then used exclusively to be able to assemble the best possible battery packs.Despite all the safety precautions, caution must always be exercised when handling batteries. The following points must be obeyed at all times to ensure safe use. Safe use can only be guaranteed if undamaged cells are used. Incorrect handling of the battery pack can cause cell damage.IMPORTANT! Analyses confirm that incorrect use and poor care of high-performance batteries are the main factors responsible for personal and/or product damage.mWARNING! Use only approved replacement batteries;other batteries may damage the power tool and cause it to malfunction, which can lead to serious personal injury.
3
mWARNING! Do not use a battery pack or appliance that isdamaged or modified. Damaged or modified batteries may exhibit unpredictable behavior resulting in fire, explosion or risk of injury.Have your battery pack serviced by a qualified repair person using only identical replacement parts. This will ensure that the safety of the battery pack is maintained.mCAUTION! To reduce the risk of injury, use only officialiON+ 24V designated chargers with the iON+ 24V battery pack. The use of other batteries or chargers poses a risk of fire, personal injury and damage. Do not wire a battery pack to a power supply plug or car cigarette lighter, such misuse will permanently disable or damage the battery pack.· Avoid dangerous environments Do not charge the battery pack in rain, snow or in damp or wet locations. Do not use the battery pack or charger in the presence of explosive atmospheres (gaseous fumes, dust or flammable materials) because sparks may be generated when inserting or removing the battery pack, which could lead to a fire.· Charge in a well-ventilated area Do not block the charger vents. Keep them clear to allow for proper ventilation. Do not allow smoking or open flames near a charging battery pack. Vented gases may explode.NOTE: The safe temperature range for the battery is 41°F 105ºF (5°C 40.5°C). Do not charge the battery outside in freezing weather; charge it at room temperature.· Maintain charger cord When unplugging the charger, pull the plug, not the cord, from the receptacle to reduce the risk of damage to the electrical plug and cord. Never carry the charger by its cord or yank it by the cord to disconnect it from the receptacle. Keep the cord away from heat, oil and sharp edges. Make sure the cord will not be stepped on, tripped over or subjected to damage or stress when the charger is in use. Do not use the charger with a damaged cord or plug. Replace a damaged charger immediately.· Do not use an extension cord unless it is absolutely necessary Using the wrong, damaged or improperly wired extension cord poses a risk of fire and electric shock. If an extension cord must be used, plug the charger into a properly wired 16 gauge or larger extension cord with the female plug matching the male plug on the charger. Make sure that the extension cord is in good electrical condition.· Charger XZ2600-0450 is rated for 100 240 volt AC only The charger must be plugged into an appropriate receptacle.· Do not use an electrical adapter Use of an adapter is not recommended or sold by the battery charger or battery pack manufacturer.· Unplug charger when not in use Make sure to remove battery packs from unplugged chargers.
mWARNING! To reduce the risk of electric shock,always unplug the charger before performing any cleaning or maintenance. Do not allow water to flow into the charger. Use a Ground Fault Circuit Interrupter (GFCI) to reduce shock hazards.· Do not burn or incinerate battery packs Battery packs may explode, causing personal injury or damage. Toxic fumes and materials are created when battery packs are burned.· Do not crush, drop or damage battery packs Do not use the battery pack or charger if they have sustained a sharp blow, been dropped, run over or have been damaged in any way (i.e. pierced with a nail, hit with a hammer, stepped on, etc.).· Do not disassemble Incorrect reassembly may pose a serious risk of electric shock, fire or exposure to toxic battery chemicals. If the battery or charger are damaged, contact an authorized Snow Joe® + Sun Joe® dealer or call the Snow Joe® + Sun Joe® customer service center at 1-866-SNOWJOE (1-866-766-9563) for assistance.· Battery chemicals cause serious burns Never let a damaged battery pack contact the skin, eyes or mouth. If damaged, battery chemicals will react violently with air, use rubber or neoprene gloves to safely dispose of it. If skin is exposed to battery chemicals, wash the affected area with soap and water. If eyes are exposed to battery chemicals, immediately flush with water for 20 minutes and seek medical attention. Remove and dispose of contaminated clothing.· Do not short circuit When battery pack is not in use, keep it away from other metal objects, like paper clips, coins, keys, nails, screws or other small metal objects, that can make a connection from one terminal to another. Shorting the battery terminals together may cause burns or a fire.· Store your battery pack and charger in a cool, dry place Do not store the battery pack or charger where temperatures may exceed 105ºF (40.5ºC), such as in direct sunlight or inside a vehicle or metal building during the summer.Information about the battery1. The battery pack supplied with your cordless power tool is only partially charged. The battery pack has to be charged completely before you use the tool for the first time.2. For optimum battery performance, avoid low discharge cycles by charging the battery pack frequently.3. Store the battery pack in a cool place, ideally at 77°F (25°C) and charged to at least 40%.4. Lithium-ion batteries are subject to a natural aging process. The battery pack must be replaced at the latest when its capacity falls to just 80% of its capacity when new. Weakened cells in an aged battery pack are no
4
longer capable of meeting the high power requirements needed for the proper operation of your cordless pole + pruning saw, and therefore pose a safety risk.5. Do not throw battery packs into an open fire as this poses a risk of explosion.6. Do not ignite the battery pack or expose it to fire. 7. Do not exhaustively discharge batteries. A completedischarge will damage the battery cells. The most common cause of exhaustive discharge is lengthy storage. Stop working as soon as the performance of the battery falls noticeably or the electronic protection system triggers. For optimum battery performance, charge the battery pack frequently. Place the battery pack in storage only after it has been fully charged.8. Protect batteries and the tool from overloads. Overloads will quickly result in overheating and cell damage inside the battery housing even if this overheating is not apparent externally.9. Avoid damage and shocks. Immediately replace batteries that have been dropped from a height of more than 3 feet (1 meter) or those that have been exposed to violent shocks, even if the housing of the battery pack appears to be undamaged. The battery cells inside the battery may have suffered serious damage. In such instances, please read the waste disposal information for proper battery disposal.10. If the battery pack suffers overloading and overheating, the integrated protective cutoff will switch off the equipment for safety reasons. IMPORTANT! Do not press the ON/OFF trigger switch any more if the protective cut-off has been activated. This may damage the battery pack.11. Recharge only with the charger specified by the manufacturer. A charger that is suitable for one type of battery pack may create a risk of fire when used with another battery pack.12. Use appliances only with specifically designated battery packs. Use of any other battery packs may create a risk of injury and fire.13. Under abusive conditions, liquid may be ejected from the battery; avoid contact. If contact accidentally occurs, flush with water. If liquid contacts eyes, additionally seek medical help. Liquid ejected from the battery may cause irritation or burns.14. Do not use a battery pack or appliance that is damaged or modified. Damaged or modified batteries may exhibit unpredictable behavior resulting in fire, explosion or risk of injury.15. Do not expose a battery pack or appliance to fire or excessive temperature. Exposure to fire or temperature above 266ºF (130°C) may cause explosion.
16. Follow all charging instructions and do not charge the battery pack or appliance outside of the temperature range specified in the instructions. Charging improperly or at temperatures outside of the specified range may damage the battery and increase the risk of fire.Information about the charger and the charging process1. Please check the data marked on the rating plate of the battery charger. Be sure to connect the battery charger to a power supply with the voltage marked on the rating plate. Never connect it to a different mains voltage.2. Protect the battery charger and its cord from damage. Keep the charger and its cord away from heat, oil and sharp edges. Have damaged cords repaired without delay by a qualified technician at an authorized Snow Joe® + Sun Joe® dealer or call the Snow Joe® + Sun Joe® customer service center at 1-866-SNOWJOE (1-866-766-9563).3. Electrical plugs must match the outlet. Never modify the plug in any way. Do not use any adapter plugs with grounded appliances. Unmodified plugs and matching outlets will reduce the risk of electric shock.4. Keep the battery charger, battery pack(s) and the cordless tool out of the reach of children.5. Do not use the supplied battery charger to charge other cordless tools.6. During periods of heavy use, the battery pack will become warm. Allow the battery pack to cool to room temperature before inserting it into the charger to recharge.7. Do not overcharge batteries. Do not exceed the maximum charging times. These charging times only apply to discharged batteries. Frequent insertion of a charged or partially charged battery pack will result in overcharging and cell damage. Do not leave batteries in the charger for days on end.8. Never use or charge batteries if you suspect that it has been more than 12 months since the last time they were charged. There is a high probability that the battery pack has already suffered dangerous damage (exhaustive discharge).9. Charging batteries at a temperature below 41°F (5°C) will cause chemical damage to the cells and may cause a fire.10. Do not use batteries that have been exposed to heat during the charging process, as the battery cells may have suffered dangerous damage.11. Do not use batteries that have suffered swelling or deformation or those that exhibit other atypical symptoms (gassing, hissing, cracking, etc.).
5
Protection from environmental influences1. Wear suitable work clothes. Wear safety goggles. 2. Protect your cordless tool and the battery charger frommoisture and rain. Moisture and rain can cause dangerous cell damage. 3. Do not use the cordless tool or the battery charger near vapors and flammable liquids. 4. Use the battery charger and cordless tools only in dry conditions and at an ambient temperature of 41ºF 105°F (5°C 40.5°C). 5. Do not keep the battery charger in places where the temperature is may to reach over 105°F (40.5°C). In particular, do not leave the battery charger in a car that is parked in the sunshine. 6. Protect batteries from overheating. Overloads, overcharging and exposure to direct sunlight will result in overheating and cell damage. Never charge or work with batteries that have been overheated replace them immediately, if possible. 7. Store the charger and your cordless tool only in dry locations with an ambient temperature of 41ºF 105°F (5°C 40.5°C). Store your lithium-ion battery pack in a cool, dry place at a temperature of 77°F (25°C). Protect the battery pack, charger and cordless tool from humidity and direct sunlight. Only place fully charged batteries in storage (charged to at least 40%). 8. Prevent the lithium-ion battery pack from freezing. Battery packs that were stored below 32°F (0°C) for more than 60 minutes must be discarded. 9. When handling batteries, be wary of electrostatic charge. Electrostatic discharges can damage the electronic protection system and the battery cells. To avoid electrostatic discharges never touch the battery terminals.6
Safety SymbolsThe following table depicts and describes safety symbols that may appear on this product. Read, understand, and follow all instructions on the machine before attempting to assemble and operate.
Symbols
Descriptions
Symbols
Descriptions
READ THE OPERATOR’S MANUAL Read, understand, and follow all instructions in the user manual before attempting to assemble and operate.
SAFETY ALERT Indicates a precaution, a warning, or a danger.
WEAR EYE AND HEARING PROTECTION For protection against injury, wear ear defendersand safety goggles.
WARNING! Do not expose the unit to rain or wet conditions. Keep dry.
Wear protective gloves and non-slip footwear when using the machine and handling debris.
m
CAUTION! Avoid contact between the tip of the guide bar with any object. Contact with the tip of the guide bar may cause the chain saw to kickback, which may cause serious injury to the user.
The moving part will continuously run for several seconds after you turn off the machine.
50 ft (15 m)
WARNING! SHOCK HAZARD Keep at least 50 ft (15 m) away from power lines. Do not overreach. Keep proper footing and balance at all times.
Only use the battery charger indoors.
7
Correct direction of cutters.DANGER! ROTATING BLADES Keep hands and feet away from openings while the saw is running.Keep bystanders a minimum distance of 50 ft (15 m) away from the work area.
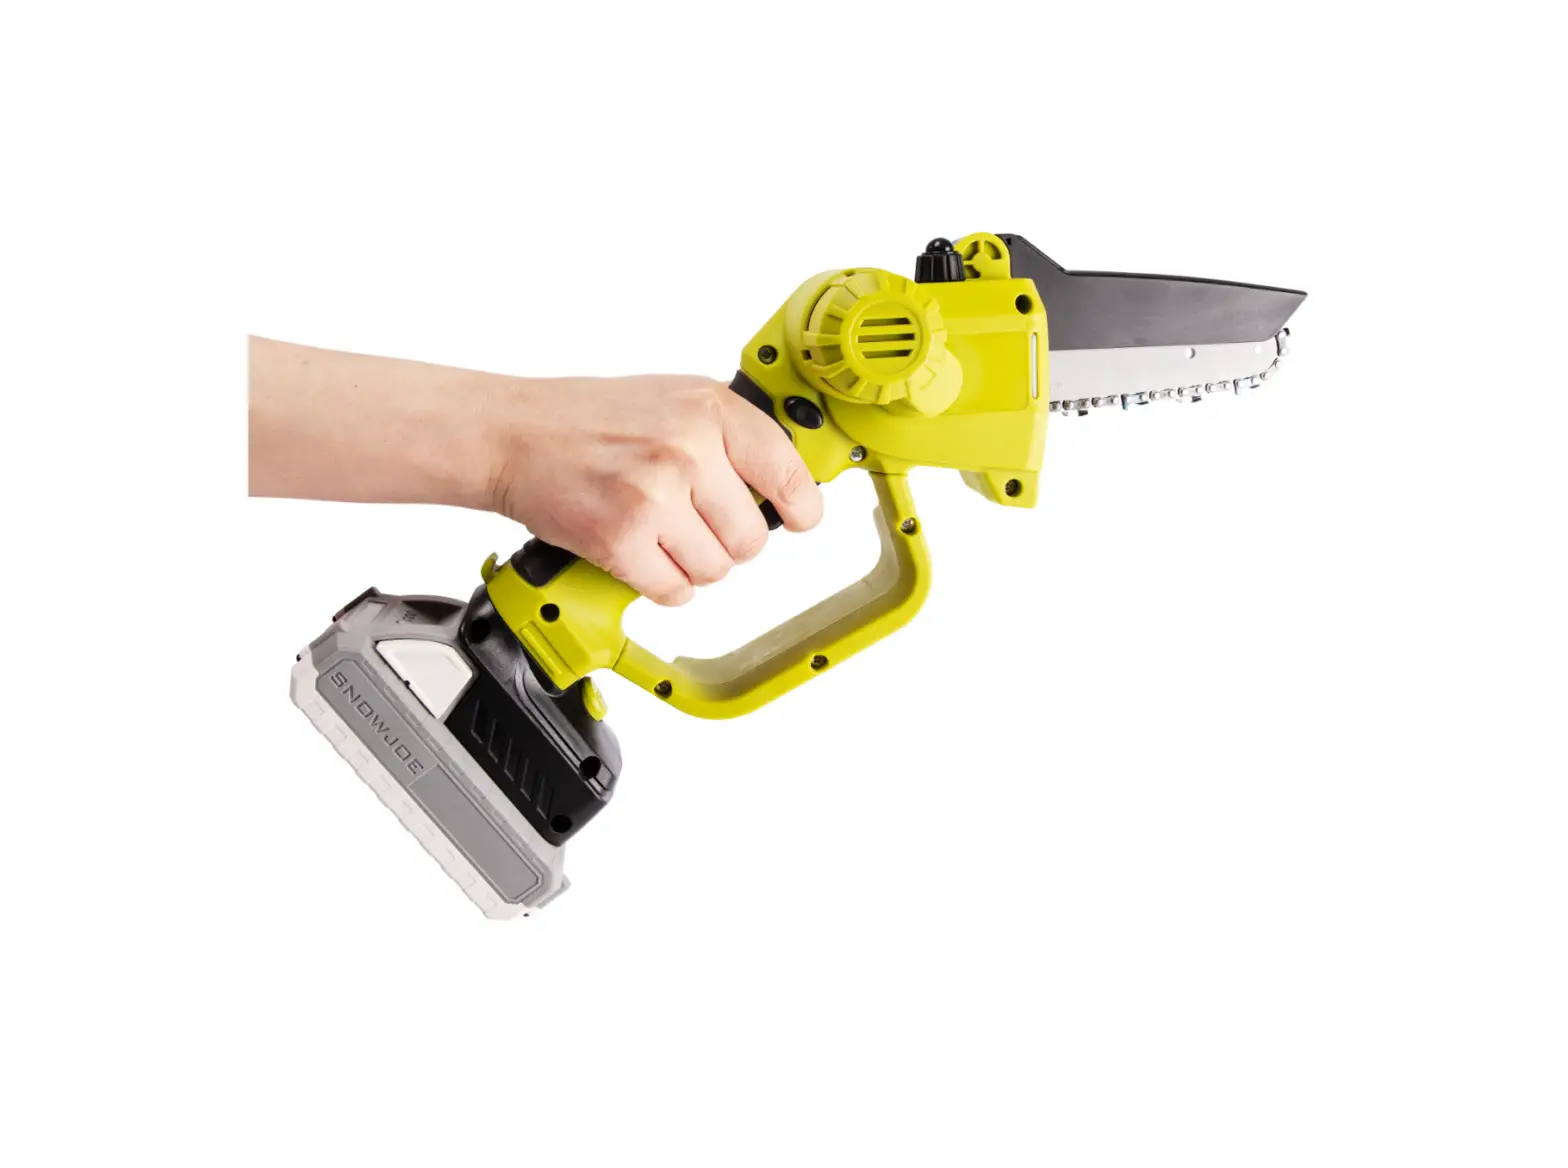
Know Your Cordless Pole + Pruning SawRead the owner’s manual and safety instructions carefully before operating the cordless pole + pruning saw. Compare the illustration below to the cordless pole + pruning saw in order to familiarize yourself with the location of the various controls and adjustments. Save this manual for future reference.
9
10 11 12 13 14
15
16
17 18
19
8
7
6
5
4
30
20
3
29
26 24
2
1
23
28
27 25
22
21
1. Bar sheath 2. 5 in. (12.7 cm) chain 3. Guide bar 4. Chain guard 5. Tensioning wheel 6. Sprocket cover 7. Oil tank cap 8. Compression cap 9. Safety lock (pruning saw)
10. Trigger (pruning saw) 11. Handle 12. Hand guard 13. Locking latch 14. Multi-angle lock button 15. Cam-lock 16. Pole assembly 17. Safety lock(pole assembly)
18. Trigger (pole assembly) 19. Removable batterycompartment 20. Locking button(removable battery compartment) 21. Wrench 22. Bar and chain oil 23. Battery indicators 24. Battery indicator button
25. Push lock button26. Charging socket27. iON+ 24V lithium-ion battery (24VBAT-LTE) featuring exclusive EcoSharp® technology28. Charger plug29. iON+ 24V lithium-ion charger (XZ2600-0450)30. Locking button (pole assembly)
Technical DataMotor …………………………………………………………………….. 250 W No Load Speed ………………………………………………….. 4000 rpm Battery Voltage Max*……………………………………………. 24V D.C. Battery Capacity……………………………………………………… 2.0 Ah Charger Input …………………….100 240V AC | 50/60 Hz | 0.4 A Charger Output ………………………………………..26V DC | 450 mA Charge Time Max ………………………………………………….. 5 hours Cutting Thickness Max ………………………………. 4.5 in. (11.4 cm)Recommended: 2.5 in. (6.4 cm)
Bar and Chain Length …………………………………… 5 in. (12.7 cm)Multi-Angle Head ……………………………………………… 7 positions (-45º | -22.5º | 0º | 22.5º | 45º | 67.5º | 90º)Telescopic Pole ……………………………………………….. 4 ft to 5.8 ft (1.2 m to 1.8 m)Overhead Reach…………………………………….. Up to 12 ft (3.7 m)Oil Tank Capacity ……………………………………… 0.85 fl oz (25 ml) Net Weight (without pole) ……………………………….. 3.2 lbs (1.5 kg)Net Weight (with pole) ……………………………………. 5.2 lbs (2.4 kg)
*Initial no-load voltage, when fully charged, peaks at 24 volts; nominal voltage under typical load is 21.6 volts.
8
UnpackingCarton Contents· Pruning saw + removable battery compartment · Pole assembly · iON+ 24V lithium-ion battery · iON+ 24V lithium-ion battery charger· Bar and chain oil · Wrench · Manual with registration card 1. Carefully remove the cordless pole + pruning saw andcheck to see that all of the above items are supplied.2. Inspect the product carefully to make sure no breakage or damage occurred during shipping. If you find damaged or missing parts, DO NOT return the unit to the store. Please call the Snow Joe® + Sun Joe® customer service center at 1-866-SNOWJOE (1-866-766-9563).NOTE: Do not discard the shipping carton and packaging material until you are ready to use your new cordless pole + pruning saw. The packaging is made of recyclable materials. Properly dispose of these materials in accordance with local regulations.IMPORTANT! The equipment and packaging material are not toys. Do not let children play with plastic bags, foils or small parts. These items can be swallowed and pose a suffocation risk!Battery Pack Operation
NOTE: Immediately after using the battery pack, the battery indicator button may display a lower charge than it will if checked a few minutes later. The battery cells “recover” some of their charge after resting.Charger Operation mWARNING! Only charge Sun Joe® 24V lithium-ionbattery pack with compatible Sun Joe® 24V lithium-ion chargers. Other types of chargers may cause personal injury and damage. To reduce the risk of electric shock, do not allow water to enter into the charger.Charging the Battery1. Push the push lock buttons on either side of the battery pack to pull it out from the battery compartment (Fig. 1)Fig. 1Push lock button
The equipment is powered by a lithium-ion battery. The battery pack is completely sealed and maintenance free.Battery Charge Level IndicatorThe battery pack is equipped with a push button for checking the charge level. Simply press the push button to read off the battery charge level from the LEDs of the battery indicator:
2. Check that the mains voltage is the same as that marked on the rating plate of the battery charger. Then plug the charger into an appropriate AC power outlet. Connect the charger plug into the charging socket of the battery to start charging (Fig. 2).
Lights
Light Indicators Charge level button The battery is at 30% capacity The battery is at 60% capacity The battery is fully charged
NOTE: If the battery indicator button does not appear to be working, charge the battery.9
Battery indicatorsFig. 2
3. The battery will take approximately 5 hours to charge. The battery indicator LEDs will cycle on one by one during the charging process. Unplug the charger immediately when all 3 LEDs are illuminated.mCAUTION! FIRE HAZARD. When disconnecting thecharger from the battery, be sure to unplug the charger from the outlet first, then disconnect the battery from the charger.mWARNING! This charger does not automatically turn offwhen the battery is fully charged. Please take care not to leave the battery plugged into the charger. Switch off or unplug the charger at the mains when charging is complete.4. Timely recharging of the battery will help prolong the battery’s life. Recharge the battery pack when you notice a drop in the equipment’s power.IMPORTANT! Never allow the battery pack to become fully discharged as this will cause irreversible damage to the battery.AssemblyThis cordless pruning saw comes completely assembled with the guide bar and chain pre-installed. Users simply have to configure the unit as a hand-held pruning saw or a pole pruning saw before operation. Follow the instructions below to connect the machine.mCAUTION! Make sure the battery is not inserted andthe chain are covered by the sheath before assembly.Hand-held Pruning Saw Assembly1. To configure the machine as a hand-held pruning saw, align the small ridge on the removable battery compartment with the guide slot on the handle, then slide the removable battery compartment upward into the handle until it clicks into position (Fig. 3).
Fig. 4 Push lock button
3. To take the removable battery compartment off of the hand-held pruning saw, press the locking button on the removable battery compartment and slide it out of the handle (Fig. 5).
Fig. 5
Handle
Locking button
Fig. 3
Handle
Pole Pruning Saw Assembly1. To install the pole, align the small ridge on the end of the pole assembly with the guide slot on the handle, slide the pruning saw downward into the pole assembly until it clicks into position (Fig. 6).
Fig. 6
Removable battery compartment
Pole assembly
2. Insert the battery into the removable battery compartment until the push lock buttons click into place (Fig. 4).
10
2. Latch the locking latch over the hook on the end of the handle, then press the latch lock down to secure the connection (Fig. 7).
Fig. 7 Latch lock
Locking latch Handle
Fig. 10
Latch lock Locking latch
3. Slide the removable battery compartment and battery into the end of the pole assembly, until it clicks into position (Fig. 8).Fig. 8
Fig. 11 Locking button
Pole assemblyRemovable battery compartment + battery4. To disassemble the pole pruning saw, press down the locking button on the removable battery compartment and slide it out of the pole assembly (Fig. 9).Fig. 9
PreparationAdjusting Chain TensionmWARNING! Use protective gloves when handling thebar and chain.1. Make sure the pruning saw is off and the battery is removed.2. To tighten the chain, turn the tensioning wheel clockwise until you meet some resistance. Prior to use, a cold chain should have no slack on the underside of the guide bar, while still allowing you to rotate the chain by hand without binding. Be aware that a chain tensioned while warm, may be too tight upon cooling. (Fig. 12).
Pole assembly
Fig. 12
Locking button
R
5. Flip up the latch lock and locking latch to unlock the saw handle (Fig. 10), then press the locking button on the bottom of the pole assembly and slide the pruning saw out of the pole assembly (Fig. 11).
Tensioning wheel
11
3. To check the chain tension, lightly pull the chain 1/8″ (3 mm) away from bottom of guide bar. If the chain snaps back into place upon release, the tension is correct. During normal operation, the chain will heat up and expand causing the chain sag slightly by approximately 0.05 in. (~1.25 mm) (Fig. 13).NOTE: A new chain will stretch. Check the tension of a new chain frequently during the first two hours of operation, after disconnecting the battery and allowing the chain to cool down.
1. Take off the oil tank cap from the top of the pruning saw. Then fill the oil tank up to top of the oil tank indicator marked with the word “MAX” (Fig. 15).Fig. 15 Bar and chain oil Oil tank cap
Fig. 13
0.05 in. (1.25 mm)
R
Warm chain after use – properly tensioned Too loose
Warm chain after use – requires tensioning4. Using the included wrench, turn the tensioning wheel counter-clockwise to loosen the chain (Fig. 14).
Fig. 14
Wrench
Oil tank indicator
2. During operation, press the compression cap 3-4 times every 30 minutes to lubricate the chain (Fig. 16).NOTE: Before storing the unit, press the compression cap 3-4 times and run the saw for 30 seconds to lubricate the chain evenly to prevent corrosion.
Fig. 16
Compression cap
R R
Tensioning wheelChain LubricationmWARNING! Failure to lubricate the chain will causedamage to the bar and chain. Only use a good quality bar and chain oil designed specifically for use with chain saws. Do not use oil containing impurities. IMPORTANT! The bar and chain oil is bio-degradable. The use of mineral oil or engine oil can have a serious impact on the environment. It is essential that you use good quality oil to lubricate the cutting parts effectively. Used or poor quality oil does not guarantee good lubrication and reduces the lifespan of the chain and bar.
Breaking-in your Pruning SawIt is recommended to break-in your pruning saw every time a new chain is installed.1. Remove the battery and adjust the chain tension.2. Insert the battery and switch on the pruning saw and leave the motor running idle for approximately 5 minutes.3. Remove the battery and check the chain tension again. If necessary, re-tighten the chain.4. Afterwards make only easy cuts for approximately 30 minutes. Always ensure sufficient lubrication of the saw chain! Only use the pruning saw for heavier cuts and greater cutting depths after the break-in period.
12
Safety ChecklistTo help maintain your cordless pruning saw for optimum performance and safety, we recommend you complete this checklist prior to each work session.mWARNING! Do not insert the battery until you havecompleted all of the checks.· Inspect for any visible damage to the chain, guide bar, or motor housing.· Check that all the screws on the machine and guide bar are tightly fastened.· Clean the guide bar and chain of any debris. · Make sure any ventilation slots are free of sawdust ordebris.· Check that the chain is tensioned correctly and sharp. · Check that the trigger remains locked until the safety lockis pressed.OperationmCAUTION! Repeatedly starting and stopping an electricmotor within a few seconds can generate a great deal of heat and damage the motor. To protect the life of your cordless pruning saw, always wait at least five seconds after stopping before restarting the saw.mWARNING! Be sure that the chain is not in contact withany object when you start the motor.mWARNING! Keep hands away from chain. Keep handon handle. Do not overreach.mWARNING! Maintain a firm grip. Do not let go of thesaw while it is in operation.mWARNING! Do not operate the cordless pruning saw ina tree, on a ladder, or on scaffolding. Using the tool under such circumstances is extremely dangerous.mCAUTION! The chain will continue to run for severalseconds after turning off the tool.mCAUTION! Do not use the pruning saw under wetconditions. Use extreme caution when cutting small brush, saplings, or branches under tension. Such material may spring back towards you or get caught on the saw which may result in throwing you off balance, or pushing the saw out of control.mWARNING! Do not allow familiarity with this type of toolto cause you to ignore necessary precautions. Remember that a careless fraction of a second is sufficient to inflict serious injury.
mWARNING! Do not cut branches near electrical wires.Hand-held Pruning Saw Operation1. Insert the battery as shown in (Fig. 4). 2. To turn on the tool, firmly grip the pruning saw handleand press the safety lock to deactivate the safety. Then squeeze the trigger to activate the saw (Fig. 17). NOTE: Do not squeeze the trigger until you are ready to make a cut.Fig. 17RSafety lockTrigger3. With the pruning saw running, butt the base plate up against the branch you wish to cut and let the saw do all the cutting (Fig. 18). Apply only light pressure on the saw. NOTE: The base plate helps to stabilize the saw and significantly reduce vibrations. It also acts as a fulcrum, allowing you to pivot the saw while cutting for better control.Fig. 18RBase plate (fulcrum)4. Release the trigger to stop the saw.
13
Pole Pruning Saw Operation
Fig. 21
R
1. To extend the pole assembly, lift the cam-lock and extend
the pole to the desired length (Fig. 19). Close the cam-lock
to secure the pole in position.
Fig. 19
Cam-lock
Pole
2. The pruning saw can be adjusted into 7 different angles (-45º | -22.5º | 0º | 22.5º | 45º | 67.5º | 90º) to allow for greater flexibility and control. To adjust the cutting angle, push the multi-angle lock button. Then pivot the pruning saw to your desired angle and release the button. The saw will click into position and be locked at that angle (Fig. 20).Fig. 20
5. To turn on the tool, firmly grip the pruning saw handle and press the safety lock to deactivate the safety. Then squeeze the trigger to activate the saw (Fig. 22). NOTE: Do not squeeze the trigger until you are ready to make a cut.Fig. 22
-45° -22.5°0° 22.5° 45° 90° 67.5°
Multi-angle lock button
Trigger
Safety lock
3. Insert the battery as shown in (Fig. 8).4. Hold the pole pruning saw with one hand on the handle and the other on the pole. Always cut adjacent to the material and never underneath to avoid injury from falling branches. Adjust the length and angle accordingly (Fig. 21).NOTE: Do not raise your bottom hand above chest height in order to maintain control of the saw in the event of a kickback.
6. Release the trigger to stop the saw.MaintenancePlease contact an authorized Snow Joe® + Sun Joe® dealer or call the Snow Joe® + Sun Joe® customer service center at 1-866-SNOWJOE (1-866-766-9563) for all maintenance operations not foreseen in this manual. Any operation performed in an unauthorized service center or by unqualified personnel will completely invalidate the warranty.mWARNING! For your safety and that of others:· Keep all nuts, bolts, and screws tight to be sure the equipment is in safe working condition.
14
· Never use the machine with worn or damaged parts. Damaged parts are to be replaced and never repaired.· Only use original Snow Joe® + Sun Joe® replacement parts. Parts that are not of the same quality can seriously damage the equipment, compromise safety, and invalidate the warranty.· Remove the battery and wait at least five minutes for the saw to cool before servicing or storing your unit.· If you drop the saw, carefully inspect it for damage. If the guide bar is bent, the housing is cracked, the handle is broken, or if you see any other damage that may affect the saw’s operation, do not use the tool.mWARNING! Always remove the battery beforeperforming any adjustments, maintenance, or repairs to your cordless pruning saw.· Use protective gloves when handling the bar and chain. · Keep the bar encased in its sheath, except when workingdirectly on the bar or the chain.· Never dispose of oils or other polluting materials in unauthorized places.mCAUTION! If you notice anything unusual, suchas excessive vibrations or odd noises, shut the saw OFF immediately. Remove the battery and check the saw for any damage.mCAUTION! To avoid overheating and damage to themotor, always keep the ventilation slots clean and free of sawdust and debris.General CleaningIt’s recommended to clean the pruning saw after each use for best performance. Use a cloth, brush or compressed air to remove saw dust and splinters from the ventilation slots. Only clean the housing of the pruning saw with mild soap and a damp cloth. Never use strong cleaning agents or solvents to clean the tool. Never immerse any part of the saw or allow liquids to get inside the cordless power tool.Storage· To prevent corrosion, press the compression cap 3-4 times and run the saw for 30 seconds to lubricate the chain evenly before storage.· Place the bar sheath over the guide bar before storing. · Do not store cordless pruning saw near chemicals, suchas fertilizers or other harsh solvents. Do not expose the plastic parts of the unit to brake fluids, gasoline, petroleum-based products, penetrating oils, or the like. These products are often highly corrosive and may cause permanent damage to the plastic parts of your unit.· When not in use, your machine should be stored indoors in a dry place, out of the reach of children.
Replacing the Guide Bar + ChainmWARNING! Make sure the battery is not insertedand the chain is covered by the sheath before replacing the guide bar and chain. The operation should be completed on a flat and stable surface, with adequate space for moving the machine and its components.mWARNING! Always wear heavy-duty gloves whenhandling the bar and chain. Mount the bar and chain very carefully so as not to impair the safety and efficacy of the machine. If in doubt, contact an authorized Snow Joe® + Sun Joe® dealer or call the Snow Joe® + Sun Joe® customer service center at 1-866-SNOWJOE (1-866-766-9563).mDANGER! Never start the motor before installing theguide bar, chain, and sprocket cover. Without all these parts in place, the guide bar and chain may fly off, exposing the user to potentially serious injuries.Replace the guide bar if:· There is excessive wear or obstructions inside the groove of the guide bar.· The guide bar is bent· The guide bar is cracked NOTE: It is normal to see burring on the edges of the guide bar. You can smooth down any burrs with a file instead of replacing it.Refer to the table below for the specifications of the chain. You should replace the chain if:
Drive Links 32
Chain Pitch 1/4 in.6.35 mm
Chain Gauge 0.043 in. 1.1 mm
· There is too much play between the links and rivets · There are cracks in the chain · Length of cutting edge has worn down to 5/32 in. (4 mm)or less (Fig. 23).
Fig. 23
< 5/32 in. (4 mm)
15
1. Loosen the tensioning wheel using the wrench and remove the sprocket cover (Fig. 24).Fig. 24R
Tensioning
wheel
Wrench
Sprocket cover
2. Using heavy-duty gloves, push the tip of the guide bar inwards towards the sprocket to relieve the tension and create some slack on the chain (Fig. 25).3. Keeping the guide bar pushed in, pull the chain off the sprocket (Fig. 25).4. With the chain off the sprocket, let go of the guide bar. The guide bar should spring back slightly allowing you to remove the chain and guide bar from the saw (Fig. 25).Fig. 25
6. Starting from the tip, place the new chain into the groove of the guide bar. Ensure that the groove is free of any obstructions and that the cutters on the top edge are facing towards the tip of the guide bar, and the cutters on the bottom edge are facing away from the tip of the guide bar. If backwards, turn the chain around. The chain will only loosely fit until secured onto the sprocket (Fig. 27). NOTE: Make certain of the chain’s direction. If the chain is mounted backwards, the saw will vibrate abnormally and will not cut.Fig. 27 Top Cutters faces towards tipRBottom Cutters faces away from tip7. Secure the guide bar onto the tensioning pins (Fig. 28).Fig. 28R
4
R
Guide bar Sprocket
5. Lay out the new chain in a loop with the cutters facing outwards and the drive links facing inwards. If necessary, flip the chain and straighten any kinks (Fig. 26).NOTE: Replace the chain with an official Sun Joe® replacement 5-inch chain (model SWJ-5CHAIN), and the guide bar with an official Sun Joe® replacement bar (model SWJ-5BAR).
Fig. 26
Cutters faces outwards
Guide bar
Tensioning pins
8. At this point, the chain is not yet able to be fitted onto the sprocket. To give the chain enough slack, push the tip of the guide bar inwards towards the sprocket (Fig. 29).9. Keeping the guide bar pushed in, wrap the end of the chain onto the sprocket (Fig. 29).Fig. 29
8R9
Drive links faces inwards
Guide bar Sprocket16
10. Let go of the guide bar once the chain is securely fitted onto the sprocket. The guide bar should spring back slightly creating some tension on the chain and guide bar.11. Reinstall the sprocket cover (Fig. 30).Fig. 30RSprocket cover12. Follow the earlier instructions to properly tighten (Fig. 12) and lubricate the chain (Fig. 16).Chain SharpeningmWARNING! To ensure that the saw works safely andeffectively, it is essential that the cutting components are well-sharpened. It is highly recommended to replace the chain once it loses its ability to cut cleanly and safely. It is however, possible to sharpen the existing chain if carefully performed. Any work on the chain and bar requires specific experience and special tools. For safety purposes, we recommend you contact an authorized Snow Joe® + Sun Joe® dealer or call the Snow Joe® + Sun Joe® customer service center at 1-866-SNOWJOE (1-866-766-9563). Sharpening is necessary when:· Sawing creates sawdust instead of wood chips · Cutting becomes difficult · The saw does not cut straight · There are excessive vibrations A professional service center will sharpen the chain using the right tools to ensure minimum removal of material and even sharpness on all the cutting edges. If you decide sharpen the chain by yourself, it’s recommended to purchase the Sun Joe® 24V-CSSHRP-LTE chain saw sharpener, which can be powered by the same iON+ 24V battery that comes with this cordless pruning saw. Visit sunjoe.com or call the Snow Joe® + Sun Joe® customer service center at 1-866-SNOWJOE (1-866-766-9563) to order.
Manual Chain Sharpening Tools (not included)To sharpen the chain manually, you will require the following tools.· 5/32 in. (4 mm) round file · File guide · Flat file · Depth gauge tool · Felt-tip markerManual Chain Sharpening Procedure1. Tighten the chain if loose. Then secure the guide bar in a vice or clamp.2. Mark one of the cutters on the top of the guide bar with a felt-tip marker to indicate where you started.3. Insert your round file into the file guide. 4. Place the file and file guide into the cutter at a 30° angle.Then file in a forward motion in 5-6 even strokes, while maintaining the file at the correct angle and parallel to the ground until the cutting edge of the cutter is shiny (Fig. 31). NOTE: Most file guides have 30° and 35° angles etched on their upper side to help you preserve the angle as you file.Fig. 31
File forward 30°
30° File guide
Vice
Round file
5. File every cutter on one side of the chain until you reach the one you marked before turning the saw over on the other side to sharpen the rest. Use gloves or a screwdriver to advance the chain as you progress from one cutter to the other (Fig. 32). NOTE: File the cutter on the opposite side of the chain if right handed or file the cutter on your side if left handed.Fig. 32
17
6. Depth gauges are small teeth on the cutter which protrude in front of the cutting edge. In order for the chain to cut effectively, the depth gauge must be lower than the cutting edge. Therefore, after heavy use or multiple sharpenings the depth gauge may require filing down.Place the depth gauge tool over the chain. Ensure that a depth gauge is exposed and protruding from the slot on the tool. Using the flat file, file down the depth gauge until flush with the tool in a forward motion (Fig. 33).
Fig. 33
File forward
Flat file
Depth gauge tool Depth gauge
Cutting edge Flat file
Amount to file down
Depth gauge tool Depth gauge7. Remove the depth gauge tool and round off the edge of the depth gauge with your file.8. Repeat for all cutters on both sides of the chain. 9. After sharpening, clean the saw of any metal filings ordust, then tighten (Fig. 12) and lubricate the chain (Fig. 16).Battery Caution + DisposalAlways dispose of your battery pack according to federal, state, and local regulations. Contact a recycling agency in your area for recycling locations.mCAUTION! Even discharged battery packs containsome energy. Before disposing, use electrical tape to cover the terminals to prevent the battery pack from shorting, which could cause a fire or explosion.
mWARNING! To reduce the risk of injury or explosion,never burn or incinerate a battery pack even if it is damaged, dead, or completely discharged. When burned, toxic fumes and materials are emitted into the surrounding environment.· Batteries vary according to device. Consult your manual for specific information.· Install only new batteries of the same type in your product (where applicable).· Failure to insert batteries in the correct polarity, as indicated in the battery compartment or manual, may shorten the life of the batteries or cause batteries to leak.· Do not mix old and new batteries. · Do not mix Alkaline, Standard (Carbon-Zinc), orRechargeable (Nickel Cadmium, Nickel Metal Hydride, or Lithium-Ion) batteries.· Do not dispose of batteries in fire. · Batteries should be recycled or disposed of as per stateand local guidelines.Recycling + DisposalThe product comes in a package that protects it against damage during shipping. Keep the package until you are sure that all parts have been delivered and the product is functioning properly. Recycle the package afterwards or keep it for long-term storage.WEEE symbol. Waste electrical products should not be disposed of with household waste. Please recycle where facilities exist. Check with your local authority or local store for recycling regulations.Service + SupportIf your Sun Joe® 24V-HCSWP-LTE cordless pruning saw requires service or maintenance, please call 1-866-SNOWJOE (1-866-766-9563) for assistance.Model + Serial NumbersWhen contacting the company, reordering parts, or arranging service from an authorized dealer, you will need to provide the model and serial numbers, which can be found on the decal located on the housing of the unit. Copy these numbers into the space provided below.Record the following numbers from the housing or handle of your new product:Model #: 2 4 V – H C SWP – L T ESerial #:
18
Troubleshooting· Remove the battery and wait at least five minutes for the saw to cool before carrying out maintenance on the machine or when checking that its parts are in proper working order.· Consult the following table before contacting customer service with any mechanical issues.
Problems
Possible Cause
Possible Solution
The motor fails to start
· Battery is not inserted correctly · Battery is out of charge
· Reinsert the battery · Check the charge status andrecharge the battery
The saw stops during operationThe saw runs, but the chain speed is low
· Battery is out of charge · The machine is overloaded/overheated· The chain is too tight
· Check the charge status and recharge the battery· Wait five minutes for the saw to cool· Loosen and retighten the chain
Bar and chain are running hot and smoking
· The chain is too tight · The chain lacks lubrication
The motor runs, but the chain is not moving
· The chain is too tight· The guide bar, chain or sprocket is damaged
· Loosen and retighten the chain · Press the compression cap to lubricatethe chain with the oil; refill if necessary.· Loosen and retighten the chain · Inspect and replace the damaged part
19
Optional AccessoriesmWARNING! ALWAYS use only authorized Snow Joe® + Sun Joe® replacement parts and accessories. NEVER usereplacement parts or accessories that are not intended for use with this saw. Contact Snow Joe® + Sun Joe® if you are unsure whether it is safe to use a particular replacement part or accessory with your saw. The use of any other attachment or accessory can be dangerous and could cause injury or mechanical damage.
Accessories
Item
Model
1
iON+ 24V 2.0 Ah Lithium-Ion Battery
24VBAT-LTE
2
iON+ 24V 2.5 Ah Lithium-Ion Battery
24VBAT-LT
3
iON+ 24V 4.0 Ah Lithium-Ion Battery
24VBAT
4
iON+ 24V 5.0 Ah Lithium-Ion Battery
24VBAT-XR
5
iON+ 24V lithium-ion Battery Quick Charger
24VCHRG-QC
6
iON+ 24V lithium-ion Dual-port Battery Charger
24VCHRG-DPC
7
R
Sun Joe® 5-inch replacement bar
SWJ-5BAR
8
Sun Joe® 5-inch replacement chain
SWJ-5CHAIN
20
Accessories910R
ItemBar and chain oilSun Joe® iON+ 24V Cordless Chain Saw Sharpener
ModelSWJ-OIL Sold online at sunjoe.com or you can purchase equivalent bar and chain oil at your local hardware store24V-CSSHRP-LTE
NOTE: Accessories are subject to change without any obligation on the part of Snow Joe® + Sun Joe® to provide notice of such changes. Accessories can be ordered online at sunjoe.com or via phone by contacting the Snow Joe® + Sun Joe® customer service center at 1-866-SNOWJOE (1-866-766-9563).
21
ENSNOW JOE® + SUN JOE® CUSTOMER PROMISEABOVE ALL ELSE, Snow Joe, LLC (“Snow Joe”) is dedicated to you, our customer. We strive to make your experience as pleasant as possible. Unfortunately, there are times when a Snow Joe®, Sun Joe®, or Aqua Joe® product (“Product”) does not work or breaks under normal operating conditions. We think it’s important that you know what you can expect from us. That’s why we have a Limited Warranty (“Warranty”) for our Products.OUR WARRANTY: Snow Joe warrants new, genuine, powered and non-powered Products to be free from defects in material or workmanship when used for ordinary household use for a period of two years from the date of purchase by the original, end-user purchaser when purchased from Snow Joe or from one of Snow Joe’s authorized sellers with proof of purchase. Because Snow Joe is unable to control the quality of its Products sold by unauthorized sellers, unless otherwise prohibited by law, this Warranty does not cover Products purchased from unauthorized sellers. If your Product does not work or there’s an issue with a specific part that is covered by the terms of this Warranty, Snow Joe will elect to either (1) send you a free replacement part, (2) replace the Product with a new or comparable product at no charge, or (3) repair the Product. How cool is that!This Warranty gives you specific legal rights, and you may also have other rights which vary from State to State.PRODUCT REGISTRATION: Snow Joe strongly encourages you to register your Product. You can register online at snowjoe.com/register, or by printing and mailing in a registration card available online from our website, or by calling our Customer Service Department at 1-866-SNOWJOE (1-866-766-9563), or by e-mailing us at help@snowjoe.com. Failure to register your Product will not diminish your warranty rights. However, registering your Product will allow Snow Joe to better serve you with any of your customer service needs.WHO CAN SEEK LIMITED WARRANTY COVERAGE: This Warranty is extended by Snow Joe to the original purchaser and original owner of the Product.WHAT IS NOT COVERED? This Warranty does not apply if the Product has been used commercially or for non-household or rental applications. This Warranty also does not apply if the Product was purchased from an unauthorized seller. This Warranty also does not cover cosmetic changes that do not affect performance. Wearing parts like belts, augers, chains and tines are not covered under this Warranty, and can be purchased at snowjoe.com or by calling 1-866-SNOWJOE (1-866-766-9563).
22
R4_01282020
23
RMANUAL DEL OPERADORUna división de Snow Joe®, LLC
MOTOSIERRA PODADORA
ES
INALÁMBRICA + TUBO TELESCÓPICO
250 W | 4.000 RPM | BARRA Y CADENA DE 12.7 CM
Modelo 24V-HCSWP-LTE
Forma SJ-24V-HCSWP-LTE-880S-M
¡IMPORTANTE!Instrucciones de seguridadTodos los operadores deberán leer estas instrucciones antes del usoSiempre obedezca estas normas de seguridad. No hacerlo podría causar lesiones personales severas o incluso la muerte.Seguridad general m ¡ADVERTENCIA! Este artefacto no ha sido diseñadopara su uso por niños ni por otras personas sin asistencia o supervisión cuyas habilidades físicas, sensoriales o mentales les impidan usarlo de forma segura. Los niños deben estar bajo supervisión para garantizar que no jueguen con este artefacto.Antes de encender su máquina, inspecciónela cuidadosamente para cerciorarse de que no tenga defectos. Si encuentra algún defecto, no la encienda. Contacte a un concesionario autorizado Snow Joe® + Sun Joe® o comuníquese con la central de servicio al cliente Snow Joe® + Sun Joe® llamando al 1-866-SNOWJOE (1-866-766-9563).m ¡ADVERTENCIA! Al usar este artefacto, se deberántomar siempre precauciones básicas de seguridad para reducir riesgos de incendio, choque eléctrico y lesiones personales. Estas incluyen:1. Mantenga su área de trabajo limpia y bien iluminada: las áreas de trabajo abarrotadas u oscuras pueden provocar accidentes. Inspeccione siempre el área donde la motosierra va a ser usada.2. Evite entornos peligrosos: no use la herramienta motorizada bajo la lluvia, en lugares húmedos o mojados, o en mal tiempo, especialmente cuando haya un riesgo de tormenta eléctrica. Esto reduce el riesgo de ser fulminado por un rayo. No opere la herramienta motorizada en atmósferas gaseosas o explosivas, ni la use cerca de líquidos inflamables o combustibles. Los motores de máquinas como ésta pueden echar chispas que pueden encender los gases.3. Conozca su producto: sepa cómo arrancar y detener la máquina. Familiarícese bien con los controles.4. Mantenga alejados a espectadores, niños y mascotas: todos los espectadores y mascotas deberán estar a una distancia segura del área de trabajo.
5. Vístase apropiadamente: no lleve prendas holgadas ni joyas. Pueden llegar a engancharse en las partes móviles. Al trabajar en exteriores, se recomienda el uso de guantes de goma y calzado antideslizante.6. Superficies resbaladizas: tenga cuidado y evite resbalar o caer. Use calzado que proteja sus pies y mejore su posición de pie en superficies resbaladizas.7. Manténgase alerta: vea lo que está haciendo. Utilice su sentido común. No opere la herramienta motorizada si siente cansancio o está bajo la influencia de las drogas o el alcohol.8. No se extralimite: mantenga con sus pies una posición y un equilibrio adecuados todo el tiempo.9. Evite encendidos accidentales: no apriete el gatillo antes de conectar la herramienta a la batería, ni al levantarla o transportarla. No lleve la motosierra inalámbrica podadora + telescópica con su dedo sobre el gatillo.10. Use el artefacto correcto: no use esta herramienta motorizada para cualquier otra aplicación que no sea una de aquellas para las cuales fue diseñada.11. La cadena tiene partes cortadoras afiladas: al levantar o sostener la herramienta motorizada no sujete su cadena expuesta ni sus partes cortadoras.12. Use ambas manos: sujete el tubo telescópico y mango con ambas manos para evitar la pérdida de control.13. Retire la batería: saque la batería de la herramienta cuando no esté siendo usada, antes de repararla, al cambiarle accesorios, o al realizar cualquier otra tarea de mantenimiento en esta.14. Use gafas protectoras: use también calzado protector, ropa que se ajuste a su cuerpo, guantes protectores y protección auditiva y para la cabeza.15. Use protección para la cabeza: use siempre protección para la cabeza al operar la herramienta motorizada en alturas. Los desechos que caigan pueden causar lesiones personales severas.16. No fuerce la herramienta: tendrá un mejor funcionamiento con menos probabilidades de lesiones personales o fallas mecánicas si es usada con la intensidad para la cual fue diseñada.17. Inspeccione la unidad en busca de partes dañadas: antes de seguir utilizando el artefacto, todos los protectores y partes deben ser cuidadosamente inspeccionados para determinar si funcionarán
© 2022 Snow Joe®, LLC Derechos reservados. Instrucciones originales.
GUARDE ESTAS INSTRUCCIONES 25
correctamente o no. Verifique el alineamiento y junturas de las partes móviles, roturas de partes, monturas y cualquier otra condición que pueda afectar su funcionamiento. Un protector o cualquier otro componente dañado deberá ser correctamente reparado o reemplazado. Comuníquese con la central de servicio al cliente Snow Joe® + Sun Joe® llamando al 1-866-SNOWJOE (1-866-766-9563) para obtener asistencia.18. Cuide su herramienta motorizada: mantenga las cortadoras afiladas y limpias para un óptimo rendimiento y para reducir el riesgo de lesiones personales. Mantenga los mangos secos, limpios y sin aceite ni grasa. Siga las recomendaciones adicionales descritas en la sección de mantenimiento de este manual.19. Guarde la herramienta en interiores: cuando no esté en uso, esta herramienta motorizada debe ser almacenada bajo techo, en un lugar seco, alto o bajo llave, lejos del alcance de los niños.20. No use la herramienta motorizada si el gatillo no la enciende y apaga. Cualquier herramienta motorizada que no pueda ser controlada es considerada peligrosa y debe ser reparada inmediatamente.21. Mantenga todas las partes del cuerpo alejadas de la cadena. No retire material cortado ni sujete el material a ser cortado cuando la cadena esté moviéndose. Asegúrese de que el interruptor esté apagado al retirar material atascado. La cadena continuará moviéndose por un rato luego de que la herramienta sea apagada. Un momento de distracción durante el uso de esta herramienta motorizada podría ocasionar lesiones personales severas.22. Lleve la herramienta motorizada por su mango, con la cadena detenida. Al transportar o almacenar la herramienta motorizada, siempre mantenga la cadena y la barra-guía dentro de la funda de barra-guía. Una manipulación correcta de la motosierra inalámbrica podadora + telescópica reducirá las probabilidades de lesiones personales.23. Sujete el producto solo por sus superficies aisladas. En caso de que la cadena haga contacto con alambres ocultos, las partes metálicas del producto pueden conducir electricidad y causar un choque eléctrico al operador.24. Esta unidad no ha sido diseñada para proporcionar protección contra un choque eléctrico en caso de hacer contacto con cables de alto voltaje. Nunca use la herramienta motorizada cerca de ninguna línea de alto voltaje. El contacto con, o uso cerca de, líneas de alto voltaje puede causar lesiones personales severas o un choque eléctrico mortal. Manténgase a una distancia mínima de 50 pies (15 m) de todas las líneas de alta tensión.m ¡ADVERTENCIA! Antes de inspeccionar, limpiar oreparar la máquina, retire la batería y espere a que todas las partes móviles se detengan. No seguir estas instrucciones puede causar lesiones personales severas o daños materiales.
m ¡ADVERTENCIA! No use este artefacto sin antes leereste manual de instrucciones.m ¡ADVERTENCIA! No emplee este artefacto cerca depersonas, a menos que estén usando ropa protectora.m ¡ADVERTENCIA! No opere esta herramientainalámbrica trepado en un árbol, sobre una escalera o en un andamio. Usar la herramienta en dichas circunstancias es extremadamente peligroso.m ¡ADVERTENCIA! No permita que la familiaridadcon este tipo de herramientas le impida tomar todas las precauciones necesarias. Recuerde que una fracción de segundo de descuido es suficiente para que ocurran graves lesiones personales.m ¡ADVERTENCIA! ¡La motosierra inalámbricapodadora + telescópica debe estar totalmente ensamblada antes de su operación! ¡No use una herramienta que haya sido ensamblada solo parcialmente o ensamblada con partes dañadas!m ¡ADVERTENCIA! El inicio, parada y reinicio de unmotor eléctrico de forma repetida en intervalos de pocos segundos puede generar una gran cantidad de calor y dañar el motor. Para proteger el ciclo de vida útil de su herramienta inalámbrica, después de detenerla espere al menos cinco (5) segundos antes de volverla a encender.m ¡ADVERTENCIA! Peligro de choque eléctrico: antesde encender su máquina, inspecciónela cuidadosamente para asegurarse de que no tenga defectos. Si encuentra algún defecto, no la encienda y comuníquese con su distribuidor. NOTA: conserve y cuide las partes pequeñas retiradas durante el ensamblado o al hacer ajustes. Manténgalas en un lugar seguro para evitar que se pierdan. Comuníquese con un concesionario autorizado Snow Joe® + Sun Joe® o comuníquese con la central de servicio al cliente Snow Joe® + Sun Joe® llamando al 1-866-SNOWJOE (1-866766-9563) para toda operación o tarea de mantenimiento no descrita en este manual. Cualquier operación llevada a cabo en un centro no autorizado o por personal no calificado invalidará por completo la garantía.m ¡ADVERTENCIA! Para su seguridad y la de losdemás: · Un mantenimiento correcto es esencial para conservar la eficiencia y seguridad originales de la máquina con el paso del tiempo.· Mantenga todos los pernos, tuercas y tornillos ajustados para garantizar que el equipo esté en una condición segura de funcionamiento.· Nunca use la máquina con partes gastadas o dañadas. Las partes dañadas deben ser reemplazadas, nunca reparadas.
26
m ¡ADVERTENCIA! Use siempre guantes protectoresdurante las operaciones de mantenimiento.m ¡ADVERTENCIA! Use solo partes de repuesto yaccesorios originales del fabricante. No hacerlo puede causar lesiones personales y un desempeño deficiente de la unidad. Para ordenar partes de repuesto o accesorios genuinos de su motosierra inalámbrica podadora + telescópica iON+ de Sun Joe®, visite snowjoe.com o comuníquese con la central de servicio al cliente Snow Joe® + Sun Joe® llamando al 1-866-SNOWJOE (1-866-766-9563).Limpieza de la herramienta m ¡ADVERTENCIA! No permita que ningún líquidose meta dentro de la carcasa del motor y NUNCA sumerja ninguna parte de la carcasa en ningún líquido.1. Detenga el motor y retire la batería.2. Limpie el cuerpo de la herramienta, y retire polvo y residuos usando un paño húmedo con un detergente suave.NOTA: no use detergentes fuertes en la carcasa de plástico o mango, ya que pueden ser dañados por ciertos aceites aromáticos tales como de pino o limón, o por solventes como acetona.Almacenamiento m ¡ADVERTENCIA! En ningún momento deje quelíquidos de frenos, gasolina, productos a base de petróleo, aceites penetrantes, solventes, etc. hagan contacto con las partes de plástico. Los agentes químicos pueden dañar, debilitar o destruir el plástico, causando lesiones personales severas.1. Detenga el motor y retire la batería.2. Limpie a fondo la motosierra inalámbrica podadora + telescópica antes de guardarla.3. Siempre coloque la funda sobre la barra-guía antes de guardar o transportar la motosierra inalámbrica podadora + telescópica. Tenga cuidado y evite tocar las cortadoras afiladas de la cadena.4. Guarde la motosierra inalámbrica podadora + telescópica en interiores, en un lugar seco y lejos del alcance de los niños. Mantenga el producto alejado de agentes corrosivos tales como químicos de jardín y sales descongelantes.5. Recomendamos usar el empaquetado original para guardar el producto, o cubrirlo con una tela o funda adecuada para protegerlo contra el polvo.
Reglas de seguridadespecíficas para la motosierra inalámbrica podadora + telescópica1. Solo el operador de la motosierra inalámbrica podadora + telescópica deberá estar en el área de trabajo.2. No utilice la motosierra inalámbrica podadora + telescópica para talar árboles.3. Utilice siempre las dos manos al operar la motosierra inalámbrica podadora + telescópica. Sujete la motosierra de forma segura con una mano en el gatillo interruptor y la otra mano en el tubo.4. Antes de encender la motosierra inalámbrica podadora + telescópica, asegúrese de que la cadena no esté haciendo contacto con ningún objeto.5. No permita que la motosierra inalámbrica podadora + telescópica haga contacto con objetos puestos a tierra tales como tuberías, cercas de alambre y postes de metal.6. No fuerce la motosierra inalámbrica podadora + telescópica durante el corte. Aplique una presión leve. Funcionará de una forma más segura y efectiva si es usada con la intensidad para la cual fue diseñada.7. Tenga mucho cuidado al cortar una rama que esté bajo tensión. Cuando la tensión de la madera es liberada, la rama puede recuperar su elasticidad y golpear violentamente al operador, causándole lesiones personales severas o la muerte.8. Durante el transporte, sostenga el tubo en su centro de equilibrio, con la barra-guía y cadena apuntando hacia atrás.9. No corte arbustos ni árboles jóvenes pequeños con la motosierra inalámbrica podadora + telescópica. Las ramas pequeñas pueden engancharse en la cadena y ser azotadas contra el operador, haciéndole perder el equilibrio.10. Nunca se pare directamente debajo de la rama que está cortando. Siempre ubíquese lejos de la ruta de caída de las ramas y demás residuos.11. Mantenga una presión firme y constante sobre la motosierra inalámbrica podadora + telescópica durante el corte. No trate de cortar ramas de diámetros mayores a la longitud de la barra-guía.12. Mantenga a las demás personas y mascotas alejadas del extremo de corte de la motosierra inalámbrica podadora + telescópica y a una distancia segura del área de trabajo.
27
Contragolpem ¡ADVERTENCIA! El contragolpe puede ocurrircuando la nariz o la punta de la barra-guía tocan un objeto, o cuando la abertura de corte de la madera se cierra apretando la motosierra durante el corte.EVITE QUE LA PUNTA DE LA BARRA-GUÍA HAGA CONTACTO CON CUALQUIER OBJETO. En algunos casos, cuando la punta hace contacto con un objeto, la motosierra puede rápidamente reaccionar lanzándose hacia arriba y hacia atrás, en dirección del operador. Un aprisionamiento de la cadena puede también lanzar violentamente la motosierra hacia el operador. Cualquiera de estas reacciones puede hacer que usted pierda el control de la motosierra inalámbrica podadora + telescópica, lesionándose gravemente. Obedezca las precauciones necesarias indicadas a continuación para evitar contragolpes.· Use siempre ambas manos al operar la motosierra inalámbrica podadora + telescópica: una mano sujetando el gatillo y la otra mano sujetando el tubo. Sujete la motosierra firmemente. Los pulgares y los dedos deben rodear el gatillo y el tubo.· La motosierra inalámbrica podadora + telescópica debe tener todos sus protectores instalados. Asegúrese de que funcionen correctamente.· No se extralimite ni extienda sus brazos por encima de la altura de sus hombros.· Asegúrese de estar de pie apropiadamente, manteniendo un equilibrio adecuado en todo momento.· Nunca intente cortar dos ramas al mismo tiempo. Corte solo una por vez.· No entierre la nariz de la barra-guía, ni trate de cortar empujando la nariz de la barra-guía dentro de la madera.· Esté pendiente del desplazamiento de la madera u otras fuerzas que puedan aprisionar la cadena.· Tenga muchísimo cuidado al re-entrar en un corte previo. · Use la cadena y barra-guía suministradas con lamotosierra inalámbrica podadora + telescópica. Use solo partes de repuesto originales Snow Joe® + Sun Joe®, diseñadas específicamente para su uso con esta motosierra.· Nunca use una cadena gastada o suelta. Mantenga la cadena afilada y tensionada adecuadamente.Instrucciones de seguridad para las baterías y el cargadorPrestamos mucha atención al diseño de cada batería para garantizar la producción de baterías seguras y durables, con una alta densidad de energía. Las celdas de las baterías tienen varios dispositivos de seguridad. Cada celda individual es
inicialmente formateada y sus curvas eléctricas características son registradas. Estos datos son luego usados exclusivamente para ensamblar las mejores baterías posibles.Independientemente de todas las precauciones de seguridad, se debe tener mucho cuidado al manipular las baterías. Las siguientes instrucciones deben ser obedecidas en todo momento para garantizar un uso seguro. Un uso seguro solo puede ser garantizado si se usan celdas libres de daños. Una manipulación incorrecta de las baterías puede causar daños en sus celdas.¡IMPORTANTE! Los análisis han confirmado que el uso incorrecto y el cuidado deficiente de baterías de alto rendimiento son las causas principales de lesiones personales y/o daños al producto.m ¡ADVERTENCIA! Use solo baterías de repuestoaprobadas. Otras baterías pueden dañar esta herramienta motorizada y provocar un desperfecto que pueda causar lesiones personales graves.m ¡ADVERTENCIA! No use baterías o artefactos quehayan sido dañados o modificados. Las baterías dañadas o modificadas pueden reaccionar impredeciblemente, causando un incendio, explosión o lesiones personales.Su batería deberá ser reparada por una persona calificada usando únicamente partes de repuesto originales. Esto mantendrá la seguridad de la batería.m ¡PRECAUCIÓN! Para reducir el riesgo de lesionespersonales, use solo cargadores originales iON+ de 24 V diseñados para la batería iON+ de 24 V. El uso de otras baterías o cargadores representa un riesgo de incendio, daños y lesiones personales. No conecte una batería a un tomacorriente doméstico o encendedor de cigarrillos. Dicho uso indebido dañará o deshabilitará permanentemente la batería.· Evite entornos peligrosos: no cargue la batería bajo la lluvia o nieve, ni en lugares húmedos o mojados. No use la batería ni el cargador en atmósferas explosivas (gases, polvo o materiales inflamables) ya que al insertar o retirar la batería se pueden generar chispas que causen un incendio.· Cargue la batería en un área bien ventilada: no bloquee los conductos de ventilación del cargador. Manténgalos despejados para permitir una ventilación adecuada. No permita que se fume o haya fuego abierto cerca de una batería siendo cargada. Los gases presentes pueden explotar.NOTA: el rango seguro de temperatura para la batería es de 41ºF (5ºC) a 105ºF (40.5). No cargue la batería en exteriores a temperaturas congelantes. Cárguela a temperatura ambiente en interiores.· Cuide el cable de alimentación del cargador: al desenchufar el cargador tire del enchufe, no del cable de alimentación, para desconectarlo del tomacorriente y así evitar daños al enchufe y cable. Nunca transporte el cargador colgado de su cable, ni tire del cable para
28
desconectarlo del tomacorriente. Mantenga el cable alejado del calor, grasas y bordes afilados. Asegúrese de que el cable no sea pisado, que la gente no se tropiece con éste, ni que esté sujeto a daños o tensiones mientras el cargador esté siendo usado. No use el cargador con un cable o enchufe dañado. Reemplace un cargador dañado inmediatamente.· No use un cable de extensión a menos que sea absolutamente necesario: usar un cable de extensión incorrecto, dañado o conectado de forma inapropiada puede causar un incendio o choque eléctrico. Si se debe usar un cable de extensión, conecte el cargador a un cable de extensión de calibre 16 (o más grueso) de alambrado adecuado, con el enchufe macho del cargador encajando perfectamente en el enchufe hembra del cable de extensión. Verifique que el cable de extensión esté en buenas condiciones.· El cargador (XZ2600-0450) está clasificado solo para voltajes de 100 V a 240 V CA: el cargador debe estar enchufado a un tomacorriente apropiado.· No use un adaptador eléctrico: un adaptador no es recomendado ni vendido por el fabricante de la batería o cargador de baterías.· Desenchufe el cargador cuando no esté siendo usado: asegúrese de retirar las baterías de los cargadores desenchufados.m ¡ADVERTENCIA! Para reducir el riesgo de un choqueeléctrico, desenchufe siempre el cargador antes de llevar a cabo cualquier tarea de limpieza o mantenimiento. No permita que entre agua dentro del cargador. Use un interruptor de circuito por falla a tierra (GFCI) para reducir el riesgo de un choque eléctrico. · No queme ni incinere la batería: la batería puede explotar,causando lesiones personales o daños. Cuando las baterías son quemadas se generan sustancias y humos tóxicos. · No triture, deje caer ni dañe la batería: no use la batería ni el cargador si han sido severamente golpeados, se han dejado caer, se han aplastado, o han sido dañados de cualquier forma como por ejemplo perforados con un clavo, golpeados con un martillo, pisados, etc.· No desarme las baterías ni el cargador: un reensamblado incorrecto puede presentar un riesgo severo de choque eléctrico, fuego o exposición a químicos tóxicos de la batería. Si la batería o el cargador están dañados, contacte a un concesionario autorizado Snow Joe® + Sun Joe® o comuníquese con la central de servicio al cliente Snow Joe® + Sun Joe® llamando al 1-866-SNOWJOE (1-866-7669563) para obtener ayuda.· Los químicos de las baterías causan quemaduras severas: nunca deje que una batería dañada haga contacto con la piel, ojos o boca. Si la batería está dañada, los químicos que escapen de ésta reaccionarán violentamente con el aire. Use guantes de hule o neopreno para deshacerse de la batería de forma segura. Si la piel es expuesta a las sustancias químicas de la batería, lave el
área afectada con agua y jabón. Si los ojos son expuestos a los químicos, inmediatamente enjuáguelos con agua durante 20 minutos y busque atención médica. Quítese y deshágase de las vestimentas contaminadas.· No cortocircuite los terminales: cuando la batería no esté en uso, manténgala alejada de objetos metálicos tales como monedas, sujetapapeles, clavos, tornillos, alfileres u otros objetos metálicos pequeños que puedan causar el contacto de un terminal de la batería con el otro. Cortocircuitar los terminales de una batería puede causar quemaduras o un incendio.· Guarde su batería y cargador en un lugar fresco y seco: no guarde la batería ni el cargador donde las temperaturas puedan exceder los 105°F (40.5°C), como bajo la luz directa del sol o dentro de un vehículo o construcción metálica durante el verano.Información sobre la batería1. La batería suministrada con su herramienta inalámbrica está cargada solo parcialmente. La batería tiene que ser cargada por completo antes de que usted use la herramienta por primera vez.2. Para un óptimo rendimiento de la batería, evite ciclos de descarga baja cargándola frecuentemente.3. Guarde la batería en un lugar fresco, de preferencia a 77°F (25°C) y cargada al menos a un 40%.4. Las baterías de iones de litio están sujetas a un proceso natural de desgaste. Una batería debe ser reemplazada a más tardar cuando su capacidad caiga a un 80% de su capacidad inicial (cuando estaba nueva). Las celdas debilitadas en una batería gastada no son capaces de cumplir con los requisitos de alta potencia necesarios para la operación adecuada de su motosierra inalámbrica podadora + telescópica, y por tanto representan un riesgo de seguridad.5. No arroje la batería al fuego abierto ya que puede explotar. 6. No queme la batería ni la exponga al fuego. 7. No descargue las baterías exhaustivamente. Unadescarga completa dañará las celdas de la batería. La causa más común de descarga exhaustiva es un almacenamiento prolongado. Deje de trabajar tan pronto como el rendimiento de la batería caiga considerablemente o se active el sistema de protección electrónico. Para un rendimiento óptimo de la batería, cárguela de forma frecuente. Almacene la batería únicamente luego de haberla cargado por completo.8. Proteja la batería y la herramienta contra sobrecargas. Las sobrecargas causarán rápidamente un sobrecalentamiento y daños a las celdas dentro de la batería, incluso si este sobrecalentamiento no es aparente por fuera.
29
9. Evite daños y golpes. Reemplace inmediatamente una batería que se haya caído desde una altura de más de 3 pies (1 m) o haya sido expuesta a golpes violentos, incluso si el exterior de la batería aparenta no tener daños. Las celdas dentro de la batería pueden haber sufrido daños severos. En dichos casos, lea la información de eliminación para deshacerse apropiadamente de la batería.10. Si la batería sufre una sobrecarga y sobrecalentamiento, el sistema interruptor de corte de protección integrado apagará el equipo por motivos de seguridad. ¡IMPORTANTE! No presione más el gatillo interruptor de encendido/apagado si el sistema interruptor de corte de protección se ha activado. Esto puede dañar la batería.11. Recargue solo con el cargador especificado por el fabricante. Un cargador adecuado para un tipo de batería puede causar un incendio al ser usado con una batería de otro tipo.12. Use artefactos a baterías solo con baterías específicamente diseñadas para éstos. El uso de cualquier otra batería puede causar un incendio o lesiones personales.13. Bajo condiciones extremas, la batería puede expulsar un líquido. Evite el contacto con este líquido. Si usted accidentalmente hace contacto con este líquido, enjuáguese con agua. Si el líquido hace contacto con los ojos, adicionalmente busque atención médica. El líquido que sale de la batería puede causar irritación o quemaduras.14. No use baterías o artefactos que hayan sido dañados o modificados. Las baterías dañadas o modificadas pueden reaccionar impredeciblemente, causando un incendio, explosión o lesiones personales.15. No exponga una batería o artefacto al fuego o a temperaturas extremas. Una exposición al fuego o a temperaturas por encima de los 266ºF (130°C) puede causar una explosión.16. Siga todas las instrucciones de carga, y no cargue la batería o artefacto fuera del rango de temperaturas especificado en las instrucciones. Cargar de forma incorrecta o a temperaturas fuera del rango especificado puede dañar la batería e incrementar el riesgo de incendio.Información sobre el cargador y el proceso de carga1. Verifique la información indicada en la placa de especificaciones del cargador de baterías. Asegúrese de conectar el cargador de baterías a una fuente de alimentación que tenga el voltaje indicado en su placa de especificaciones. Nunca lo conecte a una fuente de alimentación con un voltaje diferente al indicado.2. Proteja el cargador de baterías y su cable contra daños. Mantenga el cargador y su cable alejados del calor, grasa, aceite y bordes afilados. Haga reparar sin
demora los cables dañados por un técnico calificado en un concesionario autorizado Snow Joe® + Sun Joe® o comuníquese con la central de servicio al cliente Snow Joe® + Sun Joe® llamando al 1-866-SNOWJOE (1-866766-9563).3. Los enchufes deben encajar en los tomacorrientes. Nunca modifique el enchufe de ninguna manera. No use ningún adaptador de enchufe con artefactos que tengan conexión a tierra. El uso de enchufes no modificados y tomacorrientes equivalentes reducirá el riesgo de un choque eléctrico.4. Mantenga el cargador de baterías, la batería y la herramienta inalámbrica lejos del alcance de los niños.5. No use el cargador de baterías suministrado para cargar baterías de otras herramientas inalámbricas.6. Durante periodos de trabajo pesado, la batería se calentará. Permita que la batería se enfríe a temperatura ambiente antes de insertarla en el cargador para su recarga.7. No sobrecargue las baterías. No exceda los tiempos máximos de carga. Estos tiempos de carga solo se aplican a baterías descargadas. La inserción frecuente de una batería cargada o parcialmente cargada dará como resultado una sobrecarga y daños a las celdas. No deje las baterías en el cargador por días enteros.8. Nunca use o cargue las baterías si sospecha que han pasado más de doce (12) meses desde la última vez que fueron cargadas. Existe una alta probabilidad de que la batería ya haya sufrido daños graves por descarga exhaustiva.9. Cargar baterías a temperaturas menores de 41°F (5°C) causará daños químicos a las celdas y puede provocar un incendio.10. No use baterías que hayan sido expuestas al calor durante el proceso de carga, ya que sus celdas pueden haber sufrido daños severos.11. No use baterías que se hayan deformado o hinchado, o aquellas que muestren otros síntomas atípicos tales como liberación de gases, zumbidos, grietas, etc.Protección contra influencias del entorno1. Use ropa de trabajo adecuada. Use gafas protectoras.2. Proteja su herramienta inalámbrica y cargador de baterías contra la humedad y la lluvia. La humedad y la lluvia pueden causar daños severos a las celdas de las baterías.3. No use la herramienta inalámbrica ni el cargador de baterías cerca de vapores y líquidos inflamables.4. Use el cargador de baterías y la herramienta inalámbrica solo en entornos secos y a una temperatura ambiente de entre 41ºF (5°C) y 105°F (40.5°C).
30
5. No coloque el cargador de baterías en lugares donde la temperatura pueda sobrepasar los 105°F (40.5°C). En particular, no deje el cargador de baterías dentro de un auto estacionado bajo la luz directa del sol.6. Proteja las baterías contra el sobrecalentamiento. Las sobrecargas, exceso de carga y exposición a la luz directa del sol darán como resultado un sobrecalentamiento y daños a las celdas. Nunca cargue ni trabaje con baterías que hayan estado sobrecalentadas. De ser posible, reemplácelas inmediatamente.7. Guarde el cargador de baterías y su herramienta inalámbrica solo en entornos secos y a una temperatura ambiente de entre 41ºF (5°C) y 105°F (40.5°C). Guarde su batería de iones de litio en un lugar fresco y seco, a una temperatura ambiente de 77°F (25°C). Proteja la batería, el cargador y la herramienta inalámbrica contra la humedad y la luz directa del sol. Solo almacene baterías cargadas por completo.8. Evite que la batería de iones de litio se congele. Las baterías almacenadas a temperaturas menores de 32°F (0°C) por más de una hora deberán ser desechadas.9. Al manipular una batería, tenga cuidado con las descargas electrostáticas. Las descargas electrostáticas pueden dañar el sistema electrónico de protección y las celdas de la batería. Para evitar las descargas electrostáticas, nunca toque los terminales de la batería.31
Símbolos de seguridadLa siguiente tabla muestra y describe los símbolos de seguridad que pueden aparecer en este producto. Lea, comprenda y siga todas las instrucciones relacionadas con esta máquina antes de intentar ensamblarla y operarla.
Símbolo
Descripción
Símbolo
Descripción
LEA EL MANUAL DEL OPERADOR: lea, comprenda y siga todas las instrucciones en elmanual antes de intentar ensamblary operar esta unidad.
ALERTA DE SEGURIDAD: indica una precaución, advertencia o peligro.
USE PROTECCIÓN OCULAR Y AUDITIVA: para evitar lesiones personales, use protección auditivay gafas protectoras.
¡ADVERTENCIA! No exponga la unidad a la lluvia ni a entornos mojados. Manténgala seca.
Use guantes protectores y calzado no deslizante al operar esta máquina y al manipular desechos.
m
¡PRECAUCIÓN! Evite el contacto entre la punta de la barra-guía con cualquier objeto. El contacto con la barra-guía puede causar un contragolpe de la motosierra, lesionando gravemente al operador.
La parte móvil seguirá moviéndose durante varios segundos después de que usted haya apagado la máquina.
50 pies (15 m)
¡ADVERTENCIA! PELIGRO DE CHOQUE ELÉCTRICO: manténgase a una distancia mínima de 50 pies (15 m) de las líneas de alto voltaje. No se extralimite. Mantenga con sus pies unaposición y un equilibrio adecuados todo el tiempo.
Utilice el cargador de baterías solamente en interiores.
Dirección correcta de las cortadoras.¡PELIGRO! PARTES CORTADORAS GIRATORIAS: mantenga las manos y pies lejos de las aberturas cuando la motosierra esté funcionando.Mantenga a los espectadores a una distancia mínima de 50 pies (15 m) del área de trabajo.
32
Conozca su motosierra inalámbrica podadora + telescópicaLea detenidamente este manual del operador y las instrucciones de seguridad antes de operar su motosierra inalámbrica podadora + telescópica. Compare la ilustración debajo con la motosierra inalámbrica podadora + telescópica para familiarizarse con las ubicaciones de sus diversos controles y ajustes. Conserve este manual para futuras referencias.
9
10 11 12 13 14
15
16
17 18
19
8
7
6
5
4
30
20
3
29
26 24
2
1
23
28
27 25
22
21
1. Cubierta de barra 2. Cadena de 5 plg (12.7 cm) 3. Barra-guía 4. Guarda de cadena 5. Rueda tensionadora 6. Cubierta de piñón 7. Tapón de tanque de aceite 8. Tapa de compresión 9. Traba de seguridad(motosierra podadora)
10. Gatillo (motosierra podadora)11. Mango 12. Protector de mano 13. Hebilla de trabado 14. Botón de trabadomulti-ángulo 15. Seguro de leva 16. Ensamblado de tubo 17. Traba de seguridad(ensamblado de tubo)
18. Gatillo (ensamblado de tubo)19. Compartimiento retirable de batería20. Botón de trabado (compartimiento retirable de batería)21. Llave22. Aceite para barraguía y cadena23. Indicador de batería
24. Botón indicador de batería25. Botón de trabado26. Receptáculo de carga27. Batería de iones de litio iON+ de 24 V (24VBAT-LTE) con exclusiva tecnología EcoSharp®28. Conector de cargador29. Cargador de baterías de iones de litio iON+ de 24 V (XZ2600-0450)30. Botón de trabado (ensamblado de tubo)
Datos técnicosMotor …………………………………………………………………….. 250 W Velocidad sin carga ……………………………………………4,000 RPM Voltaje máximo de batería*……………………………………… 24V CC Capacidad de la batería …………………………………………… 2.0 Ah Entrada de cargador …100 V – 240 V CA | 50 Hz – 60 Hz | 0.4 A Salida de cargador ………………………………….26 V CC | 450 mA Tiempo máximo de carga……………………………………….. 5 horas Grosor de corte (máximo) …………………………..4.5 plg (11.4 cm)Recomendado: 2.5 plg (6.4 cm)
Longitud de barra-guía y cadena ……………………5 plg (12.7 cm)Posiciones de cabezal multi-ángulo …………………. 7 posiciones (-45º | -22.5º | 0º | 22.5º | 45º | 67.5º | 90º)Tubo telescópico ………………………………….. De 4 pies a 5.8 pies (1.2 m a 1.8 m)Altura de alcance……………………………….. Hasta 12 pies (3.7 m)Capacidad del tanque de aceite …………………. 0.85 fl oz (25 ml) Peso neto (sin tubo) ……………………………………….. 3.2 lb (1.5 kg)Peso neto (con tubo) ………………………………………. 5.2 lb (2.4 kg)
*El voltaje inicial sin carga, cuando la batería está cargada por completo, alcanza un máximo de 24 V. El voltaje nominal bajo una carga típica es de 21.6 V.
33
DesembalajeContenido del paquete:· Motosierra podadora y compartimiento retirable de batería · Ensamblado de tubo · Batería de iones de litio iON+ de 24 V · Cargador de baterías de iones de litio iON+ de 24 V · Aceite para barra-guía y cadena · Llave · Manual y tarjeta de registro 1. Retire cuidadosamente la motosierra inalámbricapodadora + telescópica y compruebe que todos los artículos anteriores estén suministrados. 2. Inspeccione cuidadosamente el producto para asegurarse de que no haya ocurrido ningún daño o ruptura durante su transporte. Si alguna parte está dañada o extraviada, NO DEVUELVA el producto a la tienda. Comuníquese con la central de servicio al cliente Snow Joe® + Sun Joe® llamando al 1-866-SNOWJOE (1-866-766-9563).NOTA: no se deshaga de la caja de transporte ni de los materiales de embalaje hasta que usted esté listo para usar su motosierra inalámbrica podadora + telescópica. El empaquetado está hecho de materiales reciclables. Deseche estos materiales de acuerdo con los reglamentos de su localidad.¡IMPORTANTE! El equipo y los materiales de embalaje no son juguetes. No deje que los niños jueguen con las bolsas plásticas, láminas o partes pequeñas. ¡Estos objetos pueden ser tragados y causar asfixia!Operación de la bateríaLa unidad es alimentada por una batería de iones de litio. La batería está completamente sellada y no requiere de mantenimiento.Indicador de nivel de carga de batería
Luces
Significado Botón indicador de nivel de carga. La batería está cargada a un 30%. La batería está cargada a un 60%. La batería está cargada por completo.
NOTA: si el botón indicador de batería no parece estar funcionando, cargue la batería. NOTA: inmediatamente luego del uso de la batería, el botón indicador de batería puede mostrar una carga más baja que la que se mostrará algunos minutos después. Las celdas de las baterías “recuperan” parte de su carga luego de permanecer inactivas.Operación del cargador m ¡ADVERTENCIA! Cargue la batería de iones delitio de 24 V Sun Joe® solo con un cargador de baterías de iones de litio de 24 V Sun Joe® compatible. Otros tipos de cargadores pueden causar lesiones personales y daños.Para reducir el riesgo de un choque eléctrico, no deje que entre agua al cargador.Carga de la batería1. Presione los botones de trabado en ambos lados de la batería para sacarla de su compartimiento (Fig. 1)
Fig. 1
La batería tiene un botón para comprobar su nivel de carga. Simplemente presione el botón para leer el nivel de carga de la batería en los LED indicadores de la batería:
Botón de trabado
34
2. Compruebe que el voltaje de la red eléctrica sea el mismo que el indicado en la placa de especificaciones del cargador de baterías. Luego, enchufe el cargador en un tomacorriente CA apropiado. Conecte el conector del cargador en el receptáculo de carga de la batería para empezar a cargarla (Fig. 2).Indicador de batería
m ¡PRECAUCIÓN! Asegúrese de que la batería no estéinsertada y que la cadena esté cubierta por la funda antes de ensamblar la máquina.Ensamblado de motosierra podadora manual.1. Para configurar la máquina como una motosierra podadora manual, alinee la saliente pequeña en el compartimiento desmontable de batería con la ranura guía en el mango, luego deslice el compartimiento hacia arriba, dentro del mango, hasta que haga “clic” en su posición (Fig. 3).
Fig. 3
Mango
Fig. 2
3. La batería tomará aproximadamente cinco (5) horas en cargarse. Las luces LED indicadoras de la batería ciclarán una a una durante el proceso de carga. Desconecte el cargador inmediatamente cuando las tres luces LED estén encendidas.m ¡PRECAUCIÓN! PELIGRO DE INCENDIO. Aldesconectar el cargador de la batería, asegúrese primero de desenchufar el cargador del tomacorriente, y luego desconectar la batería del cargador.m ¡ADVERTENCIA! Este cargador no se apagade forma automática cuando la batería está cargada por completo. Tenga cuidado de no dejar la batería conectada al cargador. Apague o desenchufe el cargador del tomacorriente cuando la carga haya sido completada.4. Una recarga oportuna de la batería ayudará a prolongar su vida útil. Recargue la batería cuando note una caída en la potencia del equipo.¡IMPORTANTE! Nunca permita que la batería se descargue por completo ya que esto causará un daño irreversible a ésta.EnsambladoEsta motosierra podadora inalámbrica viene completamente ensamblada, con la barra-guía y la cadena pre-instaladas. Los usuarios simplemente tienen que configurar la unidad como una motosierra podadora manual o una motosierra podadora telescópica antes de la operación. Siga las instrucciones a continuación para ensamblar la máquina.
Compartimiento retirable de batería2. Inserte la batería dentro del compartimiento retirable hasta que los botones de trabado hagan “clic” en su lugar (Fig. 4).Fig. 4Botón de trabado
35
3. Para sacar el compartimiento retirable de batería de la motosierra podadora manual, presione el botón de trabado en el compartimiento y deslícelo fuera del mango (Fig. 5).
Fig. 5
Mango
3. Deslice el compartimiento retirable de batería y la batería dentro del extremo del ensamblado de tubo, hasta que haga “clic” en su posición (Fig. 8).Fig. 8
Ensamblado de tubo
Botón de trabadoEnsamblado de motosierra podadora telescópica1. Para instalar el tubo, alinee la saliente pequeña en el extremo del ensamblado de tubo con la ranura guía del mango, y deslice la motosierra podadora hacia abajo dentro del ensamblado de tubo, hasta que haga “clic” en su posición (Fig. 6).Fig. 6
Compartimiento retirable de batería + batería4. Para desensamblar la motosierra podadora telescópica, presione el botón de trabado en el compartimiento retirable de batería y deslícelo fuera del ensamblado de tubo (Fig. 9).Fig. 9Ensamblado de tubo Botón de trabado
Ensamblado de tubo
2. Enganche la hebilla de trabado sobre el gancho en el extremo del mango, y luego presione el pestillo hacia abajo para asegurar la conexión (Fig. 7).
Fig. 7 Pestillo
Hebilla de trabado Mango
5. Levante el pestillo y la hebilla de trabado para destrabar el mango de la motosierra (Fig. 10), luego presione el botón de trabado en la parte inferior del ensamblado de tubo y deslice la motosierra de podado fuera del ensamblado de tubo (Fig. 11).
Fig. 10
Pestillo Hebilla de trabado
36
Fig. 11
Fig. 13
0.05 plg (1.25 mm)
Botón de trabado
Cadena caliente luego del uso, tensionada correctamente Demasiado suelta
PreparaciónAjuste de tensión de cadenam ¡ADVERTENCIA! Use guantes protectores almanipular la barra-guía y la cadena. 1. Asegúrese de que la motosierra podadora esté apagada y que su batería haya sido retirada. 2. Para ajustar la cadena, gire la rueda tensionadora en sentido horario hasta que usted sienta algo de resistencia. Antes del uso, una cadena fría no deberá mostrar holgura debajo de la barra-guía, permitiéndole girar la cadena con la mano sin esfuerzo. Tenga en cuenta que una cadena tensionada cuando está caliente puede terminar demasiado ajustada al enfriarse. (Fig. 12).Fig. 12
Cadena caliente luego del uso, requiere tensionamiento4. Usando la llave incluida, gire la rueda tensionadora en sentido anti-horario para aflojar la cadena (Fig. 14).
Fig. 14
Llave
RRueda tensionadora
RRueda tensionadora3. Para comprobar la tensión de la cadena, jálela levemente 1/8 plg (3 mm) lejos de la parte inferior de la barra-guía. Si al soltarla la cadena regresa a su lugar, la tensión es correcta. Durante una operación normal, la cadena se calentará y expandirá, causando que la cadena se holgue ligeramente aproximadamente unos 0.05 plg (~1.25 mm) (Fig. 13). NOTA: una nueva cadena se estirará. Compruebe la tensión de la nueva cadena frecuentemente durante las primeras dos horas de la operación, después de desconectar la batería y dejar que la cadena se enfríe.
Lubricación de la cadenam ¡ADVERTENCIA! No lubricar la cadena causarádaños a la barra-guía y a la cadena. Solo use aceite para barra-guía y cadena de buena calidad y formulado específicamente para motosierras. No use aceite que contenga impurezas.¡IMPORTANTE! El aceite de barra-guía y cadena es biodegradable. El uso de aceite mineral o de motor puede perjudicar severamente al medioambiente. Es importante que usted use un aceite de buena calidad para lubricar efectivamente las partes cortadoras. Un aceite usado o de mala calidad no garantiza una buena lubricación y reduce el ciclo de vida útil de la barra y la cadena.
37
1. Saque la tapa del tanque de aceite de la parte superior de la motosierra podadora. Luego llene el tanque hasta la parte superior del indicador, marcada con la palabra “MAX” (Fig. 15).Fig. 15
Tapón de tanque de aceite
Aceite para barra-guíay cadena
R
Indicador de tanque de aceite2. Durante la operación, presione la tapa de compresión 3 o 4 veces cada 30 minutos para lubricar la cadena (Fig. 16). NOTA: antes de guardar la unidad, presione la tapa de compresión 3 o 4 veces y haga funcionar la motosierra por 30 segundos para lubricar la cadena de forma pareja y así evitar la corrosión.Fig. 16 Tapa de compresión
RPeriodo de asentamiento de su motosierra podadoraSe recomienda “estrenar” o “asentar” su motosierra podadora siempre que se le instale una cadena nueva.1. Retire la batería y ajuste la tensión de la cadena. 2. Inserte la batería y encienda la motosierra podadora,dejándola funcionar al vacío por aproximadamente cinco minutos. 3. Retire la batería y compruebe la tensión de la cadena nuevamente. De ser necesario, vuelva a ajustar la cadena.
4. Luego, solo haga cortes fáciles por aproximadamente 30 minutos. ¡Asegúrese de que la cadena esté siempre lubricada lo suficiente! Solo use la motosierra podadora para cortes más grandes y de mayor profundidad luego del periodo de asentamiento.Lista de verificaciones de seguridadPara mantener su motosierra podadora funcionando de forma óptima y segura, le recomendamos estudiar esta lista de verificaciones de seguridad antes de cada sesión de trabajo.m ¡ADVERTENCIA! No inserte la batería hasta queusted haya realizado todas las inspecciones.· Inspeccione en busca de cualquier daño a la cadena, barra-guía o carcasa de motor.· Compruebe que todos los tornillos en la máquina y en la barra-guía estén ajustados firmemente.· Limpie la barra-guía y la cadena, retirando todo residuo. · Asegúrese de que todas las ranuras de ventilación esténlibres de aserrín o residuos.· Cerciórese que la cadena esté afilada y correctamente tensionada.· Verifique que el gatillo se mantenga trabado hasta que la traba de seguridad sea presionada.Operaciónm ¡PRECAUCIÓN! Arrancar y detener de forma repetidaun motor eléctrico en intervalos de pocos segundos puede generar una gran cantidad de calor y dañar el motor. Para proteger el ciclo de vida útil de esta motosierra podadora, espere al menos cinco segundos, luego de detenerla, para volverla a encender.m ¡ADVERTENCIA! Asegúrese de que la cadena noesté en contacto con ningún objeto cuando usted arranque el motor.m ¡ADVERTENCIA! Mantenga las manos alejadas dela cadena. Mantenga su mano sujetando el mango. No se extralimite.m ¡ADVERTENCIA! Sujétela firmemente. No suelte lamotosierra mientras esté funcionando.m ¡ADVERTENCIA! No opere la motosierra podadorainalámbrica trepado en un árbol, sobre una escalera o en un andamio. Usar la herramienta en dichas circunstancias es extremadamente peligroso.m ¡PRECAUCIÓN! La cadena continuará girando porvarios segundos luego de haber apagado la herramienta.
38
m ¡PRECAUCIÓN! No utilice la motosierra podadoraen entornos mojados. Tenga sumo cuidado al cortar arbustos pequeños, árboles jóvenes o ramas bajo tensión. Dicho material puede recuperarse de forma elástica y golpearle o quedar atrapado en la motosierra, haciendo que usted pierda el equilibrio o control de la motosierra.m ¡ADVERTENCIA! No permita que la familiaridadcon este tipo de herramienta haga que usted ignore las precauciones necesarias. Recuerde que una fracción de segundo de descuido es suficiente para que ocurran graves lesiones personales.m ¡ADVERTENCIA! No corte ramas cerca de cableseléctricos.Operación de Motosierra Podadora Manual.1. Inserte la batería tal como se muestra en la Fig. 4.2. Para encender la motosierra podadora, sujete firmemente su mango y presione la traba de seguridad para desactivar la seguridad. Luego apriete el gatillo para activar la motosierra (Fig. 17).NOTA: no apriete el gatillo hasta que usted esté listo para hacer un corte.
Fig. 18
RPlaca base (punto de apoyo)
4. Suelte el gatillo para detener la motosierra.Operación de la motosierra podadora telescópica1. Para extender el ensamblado de tubo, levante el seguro de leva y extienda el tubo a la longitud deseada (Fig. 19). Cierre el seguro de leva para asegurar el tubo en su posición.
Fig. 19
Seguro de leva
Fig. 17
RTraba de seguridadGatillo3. Con la motosierra podadora funcionando, embista la placa base contra la rama que desee cortar y deje que la motosierra haga todo el corte (Fig. 18). Solo aplique una ligera presión sobre la motosierra. NOTA: la placa base ayuda a estabilizar la sierra y reduce significativamente las vibraciones. También actúa como punto de apoyo, permitiéndole pivotar la sierra durante el corte para un mejor control.
Tubo2. La motosierra podadora puede ser ajustada en siete diferentes ángulos (-45º, -22.5º, 0º, 22.5º, 45º, 67.5º y 90º) para permitir una mayor flexibilidad y control. Para ajustar el ángulo de corte, presione el botón de trabado multiángulo. Luego gire la motosierra podadora a su ángulo deseado y suelte el botón. La motosierra hará “clic” en su posición y se trabará en dicho ángulo (Fig. 20).Fig. 20
-45° -22.5°0° 22.5° 45° 90° 67.5°
Botón de trabado multiángulo
3. Inserte la batería tal como se muestra en la Fig. 8.
39
4. Sujete la motosierra inalámbrica podadora + telescópica con una mano en el mango y la otra mano en el tubo. Siempre corte de forma adyacente al material y nunca debajo de éste para evitar lesiones causadas por ramas cayendo. Ajuste la longitud y ángulo adecuadamente (Fig. 21). NOTA: no levante su mano inferior por encima de la altura del pecho para mantener el control de la motosierra en caso de un contragolpe.Fig. 21 R
5. Para encender la motosierra podadora, sujete firmemente su mango y presione la traba de seguridad para desactivar la seguridad. Luego apriete el gatillo para activar la motosierra (Fig. 22). NOTA: no apriete el gatillo hasta que usted esté listo para hacer un corte.Fig. 22
Gatillo
Traba de seguridad
6. Suelte el gatillo para detener la motosierra.MantenimientoComuníquese con un concesionario autorizado Snow Joe® + Sun Joe® o llame a la central de servicio al cliente Snow Joe® + Sun Joe® al 1-866-SNOWJOE (1-866-766-9563) para cualquier operación de mantenimiento no descrita en este manual. Cualquier operación llevada a cabo en un centro no autorizado o por personal no calificado invalidará por completo la garantía.m ¡ADVERTENCIA! Para su seguridad y la de losdemás: · Mantenga todos los pernos, tuercas y tornillos ajustados para garantizar que la motosierra podadora esté en una condición segura de funcionamiento.· Nunca use la máquina con partes gastadas o dañadas. Las partes dañadas deben ser reemplazadas, nunca reparadas.· Solo use partes de repuesto originales Snow Joe® + Sun Joe®. Las partes que no son de la misma calidad pueden dañar severamente el equipo, comprometer la seguridad e invalidar la garantía.· Retire la batería y espere por lo menos cinco (5) minutos para que la motosierra se enfríe antes de guardarla o repararla.· Si usted deja caer la motosierra, inspecciónela cuidadosamente para comprobar que no se hayan producido daños. Si la barra-guía está doblada, la carcasa está quebrada, el mango está roto, o si usted nota cualquier otro daño que pueda afectar la operación de la motosierra, no la use.m ¡ADVERTENCIA! Siempre retire la batería antesde llevar a cabo cualquier ajuste, tarea de mantenimiento o reparación en su motosierra podadora inalámbrica.· Use guantes protectores al manipular la barra-guía y la cadena.· Mantenga la barra-guía insertada en su funda, excepto al trabajar directamente en la barra-guía o la cadena.· Nunca se deshaga de aceites u otros materiales contaminantes en lugares no autorizados.m ¡PRECAUCIÓN! Si se percata de algo inusual, comovibraciones excesivas o ruidos extraños, apague la motosierra inmediatamente. Retire la batería y revise la motosierra, buscando el daño.m ¡PRECAUCIÓN! Para evitar el sobrecalentamiento ydaños al motor, mantenga siempre las ranuras de ventilación limpias y libres de aserrín y residuos.
40
Limpieza generalPara un máximo rendimiento, se recomienda limpiar la motosierra podadora luego de cada uso. Use un paño, cepillo o aire comprimido para retirar el aserrín y las astillas de las ranuras de ventilación. Solo limpie la carcasa de la motosierra podadora con un paño suave y un jabón húmedo. Nunca use agentes de limpieza fuertes o solventes para limpiar la herramienta. Nunca sumerja ninguna parte de la motosierra ni permita que líquidos entren dentro de ésta.Almacenamiento· Para evitar la corrosión, presione la tapa de compresión tres o cuatro veces y haga funcionar la motosierra por 30 segundos para lubricar la cadena de forma pareja antes del almacenamiento.· Coloque la funda de la barra-guía sobre la barra guía antes de guardarla.· No guarde la motosierra podadora inalámbrica de mano cerca de químicos tales como fertilizantes u otros solventes agresivos. No exponga las partes plásticas de la unidad a líquidos de frenos, gasolina, productos a base de petróleo, aceites penetrantes o sustancias similares. Estos productos son en su mayoría altamente corrosivos y pueden dañar permanentemente las partes plásticas de su producto.· Cuando no esté siendo usada, su máquina deberá ser guardada en interiores, en un lugar seco, lejos del alcance de los niños.
· La barra-guía está doblada; o · La barra-guía está resquebrajada.NOTA: es normal ver desbarbado en los bordes de la barra-guía. Usted puede alisar los desbarbados con una lima en lugar de reemplazar la barra-guía.Consulte la siguiente tabla con especificaciones de cadena:
Eslabones de impulso 32
Paso de cadena 1/4 plg 6.35 mm
Calibre de cadena 0.043 plg 1.1 mm
Usted debe reemplazar la cadena si: · Hay demasiada holgura entre los eslabones y remaches; · Hay grietas en la cadena; o · El largo del borde de corte se ha desgastado hasta los 5/32 plg (4 mm) o menos (Fig. 23).
Fig. 23
< 5/32 plg (4 mm)
Reemplazo de la barra-guía y cadenam ¡ADVERTENCIA! Asegúrese de que la batería no estéinsertada y que la cadena esté cubierta por su funda antes de reemplazar la barra-guía y la cadena. La operación debe ser hecha en una superficie plana y estable, con un espacio adecuado para mover la máquina y sus componentes.m ¡ADVERTENCIA! Use siempre guantes resistentesal manipular la barra-guía y la cadena. Monte la barra-guía y cadena de corte con mucho cuidado para no perjudicar la seguridad y eficacia de la máquina. Si no está seguro, contacte a un concesionario autorizado Snow Joe® + Sun Joe® o comuníquese con la central de servicio al cliente Snow Joe® + Sun Joe® llamando al 1-866-SNOWJOE (1-866-766-9563).m ¡PELIGRO! Nunca arranque el motor antes de instalarla barra-guía, cadena y cubierta de piñón. Sin todas estas partes en su lugar, la barra-guía y la cadena pueden salir volando, causando lesiones personales graves al usuario.Reemplace la barra-guía si:· Hay un excesivo desgaste u obstrucciones dentro de la ranura de la barra-guía;
1. Afloje la rueda tensionadora usando la llave y retirando la cubierta de piñón (Fig. 24).Fig. 24R
Rueda tensionadora
Llave
Cubierta de piñón
41
2. Usando guantes de alta resistencia, presione la punta de la barra-guía hacia el piñón para liberar la tensión y crear un poco de holgura en la cadena (Fig. 25).3. Manteniendo la barra-guía presionada, saque la cadena del piñón (Fig. 25).4. Con la cadena fuera del piñón, suelte la barra-guía. La barra-guía debe regresar ligeramente, permitiéndole retirar la cadena y la barra-guía de la motosierra (Fig. 25).Fig. 25
Fig. 27
Arriba
las cortadoras apuntan hacia la punta
R
Abajo las cortadoras inferiores apuntan en dirección opuesta a la punta7. Asegure la barra-guía sobre las clavijas tensionadoras (Fig. 28).
4
R
Fig. 28
Barra-guía PiñónR
5. Coloque la nueva cadena en un bucle, con las cortadoras apuntando hacia fuera y los eslabones de impulso apuntando hacia dentro. De ser necesario, voltee la cadena y enderece todas las torcedura (Fig. 26).NOTA: reemplace la cadena con una cadena de repuesto de 5 plg original de Sun Joe® (modelo SWJ-5CHAIN), y la barra-guía con una barra-guía de repuesto original Sun Joe® (modelo SWJ-5BAR).
Fig. 26
Cortadoras apuntando hacia afuera
Barra-guía
Clavijas tensionadoras
8. En este momento la cadena aún no puede ser colocada sobre el piñón. Para darle a la cadena suficiente holgura, presione la punta de la barra-guía hacia el piñón (Fig. 29).9. Manteniendo la barra-guía presionada, envuelva el extremo de la cadena sobre el piñón (Fig. 29).
Fig. 29
Eslabones de impulso apuntando hacia adentro6. Empezando desde la punta, coloque la nueva cadena dentro de la ranura de la barra-guía. Asegúrese de que la ranura esté libre de toda obstrucción y que las cortadoras en el borde superior apunten hacia la punta de la barraguía, y que las cortadoras en el borde inferior apunten en dirección opuesta a la punta de la barra-guía. Si está al revés, voltee la cadena. La cadena solo encajará suelta hasta que esté asegurada alrededor del piñón (Fig. 27). NOTA: compruebe la dirección de la cadena. Si la cadena es montada al revés, la motosierra vibrará de forma anormal y no cortará.
8R9
Barra-guía
Piñón
10. Suelte la barra-guía una vez que la cadena esté colocada de forma segura sobre el piñón. La barra-guía deberá recuperarse ligeramente, creando algo de tensión en la cadena y barra-guía.11. Reinstale la cubierta de piñón (Fig. 30).
42
Fig. 30RCubierta de piñón12. Siga las instrucciones anteriores para apretar (Fig. 12) y lubricar apropiadamente la cadena (Fig. 16).Afilamiento de la cadenam ¡ADVERTENCIA! Para asegurarse de que lamotosierra funcione de forma segura y efectiva, es esencial que sus componentes de corte estén bien afilados. Se recomienda enfáticamente reemplazar la cadena una vez que haya perdido su habilidad de cortar de forma limpia y segura. Sin embargo, es posible afilar la cadena existente si se hace con cuidado. Cualquier trabajo en la cadena y barra requiere de una experiencia específica y herramientas especiales. Por motivos de seguridad le recomendamos contactar a un concesionario autorizado Snow Joe® + Sun Joe® o llamar a la central de servicio al cliente Snow Joe® + Sun Joe® llamando al 1-866-SNOWJOE (1-866-766-9563). El afilamiento es necesario cuando:· El aserrado crea aserrín en lugar de virutas; · El corte se vuelve más difícil; · La motosierra no corta de forma recta; o · Hay vibraciones excesivas. La cadena se puede afilar en un centro de servicio profesional empleando las herramientas correctas para asegurar un mínimo retiro de material y un afilado parejo en todos los bordes de corte. Si usted decide afilar la cadena por su cuenta, le recomendamos comprar el afilador de cadena de motosierra 24V-CSSHRP-LTE de Sun Joe®, el cual funciona con una batería iON+ de 24V igual a la que alimenta a esta motosierra podadora inalámbrica. Visite sunjoe.com o comuníquese con la central de servicio al cliente Snow Joe® + Sun Joe® llamando al 1-866-SNOWJOE (1-866-766-9563) para hacer su pedido.
Herramientas de afilado manual de cadena (no incluidas)Para afilar la cadena de forma manual, usted necesitará las siguientes instrucciones:· Lima redonda de 5/32 plg (4 mm) · Portalimas · Lima plana · Herramienta calibradora de profundidad · RotuladorProcedimiento manual de afilado de cadena1. Tense la cadena de estar suelta. Luego asegure la barraguía en un tornillo de banco o pieza de sujeción.2. Marque una de las cortadoras en la parte superior de la barra-guía con un rotulador para indicar el punto de inicio.3. Inserte la lima redonda dentro del portalimas. 4. Coloque la lima y el portalimas a un ángulo de 30º. Luegoafile en un movimiento hacia adelante, en cinco o seis recorridos, manteniendo la lima en un ángulo correcto y paralela al piso hasta que el borde de corte de la cortadora brille (Fig. 31). NOTA: la mayoría de portalimas tienen ángulos de 30° y 35° grabados en su lado superior para ayudarle a mantener el ángulo mientras usted lime.Fig. 31
Lime hacia adelante
30° Portalimas
Tornillo de banco 30°
Lima redonda
5. Lime cada cortadora en un lado de la cadena hasta que usted alcance la que usted marcó, antes de voltear la cadena al otro lado para limar el resto. Use guantes o un destornillador para hacer avanzar la cadena mientras usted progresa de una cortadora a otra (Fig. 32). NOTA: lime la cortadora en el lado opuesto de la cadena si usted es diestro, o lime la cortadora en su lado si usted es zurdo.Fig. 32
43
6. Los dientes limitadores de profundidad son pequeños dientes en la cortadora que sobresalen en frente del borde de corte. Para que la cadena corte de forma efectiva, el diente limitador de profundidad debe estar más abajo que el borde de corte. Por tanto, luego de un uso intenso o múltiples afilados, el diente limitador de profundidad puede requerir ser afilado.Coloque la herramienta calibradora de profundidad sobre la cadena. Asegúrese de que un diente limitador de profundidad sea expuesto y sobresalga de la ranura en la herramienta. Usando la lima plana, lime el diente limitador de profundidad, en un movimiento hacia adelante, hasta que esté al ras de la herramienta (Fig. 33).
Fig. 33
Lime hacia adelante
Lima plana
Herramienta calibradora deprofundidad
Diente limitador de profundidad
Borde de corte
Lima plana Total para limar
Precaución y eliminación de la bateríaDeshágase de su batería de acuerdo con los reglamentos federales, estatales y locales. Para encontrar lugares de reciclaje, comuníquese con un servicio de reciclaje en su localidad.m ¡PRECAUCIÓN! Incluso las baterías descargadascontienen algo de energía. Antes de deshacerse de estas, use cinta aislante para cubrir los terminales y evitar que la batería haga cortocircuito, lo cual puede causar una explosión o incendio.m ¡ADVERTENCIA! Para reducir el riesgo de lesionespersonales o explosión, nunca queme ni incinere una batería incluso si está dañada, inservible o completamente descargada. Al ser quemada, los humos y materiales tóxicos son lanzados al medioambiente.· Las baterías varían de acuerdo al dispositivo. Consulte su manual para obtener la información específica.· Instale solo nuevas baterías del mismo tipo en su producto (donde corresponda).· No insertar las baterías con la polaridad correcta, tal como se indica en el compartimiento de la batería o en el manual, puede reducir el ciclo de vida útil de las baterías o causar fugas en estas.· No combine baterías nuevas con antiguas. · No combine baterías alcalinas, estándar (de zinc-carbono)o recargables (de níquel-cadmio, de níquel-hidruro metálico o de iones de litio).· No arroje las baterías al fuego. · Las baterías deben ser recicladas o desechadas según losreglamentos locales y estatales.
Herramienta calibradora deprofundidad
Diente limitador de profundidad
7. Retire la herramienta calibradora de profundidad y redondee el borde del diente limitador de profundidad con su lima.8. Repita para todas las cortadoras en ambos lados de la cadena.9. Después del afilado, limpie la motosierra retirando el polvo y limaduras de metal, y luego tensione (Fig. 12) y lubrique la cadena (Fig. 16).
Reciclaje y eliminaciónEl producto viene en un empaquetado que lo protege contra daños durante el transporte. Conserve el empaquetado hasta que usted esté seguro de que todas las partes hayan venido en este y que el producto esté funcionando adecuadamente. Luego, recicle el empaquetado o consérvelo para un almacenamiento a largo plazo.Símbolo WEEE. Los productos eléctricos no deben ser desechados en la basura doméstica. Recíclelos donde hayan instalaciones adecuadas. Consulte con las autoridades locales o tienda local para saber sobre las normas de reciclaje.
44
Servicio y soporteSi su motosierra podadora inalámbrica 24V-HCSWP-LTE de Sun Joe® requiere servicio o mantenimiento, llame al 1-866-SNOWJOE (1-866-766-9563) para obtener ayuda.Modelo y número de serieAl comunicarse con la empresa, ordenar partes de repuesto o programar una reparación en un centro autorizado, usted necesitará proporcionar el modelo y número de serie, los cuales se encuentran en la etiqueta ubicada en la carcasa de la unidad. Copie estos números en el espacio proporcionado a continuación.Registre los siguientes números que se encuentran en la carcasa o mango de su nuevo producto:Modelo: 2 4 V – H C S WP – L T Ede serie:45
Solución de problemas· Retire la batería y espere al menos cinco (5) minutos para que la motosierra se enfríe antes de llevar a cabo tareas de mantenimiento en ésta o comprobar que sus partes funcionen correctamente.· Consulte la siguiente tabla antes de comunicarse con la central de servicio al cliente si tiene problemas mecánicos.
Problema
Causa posible
Solución posible
El motor no enciende.
· La batería no está insertada correctamente. · La batería está descargada.
· Reinserte la batería. · Verifique el estado de carga y recargue labatería.
La motosierra se detiene durante la operación.
· La batería está descargada. · La máquina está sobrecargada/sobrecalentada.
· Verifique el estado de carga y recargue la batería.· Espere cinco minutos para que la motosierra se enfríe.
La motosierra funciona, pero la velocidad de la cadena es baja.
· La cadena está demasiado tensa.
· Afloje y vuelva a tensar la cadena.
La barra y la cadena funcionan muy calientes y echan humo.
· La cadena está demasiado tensa. · La cadena no está lubricada.
· Afloje y vuelva a tensar la cadena.· Presione la tapa de compresión para lubricar la cadena con aceite. Eche más aceite de ser necesario.
El motor funciona, pero la cadena no se mueve.
· La cadena está demasiado tensa. · La barra-guía, cadena o piñón estándañados.
· Afloje y vuelva a tensar la cadena. · Inspeccione y reemplace la parte dañada.
46
Accesorios opcionales m ¡ADVERTENCIA! USE SIEMPRE solo partes de repuesto y accesorios Snow Joe® + Sun Joe®. NUNCA use partes derepuesto o accesorios que no estén destinados para su uso con esta motosierra. Comuníquese con Snow Joe® + Sun Joe® si tiene dudas sobre si es seguro usar una parte de repuesto o accesorio en particular con su herramienta. El uso de cualquier otro accesorio o parte puede ser peligroso y causar lesiones personales o daños mecánicos.
Accesorio
Descripción
Modelo
1
Batería de iones de litio iON+ de 24 V y 2 Ah
24VBAT-LTE
2
Batería de iones de litio iON+ de 24 V y 2.5 Ah
24VBAT-LT
3
Batería de iones de litio iON+ de 24 V y 4.0 Ah
24VBAT
4
Batería de iones de litio iON+ de 24 V y 5.0 Ah
24VBAT-XR
5
Cargador rápido de batería de iones de litio iON+ de 24 V
24VCHRG-QC
6
Cargador de doble puerto de baterías de iones de litio iON+ de 24 V
24VCHRG-DPC
7
R
Barra-guía de repuesto de 5 plg de Sun Joe®
SWJ-5BAR
8
Cadena de repuesto de 5 plg de Sun Joe®
SWJ-5CHAIN
47
Accesorio910R
DescripciónAceite para barra-guía y cadena
ModeloSWJ-OIL De venta en sunjoe.com. Usted también puede comprar un aceite equivalente para barraguía y cadena en su ferretería local.
Afilador inalámbrico de cadena de motosierra iON+ de 24 V de Sun Joe®
24V-CSSHRP-LTE
NOTA: los accesorios están sujetos a cambios sin obligación alguna por parte de Snow Joe® + Sun Joe® de notificar sobre dichos cambios. Los accesorios pueden ser pedidos en línea en sunjoe.com o vía telefónica llamando a la central de servicio al cliente Snow Joe® + Sun Joe® al 1-866-SNOWJOE (1-866-766-9563).
48
ESLA PROMESA DE SNOW JOE® + SUN JOE® AL CLIENTEPOR SOBRE TODO, en Snow Joe, LLC (“Snow Joe”) estamos dedicados a usted, nuestro cliente. Nos esforzamos por hacer que su experiencia sea lo más placentera posible. Desafortunadamente, hay veces en que un producto Snow Joe®, Sun Joe®, o Aqua Joe® (el “Producto”) no funciona o sufre un desperfecto bajo condiciones normales de operación. Creemos que es importante que usted sepa que puede confiar en nosotros. Es por eso que tenemos esta Garantía Limitada (la “Garantía”) para nuestros Productos.NUESTRA GARANTÍA: Snow Joe garantiza que sus Productos motorizados y no motorizados, nuevos y genuinos, están libres de defectos materiales o de mano de obra al ser usados en tareas domésticas normales durante un periodo de dos (2) años a partir de la fecha de compra por parte del comprador original y usuario final, cuando este último los compra a través de Snow Joe o un vendedor autorizado por Snow Joe y ha obtenido un comprobante de compra. Ya que Snow Joe no puede controlar la calidad de sus Productos vendidos por vendedores no autorizados, a menos que la ley lo prohíba esta Garantía no cubre Productos adquiridos a través de vendedores no autorizados. Si su Producto no funciona, o hay un problema con una parte específica que está cubierta por los términos de esta Garantía, Snow Joe elegirá entre: (1) enviarle una parte de repuesto gratuita; (2) reemplazar el Producto con uno nuevo o similar sin costo alguno; o (3) reparar el Producto. ¡Un excelente soporte!Esta Garantía le da derechos legales específicos, y usted puede también tener otros derechos según el Estado.REGISTRO DEL PRODUCTO: Snow Joe le recomienda enfáticamente registrar su Producto. Puede registrar su producto en línea visitando snowjoe.com/register, imprimiendo y enviando por correo una tarjeta de registro disponible en línea en nuestro sitio Web, llamando a nuestra central de servicio al cliente al 1-866-SNOWJOE (1-866-766-9563), o enviándonos un e-mail a help@snowjoe.com. Si usted no registra su Producto, sus derechos de garantía no disminuirán; sin embargo, registrar su Producto permitirá que Snow Joe le pueda atender mejor si usted tiene alguna necesidad como cliente.¿QUIÉN PUEDE SOLICITAR COBERTURA DE GARANTÍA LIMITADA? Esta Garantía es otorgada por Snow Joe al comprador original y propietario original del Producto.¿QUÉ NO ESTÁ CUBIERTO? Esta Garantía no se aplica si el Producto ha sido usado de forma comercial o en aplicaciones no domésticas o de alquiler. Esta Garantía tampoco se aplica si el Producto fue adquirido desde un vendedor no autorizado. Esta garantía tampoco cubre cambios cosméticos que no afecten el funcionamiento del Producto. Las partes desgastables como correas, brocas y cuchillas no están cubiertas por esta Garantía, y pueden ser compradas visitando snowjoe.com o llamando al 1-866-SNOWJOE (1-866-766-9563).
49
R4_01282020
RMANUEL D’UTILISATIONUne division de Snow Joe®, LLC
SCIE À ÉLAGUER SANS CORDON FR À MANCHE TÉLESCOPIQUE
250 W | 4 000 tr/min | CHAÎNE ET GUIDE-CHAÎNE DE 12,7 cm
Modèle 24V-HCSWP-LTE
Formulaire n° SJ-24V-HCSWP-LTE-880F-M
 report this ad
IMPORTANT!Consignes de sécuritéTous les utilisateurs doivent lire ces instructions avant utilisationSuivez toujours ces consignes de sécurité. Ne pas s’y conformer peut entraîner de graves blessures pouvant même être fatales.Sécurité générale mAVERTISSEMENT! Cet outil n’est pas destiné àêtre utilisé par des enfants ou par des personnes qui ne sont ni assistées ni supervisées et dont les capacités physiques, sensorielles ou mentales les empêchent de l’utiliser sans danger. Les enfants doivent être supervisés pour s’assurer qu’ils ne jo
References
Register Your Product | Product Registration For Your Snow Joe®, Sun Joe®, Aqua Joe®
Cordless + Electric Snow, Lawn and Garden Outdoor Tools | Snow Joe® | Sun Joe® | Aqua Joe®
Cordless + Electric Snow, Lawn and Garden Outdoor Tools | Snow Joe® | Sun Joe® | Aqua Joe®
Cordless + Electric Snow, Lawn and Garden Outdoor Tools | Snow Joe® | Sun Joe® | Aqua Joe®
[xyz-ips snippet=”download-snippet”]