
Sun-Tek CMG Installation Instructions
INSULATED GLASS SERIES
Use on any type roof (curb required)
Sun-Tek Manufacturing, Inc.10303 General DriveOrlando, FL 32824(407) 859-2117www.Sun-Tek.com[email protected]

You will need:
- hammer
- keyhole saw
- skill saw
- nails
- drill
- 2 x 4’s
- utility knife
- tape measure
- chalkline or straight edge
- trowel or caulk gun
For Light Tunnel:
- 8 or 10 penny nails
- plywood or drywall
- 100% Silicone
- (or equivalent) Butyl rubber sealant/caulk

FAILURE TO FOLLOW RECOMMENDED INSTALLATION PROCEDURES MAY VOID WARRANTY
Check local building codes for glass requirements. • Please read instructions completely before beginning. • Deck and roofing felt should already by installed.
All installation information is supplied in good faith, but without recommendation to its use. No guarantee of the results of any use of this information is to be implied, since conditions of use are beyond our control. Please consult local building codes for compliance before installing.
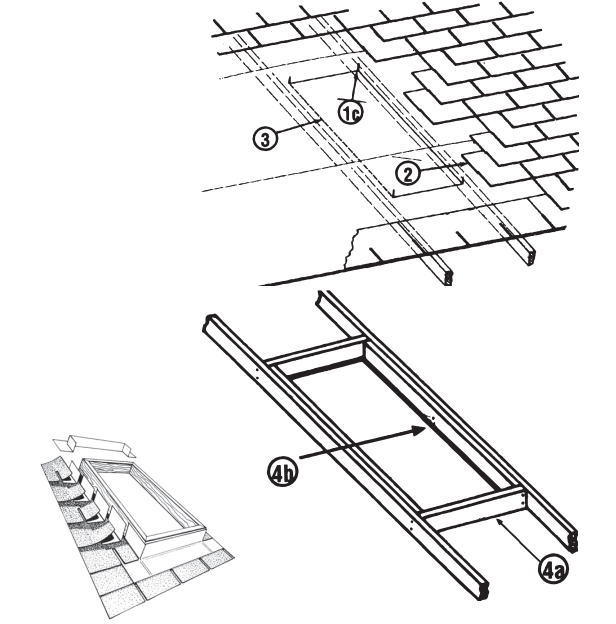
- To properly position skylight between trusses/rafters, locate the roof opening from the underside of the decking. (If this area is not accessible, locate the ceiling joists from inside the house, mark opening in ceiling (a-c), and cut ceiling opening. Then follow steps below for roof opening.)a) measure distance between trusses/rafters and mark center point.b) to center skylight, measure one-half of appropriate roof opening to each side of center point and mark.c) using the side marks as a guide, mark corners by drilling holes or driving nails through roof.
- Remove shingles 6 – 8” out from roof opening.
- Cut roof opening (snap a chalkline from corner to corner, or draw line with a straightedge.)
- Frame roof opening:a) cut two 2 x 4’s to fit the actual distance between trusses/rafters and nail into place.b) cut two 2 x 4’s to the exact length of the roof opening and nail to the trusses/rafters.c) if applicable, cut ceiling opening and build tunnel framing. (See “Light Tunnel Installation Instructions.”)
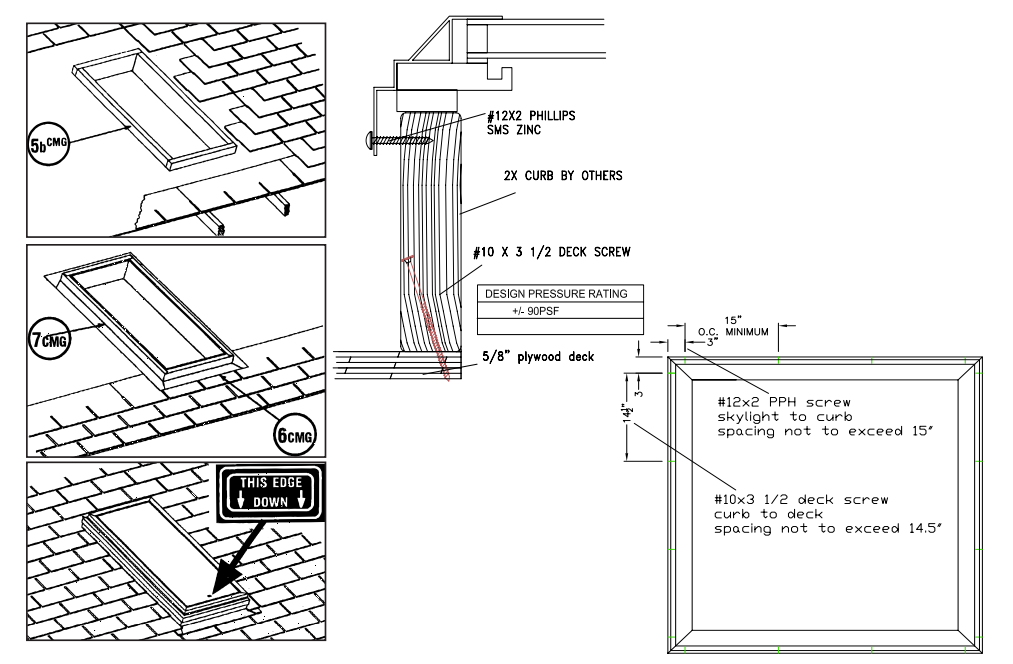
- Build curb:a) Construct curb with 2 x 4’s, 2 x 6’s, etc. (depending on height desired or building code requirements). Curb should be minimum 3½” high. Be sure inside measurement of curb is the same as roof opening measurement.b) Secure curb to roof. See fastener schedule and drawing.
- Shingle roof up to bottom of curb.
- Flash curb with Sun-Tek’s preformed, pre-cut Step Flash Kit with one-piece head and sill – (not for use on metal roofs). Or use galvanized sheet metal, aluminum, or copper. Metal should extend a minimum of 4” over shingles (on bottom side), then up sides of curb. Flashing should be flush with curb top.
- Shingle up sides and across the top.
- Position the skylight over the curb with the “THIS EDGE DOWN” label at the lowest side of the curb. Center the skylight over the curb, making sure the foam gasket is in contact with the top of the curb. As the fasteners, , are being attached to the curb, push down on the frame just above the fastener to insure the gasket is compressed to form a good seal. Use the #10 x 2” screws, provided. Continue attaching the remaining fasteners in the same manner. All fastener installation holes provided must be used.
LIGHT TUNNEL INSTALLATION INSTRUCTIONS
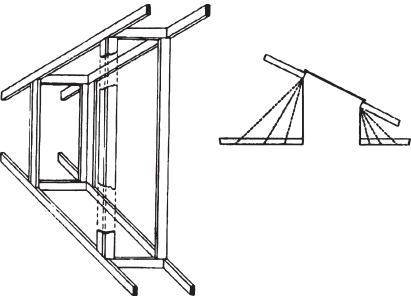
For homes with an attic, it is necessary to build a tunnel between skylights and ceiling. The tunnel walls may be straight, or flared for extra light and architectural appeal. It’s very easy to increase the tunnel size along the length of the ceiling joists. As long as no roof-supporting members are cut, no special framing is needed. While it is possible to flare the tunnel in all directions, if support members are cut, special framing will be required for structural support. In this case you must consult a qualified building professional to insure proper and safe results.
 After roof and ceiling openings have been framed, measure distance (at each corner of roof opening) between rafter/ truss and ceiling joist.
- Using these four measurements, cut 2 x 4 lumber for vertical support members (two per corner).
- In each corner, nail vertical support members into place at right angles to each other.
- Measure, cut, and nail tunnel walls into place. Suggestions for lining tunnel:
- use drywall, tape corners, and paint white using regular or texture paint. (Texture paint alone will hide and fill untaped joints, but in time, cracks may appear in corners.)
- use pre-finished paneling with molding in corners.
- line the tunnel with cedar, pine, or a wood to coordinate with your decor.
- for special effects, try painting the tunnel a striking accent color, or use mirrors or wallpaper on tunnel walls.
- Caulk the slight gap between the tunnel walls and skylight base.
- Finish off tunnel at ceiling with molding, or blend edges into ceiling with texture paint.
- Be sure to wrap the exterior of the tunnel with insulation for energy savings.
 After roof and ceiling openings have been framed, measure distance (at each corner of roof opening) between rafter/ truss and ceiling joist.
References
[xyz-ips snippet=”download-snippet”]