
![]() DiamondForce™3-in-1 Digital Air FryerUser Guide
DiamondForce™3-in-1 Digital Air FryerUser Guide
Important instructions-retain for future use.
Sunbeam’s Safety Precautions
SAFETY PRECAUTIONS FOR YOUR DIAMONDFORCE™ 3-IN-1 DIGITAL AIR FRYER
- Use your air fryer at least 200mm away from walls and curtains, and do not use it in confined spaces.
- Do not operate the air fryer when placed directly onto a benchtop. Place a heat-proof mat or chopping board underneath to protect the surface.
- Avoid placing your air fryer on top of stone/stone polymer composite benchtops as this type of benchtop can be susceptible to cracking under heat.
- Do not operate the unit on an inclined surface.
- Do not move or cover the unit whilst in operation.
- Do not immerse the base of the unit in water or any other liquid.
- Do not touch any metal surface of the unit whilst in use as it will be hot.
- Use oven mitts when supporting the base of the basket during basket removal when hot.
- Use only the supplied basket and tray inside the unit.
- Do not plug in or switch on the unit without having the basket inside the air fryer unit.
- Do not place food or liquid inside the unit. Only place inside the basket or top of the supplied tray.
- Do not operate the unit without food or liquid in the basket or supplied tray.
- Do not use the basket or tray on the stovetop, inside a microwave oven, or inside an oven.
Sunbeam is very safety conscious when designing and manufacturing consumer products, but it is essential that the product user also exercise care when using an electrical appliance. Listed below are precautions that are essential for the safe use of an electrical appliance:
- Read carefully and save all the instructions provided with an appliance.
- Always turn the power off at the power outlet before you insert or remove a plug. Remove by grasping the plug – do not pull on the cord.
- Turn the power off and remove the plug when the appliance is not in use and before cleaning.
- Do not use your appliance with an extension cord unless this cord has been checked and tested by a qualified technician or service person.
- Always use your appliance from a power outlet of the voltage (A.C. only) marked on the appliance.
- This appliance is not intended for use by persons (including children) with reduced physical, sensory or mental capabilities, or lack of experience and knowledge unless they have been given supervision or instruction concerning the use of the appliance by a person responsible for their safety.
- Children should be supervised to ensure that they do not play with the appliance.
- The temperature of accessible surfaces may be high when the appliance is operating.
- Never leave an appliance unattended while in use.
- Do not use an appliance for any purpose other than its intended use.
- Do not place an appliance on or near a hot gas flame, electric element, or in a heated oven.
- Do not place on top of any other appliance.
- Do not let the power cord of an appliance hang over the edge of a table or benchtop or touch any hot surface.
- Do not operate any electrical appliance with a damaged cord or after the appliance has been damaged in any manner. If damage is suspected, return the appliance to the nearest Sunbeam Appointed Service Centre for examination, repair, or adjustment.
- For additional protection, Sunbeam recommends the use of a residual current device (RCD) with a tripping current not exceeding 30mA in the electrical circuit supplying power to your appliances.
- Do not immerse the appliance in water or any other liquid unless recommended.
- Appliances are not intended to be operated by means of an external timer or separate remote control system.
- This appliance is intended to be used in household and similar applications such as staff kitchen areas in shops, offices, and other working environments; farm houses; by clients in hotels, motels, and other residential type environments; bed and breakfast type environments.
![]() Hot SurfaceDo Not TouchThis symbol indicates, the temperature of accessible surfaces may be high when the appliance is operating and for some time after use.If you have any concerns regarding the performance and use of your appliance, please visit www.sunbeam.com.au or contact the Sunbeam Consumer Service Line.Ensure the above safety precautions are understood.
Hot SurfaceDo Not TouchThis symbol indicates, the temperature of accessible surfaces may be high when the appliance is operating and for some time after use.If you have any concerns regarding the performance and use of your appliance, please visit www.sunbeam.com.au or contact the Sunbeam Consumer Service Line.Ensure the above safety precautions are understood.
Features of your Sunbeam DiamondForce™ 3-in-1 Digital Air Fryer
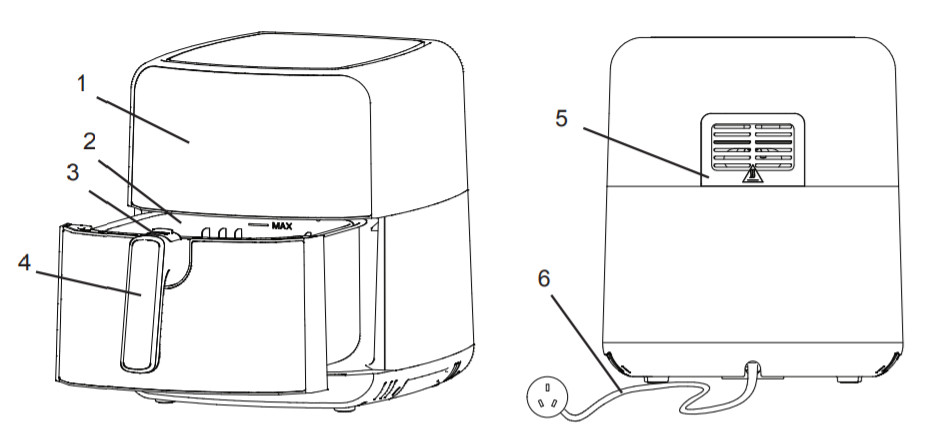
| 1. Digital display & user interface2. Removable cooking tray3. Cooking basket | 4. Handle5. Heating fan vent cover6. Power cord |
Control Panel

| 1. Heating element indicator2. Temperature indicator3. Time indicator4. Power5. Air fry presets (From left to right) FRIES, BACON, SEAFOOD, VEGGIES, POULTRY, MEAT, CAKE/ BREAD, DEHYDRATE | 6. Manual Mode: Cake / Bread baking, Dehydrate7. Preset selector8. Decrease temperature/timer9. Temperature setting10. Timer setting11. Increase temperature/timer12. Start/Pause |
Parts & Accessories
![]() Never immerse any part of the air fryer body, power cord, or plug in water or any other liquid. Before assembling or disassembling your air fryer, ensure it is unplugged and all parts are cool.
Never immerse any part of the air fryer body, power cord, or plug in water or any other liquid. Before assembling or disassembling your air fryer, ensure it is unplugged and all parts are cool.
DiamondForce™ non-stick basket surfaceThis product features the DiamondForce™ coating advantage with advanced non-stick performance.This unique diamond-infused non-stick coating provides superior food release, requiring little to no oil when air frying food and easy wipe clean up.
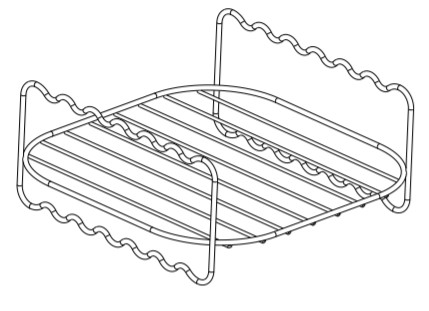
High and Low Rack TrayThe additional tray is ideal for 2 layer air frying of bacon, salmon, chicken breast, or steak. The tray can be flipped for a high rack or low rack to cater to different sizes of food.Caution: Remove the basket from the unit before lifting the tray out of the basket. Use mittens when removing the tray from the basket as this can be hot.
Usage Instructions
Before First UseBefore using your Air Fryer for the first time, unpack the appliance and remove all packaging, promotional materials, and stickers from the product. Remove any plastic or cardboard from underneath the air fry basket. Remove all printed documents.Wash the cooking basket and tray in warm soapy water using a mild household detergent. Rinse thoroughly and dry.Using Your Air Fryer
- Place on a flat, level, heat-resistant surface.
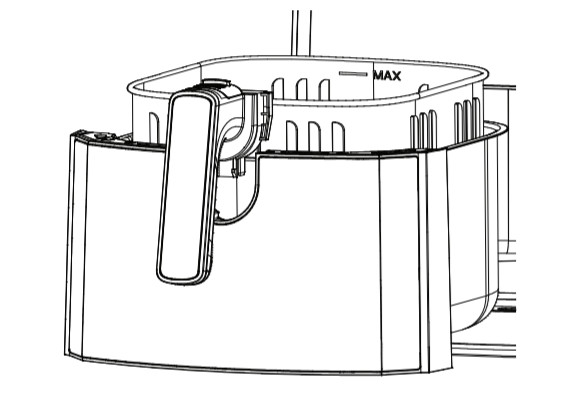
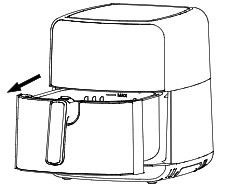
- To open the unit, pull the handle towards you and ensure that the basket ejection button is covered.

- Put your desired food inside the perforated basket. If using the tray accessory, position the tray inside the perforated basket and place your additional ingredients on top of the tray.
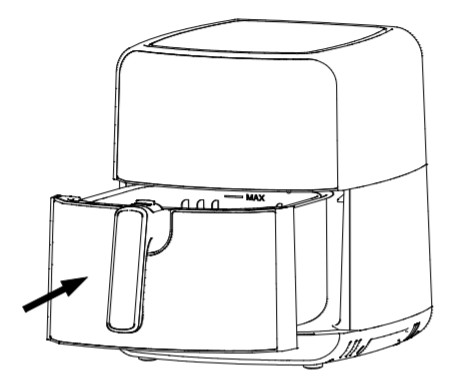
- Slide the basket back into the air fryer.Noting to carefully align with the guides in the body of the air fryer. Never use the air fryer without the basket in it.Caution: Do not touch the basket and tray during and after use, as it gets very hot.
- Plug the cord into a 230-240V power outlet and turn the power ( ) on.
- Once plugged and the tray and basket are properly placed in the main housing, the power light will be illuminated. The air fryer’s default temperature is 200°C, while the cooking time will be set to 15 minutes.
- If you are happy with the default temperature setting, press the start/pause button ( ) to start cooking.Note: The fan icon indicates that the cooking cycle is in process.
- Some ingredients require shaking through the cooking process. To do this, pull the handle and gently shake/stir the food. You can use heat-resistant plastic or wooden or silicone utensils. Slide the basket back into the air fryer.Caution: Do not press the basket ejection button during shaking.Note: Avoid using sharp or metal objects to prolong the life of your non-stick surface. Do not cut food inside the basket or tray. Do not leave utensils in contact inside the basket or on top of the unit.Note: When you pull the basket out of the unit, the LED display will disappear, but will appear once you put the basket in. Cooking will resume once the basket has been put back in and aligned back to the body of the air fryer. Your setting will only reset when the basket has not been put back in after 30 minutes.
- An audible alert will sound once the timer is done.
- After cooking, carefully pull the basket out completely out of the unit and onto a stable, even, and heat resistant surface.
- To use the basket ejection button, slide the transparent cover on top of the handle forward with your thumb and press the button underneath. This will release and detach the basket from the base. Lift the perforated basket using the handle and place it on a stable, even, and heat-resistant surface.Caution: Ensure that you are transferring the perforated basket safely as there might be oil dripping from the food. Do not turn the basket upside down with the basket still attached to it as any excess oil that has collected on the bottom of the basket housing will leak onto the ingredients. The basket and the ingredients are hot. Depending on the type of ingredients in the air fryer, steam may escape from the basket.Caution: Do not press the basket ejection button during shaking.Caution: Oil left on the base on the main housing basket is hot.
- Empty the basket into a bowl or onto a plate using heat-resistant utensils.
 Caution: Do not touch the basket and tray during and after use, as it gets very hot.
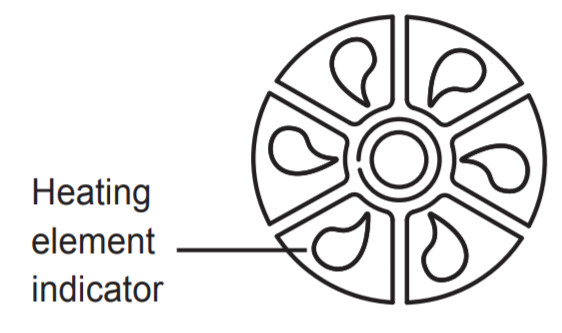
Usage Instructions
Cooking ModesThis product operates 3 appliances in 1. You can choose from air frying, dehydrating, and baking.
- Choose the desired cooking mode – Air Fry, Bake, or Dehydrate.
- To select an Air Fry preset, press the PRESETS button and select any of the 6 air fries presets Fries, Bacon, Seafood, Veggies, Poultry, Meat.
- Press Cake/Bread for baking cakes or baking bread after proofing.
- Press Dehydrate for dehydrating fruits, herbs, flowers, or for proofing bread.
- Press Start/Pause button to start.
Manual Modes
- To manually set the time, press the timer Setting and use the PLUS and MINUS signs. You will see the time reading in the Time Indicator next to the power button.
- To manually set the temperature, press the Temperature Setting and use the PLUS and MINUS signs. You will see the temperature reading in the Temperature Indicator next to the Power button.
Air Fry Preset Mode
- Choose from the 6 Air Fry Presets– Fries, Bacon, Seafood, Veggies, Poultry, Meat. Temperature and time will automatically appear.
- Press Start/Pause button ( ).Note: To quickly pause the cooking cycle, pull the handle out. Alternatively, you can press the start/pause button.Note: When you pull the basket out of the unit, the LED display will disappear, but will appear once you put the basket in. Cooking will resume once the basket has been put back in and aligned back to the body of the air fryer. Your setting will only reset when the basket has not been put back in after 30 minutes.
Care And Cleaning
Use heat-resistant plastic or wooden or silicone utensils when shaking food inside the basket or taking food out of the basket.Avoid using sharp or metal objects to prolong the life of your non-stick surface.Do not cut food inside the basket or tray.Do not leave utensils in contact inside the basket or on top of the unit.To clean after use![]() Always unplug your Digital Air Fryer and allow it to cool completely before cleaning it.NEVER immerse the MAIN body, power cord, or plug in water or any other liquid. To prevent damage to the appliance do not use alkaline cleaning agents when cleaning, use a soft cloth and a mild detergent.DiamondForce™ non-stick coatingWhen cleaning DiamondForce™ non-stick coating, do not use metal (or another abrasive scourer). When the basket has cooled down, you may wipe using a paper towel to remove residue on the basket. With the perforated basket ejected from the main basket housing, wash with warm soapy water using a mild household detergent.Rinse thoroughly and dry the basket with a soft cloth before storing. Alternatively, you can put the removable perforated basket into the dishwasher.Tray Accessory Before first use, wash with warm soapy water using a mild household detergent and dry thoroughly. When the tray has cooled down, you may wipe using a paper towel to remove residue then wash with warm soapy water using a mild household detergent.Rinse thoroughly and dry the tray with a soft cloth before storing to avoid rusting.StorageAfter the unit has cooled down, carefully wipe any oil spatter from the heating fan cover with kitchen paper. Wipe over the outer body with a clean, slightly damp cloth and dry.You can store your air fryer on your benchtop or in a safe place. If the outer body of the unit accumulates dust, wipe it over with a clean, slightly damp cloth. Dry thoroughly to avoid rusting on the stainless steel parts.Caution: Always lock the basket casing before storing. When the basket is placed back in the casing, slide the transparent lid of the ejection button back.This appliance has no user-serviceable parts. Any servicing beyond that described in the Cleaning Section should be performed by an Authorised ServiceRepresentative only. See Warranty Section.
Always unplug your Digital Air Fryer and allow it to cool completely before cleaning it.NEVER immerse the MAIN body, power cord, or plug in water or any other liquid. To prevent damage to the appliance do not use alkaline cleaning agents when cleaning, use a soft cloth and a mild detergent.DiamondForce™ non-stick coatingWhen cleaning DiamondForce™ non-stick coating, do not use metal (or another abrasive scourer). When the basket has cooled down, you may wipe using a paper towel to remove residue on the basket. With the perforated basket ejected from the main basket housing, wash with warm soapy water using a mild household detergent.Rinse thoroughly and dry the basket with a soft cloth before storing. Alternatively, you can put the removable perforated basket into the dishwasher.Tray Accessory Before first use, wash with warm soapy water using a mild household detergent and dry thoroughly. When the tray has cooled down, you may wipe using a paper towel to remove residue then wash with warm soapy water using a mild household detergent.Rinse thoroughly and dry the tray with a soft cloth before storing to avoid rusting.StorageAfter the unit has cooled down, carefully wipe any oil spatter from the heating fan cover with kitchen paper. Wipe over the outer body with a clean, slightly damp cloth and dry.You can store your air fryer on your benchtop or in a safe place. If the outer body of the unit accumulates dust, wipe it over with a clean, slightly damp cloth. Dry thoroughly to avoid rusting on the stainless steel parts.Caution: Always lock the basket casing before storing. When the basket is placed back in the casing, slide the transparent lid of the ejection button back.This appliance has no user-serviceable parts. Any servicing beyond that described in the Cleaning Section should be performed by an Authorised ServiceRepresentative only. See Warranty Section.
Temperature Setting Guide
This table provides the default time and temperature for each Air Fry Preset and Cooking Modes, and the Temperature and Time Range of each Preset as a guide when selecting for Manual Mode.
| Defaults | Range (For Manual Mode) | |||
| Preset | Temperature(Degrees in C) | Time
(in Mins) |
Temperature(Degrees in C) | Time
(in Mins) |
| Default (When turning on) | 200 | 15 | 80-200 | 1-60 |
| Fries | 200 | 25 | 80-200 | 1-60 |
| Bacon | 185 | 10 | 80-200 | 1-60 |
| Seafood | 180 | 15 | 80-200 | 1-60 |
| Veggies | 190 | 30 | 80-200 | 1-60 |
| Poultry | 190 | 25 | 80-200 | 1-60 |
| Meat | 200 | 25 | 80-200 | 1-60 |
| Cake / Bake | 170 | 35 | 80-200 | 1-60 |
| Dehydrate | 70 | 4hours | 27-70 | 2-24hours |
Please note that due to the variations in thickness and size of foods being cooked, cooking results may vary. Always ensure that the food is thoroughly cooked before consuming.
Cooking Guide
Guide to oils and fatsUsing your Digital Air Fryer to cook food will help you to reduce the amount of oil needed in some recipes, which may benefit your diet.The table below lists some of the more widely available, popular oils. All of them can be used in your Digital Air Fryer. However, for best results, we recommend Vegetable or Rapeseed oil.
| Oil Type | Use |
| Vegetable oil | Shallow. deep and stir-frying. |
| Rapeseed oil (often called vegetable oil) | Shallow. deep and stir-frying. |
| Corn oil | Shallow. deep and stir-frying. |
| Sunflower oil | Shallow. deep and stir-frying. |
| Olive oil | Shallow and stir-frying. Marinades. dressings. drizzling |
| Sesame oil | Shallow. deep and stir-frying. Marinades. drizzling. |
| Peanut oil (often called groundnut oil) | Shallow and stir-frying. Dressings. Adds a nutty flavor. |
| Grape Seed oil | Shallow. deep and stir-frying. |
| You can also use low-calorie cooking spray in your Digital Air Fryer. | Always ensure that the ingredients are evenly coated with oil. |
Guide to cooking popular foods in your air fryerThe following table provides basic cooking guidelines for popular foods that can be used for each Air fry Preset, Dehydrate, Bake, and Manual Mode. Please note that due to the variations in thickness and size of the foods being cooked some experimentation may be required for the best cooking results. Always ensure that the food is thoroughly cooked to a food-safe temperature throughout before consuming.When cooking fresh fries, keep oil quantities as low as possible for the healthiest results. However, if you feel the fries are a little pale and require further browning, increase the quantity of oil slightly.Note: For crispier results, it is recommended to shake the fryer basket 2-4 times throughout the cooking cycle.For larger quantities, (1kg) increase cooking times and toss food more frequently.
| Pre-set Programs | Min — Max Amount | lime (min) | Temp | Shake, tum, or Stir halfway through | Additional Information |
| FRIES/POTATO PRODUCTS Tip: For best results, use 750g frozen shoestring fries, shake once. If using 1 kilo, shake 2 or 3 times or as required. | |||||
| Shoestring fries | 200g – 1kg | 20-25 | 200c | Yes | |
| Steak cut fries | 200g – 1kg | 25-30 | 200c | Yes | |
| Sweet potato fries | 200g – 1kg | 20-25 | 200c | Yes | |
| Potato Gems | 200g – 1kg | 10-15 | 200c | Yes | |
| Hash Browns | 4-6 pieces | 8-10 | 200c | Yes | |
| Hand-cut chips – fresh | 200g – 1kg | 25-30 | 200c | Yes | Soak 30 minutes In water, rinse, pat dry, then toss in 1Tbs oil prior to cooking |
| Roast potatoes-fresh | 200g – 1kg | 20-25 | 200c | Yes | Soak 30 minutes In water, rinse, pat dry, then toss in 1Tbs oil prior to cooking |
| Pro-tot Pie rams | Min-Max Amount | lime Mit | Temp | Shake, torn or Stir balhoy deo* | Additional Informatics |
| BACONTip: You can use any type of bacon for this preset Check from time 10-time °Dooming on has you like your bacon <coked. Be cwetu when wino Me base as Me tochers ml Can be In In the main housing at me basket | |||||
| Rashers*4-6 each*10*185c*yes | |||||
| SEAFOODTip: Best for both Pozen seafood Or Peen salmon yen skin. Place the salmon’s skin side Oasn me basket for crispy sort resells due to the perforation on the sides of the basket | |||||
| King prawns | 12 | 0-0 | 100c | Yes | |
| Fish fleets .wetie | 2000 each | 0.12 | 100c | Yes | Coal with It pia io cooking it desired |
| Salmon Met | 3501i | ID | 190c | Yes | Coat wen censor to booking If desired |
| Catamaran | 3500 | 15 | 200c | Spray with vegetable oa | |
| VEGETABLESTip: Best for “ticker vac es such as carrots. broccoli. °sunflower. and asparagus rather than leafy vegetable Ike spinach kale and Collard peen. | |||||
| Potatoes. sweet Maio. Carrots. beetroot. swede | 1900. Mg | 20.30 | 190c | Yes | |
| Toss n on If needed prior to cooking | |||||
| EggiStani. capsicum. Onion Cauliflower. broccoli. Pumpkin | 1500. 1kg | 10.15 | 190c | Yes | Toss in MI If needed prior to cooking |
| Musfiroorrrs. broccolini Asparagus. zucchini | 1500 kg | 5.15 | 190c | Yes | |
| Toss in oil if needed prior to cooking | |||||
| MALTBYTim Your fryer can fit a 2kg whole chicken. You can also use chicken wings. drumsticks or breast fillets for a crispy skin finish with moist meal See Recipes for more nspi abort | |||||
| Whole chicken | 1.3kg – 2kg | 4540 | 180c | Coat with oil prior to cooking | |
| Drumsticks | 4-6 each | 25-30 | 2000 | Yes | Coat with on prior to cooking |
| Breast Niels | 1209 each | 25 | 190c | Yes | Coat with on price lo cooking |
| Pre-set Programs | MM – MaxAmount | Time (min) | Temp | Shake. tum or Stir halfway through | Additional Information |
| MEATTip: This preset cooks meat such as steak to medium-light rink middle and 750g pork belly. When using pork belly, score the pork belly across on Diago al. 2cm apart. No need to shake our turnover. Less oil is required as the pork will ooze this out from its own meat. | |||||
| Steak | 2 x 200g | 10-14 | 200c | Yes | |
| Beef patties | 4 x 100g | 5-8 | 200c | Yes | |
| Sausages | 4-6 each | 8-10 | 200c | Yes | |
| Pork tenderloins | 4 x 120g | 15 | 200c | Yes | Toss in 1Tbs oil prior to cooking |
| Pork belly | 750g | 25 | 200c | Toss in 1Tbs oil prior to cooking | |
| Rack of lamb | 5 00g – 800 g | 20-30 | 120c | ||
| Lamb loin chops | 6 each | 10-15 | 130c | Yes | |
| CAKE/BREADTlip: Use a 20cm cake tin to fd inside the basket. Ba e cakes or bread using this function. After proofing (using the Dehydrate function) use this cooking mode to bake the bread to perfection. See Recipes for detailed instructions. | |||||
| Cake | 20cm | 45 | 165c | Use 20cm cake tin | |
| Muffins | 6 each | 15 | 160c | ||
| Brownies | 15 | 160c | 15cm square cake tin | ||
| Individual Puddings | 4 | 12-15 | 180c | 175m1 ramekin | |
| Bread white loaf | 500g | 25 | 170c | 20cm round cake tin | |
| Bread wholegrain loaf | 500g | 30 | 170c | 20cm round cake tin | |
| Bread Mix Loaf White | 500g | 20cm round cake tin | |||
| Bread Mix Loaf Brown | 500g | 20cm round cake tin |
| Pre-set Programs | MM – Max
Min Amount |
(min) | Temp | Shake, tumor Stir halfway through | Additional Information |
| DEHYDRATETip: Dehydrate fruits, herbs, and flowers. plus you can also use this function to proof dough with minimal fuss and under controlled temperature. Perfect for proofing bread before baking. | |||||
| Herbs. flowers | Multi-layer | 2-4 hours | 35c | Yes | |
| Yogurt | Pots | 8-12 hours | 40c | Yes | |
| Soft vegetables | Single-layer | 6-8 hours | 45c | Yes | |
| Hard vegetables | Multi-layer | 8-10 hours | 50c | Yes | |
| Citrus peel | Multi-layer | 4-6 hours | 55c | Yes | |
| Fruit- high in sugar | Single-layer | 12-14 hours | 60c | Yes | |
| Fruit – other | Variable | 8-10 hours | 60c | Yes | |
| Fish | Single-layer | Up to 8 hours | 65c | Yes | |
| Meat jerky | Single-layer | Up to 10 hours | 70c | Yes | |
| Dough proof | 500g | 30 | 27c | 18cm glass greased bowl | |
| MANUAL Tip: These types of food are a great alternative to red meat. | |||||
| Tofu | 450g | 10-15 | 190c | Yes | |
| Tempeh | 450g | 10-15 | 160c | Yes | |
| Halloumi | 4509 | 8-10 | 180c | Yes |
Recipes
All recipes have been specifically created and tested by the Sunbeam Test Kitchen for the 3-in-1 Digital Air Fryer. We hope you enjoy using your Sunbeam Air Fryer.The temperature and time in each recipe are a guide only and may require adjustment to suit various thicknesses and sizes of the food being cooked and individual tastes. Always ensure that the food is thoroughly cooked before consuming.
Salt & Pepper Squid350g squid, cut down the center, scored diagonally, and cut into bite-size piecesFor the batter4 tablespoon potato flour, ½ cup extra2 tablespoon cornflour1 egg, beaten1 tablespoon mirin1 tablespoon fish sauce1/2 teaspoon salt1/2 teaspoon black pepperVegetable oil sprayFor the spiced salt2 teaspoon sea salt, ground1 teaspoon white pepperCoriander to garnish
- SPICED SALT – heat a small frying pan over medium-high heat, add salt and stir for 30 seconds. Remove from heat. Transfer to a small mortar and pestle, add the pepper crush, mixing well.
- In a separate bowl, combine all the batter ingredients. Place the squid into the batter, remove one piece at a time and dredge through the extra potato flour, place into AIR FRY basket. Repeat with remaining pieces. Spray the calamari well with vegetable oil.
- Select SEAFOOD program, adjust TEMPERATURE to 200°C, TIME 15 minutes. Press the start button.
- After cooking, carefully remove from the basket using heat-resistant utensils.
- Garnish with coriander and sprinkle with spiced salt.
Zucchini Tater TotsServes 43 medium zucchinis, grated (about 5 cups)2 large eggs, lightly beaten1/2 cup shredded cheddar1/2 cup grated Romano1 teaspoon dried oregano1 teaspoon dried thyme2 garlic cloves, crushedSea saltFreshly ground black pepper Tomato Sauce, for serving
- Place zucchini in a kitchen towel and squeeze all excess liquid out. Line the air fryer basket with baking paper.
- In a large bowl, mix together zucchini, egg, cheddar, Romano, oregano, thyme, garlic, salt, and pepper.
- Spoon about 1 tablespoon of mixture and roll it into a gnocchi shape with your hands. Place on the baking sheet. Select FRIES program, adjust TEMPERATURE 200°C, TIME 10 minutes. Press the start button.
- After cooking, carefully remove from the basket using heat-resistant utensils and onto a serving plate or bowl. Serve with tomato sauce on the side.
Sausage RollsMakes 203 sheets frozen puff pastry, thawed1 large egg, lightly beatenFilling200g bacon, minced or finely chopped2 cloves garlic, minced1 small onion, finely chopped1 stalk celery, finely chopped1 small carrot, finely shredded/grated1 teaspoon ground fennel seeds250g ground pork mince250g ground beef mince1/2 cup panko breadcrumbs1 large egg2 tablespoon barbecue sauce1 tablespoon Worcestershire sauce1 tablespoon fresh parsley, chopped3⁄4 teaspoon saltCracked black pepper
- FILLING – Fry bacon in a skillet over medium-high heat for 2-3 minutes until just starting to crisp, add garlic, onion, celery, and carrot to the pan, sauté for 2 minutes or until veggies have softened.
- Transfer to a bowl and let the mixture cool for 10 minutes.
- Add remaining FILLING ingredients to the bowl and mix well using your hands.
- Cut each pastry sheet in half. Shape 1/2 cup mince mixture into a sausage shape. Place along the long side of pastry half. Roll up pastry to enclose filling. Using fingertips, pinch pastry to seal.
- Cut into quarters. Repeat with remaining mince mixture and pastry. Brush the tops with beaten egg.
- Line the air fryer basket with parchment paper, or lightly grease with nonstick cooking oil spray.
- Place the sausage rolls seam side down into the air fryer. Select the BAKE program, adjust TEMPERATURE 200°C, TIME 20 minutes.Press the start button.
- After cooking, carefully remove from the basket using heat-resistant utensils. Let cool to the touch. Serve hot (or warm) tomato sauce.
Spring Rolls25g mixed dried mushrooms, soaked in hot water for 30 minutes25ml olive oil25ml sesame oil1 onion, finely diced2 cloves garlic, minced1 tablespoon fresh ginger, minced1/2 green chili, de-seeded and diced1/2 leek julienned, matchstick shape1 carrot, peeled and grated2 tablespoon soy sauce8 sheets filo pastry, kept damp under a damp cloth25g butter, meltedSprig of coriander, chopped
- Heat olive oil and sesame oil in a wok over high heat. Add onions, garlic, ginger, and chili, stir-fry for 2 minutes.
- Add leeks and carrot, continue to stir fry for a further 2 minutes, add the mushrooms, and stir-fry for 1 minute. Remove from heat and season with soy sauce.
- Working quickly, brush the sheets of filo pastry with a little melted butter on a flat work surface. Place tablespoons of the vegetable filling in the lower center of the filo pastry. Fold the edges in and over the filling and then roll up into a cigar shape, tucking the pastry around the filling tightly to secure.
- Arrange on the baking sheet and air fry on FRIES program, TEMPERATURE 200°C, TIME 10 minutes, or until golden and crispy, turning halfway through.
- After cooking, carefully remove from the basket using heat resistant utensils and arrange on a serving plate, garnish withcoriander and serve immediately.
Spicy Mexican Chicken EmpanadasMakes 81 cup shredded rotisserie chicken1/2 cup grated Cheddar Cheese1/4 cup chopped shallots2 Jalapeno, chopped, seeds and membrane removed1/2 cup chopped coriander1/2 teaspoon garlic powder1/2 teaspoon ground cumin2 teaspoon hot sauceSalt and pepper to taste2 sheets shortcrust ready-rolled frozen pastryEgg wash (1 egg whisked with 1 tablespoon water)For the Coriander-Shallot Dipping Sauce1/2 cup sour cream1 teaspoon chopped shallots1/2 cup chopped coriander1/4 teaspoon cayenne pepper1/4 teaspoon smoked paprikaSalt to taste
- DIPPING SAUCE – Combine all ingredients, chill until required.
- In a large bowl, combine chicken, cheese, shallots, jalapeno, coriander, garlic powder, ground cumin, hot sauce, and salt and pepper.Mix well.
- Using a 12cm circular cookie cutter, cut out as many circles as possible from the pastry sheets.
- Spoon about 1 tablespoon of the chicken filling into the middle of the dough. Moisten edges with egg wash.
- Fold the dough in half over the filling, forming a half-circle, use fingers to gently press and seal the edges. Use a fork to crimp the edges together.
- Brush each empanada with the egg wash. Place the empanadas on the air fry tray or in the air fryer basket.
- Select BAKE program, adjust TEMPERATURE 200°C, TIME 10 minutes. Press the start button.
- After cooking, carefully remove from the basket using heat-resistant utensils and onto a serving plate. Serve with dipping sauce.
Spinach and Feta GozlemeGozleme Dough2 cups (270g) plain flour3 tablespoon Greek yogurt1/2 teaspoon baking powder1/2 teaspoon dry yeast1/2 teaspoon sea salt flakes2 tablespoon olive oil1/2 cup (150ml) warm water extra flour for dustingTo assemble2 cups baby spinach leaves, chopped1 cup crumbled fetaChilli flakes (optional)Olive oil, for pan-fryingLemon wedges, to serve
- Gozleme dough – Combine all ingredients except olive oil in a large bowl. Mix with a spoon until just combined. Turn onto a floured surface and knead for a few minutes until smooth.
- Return to the bowl. Cover with a tea towel and set in a warm place for about 30 minutes to prove.
- Punch down the dough and knead in the olive oil to get a smooth dough ball. Cover and set aside for another 30 minutes.
- Divide dough into 6 balls. Roll each dough ball into a large rectangle. Dust with extra flour as needed to avoid sticking. Roll to 3/4mm thickness or near translucent.
- Scatter spinach, feta, and chili flakes (if using) in the center of the rolled pastry. Fold the ends over like an envelope, brushing with water to seal and pinch the pastry.
- Dust the folded gozleme lightly with extra flour and gently roll it out, using a rolling pin, to three times the folded size.
- Cut the gozleme to size to fit the air fry basket, spray the gozleme with olive oil spray, and place it in the basket.
- Select the BAKE program, adjustTEMPERATURE 180°C and TIME 8 minutes.Press the start button.
- After cooking, carefully remove from the basket using heat-resistant utensils and cut into triangles (or squares). Serve hot with lemon wedges.
Memphis Style BBQ Pork Spareribs2 tablespoon sea salt2 tablespoon dark brown sugar2 tablespoon smokey paprika2 teaspoon garlic powder2 teaspoon onion powder2 teaspoon cumin powder1 teaspoon mustard powder1 teaspoon freshly ground black pepper2kg individually cut pork spareribs
- Combine all ingredients in a bowl. Add ribs and rub seasoning until well coated.
- Arrange ribs in the air fry basket. Select MEAT program, adjust TEMPERATURE 180°C, TIME 35 minutes or cook until tender.
- After cooking, carefully remove from the basket using heat-resistant utensils and serve.
Korean BBQ Short Ribs with Sesame SaltServes 4 – 61.5kg short ribsMarinade1/2 cup soy sauce1/4 cup rice wine or mirin1/4 cup pineapple juice2 tablespoon sugar2 tablespoon sesame seeds3 tablespoon chopped garlic1/4 cup chopped shallots, plus ¼ cup for garnish1 small onion, finely chopped1 tablespoon finely grated fresh ginger1 small pear, diced3 tablespoon sesame oil2 teaspoon red chili flakes2 teaspoon freshly ground black pepper
- Combine all marinade ingredients in food processor and puree, transfer to a bowl. Add the ribs and marinate for at least 3 hours or overnight.
- Remove the ribs from the marinade and shake off any excess.
- Place the ribs into the air fry basket. Select MEAT program, adjust TEMPERATURE 200°C and TIME 15 minutes. Press the start button.
- After cooking, carefully remove from the basket using heat-resistant utensils. Transfer to a bowl and garnish with extra shallots.
Kentucky Drumsticks10 chicken drumsticks or thighs1 cup Buttermilk2 eggs, beaten2 cups flour2/3 teaspoon salt1/2 teaspoon thyme1/2 teaspoon basil1/3 teaspoon oregano1 teaspoon celery salt1 teaspoon black pepper1 teaspoon dried mustard4 teaspoon paprika2 teaspoon garlic salt1 teaspoon ground ginger3 teaspoon white pepperOlive oil spray
- Soak drumsticks in buttermilk for up to 24 hours.
- Place the eggs in one bowl and the combined flour and spices in a second bowl.
- Remove chicken one piece at a time from buttermilk, drain off excess.
- Dredge each chicken leg in the flour, then the eggs, then the flour once again. Put the coated drumstick in the air fry basket and repeat with the remaining chicken. Spray with olive oil.
- Select the POULTRY program and adjust TEMPERATURE 200°C, TIME 30 mins. Turn chicken over halfway through the cooking process and spray further with olive oil. Spray with oil if there are any dry flour spots.
- After cooking, carefully remove from the basket using heat-resistant utensils.
- Ensure that the chicken is thoroughly cooked before consuming. Time may vary depending on the size and thickness of the chicken.
Chicken Burrito Bowl SaladServes 22 chicken breastsChili lime chicken marinade3 tablespoon olive oil1/3 cup freshly squeezed lime juice2 tablespoon coriander, chopped2 cloves garlic, crushed1 teaspoon brown sugar3/4 teaspoon red chili flakes1/2 teaspoon ground Cumin1 teaspoon saltFor assembling into the bowl1 cup cooked white rice or quinoa or brown rice.1 cup Black beans or refried beans1/2 cup corn kernels fresh, canned, or frozen1 Red onion, sliced1 red and yellow capsicum cut into strips1 Avocado, sliced4 iceberg lettuce leavesShredded coriander1/2 cup sour cream, optional
- Whisk marinade ingredients together. Pour half the marinade over the chicken, reserve the remaining marinade for salad dressing.Refrigerate chicken for 2 hours.
- Place chicken fillets in the Air Fry basket. Select POULTRY program, TEMPERATURE 190°C, TIME 25 mins. Press start button.
- Once the chicken is cooked, carefully remove it from the basket using heat-resistant utensils to set aside and allow to rest.
- Slice chicken into strips on a clean chopping board and prepare the salad in a bowl.
- Put rice at the bottom of the bowl. Top with the rest of the ingredients, arrange to start from one side of the bowl clockwise. Add the chicken.
- Drizzle with remaining marinade/dressing and serve with (optional) extra coriander leaves and sour cream.
Crispy Tofu & Asian GreensServes 4450g firm tofu, drained, patted dry, and cut into 8piecesMarinade1/3 cup soy sauce1/4 cup hot chile sauce, such as Sriracha or sambal oelek chile sauce1 red chili, halved, seeded if desired1/3 cup chopped fresh coriander leaves6 garlic cloves, coarsely chopped1 tablespoon coarsely chopped peeled fresh gingerTo toss1/2 cup cornflour1 tablespoon Peanut oilFor assembling into the bowl140g baby kale or spinach leaves4 radishes, finely sliced2 cups brown rice, cooked2 carrots, shredded100g soybeans2 tablespoon extra-virgin olive oilShallots for garnishFine sea salt to taste
- Sliced shallots (white and green parts), for garnish
- In a blender, combine the soy sauce, chili sauce, chili halves, coriander, garlic, and ginger; puree until smooth.
- Arrange the tofu on a plate or baking sheet.
- Coat the tofu on both sides with two-thirds of the chili mixture (reserve the rest for serving).Cover with plastic wrap and refrigerate for 1 hour to 6 hours.
- Remove the tofu from the refrigerator and dip the tofu in the cornflour, tap off the excess.
- Drizzle the peanut oil over the tofu and place it into the Air Fry basket. Select MANUAL program, TEMPERATURE 190°C, and TIME
- minutes. Press the start button. Turn tofu over through the cooking process. Cook until golden.
- After cooking, carefully remove from the basket using heat-resistant utensils.
- In a large bowl, toss the kale and radish with olive oil and salt to taste. Add the tofu and toss.
- Arrange in a bowl with the rice, carrots, and soybeans. Serve hot, topped with sliced shallots and coriander leaves, drizzle with reserved marinade.
Chicken Katsu1kg chicken breasts cut in half horizontallySalt1 1/2 cups all-purpose flour3 eggs beaten3 cups panko breadcrumbsOlive oil spray2 shallots, finely sliced, for garnishTonkatsu Sauce1/2 cup tomato sauce2 tablespoon soy sauce2 teaspoon brown sugar1 tablespoon mirin2 teaspoon Worcestershire sauce1 teaspoon freshly grated ginger1 teaspoon finely minced garlic
- Tonkatsu Sauce – In a small bowl combine all ingredients.
- Place chicken breasts between plastic wraps and gently pound out to 1cm thick.
- Salt the chicken liberally, cover it and place it in the refrigerator for about 1 hour.
- Set up a breading station with three bowls.Place the flour into one bowl. Beat the eggs and water together and pour into a second bowl. Place panko breadcrumbs into the third bowl.
- Place chicken in flour, shake off any excess. Dip into egg wash, coat well, then shake off excess. Dredge in panko breadcrumbs. Place the coated chicken on a plate and chill for 1 hour. Repeat with all the chicken.
- Place chicken in an air fry basket lined with baking paper. Select POULTRY, adjust TEMPERATURE 180°C, TIME 20 minutes.Spray the chicken with olive oil spray and close the basket. Press the start button.
- Halfway through the cooking process, turn the chicken over, spray with olive oil spray and continue the cooking.
- When the chicken is fully cooked, carefully remove it from the basket using heat-resistant utensils and onto a clean chopping board.Cut into thin strips that you can pick up with chopsticks. Serve with rice and tonkatsu sauce.
Greek Chicken Gyros with Tzatziki SauceChicken marinade500g chicken breast, sliced into thin strips1/4 cup greek yogurt1 tablespoon fresh lemon juice1 tablespoon Extra Virgin Olive Oil1/2 tablespoon red wine vinegar1/2 teaspoon salt1/2 teaspoon pepper1 teaspoon oreganoTzatziki sauce1 cup greek yogurt1 cucumber, seeded, finely grated, and drained2 cloves garlic, finely minced1 teaspoon lemon zest plus 1 tablespoon fresh lemon juice2 tablespoon chopped fresh dillSalt and freshly cracked black pepper, to tasteGreek salad2 tomatoes, diced1 cucumber, peeled and diced1/4 red onion, diced1 tablespoon Italian parsley, chopped1/2 tablespoon extra virgin olive oilSalt and pepper to taste150g feta cheese, cubed4 Greek pita bread or naan bread or flatbread
- Place chicken and all marinade ingredients in a bowl and let marinate at least 30 minutes, preferably 2-4 hours up to 24 hours, refrigerated.
- To make tzatziki sauce, combine all ingredients together.
- To make a greek salad, place all ingredients together in a bowl. Stir to coat. Season to taste.
- Lay chicken pieces into the air fry basket. Select POULTRY, adjust TEMPERATURE 190°C, and TIME 7 minutes.
- After cooking, carefully remove from the basket using heat-resistant utensils.
- Place cooked chicken in selected bread. Top with tzatziki sauce and Greek salad. Add additional feta, if desired.Note: Ensure that the chicken is thoroughly cooked before consuming. Time may vary depending on the size and thickness of the chicken.
Spiced Pork BellyServes 4750g pork belly, skin on and scored 2cm apart and 1cm deepPaste2 teaspoon fennel seeds2 tablespoon coriander paste2 teaspoon garlic paste2 teaspoon fresh thyme leaves2 teaspoon sea salt1 tablespoon olive oil
- Mix all the flavorings together to form a paste.
- Rub the paste all over the skin of the pork belly ensuring to get deep into the scored sections.
- Select MEAT program, TEMPERATURE 200°C, and TIME 25 minutes.
- Place the pork belly skin side up in the air fryer basket and cook until golden.
- After cooking, carefully remove from the basket using heat-resistant utensils.
- Serve with your favorite salads or vegetables.
Basic White Bread
3 1/3 cups plain flour2 teaspoon dried yeast1 teaspoon salt1 1/2 cups lukewarm waterWater, for brushing1 teaspoon sesame seeds, for sprinkling
- Add all ingredients to the bowl of a mixer with the dough hook attached.
- Mix for 5 minutes at low speed.
- Remove dough and place in greased, 18cm glass bowl. Cover with greased aluminum foil.
- Place in the air fryer select DEHYDRATOR program, adjust TEMPERATURE 27°C and TIME 30 minutes for first proofing stage.
- Remove dough, punch down and knead for 3 minutes on floured board.
- Place dough in greased 20cm round high-sided cake pan. Cover with greased aluminum foil and place pan in the air fryer.Select the DEHYDRATOR program, adjust TEMPERATURE 27°C and TIME 30 minutes.
- Carefully remove aluminum covering using mitts, brush dough with a little water, and sprinkle with sesame seeds.
- Select the CAKE program, adjust TEMPERATURE 170°C and TIME for 25 minutes.
- After baking, carefully remove the cake pan from the basket using heat-resistant utensils.
- Remove bread from the cake pan and cool on the wire rack.
Easy Wholegrain Bread4 cups (520g) whole wheat flour*1 packet (11g) instant yeast (~1 tablespoon)*1/2 tsp salt2 tsp maple syrup*2 cups (480ml) warm water1 tablespoon water, extra for brushing1 tablespoon seed variety of choice
- Add all ingredients to the bowl of a mixer with the dough hook attached.
- Mix for 5 minutes at low speed.
- Remove dough and place in greased, 18cm glass bowl. Cover with greased aluminum foil Place in the air fryer select DEHYDRATOR program, adjust TEMPERATURE 27°C and TIME 30 minutes for first proofing stage.
- Remove dough, punch down and knead for 3 minutes on floured board.
- Place dough in greased 20cm round high-sided cake pan. Cover with greased aluminum foil and place pan in the air fryer.Select the DEHYDRATOR program, adjust TEMPERATURE 27°C and TIME 30 minutes.
- Carefully remove aluminum covering using mitts, brush dough with a little water, and sprinkle with sesame seeds.
- Select CAKE program, adjust TEMPERATURE 170°C and TIME for 25 minutes.
- Remove bread from the cake pan and cool on the wire rack.
Roasted Granola3 cups rolled oats1/4 cup honey or maple syrup1/4 cup avocado oil1/2 teaspoon salt2 tablespoon brown sugar1/4 cup unsalted almonds1/4 cup unsalted cashews1/4 cup cashew butter1/4 cup chia seeds1/4 cup coconut flakes1/4 cup dried raisins1/4 cup chocolate chip morsels optional
- Add the first 8 ingredients into a bowl and mix well.
- Cut parchment paper to the size of the base of the air-fryer basket. Cut a few small holes so that the hot air can circulate properly.
- Add the rolled oats mixture and spread it out evenly.
- Select the CAKE/BAKE program and adjust TEMPERATURE 160°C, TIME 12 minutes.Press the start button.
- After 5 minutes of baking, pull out the handle and add seeds and coconut pieces (if using), stir the granola mixture.
- Place back into the air fryer and cook for another 5 minutes.
- When you have 2 minutes left, reduce the temperature to 150°C. Press the TEMPERATURE SETTING button and then adjust using the MINUS button.
- Carefully transfer the granola mixture from the basket using heat-resistant utensils, to a bowl.When completely cool, add the remaining ingredients.
- Store in an air-tight glass container for about 3 weeks.
Troubleshooting
| Problem | Possible Reason | Solution |
| The digital air fryer does not turn on or starts cooking | • Removable drawer is not inserted properly.• Air Fry Presets have not been chosen.• Power button has not been pressed. | • Insert the removable drawer properly, ensuring it clicks into the closed position.• Select which Preset CookFunctions you desire on the digital control panel and press the ‘Start/Pause’ to begin cooking. |
| Food is not evenly cooked | • Too much food in the inner cooking basket. | • Remove food from the cooking basket and cook in smaller batches. |
| Chips are not crispy | • Potatoes have too much starch in them.• Old potatoes used.• Not enough oil added.• Potatoes cut too large. | • Wash potatoes thoroughly and dry before frying.• Use fresh potatoes.•Add slightly more oil.• Cut potatoes into smaller pieces. |
| Chips not evenly cooked | • Chips were not shaken frequently through the cooking process. | • Shake chips halfway through the cooking process or as frequently as every 5mins for optimal results. |
| Burning Smell | • Food build-up inside the oven, on heating elements, or in the crumb tray | • Refer to the “Refer to Care & Cleaning” Section. |
| Touch panel interface is non-responsive | • Panel is dirty or greasy• Excess moisture on panel• Controller is malfunctioning | • Ensure the panel is clean and free of debris before using.• Ensure panel is clean and dry, and use dry hands to operate.• Unplug the unit and let it rest for 60 seconds before plugging in. |
| Small water drips from the door during cooking | • Water released from food during the cooking cycle | • This is not a concern and is part of the normal cooking cycle. Please mop up drips with a soft cloth. |
 This Sunbeam product is covered by a 12-month replacement or repair warranty, which is in addition to your rights under the Australian Consumer Law (if your product was purchased in Australia) or New Zealand Consumer Guarantees Act (if your product was purchased in New Zealand).Should you experience any difficulties with your product during the warranty period. please contact our customer service line for advice on 1300 881 861 in Australia. or 0800 786 232 in New Zealand.Australiawww.sunbeam.com.au1300 881 861Suite 1, Level 1,13 Lord Street, Botany NSW 2019 AustraliaNew Zealandwww.sunbeam.co.nz0800 786 232Level 6, Building 5,Central Park, 660-670 Great South Road,Greenlane, Auckland New Zealand
Upon receipt of your claim, Sunbeam will seek to resolve your difficulties or, if the product is defective, advise you on how to obtain a replacement or refund.To assist us in managing warranty claims, we recommend you register your product as soon as practicable after purchase, on our Sunbeam website and uploading a copy of your original receipt. View the Support section of the Sunbeam website.In order to make a claim under our warranty, you must have the original. proof of purchase documentation for the product and present it when requested (if not already uploaded to our website).Should your product develop any defect within 12 months of purchase because of faulty materials or workmanship, we will replace or repair it, at our discretion, free of charge. A product presented for repair may be replaced by a refurbished product of the same type rather than being repaired. Refurbished parts may be used to repair the product.Our replacement or repair warranty only applies where a defect arises as a result of faulty material or workmanship during the warranty period. Your warranty does not cover misuse or negligent handling (including damage caused by failing to use the product in accordance with this instruction booklet), accidental damage, or normal wear and tear.Your warranty does not:
- cover freight or any other costs incurred in making a claim, consumable items, accessories that by their nature and limited lifespan require periodic renewal. (such as filters and seals) or any consequential loss or damage; or
- cover damage caused by:– power surges, power dips, voltage supply problems, or use of the product on incorrect voltage;
- servicing or modification of the product other than by Sunbeam or an authorized Sunbeam service center;
- use of the product with other accessories, attachments, product supplies, parts, or devices that do not conform to Sunbeam specifications; or
- exposure of the product to abnormally corrosive conditions; or
- extend beyond 3 months if the product is used in commercial., industrial., educational, or rental applications.
The benefits given to you by our warranty are in addition to other rights and remedies under a law in relation to the product.
In Australia, our goods come with guarantees that cannot be excluded under the Australian Consumer Law. You are entitled to a replacement or refund for a major failure and for compensation for any other foreseeable loss or damage. You are also entitled to have the goods repaired or replaced if the goods fail to be of acceptable quality and the failure does not amount to a major failure.Our goods also come with guarantees that cannot be excluded under the New Zealand Consumer Guarantees Act.If your warranty claim is not accepted, we will inform you and if requested to do so by you, repair the product provided you pay the usual charges for such repair.You will also be responsible for all freight and other costs.Should your product require repair or service after the warranty period, contact your nearest Sunbeam service center.For a complete list of Sunbeam’s service centers, visit our website or call our customer service line for advice on 1300 881 861 in Australia, or 0800 786 232 in New Zealand.
Need help with your appliance?
Contact our customer service team or visit our website for information and tips on getting the most from your appliance.Australiavisit www.sunbeam.com.auphone 1300 881 861mail Suite 1, Level 1, 13 Lord Street,Botany NSW 2019 Australia.New Zealandvisit www.sunbeam.co.nzphone 0800 786 232mail Level 6, Building 5, Central Park,660–670 Great South Road,Greenlane, Auckland.NEWELL AUSTRALIA PTY LTD. ABN 68 075 071 233Sunbeam is a registered trademark.‘DiamondForce’ is a trademark of Sunbeam Corporation.Made in China to Sunbeam’s specification.Due to minor changes in design or otherwise, the product you buy may differ slightly from the one shown here.Approved by the appropriate electrical regulatory authorities.© Copyright Sunbeam 2020.01/204113-IBAFP4500DF_21EM1 (ANZ)GCDS-SUN-SL
References
[xyz-ips snippet=”download-snippet”]