
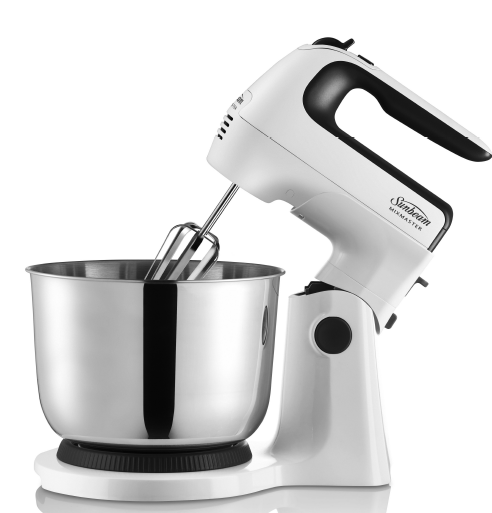
Sunbeam MXP1000WH Mixmaster Combo Pro Hand & Stand Mixer
Sunbeam’s Safety Precautions
SAFETY PRECAUTIONS FOR YOUR SUNBEAM MIXMASTER COMBO PRO.
- Never eject beaters, whisks or dough hooks when the appliance is in operation.
- Ensure fingers are kept well away from moving beaters and dough hooks.
- Any misuse of this product may lead to potential injury.
- Do no operate for longer than 5 minutes at a time. After 5 minutes rest for 2 minutes then continue mixing.
- Switch off the appliance and disconnect from supply before changing accessories or approaching parts that move in use.
Sunbeam is very safety conscious when designing and manufacturing consumer products, but it is essential that the product user also exercise care when using an electrical appliance. Listed below are precautions which are essential for the safe use of an electrical appliance:
- Read carefully and save all the instructions provided with an appliance.
- Always turn the power off at the power outlet before you insert or remove a plug. Remove by grasping the plug – do not pull on the cord.
- Turn the power off and remove the plug when the appliance is not in use and before cleaning.
- Do not use your appliance with an extension cord unless this cord has been checked and tested by a qualified technician or service person.
- Always use your appliance from a power outlet of the voltage (A.C. only) marked on the appliance.
- This appliance is not intended for use by persons(including children) with reduced physical, sensory or mental capabilities, or lack of experience and knowledge, unless they have been given supervision or instruction concerning use of the appliance by a person responsible for their safety.
- Children should be supervised to ensure that they do not play with the appliance.
- The temperature of accessible surfaces may be high when the appliance is operating
- Never leave an appliance unattended while in use.
- Do not use an appliance for any purpose other than its intended use.
- Do not place an appliance on or near a hot gas flame, electric element or on a heated oven.
- Do not place on top of any other appliance.
- Do not let the power cord of an appliance hang over the edge of a table or bench top or touch any hot surface.
- Do not operate any electrical appliance with a damaged cord or after the appliance has been damaged in any manner. If damage is suspected, return the appliance to the nearest Sunbeam Appointed Service Centre for examination, repair or adjustment.
- For additional protection, Sunbeam recommend the use of a residual current device (RCD)with a tripping current not exceeding 30mA in the electrical circuit supplying power to your appliances.
- Do not immerse the appliance in water or any other liquid unless recommended.
- Appliances are not intended to be operated by means of an external timer or separate remote control system.
- This appliance is intended to be used in household and similar applications such as: staff kitchen areas in shops, offices and other working environments; farm houses; by clients in hotels, motels and other residential type environments; bed and breakfast type environments.
If you have any concerns regarding the performance and use of your appliance, please visit www.sunbeam.com.au or contact the Sunbeam Consumer Service Line. Ensure the above safety precautions are understood.
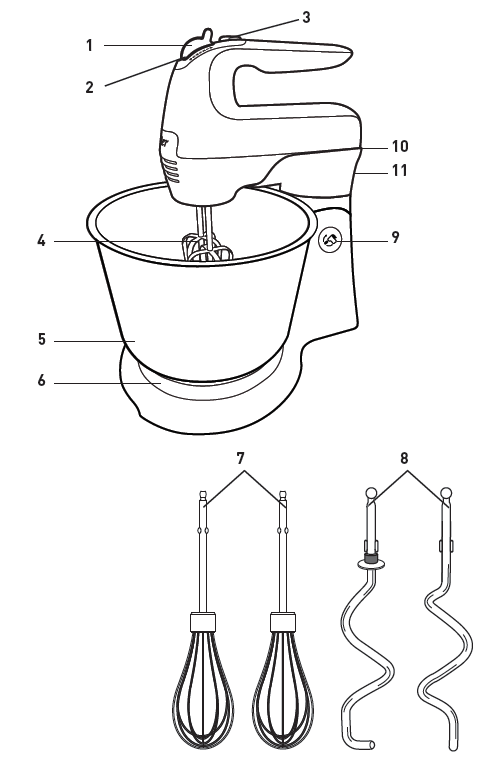
Features of your Mixmaster® Combo Pro
- 6 speed control switch6 speeds that range from high speeds for whisking and low speeds for kneading.
- Beater ejectTo effortlessly release the beaters, whisks or dough hooks for easy cleaning. Press the speed control button downwards to eject.
- Burst of powerProvides an extra speed boost and burst of power for those extra tough mixing tasks.
- ‘V-groove’ beatersSpecially designed for optimum mixing and aeration. The beaters are positioned off-centre for easy addition of ingredients during mixing.
- 3.8 litre stainless steel mixing bowlIdeal for mixing delicate ingredients.
- TurntableThe mixing bowl sits here and is rotated by the attachments during mixing to allow all areas of the bowl to be mixed.
- Balloon whisksDesigned to add in maximum air in minimum time. Use for whipping and whisking tasks.
- Dough hooksThe heavy-duty steel dough hooks take the hard work out of kneading dough and other heavy mixtures.
- Tilt buttonThe head of the mixer tilts back and locks securely into position to allow for easy removal of the mixing bowl and attachments.
- Hand mixer release tabDesigned for maximum use the mixer transforms into a convenient hand mixer, as the head of the mixer simply detaches from the mixing stand.
- Swivel controlChoose between 2 different mixer head positions to ensure a thorough and even mixing action.
Using your Mixmaster® Combo Pro
Before useBefore assembling your mixer, be sure the power cord is unplugged from the power outlet and the speed control switch is in the ‘0’ OFF position.
- Press the tilt button and tilt the cradle back into OPEN position. Place the hand mixer into the cradle ensuring the base of the hand locks in correctly.Note: When fitted correctly there will be no gap between the hand mixer and the cradle.

- Select the desired attachments, depending on the mixing task to be performed: beaters for mixing and beating, whisks for whisking or dough hooks for kneading.
- Inserting the beaters or whisks3a. Beaters or whisks can be inserted in either socket, as they are identical.Inserting the dough hooks3b. To insert the dough hooks, place the dough hook with the small washer into the left socket. Place the other dough hook into the right socket.Note: Ensure both beaters, whisks or dough hooks are fully inserted into the correct sockets or your mixing results may be affected.
- Place the 3.8 litre mixing bowl onto the turn table.
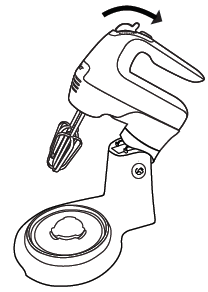
- To lower the head of the mixer and beaters/whisks/dough hooks into the bowl, depress the ‘tilt’ button, hold the handle with the other hand and ease the head of the mixer down. A ‘click’ will indicate when the head has reached the correct position.


Using your mixer
- With the speed control switch in the ‘0’OFF position, plug the power cord into a230-240V AC power outlet.
- Use the speed control switch to turn the mixer ‘ON’ and ‘OFF’ and to control the mixing speeds. Clearly marked instructions for correct mixing speeds for each type of mixture are shown in the Mixing Guide on page 7.Tip: Always start mixing at slow speeds and increase the speed gradually to prevent ingredients splashing out of the mixing bowl.Tip: When adding dry ingredients use the lowest speed to prevent the ‘snow storm’ effect.Tip: When kneading yeast doughs, using Low speeds 1-2 (low) to achieve best results.
- When mixing is complete, turn the speed control switch to the ‘0’ OFF position and unplug the cord from the power outlet.
- Hold down the ‘tilt’ button and ease the head of the mixer back until the mixer head is in the tilt position.
- To remove the beaters/whisks/dough hooks, place fingers loosely around the spindles and press the speed control switch downwards.
Removing the hand mixer
- With the speed control switch in the ‘0’OFF position, unplug the power cord.
- Press the ’tilt’ button with one hand and place the other hand on the hand mixer handle. Tilt the mixer head back to full position until ‘click’ into place.
- With one hand pull down on the Hand Mixer Release Tab, releasing the hand mixer from the mixing base.
- With the other hand, grip the hand mixer handle and pull away from the mixer base in a diagonally upwards movement.
- The hand mixer is now ready to use for mixing tasks.
Swivel Control
At the back of the mixer stand is the Swivel Control switch. This controls the position of the mixer head in the mixing bowl.Lock Position (switch in far right position)The mixer head will be locked into position with the accessories close to the edge of the bowl.Unlock Position (switch in far left position)The mixer head will be free to move from side to side during mixing to reach all areas of the bowl.
Mixing Guide
| Mixing Task | Recommended Speed(s) |
| Kneading, Folding & Blending | 1 – 2 (low) |
| Light Mixing | 2 – 3 (low/med) |
| Creaming & Beating | 4 – 5 (med/high) |
| Whipping & Aerating | 5 – 6 (high) |
Care and Cleaning
CAUTION: Turn off and unplug appliance and eject any accessories before cleaning.
- Before cleaning any part of the mixer, set the speed control switch to the“0 (OFF)” position to turn off. Then unplug the cord from the outlet and eject the beaters.
- The beaters, whisks, dough hooks and bowl may be washed in hot, soapy water or in a dishwasher.CAUTION: Do not immerse mixer or stand in water while cleaning. This may cause electric shock, injury, or damage to the product.
- To remove stubborn spots on the hand mixer and base, wipe surfaces with a cloth, slightly dampened in soapy water or a mild, non-abrasive cleaner.
- Do not use any abrasive cleaner or material to clean any part of the hand mixer or stand as it can scratch the product.
Warranty


![]()
References
[xyz-ips snippet=”download-snippet”]