![]()
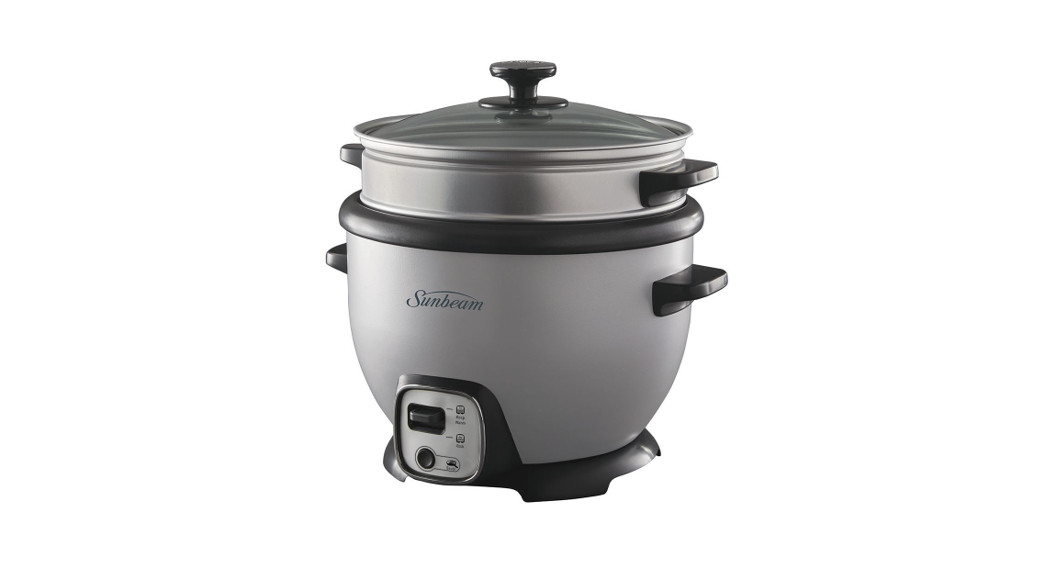
RICE COOKER + SAUTÉ 10 CUPUser Guide RCP4000SV
RCP4000SV_20EM1 (ANZ).indd 14/1/20 11:26
Important instructions -retain for future use.
Sunbeam’s Safety Precautions
SAFETY PRECAUTIONS FOR YOUR SUNBEAMRICE COOKER + SAUTÉ.
- Do not operate the rice cooker on an inclined surface. Use a flat-level surface.
- Do not move or cover the rice cooker whilst in operation. Unplug before moving.
- Do not immerse the heating vessel of the rice cooker in water or any other liquid.
- Use your rice cooker at least 200mm away from walls and curtains.
- Do not put your face or hands over the steam vent whilst cooking as you may scald your skin.
- Do not use your rice cooker in confined spaces.
- Remove the power cord before cleaning and avoid spillage on the connector.
- After cleaning ensure that the cord inlet area is completely dry before using again.
- Allow the cooking bowl to cool before removing it.
Sunbeam is very safety conscious when designing and manufacturing consumer products, but it is essential that the product user also exercise care when using an electrical appliance. Listed below are precautions that are essential for the safe use of an electrical appliance:
- Read carefully and save all the instructions provided with an appliance.
- Always turn the power off at the power outlet before you insert or remove a plug. Remove by grasping the plug – do not pull on the cord.
- Turn the power off and remove the plug when the appliance is not in use and before cleaning.
- Do not use your appliance with an extension cord unless this cord has been checked and tested by a qualified technician or service person.
- Always use your appliance from a power outlet of the voltage (A.C. only) marked on the appliance.
- This appliance is not intended for use by persons (including children) with reduced physical, sensory or mental capabilities, or lack of experience and knowledge unless they have been given supervision or instruction concerning the use of the appliance by a person responsible for their safety.
- Children should be supervised to ensure that they do not play with the appliance.
- The temperature of accessible surfaces may be high when the appliance is operating.
- Never leave an appliance unattended while in use. Potential injury from misuse.
- Do not use an appliance for any purpose other than its intended use.
- Do not place an appliance on or near a hot gas flame, electric element, or in a heated oven.
- Do not place on top of any other appliance.
- Do not let the power cord of an appliance hang over the edge of a table or benchtop or touch any hot surface.
- Do not operate any electrical appliance with a damaged cord or after the appliance has been damaged in any manner. If damage is suspected, return the appliance to the nearest Sunbeam Appointed Service Centre for examination, repair, or adjustment.
- For additional protection, Sunbeam recommends the use of a residual current device (RCD) with a tripping current not exceeding 30mA in the electrical circuit supplying power to your appliances.
- Do not immerse the appliance in water or any other liquid unless recommended.
- Appliances are not intended to be operated by means of an external timer or separate remote control system.
- This appliance is intended to be used in household and similar applications such as staff kitchen areas in shops, offices, and other working environments; farm houses; by clients in hotels, motels, and other residential type environments; bed and breakfast type environments.
- The heating element surface is subject to residual heat after use.
If you have any concerns regarding the performance and use of your appliance, please visit www.sunbeam.com.au or contact the Sunbeam Consumer Service Line.Ensure the above safety precautions are understood.
Features of your Rice Cooker + Sauté
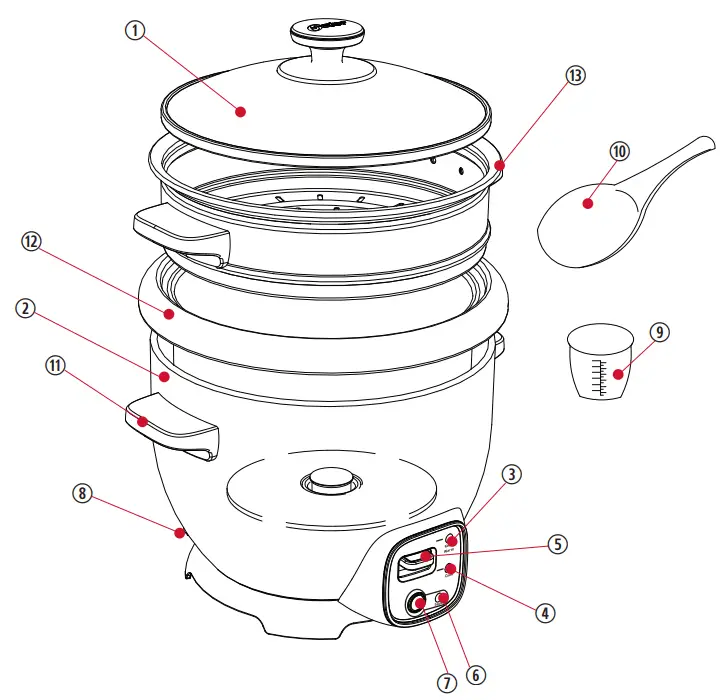
| 1. Glass Lid | 8. Power Cord |
| 2. Heating Body | 9. Measuring Cup |
| 3. Keep Warm Light (amber) | 10. Paddle |
| 4. Cook Light (green) | 11. Handle |
| 5. On-Switch Cook Button | 12. Inner Pot |
| 6. Sauté Light (red) | 13. Steamer |
| 7. Sauté On/Off Button |
Instructions For Use
BEFORE USING IT FOR THE FIRST TIMEClean the Glass Lid, Inner Pot, Paddle and Measuring Cup according to the user maintenance instructions.
USING YOUR RICE COOKER + SAUTÉYour Rice Cooker + Sauté includes a convenient and useful Sauté Function, which allows you to sauté/brown onions, garlic, and/ or other ingredients in oil prior to cooking.You can choose to cook rice or other meals directly without the need to sauté, but this added feature gives you greater versatility in the preparation of your favorite recipes.
SAUTÉ FUNCTIONThis function was designed to give you control when sautéing/browning and needs to be controlled manually as follows:
- Remove lid and place food inside the unit.
- Connect the power cord to an electrical outlet and press the Sauté On/Off Button “
 ” once to the active function.
 - The Rice Cooker + Sauté will heat up the Inner Pot and sauté the food inside.
- This function requires close supervision and needs to be controlled manually.When browning is done, turn off this function by pressing the Sauté On/Off Button “ ” once.
IMPORTANT: Before cooking rice, you must manually turn off the Sauté function.
NOTE: Do not use a metal spoon to stir the food inside the inner pot since that might damage the non-stick coating, which could affect the unit performance in the long term.
AUTOMATIC COOK FUNCTIONIf you would like to sauté/brown prior to cooking rice or other ingredients, please refer to the Sauté Function section. Once you are done browning your ingredients, follow theinstructions below.
You may also use the Automatic Cook Function without browning any ingredients by simply following these instructions.
- Make sure the appliance is unplugged.
- Measure raw rice for the desired amount with the Measuring Cup (180 ml) provided.
- One cup of uncooked rice will make about two cups of cooked rice.
- By using the Measuring Cup, add the proper amount of water to the rice inside the Inner Pot (for every cup [180 ml] of raw rice, add 1-1/2 cups of water).NOTE: You may need to adjust the quantity of water depending on the kind of rice you are cooking and how moist you prefer it. For sticker rice, add slightly more water. For fluffier rice, use slightly less water. If you are cooking brown rice, add more water. You may also need to adjust the water quantity by adding more water if you are using the rice cooker at a high altitude.
- Set the Inner Pot into the Rice Cooker. Make sure that the Inner Pot sits directly in contact with the heating plate by turning it slightly from right to left until it is seated properly. Cover with Lid. WHEN USING THE AUTOMATIC COOK MODE DO NOT OPERATE THE UNIT UNCOVERED. STEAM IS GENERATED DURING USE.
- Plug the Power Cord into an electrical outlet. Activate the Rice Cooker by pushing down the On-Switch Cook Button down. Make sure the Cook Light (amber)is on.IMPORTANT: If you use the sauté/brown function, you must manually turn off the sauté/brown function before cooking rice.
- After 15 minutes mix the rice. Lift and remove the Lid carefully to avoid scalding and allow water to drip into the Inner Pot. Use the Paddle or another long handheldutensil to scoop and mix the rice. After mixing, cover the Inner Pot with the Lid.
- When your rice is cooked, the Rice Cooker will automatically switch to the warm function and the Keep Warm Light (green) will turn on. The Rice Cooker will keep the rice warm until the unit is disconnected from the wall outlet.
- The Rice Cooker will automatically keep rice warm at 60°C – 80°C.
- Allow the appliance to cool completely before cleaning. Disconnect the plug from the wall outlet when not in use.
NOTES: Wash the rice in a separate bowl, prior to cooking, if desired. For softer rice, we suggest preparing rice and water in the Inner Pot and let soak for 10 – 20 minutesbefore cooking.
INSTRUCTIONS TO REHEAT RICE To reheat cold rice, add 1/4 cup (4 Tbsp.) of cold water per cup of cooked rice, stir to mix, and then press On-Switch Cook Button to start cooking. When rice is warm, the Rice Cooker will automatically switch to the keep-warm function.
USING THE STEAMING TRAYSteam cooking vegetables retain more nutrients than boiling or baking while preserving the bright, natural color.
- Prepare vegetables by washing, peeling, and then cut into smaller-sized pieces.
- Make sure the unit is unplugged.
- Fill the Inner Pot with the appropriate amount of water. (See Chart)
- Set the Inner Pot into the heating body. Make sure that the Inner Pot sits directly in contact with the heating plate.
- Place vegetables in the Steaming Tray and position the Tray on top of the Inner Pot. Cover with Lid.DO NOT OPERATE THIS UNIT UNCOVERED. STEAM IS GENERATED DURING USE.
- Plug the Power Cord into a wall outlet. Activate the Rice Cooker by pushing down the On-Switch Button. Make sure the red Cook Light is on.
- Time the cooking manually according to the chart on the next page. The unit will automatically switch to the keep warm cycle once all the water evaporates. If all the water evaporates and you wish to extend the cooking cycle, add more water.
- Once the vegetables have been steamed according to your personal preference, remove the Steamer Tray from the Rice Cooker.
- Disconnect from the wall outlet and allow the unit to cool completely before cleaning.
| VEGETABLE | QUANTITY | WATER | TIME |
| Green Beans | 300 g | I/3 Cup / 50 ml | 30-35 minutes |
| Broccoli | 300 g | I/3 Cup / 50 ml | 30-35 minutes |
| Carrots (Sliced) | 200 g | I/3 Cup / 50 ml | 30-35 minutes |
| Cauliflower | 200 g | I/3 Cup / 50 ml | 30-35 minutes |
| Corn (Kernel) | 300 g | I/3 Cup / 50 ml | 40-45 minutes |
| Peas | 300 g | I/3 Cup / 50 ml | 30-35 minutes |
| Spinach | 150 g | 1/3 Cup / 50 ml | 20-30 minutes |
| Mixed Vegetables | 300 g | 1/3 Cup / 50 ml | 30-35 minutes |
NOTE: These times are approximate. It is recommended that you monitor the steaming process and adjust the cooking time according to your preference. Stir vegetables occasionally during the cooking process. When cooking rice, steaming times may vary.
Care and Cleaning
After using your Rice Cooker + Sauté, turn the power off and remove the cord from the power outlet.
The food contact parts (removable pan, measuring cup, steaming tray, serving spoon) should be washed in warm water using a mild detergent.DO NOT use harsh abrasives to clean the removable cooking pan as these will damage the non-stick coating. The interior and exterior of the cooking vessel can be wiped over with a damp cloth.
CAUTION: Never immerse the heating vessel in the water.
DO NOT place any part of your Rice Cooker + Sauté in a dishwasher. The hot water temperatures and harsh detergents may warp or stain the parts.CAUTION: Never use any chemical, steel wool, harsh abrasive cleaners, thinners, or chemical dust cloths to clean any part of your Rice Cooker + Sauté.WARNING: Do not allow water to enter the inside of the heating vessel as this may cause electrocution.
RECIPES
Spanish Rice250 grams of sausage (chorizo)1 medium onion1 tablespoon yellow pepper, ground1-teaspoon paprika2 cups tomatoes, diced, without skin or seeds1 cup green peas1 red pepper, diced2 celery stalks, sliced1 green pepper, diced2 cups long-grain rice3 cups chicken brothSalt and pepper
PreparationChop the onion. Turn on “ ![]() ” the sauté function of your Rice Cooker + Sauté and add the sausage cut in slices, the onion, the yellow pepper, paprika, and tomatoes. Mix together and sauté the ingredients. Turn off “
” the sauté function of your Rice Cooker + Sauté and add the sausage cut in slices, the onion, the yellow pepper, paprika, and tomatoes. Mix together and sauté the ingredients. Turn off “ ![]() ” the sauté function. Add the remaining vegetables, the rice, and the broth. Check seasoning, cover, and cook until done.Garnish with curly parsley. Serve hot.
” the sauté function. Add the remaining vegetables, the rice, and the broth. Check seasoning, cover, and cook until done.Garnish with curly parsley. Serve hot.
Fettuccini with Apple, Shrimp and Curry Sauce½ kg fettuccini4 tablespoons butter3 tablespoons flour1-teaspoon curry½ cup cream1 cup chicken broth2 cups apples, peeled and diced½ kg shrimpParmesan cheese to tasteJuice of one lemon (for the apples)
PreparationIn the Rice Cooker + Sauté, melt butter, add flour and curry. Cook for 2 minutes. Add cream, chicken broth, apples, and shrimp. Stir until thickened. Remove from heat andkeep hot. In the Rice Cooker + Sauté, pour sufficient water and salt to cook fettuccini al dente. Serve the fettuccini with the sauce and sprinkle with Parmesan cheese.
Rice with Shellfish1 package (16 ounces or 400 grams) saffron rice 12 small clams¼ lb (240 grams) shrimp, shelled and deveined, with or without tails¼ lb (250 grams) oysters 1 cup sweet peas¼ red pepper, diced
PreparationWash clams, shucking thoroughly, and rinse well. Cook rice in the Rice Cooker + Sauté, following the instructions on the package.Add clams, shrimp, oysters, sweet peas, and red pepper five minutes before the rice is fully cooked. Mix well, without stirring.Serve with French bread croutons and a fresh salad. Option: The saffron rice may be substituted with brown rice.
Milanese Minestrone½ kg chicken breast2 cloves garlic, chopped1-tablespoon basil½ cup celery½ cup fresh beans½ teaspoon thyme½ teaspoon oregano½ cup onions, sliced½ cup green pepper, chopped½ cup mushrooms, and sliced½ cup squash, diced2 cups tomatoes, diced,3 medium potatoes, peeled and dicedwithout skin or seeds½ kg fine noodles2 teaspoons of Worcestershire sauce1 cup Parmesan cheese3 tablespoons margarine2 quarts waterSalt
PreparationIn the Rice Cooker + Sauté, pour water and boil chicken with salt. When chicken is cooked, remove, and dice. Reserve the broth.Turn on “ ![]() ” the sauté function of your Rice Cooker + Sauté, melt butter, add garlic, onion, celery, green pepper, mushrooms, beans and squash. Sauté until soft. Add thetomatoes, then the potatoes and sauté. Turn off “
” the sauté function of your Rice Cooker + Sauté, melt butter, add garlic, onion, celery, green pepper, mushrooms, beans and squash. Sauté until soft. Add thetomatoes, then the potatoes and sauté. Turn off “ ![]() ” the sauté function. Add this mixture to the chicken broth; add Worcestershire sauce, the herbs bouquet (basil, thyme,oregano), salt, chicken and noodles. Cook 10 minutes until the potatoes are cooked, but firm. Add Parmesan cheese while stirring.Cook 2 minutes longer. Serve and sprinkle with more cheese.
” the sauté function. Add this mixture to the chicken broth; add Worcestershire sauce, the herbs bouquet (basil, thyme,oregano), salt, chicken and noodles. Cook 10 minutes until the potatoes are cooked, but firm. Add Parmesan cheese while stirring.Cook 2 minutes longer. Serve and sprinkle with more cheese.
Rice with Chicken4 cups rice1 onion3 green peppers2 carrots4 cloves garliccelery to taste4 chicken breasts3 tablespoons saltblack pepper to tasteoregano to tastechicken broth, 1 envelopetomato paste
PreparationCook the chicken in water, salt, black pepper, oregano, chicken broth in the Rice Cooker + Sauté. When done, shred the chicken in the water in which it was cooked and add green peppers, onion, garlic, celery, and carrots, everything well chopped. Cook 10 minutes, and add tomato paste and shredded chicken. After the sauce is cooked, add the uncooked, washed rice and cover the rice somewhat more than normal.
Rice and Tuna Salad2 cups cooked rice2 peppers in vinegar*1 can tuna100g green olives3 hard-boiled eggsMayonnaiseSalt and pepperLettuce leavesOlive oilVinegar
PreparationCook the rice in the Rice Cooker + Sauté in the traditional manner, remove and place it on a platter until it is completely cool. Dice the cooked peppers and slice the eggs. Shredthe tuna and add along with the remaining ingredients to the rice, reserving some of the egg slices and olives to garnish the salad. Season with olive oil, salt, pepper andvinegar. Serve the salad on a platter with lettuce leaves and garnish with hard-boiled egg and olives.
- Peppers in vinegar: wash and cut the peppers in two lengthwise. Remove the seeds and cook the peppers in a saucepan with two cups water and one-half cup vinegar with a pinch of salt. After 15 minutes, remove from heat.
Rice Pudding1 cup rice3 cups water1 cinnamon stick2 whole cloves1¾ cup evaporated milk1¼-cup condensed milk1 teaspoon grated lemon and orange peel½ cup dark raisins1-teaspoon vanilla¼ cup grape brandy1 egg yolkPowdered cinnamon
PreparationIn the Rice Cooker + Sauté, cook the pre-washed rice with 3 cups of water, cinnamon stick, and cloves. Once the rice is cooked, add evaporated and condensed milk, grated lemon and orange peel, and raisins.Continue stirring until set. Add vanilla, grape brandy, and the egg yolk beat. Sprinkle with cinnamon and serve.
Chinese Rice4 cups of cooked rice½ cup of snow peas½ cup of bean sprouts1 sliced onion1 scallion (green onion), minced1 red pepper, thinly sliced3 tablespoons of soy sauce1 tablespoon of shredded ginger2 tablespoons of sesame oil
PreparationTurn on “ ![]() ” the sauté function of your Rice Cooker + Sauté. Sauté the onion and red pepper. Add the ginger, the snow peas, and the bean sprouts. Then add the cooked riceand stir it until it is hot. Add the soy sauce and then the minced scallion. Turn off “
” the sauté function of your Rice Cooker + Sauté. Sauté the onion and red pepper. Add the ginger, the snow peas, and the bean sprouts. Then add the cooked riceand stir it until it is hot. Add the soy sauce and then the minced scallion. Turn off “![]() ” the sauté function. Serve hot.
” the sauté function. Serve hot.
Steaming Vegetables
For best results when steaming vegetables:
- Before steaming, thoroughly clean the vegetables. Cut off the stems and peel if desired.
- Cut pieces to the desired size. The smaller the piece the faster that it will cook.
- To retain vegetable flavor and nutrients steam until just tender, but they should still be slightly firm.
- Frozen vegetables should be defrosted before steaming.
| VEGETABLE | QUANTITY | MINIMUM WATER(1 metric cup = 250ml) | APPROXIMATECOOKING TIME(minutes) |
| Asparagus | 1 bunch (approx. 250g) | 1/2 | 6-8 |
| Beans | 250g cut or whole | 1/2 | 8-10 |
| Beetroot | 250g whole | 2 | 20-30 |
| Bok Choy | 250g | 1/2 | 6-8 |
| Broccoli | 350g | 1/2 | 10 |
| Brussel Sprouts | 250g | 1/2 | 10 |
| Butternut Pumpkin | 250g cut into 3cm pcs | 2 | 15-20 |
| Cabbage | 250g coarsely shredded | 1 | 12 |
| Carrots | 250g cut into 3cm pieces | 1 | 15-20 |
| Cauliflower | 250g | 1/2 | 10 |
| Corn on the cob | 500g whole cob | 1 | 20-25 |
| English Spinach | 250g trimmed | 1/2 | 5 |
| Snowpeas | 250g whole | 1/2 | 5-7 |
| Button squash | 250g whole | 1/2 | 8-12 |
| Peas | 250g shelled | 1/2 | 12-15 |
| Potatoes | |||
| 1. Chats | 500g whole | 1 1/2 | 20-24 |
| 2. Red or White | 600g – 800g whole | 2 1/2 | 30-36 |
| 3. Red or White | 500g 3cm pieces | 2 | 15-20 |
| 4. Sweet | 500g 3cm pieces | 1 | 12-17 |
| Zucchini | 250g sliced | 1/2 | 8 |
| FROZEN VEGETABLES | *Must be defrosted first. | 1 | 12-16 |
| Green beans, lima, broad beans, broccoli, Brussel sprouts, carrots, cauliflower, mixed vegetables, peas. |
Steaming Fish and Seafood
For best results when steaming fish and seafood:
- Place fish in the steamer tray.
- Add lemon wedges, herbs, spices, and seasoning before steaming.
- Add butter or oils after steaming if desired.
- Fish is cooked when it flakes easily with a fork.
| TYPE | QUANTITY | MINIMUM WATER(1 cup = 250ml) | APPROXIMATECOOKING TIME (minutes) | SUGGESTIONS |
| Clams and puppies | 500g | 1 1/2 | 5-8 | Steam until just open. |
| FISH
1. fillet 2. steak |
500g
500g – 2cm thick |
1 1/2
1 1/2 |
12
12-18
|
Before cooking brush
lightly with oil & season. |
| Mussels | 500g in the shell | 1 1/2 | 8-12 | Steam until just open. |
| Prawns (green) | 500g medium in shell | 1 1/2 | 12 | Steam until just pink. |
Steaming Poultry
For best results when steaming poultry:
- Select pieces of a similar size for even cooking.
- Cook meat on a single layer.
- Remove all fat and skin.
- If you desire color. Brown the pieces well in a non-stick frypan before steaming.
- Steam until well done. Check by piercing the thickest part of the poultry. If the juices run clear it is cooked through.
- Cooking will vary depending on the size of the pieces.
| TYPE | QUANTITY | MINIMUM WATER(1 cup = 250ml) | APPROXIMATECOOKINGTIME (minutes) | SUGGESTIONS |
| Breast fillet | 500g | 2 | 12-14 | Place the thickest part towards the outside of the basket. Brush with oil and season first. |
| Pieces – bone in | 500g (approx. 4) | 2 | 15-25 | Place the thickest part towards the outside of the basket. Brush with oil and season first. |

This Sunbeam product is covered by a 12-month replacement or repair warranty, which is in addition to your rights under the Australian Consumer Law (if your product was purchased in Australia) or New Zealand Consumer Guarantees Act (if your product was purchased in New Zealand).
Should you experience any difficulties with your product during the warranty period. please contact our customer service line for advice on 1300 881 861 in Australia or 0800 786 232 in New Zealand.
Australiawww.sunbeam.com.au1300 881 861Suite 1, Level 1,13 Lord Street,Botany NSW 2019 Australia
New Zealandwww.sunbeam.com.nz0800 786 232Unit 3, Building D,26 Vestey Drive, Mt Wellington AucklandNew Zealand
report this adUpon receipt of your claim, Sunbeam will seek to resolve your difficulties or, if the product is defective, advise you on how to obtain a replacement or refund.
To assist us in managing warranty claims, we recommend you register your product as soon as practicable after purchase by creating a MySunbeam account on our website and uploading a copy of your original receipt.
In order to make a claim under our warranty, you must have the original proof of purchase documentation for the product and present it when requested (if not already uploaded to our website.
Should your product develop any defect within 12 months of purchase because of faulty materials or workmanship, we will replace or repair it, at our discretion, free of charge. A product presented for repair may be replaced by a refurbished product of the same type rather than being repaired. Refurbished parts may be used to repair the product.
(including damage caused by failing to use the product in accordance with this instruction booklet), accidental damage, or normal wear and tear. Our replacement or repair warranty only applies where a defect arises as a result of faulty material or workmanship during the warranty period. Your warranty does not cover misuse or negligent handlingYour warranty does not:
- cover freight or any other costs incurred in making a claim, consumable items, accessories that by their nature and limited lifespan require periodic renewal (such as filters and seals) or any consequential loss or damage; or
- cover damage caused by:– power surges, power dips, voltage supply problems, or use of the product on incorrect voltage;– servicing or modification of the product other than by Sunbeam or an authorized Sunbeam service center;– use of the product with other accessories, attachments, product supplies, parts or devices that do not conform to Sunbeam specifications; or– exposure of the product to abnormally corrosive conditions; or
- extend beyond 3 months if the product is used in commercial, industrial, educational or rental applications.The benefits given to you by our warranty are in addition to other rights and remedies under a law in relation to the product.
In Australia, our goods come with guarantees that cannot be excluded under the Australian Consumer Law. You are entitled to a replacement or refund for a major failure and for compensation for any other foreseeable loss or damage. You are also entitled to have the goods repaired or replaced if the goods fail to be of acceptable quality and the failure does not amount to a major failure.
Our goods also come with guarantees that cannot be excluded under the New Zealand Consumer Guarantees Act.You will also be responsible for all freight and other costs. If your warranty claim is not accepted, we will inform you and if requested to do so by you, repair the product provided you pay the usual charges for such repair.
Should your product require repair or service after the warranty period, contact your nearest Sunbeam service center. For a complete list of Sunbeam’s service centers, visit our website or call our customer service line for advice on 1300 881 861 in Australia, or 0800 786 232 in New Zealand.
Need help with your appliance?Contact our customer service team or visit our website for information and tips on getting the most from your appliance.Australiavisit www.sunbeam.com.auphone;1300 881 861mail;Suite 1, Level 1,13 Lord Street,Botany NSW 2019AustraliaNew Zealand | visit www.sunbeam.co.nzphone; 0800 786 232mail; Level 6, Building 5, CentralPark, 660–670 Great SouthRoad, Greenlane, Auckland.
Newell Australia Pty Ltd | ABN 68 075 071 233Sunbeam is a registered trademark.Made in China to Sunbeam’s specification.Due to minor changes in design or otherwise,the product you buy may differ slightly from the one shown here.Approved by the appropriate electrical regulatory authorities.©Copyright Sunbeam 2020.03/20RCP4000SV_20EM1 (ANZ)GCDS-SUN1072472-JC3941-IB
RCP4000SV_20EM1 (ANZ).indd 144/1/20 11:26
References
[xyz-ips snippet=”download-snippet”]