
![]() OPERATION INSTRUCTIONS FOR THE FLUSH FIT REGISTER BOOSTER™READ AND SAVE THESE INSTRUCTIONSMODEL: HC500
OPERATION INSTRUCTIONS FOR THE FLUSH FIT REGISTER BOOSTER™READ AND SAVE THESE INSTRUCTIONSMODEL: HC500
IMPORTANT NOTICEWith the use of any electrical appliance, it is important to observe all basic precautions to minimize the risk associated with use, such as electrical shock, fire, or injury to persons. Read these instructions before using your Flush Fit Register Booster™NEVER EXPOSE YOUR FLUSH FIT REGISTER BOOSTER™ TO TEMPERATURES OVER 140°F (60°C)IMPORTANT WARNINGS
- The Flush Fit Register Booster™ will be as warm as the air that is delivered from the register of your forced air furnace and/or cooling system. The maximum temperature for the register is 140° Fahrenheit or 60° Centigrade. Your Flush Fit Register Booster™ should never be exposed to higher temperatures or temperatures below freezing.
- Do not in any way block the air grilles of the Flush Fit Register Booster™. Pressure on the bottom or top grilles of the Flush Fit Register Booster™ may cause the fan impeller to contact these grilles and damage the unit.
- Unplug the Flush Fit Register Booster™ when not in use. Turn the unit off before unplugging.
- Do not operate the Flush Fit Register Booster™ with a damaged plug or cord, if the unit malfunctions, becomes noisy when operating, has been dropped or otherwise damaged, or if the housing is damaged or broken.Discard or return the unit for inspection, replacement, or repair.
- Do not run cord under carpeting. Do not cover the cord with throw rugs, runners, or similar coverings. Do not route the cord under furniture or appliances.Arrange cord away from traffic area and where it will not be tripped over.
- The Flush Fit Register Booster™ should never be exposed to moisture. Do not use the unit in an open window, bathroom, or laundry area where it may come in contact with water.
- The Flush Fit Register Booster™ is designed for indoor use only.
- Never insert any object or allow any object to enter the Flush Fit Register Booster™ through the bottom or top grilles, as this may damage the unit or cause it to malfunction.
- Do not use the Flush Fit Register Booster™ near flammables such as gasoline, paint, or natural gas.
- The Flush Fit Register Booster™ is intended for use as described in the instructions only. Other use may cause fire, electrical shock, damage to the unit, or injury to persons and will void any warranty by the manufacturer.
- Do not use strong detergents or flammable liquids to clean the Flush Fit Register Booster™.
- The housing of your Flush Fit Register Booster™ is sealed at the factory. THERE ARE NO SERVICEABLE PARTS INSIDE. Attempting to open the housing will expose you to dangerous electricity, may cause fire, and will void any and all warranty.
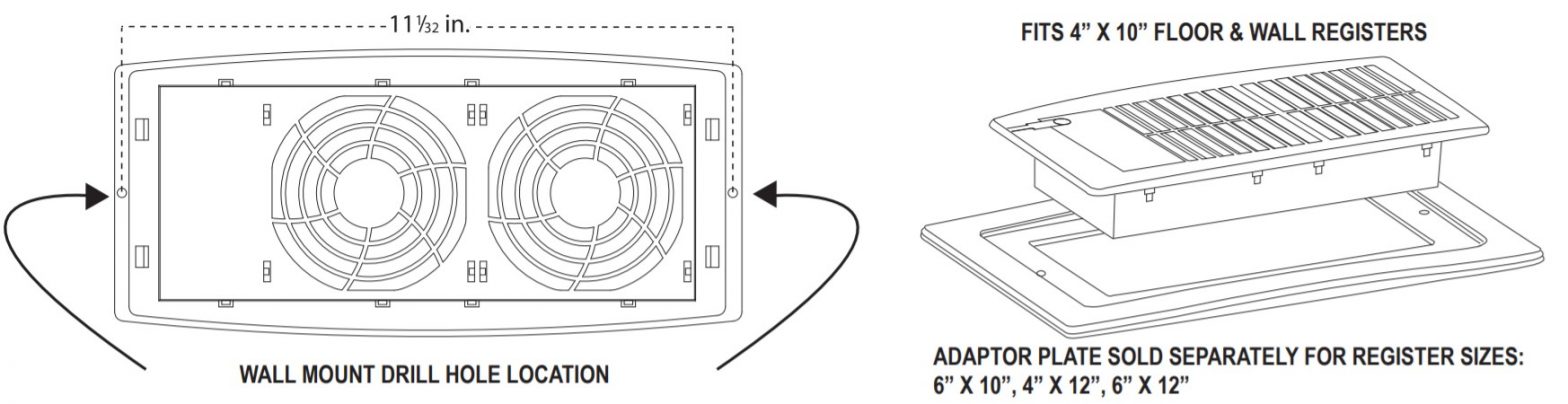
INSTALLATIONDO NOT INSTALL IN CEILING.(4” X 10”) WALL REGISTER APPLICATIONS
- Drill (two) holes with a 3/16” drill bit from the bottom side of the Flush Fit Register Booster™ grille. The holes should be drilled in the pre-molded location as pictured below.
- Secure the Flush Fit Register Booster™ in place.
GENERAL SETUP
- Prior to applying power place or mount over the register
- Allow the unit to acclimate to room temperature focal at least one hot
OPERATION SETTINGS
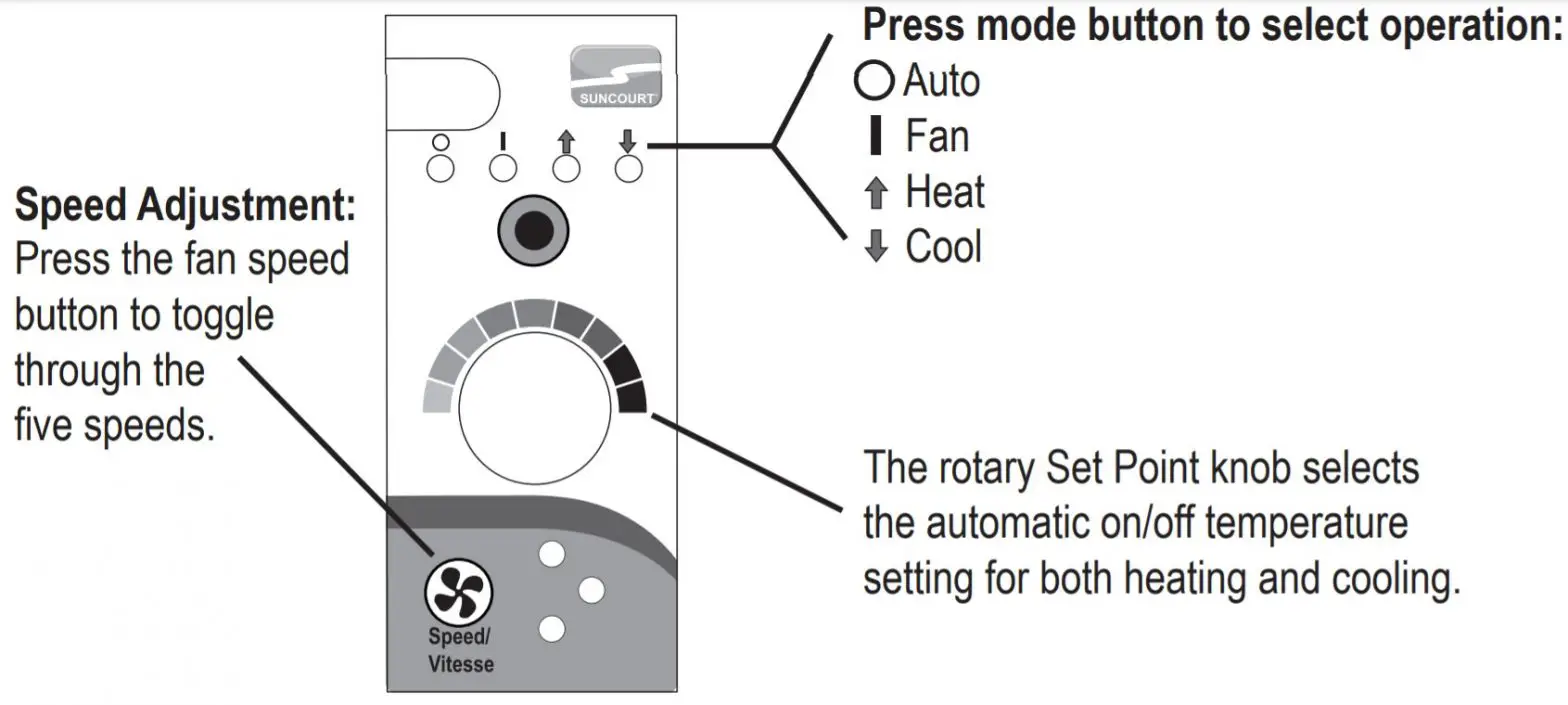
AUTO MODE SETUPWhen the orange Auto mode indicator light is lit, the Flush Fit Register Booster”‘ will automatically turn the booster fan on when either the warm air from the furnace or the cool air from the air conditioner is detected. It will automatically sense the end of the conditioned air cycle, which can often be before the central blower stops. This mode requires no seasonal adjustments.
- Follow the general setup procedures above.
- Apply power and ensure the orange auto mode indicator light is lit.

- The booster fan will turn on within a few minutes of the third or fourth cycle.
- Allow 24 hours for optimal on/off operation. The unit will continue to monitor conditions/operation in an attempt to further optimize the booster fan performance. Leave the unit plugged in for a full 24 hours. If removed from the power source the learned information will be lost and the unit will reset. The fan may miss a cycle or turn on outside of a cycle but will continue to self-correct.

FAN MODE SETUPWhen the green Fan mode indicator light is lit, the Flush Fit Register Booster”‘ will run the fan continuously regardless of the temperature conditions. This mode is appropriate for general ventilation applications as well as forced air applications in which the air handler’s blower is always running. Auto, Heat and Cool modes often don’t perform well under these circumstances.
- Follow the general setup procedures above.
- Apply power to the unit and press the mode button to select Fan Mode.

HEAT MODE SETUPWhen the red Heat mode indicator light is lit, the Flush Fit Register Booster\’” will automatically turn the booster fan on when the warm air from the supply register rises above the temperature setpoint. It will turn off once the temperature falls below the setpoint. This mode is recommended for the ‘heating’ season if Auto Mode is not appropriate for your application.
- Follow the general setup procedures above.
- Apply power to the unit and press the mode button to select Heat
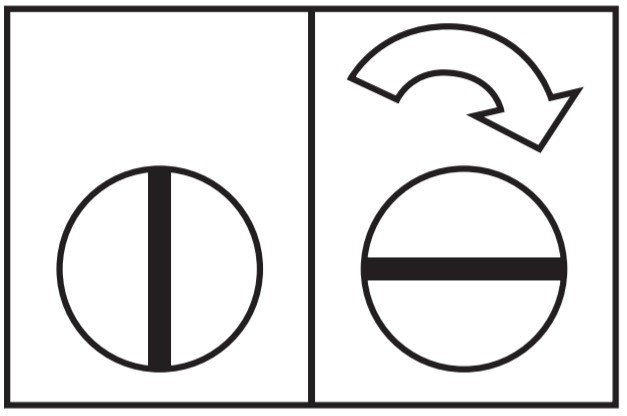
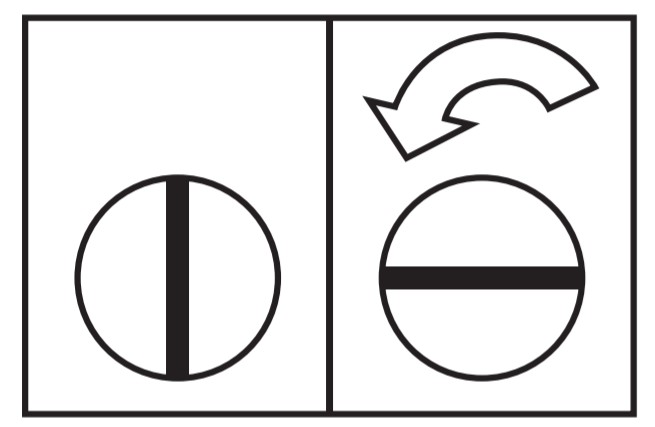
- Start with the adjustment knob fully clockwise.
- After the start of the fu nace cycle, allow approximately 45 seconds of central blower operation to occur before proceeding to the next step.
- Slowly turn the knob counter-clockwise until the booster fan turns on.
- Once the next forced air cycle starts, observe the Flush Fit Register Booster’ to ensure that the fan is turning on and off with the cycle in the way you want.

HEAT MODE TROUBLESHOOTING
- The booster fan does not start soon enough or at all.Slowly move the adjustment knob counter-clockwise to choose a lower setpoint. Observe the next furnace cycle to confirm your adjustments have been satisfactory. Repeat as necessary.
- The booster fan runs more than 5 minutes after the furnace cycle has ended.Slowly move the adjustment knob clockwise to choose a higher setpoint. Observe the next furnace cycle to confirm your adjustments have been satisfactory.Repeat as necessary.
COOL MODE SETUPWhen the blue Cool mode indicator light is lit, the Flush Fit Register Booster’ will automatically turn the booster fan on when the cool air from the supply register falls below the temperature setpoint. It will turn off once the temperature rises above the setpoint. This mode is recommended for the ‘cooling’ season if Auto Mode is not appropriate for your application.
- Follow the general setup procedures above.
- Apply power to the unit and press the mode button to select
- Start with the adjustment knob fully counter-clockwise.
- After the start of the air conditioning cycle, allow approximately 45 seconds of central blower operation before proceeding to the next step.
- Slowly turn the knob clockwise until the booster fan turns on.
- Once the next forced-air system starts, observe the Flush Fit Register Booster” ensure that the fan is turning on and off with the cycle in the way you want.

COOL MODE TROUBLESHOOTING
- The booster fan does not start soon enough or at all.Slowly move the adjustment knob clockwise to choose a higher setpoint. Observe the next NC cycle to confirm your adjustments have been satisfactory.Repeat as necessary.
- The booster fan runs more than 7 minutes after the air conditioning cycle has ended.Slowly move the adjustment knob counter-clockwise to choose a lower setpoint. Observe the next NC cycle to confirm your adjustments have been satisfactory. Repeat as necessary.
GENERAL NOTES:
- In heating and cooling modes, repeatedly pressing the mode button to leave the current mode and return to it will effectively “reset” the logic.
- The Flush Fit Register Booster™ is suitable for applications involving timers, switched outlets, or other devices that regulate the power to the unit. Both mode and fan speed selections will be maintained upon power loss.
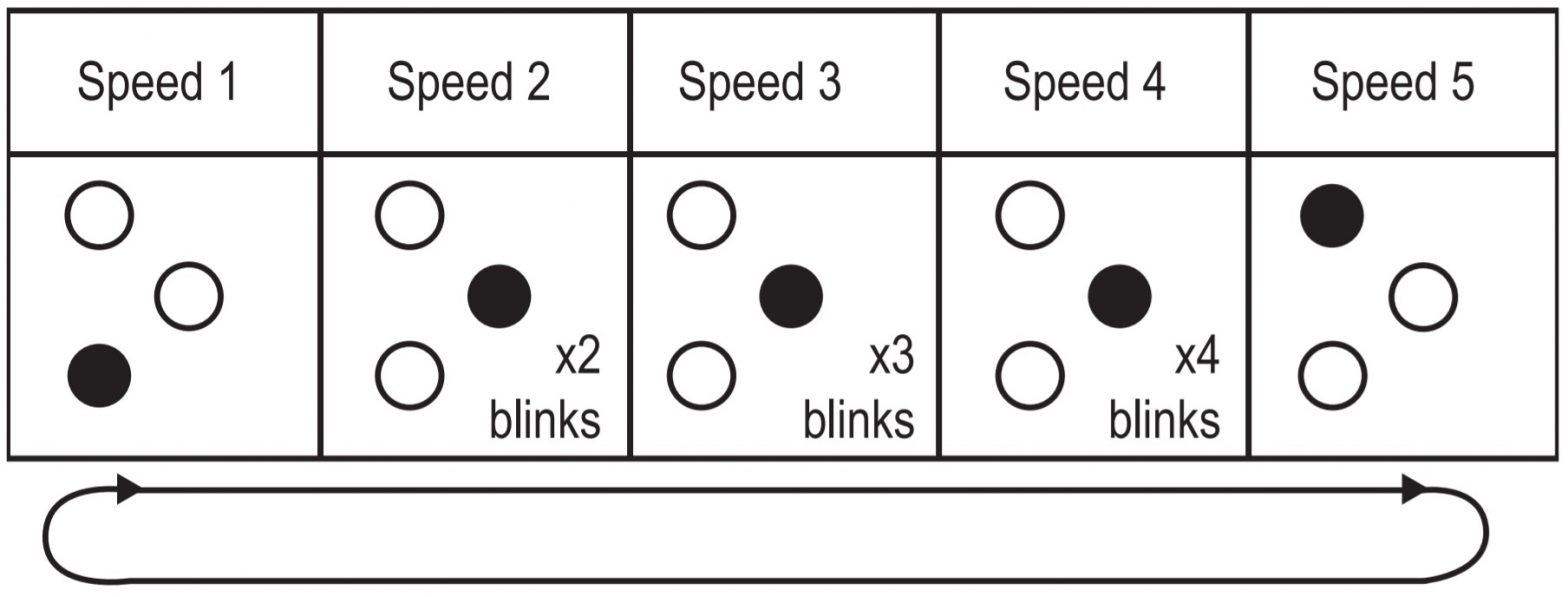
GENERAL NOTES ABOUT FAN SPEEDS
- There are 5 fan speed settings that are incremented by momentarily pressing the speed button. Fan speed is displayed temporarily.
- Adjusting the fan speed, like all air-moving equipment, involves a trade-off between noise and performance.a)A speed that is too low will be quieter, but may not deliver adequate airflow.b)A speed that is too high will be louder and may ‘over condition the space by drawing too much air from the branch duct.
CLEANING AND MAINTENANCE
Before cleaning the Flush Fit Register Booster disconnect the power cord from the outlet. Dust may be removed from the exterior surfaces using a soft cloth, the round brush attachment of your vacuum cleaner, or a cloth that has been lightly moistened with water and a mild, non-abrasive detergent. Dust accumulation in the interior of the unit may be removed by using the small round brush attachment of your vacuum cleaner. Accumulation of dust in the interior will be minimized by regular replacement of your furnace filter as recommended by the manufacturer.
ONE YEAR LIMITED WARRANTY
Subject to the following limitations, Suncourt Inc. (manufacturer) warrants that the Flush Fit Register Booster will, for 1 (one) year from date of original retail purchase, but not exceeding 2 (two) years from the date of manufacture, remain free from the appearance of defects in workmanship or materials. This warranty is subject to the following limitations: (a) manufacturer’s liability is limited to the replacement or repair of the unit, as decided by the manufacturer; (b) a defective unit must be returned, prepaid, with proof of purchase, well packaged to avoid damage in transit; and (c) this warranty does not apply to defects resulting from the alteration, abuse, accidental damage, unauthorized repair, or misuse of the unit. This warranty is given in lieu of all other warranties, guarantees, and conditions on the manufacturer’s part, and the manufacturer shall have no tortious or other liability in respect to this Flush Fit Register Booster. Ship unit to Suncourt Inc. only after obtaining a Return Goods Authorization (RGA) number. Returns without this RGA number will not be accepted. Actual product appearance may differ from illustrations. Suncourt reserves the right to modify any or all of its products’ features, designs, components, and specifications without notice.
![]() SUNCOURT INC.P.O. Box 40Durant, IA 52747-0040 1.800.999.FANS (3267) www.suncourt.comWNT500-1120-A04 PRINTED IN USA
SUNCOURT INC.P.O. Box 40Durant, IA 52747-0040 1.800.999.FANS (3267) www.suncourt.comWNT500-1120-A04 PRINTED IN USA
References
[xyz-ips snippet=”download-snippet”]