Sunflow Digital Controller User Manual

Basic concepts
- Your heater will only use electricity if the target temperature is higher than the actual temperature.
- As the target is reached, the heater will power down, trickle-charging as required to keep you warm.
- You can set targets in various ways:
- manually, by using the UP and DOWN buttons on the right of the controller on the main screen;
- automatically, using Prog mode to set different targets for certain times;
- or by various overrides (Holiday, Boost, Set-back and Advance modes).
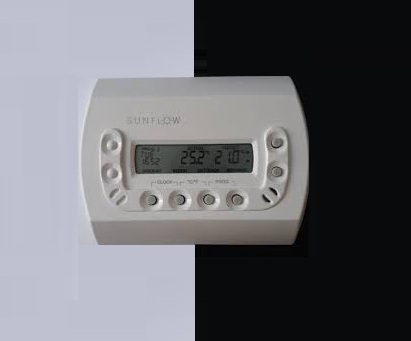
Overview of the CZC1 controller (full instructions inside)
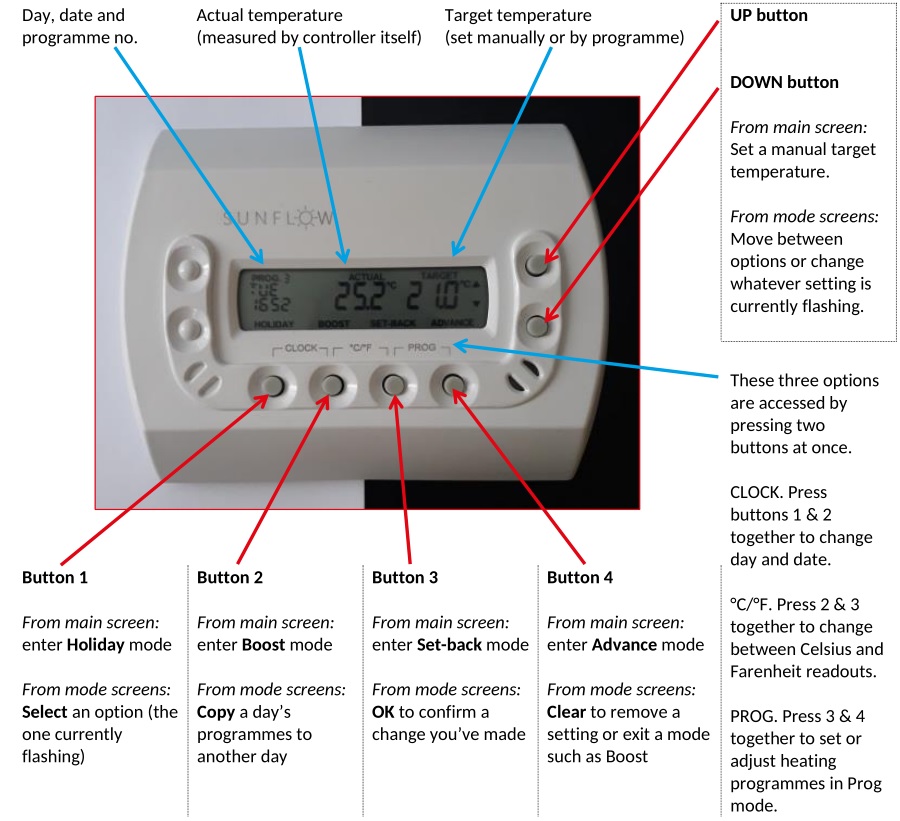
TIP: If the bottom line of the display says “Holiday, Boost, Set-back, Advance” you know you’re on the main screen.
Programmes explained
Unless your fitting team changed them for you, your controller starts with the following programmes:

What this means is you will have heating on weekdays between 6.30 and 8.30am, and between 4.30 and 11pm. Weekends are slightly different – you will have heating all day, between 8am and 11pm.
During those times, the heater will come on if the actual room temperature is below the target of 21°C. Once the actual temperature is equal to the target one, the heater will work intermittently as required to keep it there. (See the section “The controller and the radiator” if you are interested how this works.)
At times when the target temperature is 4°C, the heater is effectively “off” as it will only come on if the room is below this extremely low target. This can be considered a ‘frost protection’ setting.
Thinking about your own programmes
Control is the key to successful and effective home heating. Sunflow Invincible heaters are highly controllable. If you heat rooms as and when you need to, you should improve your comfort level and avoid wasting energy on un-needed heating.
Have a think about when and why you need each area heated. This will help you choose useful programmes.
- For a bedroom you may only want heat for an hour or two in the morning, and another hour or two in the evening. These times can be different for different members of the household.
- For a bathroom you may also want morning and evening heat, but rather than going “off” (4°C target) in between these times, you could set a target of 16°C to ensure it never got seriously cold.
- For a hallway you could turn the 21°C settings down to 18°C.
It is well worth spending some time thinking about how best to set these up. You can always override a programme if you need heating at short notice, but setting programmes means you don’t have to remember to change settings by hand several times a day.
TIP: Sunflow heaters produce a lot of radiant heat so you may find you can use a lower temperature than you are used to, and still feel warm (say 19/ 20°C if you are used to 21°C).
If you get stuck
The following pages will help you set programmes, and also explain manual control and overrides. If you get stuck you can call the office on (01793) 854371 and ask for help.
Prog mode – changing the programmes
Make sure you are on the main screen, not a mode screen. The menu at the bottom of the screen, indicating what buttons 1 to 4 do, should read “Holiday, Boost, Set-Back, Advance”.
- Enter Prog mode by pressing buttons 3 & 4 together.The screen will change. The new button 1-4 menu will be “Select, Copy day, OK, Clear”. The programme day and programme number will be flashing, as shown here.

- Press UP or DOWN until the flashing section reads Mon 1 (this is the first programme on Monday).
- Press Select. The time will flash.
- Press UP or DOWN until the time changes to the one you want.
- Press Select. The target temperature will flash.
- Press UP or DOWN until the temperature changes to the one you want.
- You can now carry on changing programmes, copy a complete set to another day, or finish:To change another programme, press Select. The day/prog number will flash, use UP and DOWN to pick the next programme number (e.g. Mon 2) then return to step 3.To copy these programmes to other days of the week, press Copy day. The target day will flash, use UP and DOWN to change day, Copy day again to confirm, and Clear to return to Prog mode.To finish changing programmes, press OK to exit Prog mode and return to the main screen.

Prog mode – notes
- A completely blank programme (time and target both show —-) can’t be changed with UP and DOWN – you need to first press Clear, which toggles between a blank and an editable programme. You can toggle editable programmes to blank ones if you don’t need all six per day.
- Programmes must be in time order – you can’t set programme 1 to happen after programme 2. If in doubt, Clear the programme following the one you are trying to adjust, then try again.
- If you don’t press any buttons for about a minute, the controller will exit Prog mode and return you to the main screen.
Prog mode – summary
Select moves between programme settings so you can change them. The current selection flashes.UP and DOWN buttons increase or decrease whatever value you currently have selected.OK tells the controller you are done making changes, and returns you to the main screen.
Copy day takes the six programmes from that day and pastes them into another day. This includes blanks.
Clear turns an existing programme into a blank programme (also used to leave Copy day mode).
Manual control, temporary
Simply press UP or DOWN to set a new target temperature. Your controller/heater will ignore the target temperature from the currently active programme, and use your own setting instead.
You can change this target temperature at any time by using UP and DOWN again.
Your heater will switch back to normal when the next timed programme starts – or you can press Clear at any time.
Manual control, 24/7
If you wish, you can run the heater entirely on manual control by clearing every programme from every day. Then when you set your own target temperature as above, it will stay at that setting until you change it or cancel it.
- Enter Prog mode by pressing buttons 3 & 4 together.The screen will change. The new button 1-4 menu will be “Select, Copy day, OK, Clear”. The programme day and programme number will be flashing, as shown here.
- Press UP or DOWN until the flashing section reads Mon 1 (this is the first programme on Monday).
- Press Clear.The day/prog number remain, but the time and temperature will be replaced with rows of dashes.
- Press UP to move to the next programme.
- Repeat steps 3) and 4) until all six Monday programmes are clear.
- Press Copy day. The target day will flash, press Copy day again to copy Monday’s blank programmes to Tuesday.
- Press UP to move to the next day.
- Repeat steps 6) and 7) until you have copied Monday’s blank programmes to every other day – you will know you’ve done this when the flashing target day is back to being Tuesday.
- Press Clear to return to Prog mode, and press Clear again to return to the main screen.
Now, when you set a manual temperature, the heater will hold it there.
TIP: This makes the heater very easy to operate, but don’t forget to turn heaters down when you’re done using them or you will waste energy.
Override 1: Holiday mode
From the main screen, press Holiday. Then use UP and DOWN to pick your holiday temperature which will be maintained 24 hours a day, 7 days per week. You can choose blank (so no heating at all) or a temperature between 4°C and 12°C.
TIP: Use this when you are away from the property on holiday, to look after the building – or during the summer with a blank setting, if you want to ensure the heating won’t come on at all.
Override 2: Boost mode
From the main screen, press Boost. Then use UP and DOWN to pick your temporary temperature, which will be used for fifteen minutes.
Press Boost again to add more time. Each press adds another fifteen minutes, to a maximum of four hours.
Boost mode is not affected by the timed programmes. Any new instructions from timed programmes will only start after the boost finishes.
Press Clear to end the boost early and return to the main screen.
TIP: Use this when you want a short burst of heating. It doesn’t alter the programmes and you don’t have to remember to turn the heating off again.
Override 3: Set-back mode
From the main screen, press Set-back. Your heater will continue to follow your timed programme, but reduced by 5°C. This is intended as an “economy mode”.
Set-back mode follows the same timings as the programmes, but reduces the target temperatures.
Press Clear to end this and return to the main screen.
TIP: Use this when you want the turn the heaters down while still maintaining a programme.
Override 4: Advance mode
From the main screen, press Advance. Your heater will skip ahead to the next entry in your timed programme.
The heater/controller will now bring the room to the target temperature earlier than scheduled. The controller will stay in this mode until the ‘natural’ start time of the next programme, the timed programme will then take over, ending at whatever time it normally ends.
Press Clear to end this early and return to the main screen.
TIP: Use this when you are leaving the house earlier than expected, or going to bed earlier than expected, and don’t want to heat rooms unnecessarily.
The controller and the radiator
There is an LED on the side of your Sunflow Invincible heater.
If the light on the side of the heater is red, it is using electricity.
If the light on the side of the heater is amber, the room is close to target temperature and the powerdown feature is active (see below) – using electricity, but less than on red.
If the light on the side of the heater is green, no power is being drawn – any heat you feel is stored in the heater.
The light blinks once per minute; this is normal and represents the heater and controller checking the connection. The controller briefly displays ![]() when signaling the heater.
when signaling the heater.
When powerdown is active, this is reflected on the controller screen as well as the amber LED light – whether the heater is working at 25%, 50%, 75% or 100% of its full kilowatt rating is indicated thus:

When the light on the radiator is green, no power is being drawn by the heater. Any warmth you feel is from heat stored in the kiln clay, keeping consistent radiant heat with only occasional topping up.
Pairing the heater
More details can be found in the Installation Guide.
- Switch the radiator off at the mains. Turn it on again for three seconds. Turn it off again.
- Turn the radiator on at the mains, it will now be in learning mode. The LED will blink green.
- Press the button on the back of the controller within thirty seconds of completing step 2).
- The controller will now pair with the heater and the LED will stop blinking.
Setting time and day
More details can be found in the Installation Guide.
- Enter Clock mode by pressing buttons 1 & 2 together.
- Press Select until the day flashes. Then use UP and DOWN to pick the current day.
- Press Select. Press UP and DOWN to choose between 12-hour or 24-hour clock.
- Press Select. Press UP and DOWN to set the hours to the correct figure.
- Press Select. Press UP and DOWN to set the minutes to the correct figure.
- Press OK to save your changes and return to the main screen.
Factory reset
Erases all your timed programmes and restores the factory-set ones at the top of page two.
- Enter Prog mode by pressing buttons 3 & 4 together.
- Press Copy day
- Press UP and DOWN at the same time.
- Press OK within five seconds to perform a factory reset. This will only take a second or two. Controller returns to main screen.
Sunflow Digital Controller User Manual – Sunflow Digital Controller User Manual –
[xyz-ips snippet=”download-snippet”]