
![]()
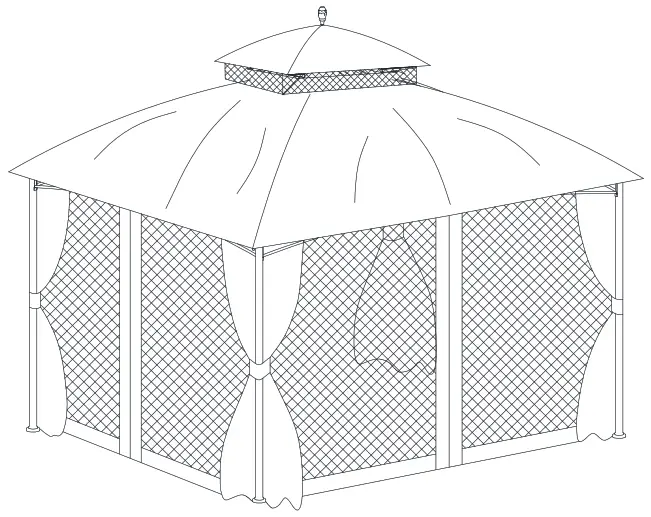
I ITEM NO.: A101012202
WE HAVE YOU IN MIND, LET US SERVE YOU!Questions? Issues? CONTACT US 24 hours / 7 (Joys o week pyrnrtorar) www.sunjoyonline.com[email protected]Tall rn 14866)-5784569Country of Origin: CiliaP eduction Number: xxxxxxxxxx
Safety Information
- More than two people are required for this assembly.
- Some parts may contain sharp edges. Wear protective gloves.
- When assembling and using this product, basic safety precautions should always be followed to reduce the risk of personal injury and damage to equipment- Please read all instructions before assembly and usage.
WARNING: Keep all flame and heat sources away from this gazebo fabric. This Gazebo is made with fabric that meets CPAI-84 specifications for flame resistance. It is not fireproof. The fabric will burn if left in continuous contact with any flame source. The application of any foreign substance to the gazebo fabric may render the flame-resistant properties ineffective.
 NOTICE: For outdoor use only.
 DANGER: This unit is heavy! Do not assemble this item alone. WARNING: While this gazebo is manufactured to withstand winds through only the supplied ground stakes, in areas subject to frequent severe weather, securing the gazebo to a deck, concrete patio, or footings should be considered. Snow must be cleared off regularly during snowy days. Remove the snow at the top when it is thicker than 4 inches. In order to avoid damage, use a plastic snow rake to remove excess snow and ice buildup from the roof and keep away from falling debris.
 CAUTION: Do not climb on top of the gazebo. Falling off the gazebo can result in serious injury, possibly even death.
Warranty6 MONTHS WARRANTYWHAT IS COVEREDThis limited warranty is extended to the original purchaser and applies to defects in materials and workmanship of your item provided the item is maintained with care and used only for personal, residential purposes. The item is warranted to be free from defects in material or workmanship for a period of 1 year.WHAT IS NOT COVEREDWe do not reimburse for transportation of delivery costs or compensate the individual or any outside party for assembling or disassembling the product.
Pre-Assembly
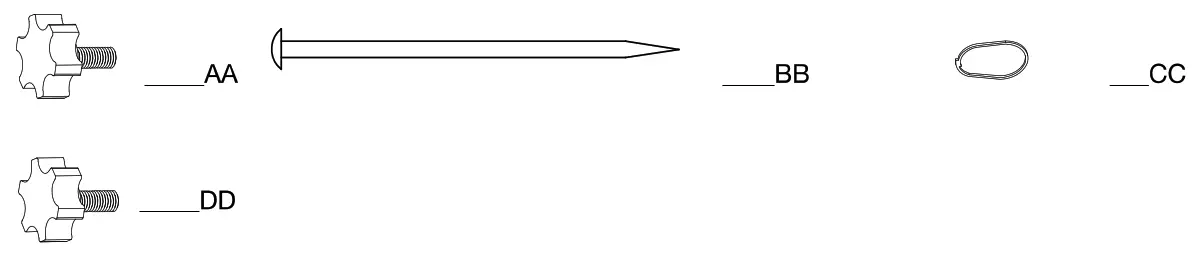
PLANNING ASSEMBLYBefore beginning the assembly of this product, make sure all parts are present. Compare parts with the Hardware Included and Package Contents lists. If any part is missing or damaged, do not attempt to assemble the product. Contact customer service for replacement parts.HARDWARE INCLUDED
![]() NOTE: Hardware not shown to actual size.
NOTE: Hardware not shown to actual size.
|
Part |
Part Number | Description |
Quantity |
| AA | P005100262 | M6 X 20 Screw | 24 |
| BB | H070010019 | 0 6 X 200 Stake | 8 |
| CC | 8079990135 | Plastic Ring | 104 |
| DD | P005100263 | M5 X 15 Screw | 16 |
ADDITIONAL HARDWARE
| Part | Part Number | Description |
Quantity |
| AA | P005100262 | M6 X 20 Screw | 2 |
| CC | 8079990135 | Plastic Ring | 1 |
| DD | P005100263 | M5 X 15 Screw | 1 |
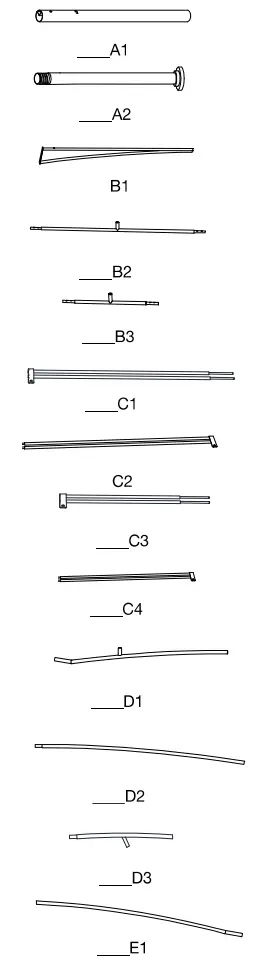
PACKAGE CONTENTS
 |
 |
|
Part |
Part Number | Description |
Quantity |
| Al | P000200461 | Post 1 | 4 |
| A2 | P000200460 | Post 2 | 4 |
| 81 | P006300077 | Cross panel | 8 |
| 82 | P000400897 | Long cross beam | 2 |
| 83 | P000400898 | Short cross beam | 2 |
| C1 | P005700661 | Long mosquito netting bar 1 | 4 |
| C2 | P005700662 | Long mosquito netting bar 2 | 4 |
| C3 | P005700663 | Short mosquito netting bar 1 | 4 |
| C4 | P005700664 | Short mosquito netting bar 2 | 4 |
| DI | P000601344 | Upper oblique tube | 4 |
| D2 | P000601345 | Middle oblique tube | 4 |
| D3 | P000601343 | Bottom oblique tube | 4 |
| El | P000601346 | Upper long middle tube | 2 |
| E2 | P000601347 | Bottom long middle tube | 2 |
| F1 | P000601348 | Upper short middle tube | 2 |
| F2 | P000601349 | Bottom short middle tube | 2 |
| G | P000501178 | Big roof connector | 1 |
| H | P000501177 | Small roof connector | 1 |
| l | P000601350 | Small roof oblique tube | 4 |
| J | P005600300 | Top Decoration | 1 |
| K | P005800001 | Hook | 1 |
| L | P001100555 | Small Canopy | 1 |
| M | P001100556 | Big Canopy | 1 |
| N | P001200216 | Mosquito Netting | 1 |
| 0 | P001300106 | Private Curtain | 1 |
ASSEMBLY
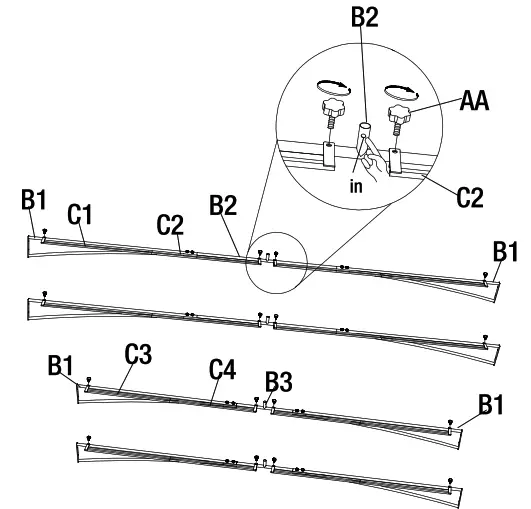
- Assembling the Cross Panels❑ Connect 2 sets of Cross Panels (B1) with the long cross beams (B2) using screws (DD).
 NOTE: To avoid destroying the finish, do not put the parts on the ground directly.
 - Assembling the Cross Panels❑ Connect another 2 sets of Cross Panels (B1) with the short cross beam (B3) using screws (DD). NOTE: To avoid destroying the finish, do not put the parts on the ground directly.
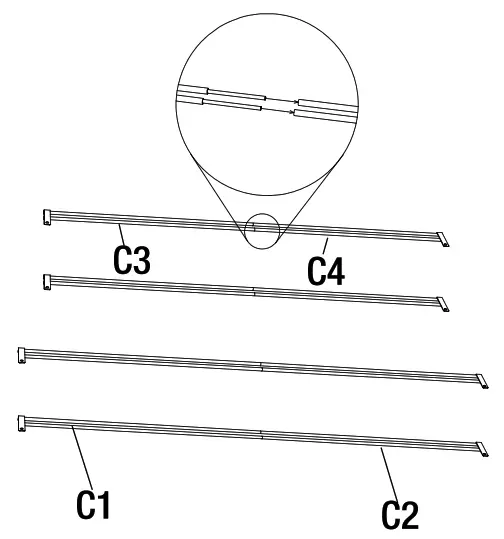
- Assembling Mosquito Netting Bars❑ Connect the Long mosquito netting bar 1 (C1) with Long mosquito netting bar 2 (C2). Connect the Short mosquito netting bar 1 (C3) with Short mosquito netting bar 2 (C4). NOTE: To avoid destroying the finish, do not put the parts on the ground directly.
- Attaching the Mosquito Netting Bars❑ Attach the assembled Long Mosquito Bars (C1&C2) to the Cross Beam (B1) using bolts (AA). Attach the Short Mosquito Bar (C304) in the same way. NOTE: To avoid destroying the finish, do not put the parts on the ground directly.
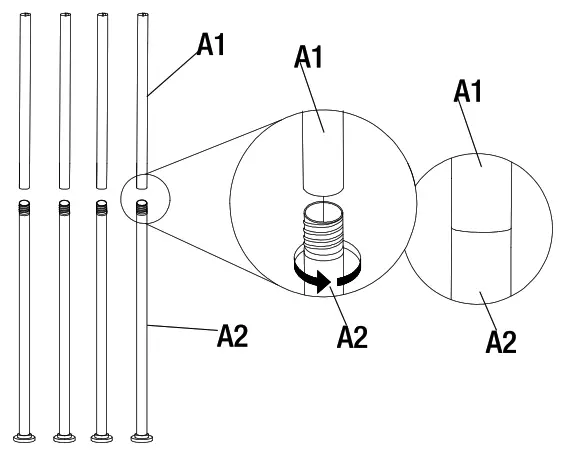
- Assemble the Post 1 and Post 2❑ Screw the Post 2 (A2) on Post 1 (Al). NOTE: To avoid destroying the finish, do not put the parts on the ground directly.
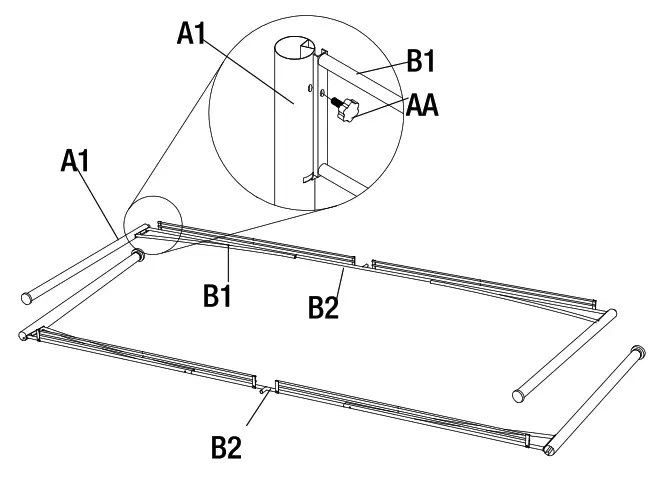
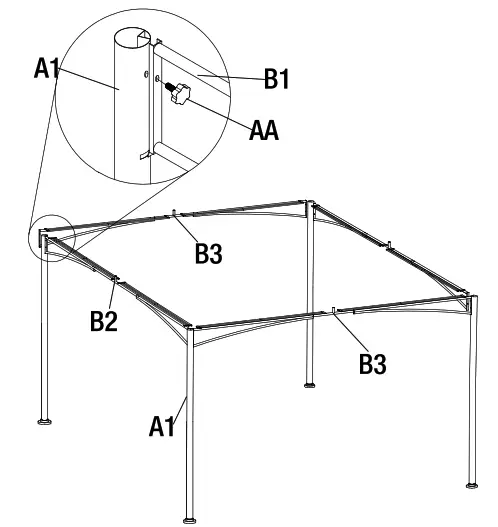
- Attaching the Crossbeams❑ Attach the Post I (A1) to the assembled Cross Beams (BI&B1) using bolts (AA).NOTE: To avoid destroying the finish, do not put the parts on the ground directly.
- Attaching the Crossbeams❑ Attach the Post 1 (A1) to the assembled Cross Beams (Bl&B1) using bolts (AA). NOTE: To avoid destroying the finish, do not put the parts on the ground directly.
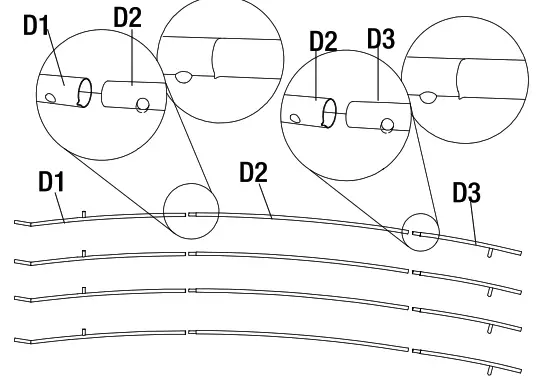
- Assembling the Oblique Tubes❑ Connect the Upper oblique tube (Dl), Middle oblique tube (D2) and Bottom oblique tube (D3) using the spring button on the parts. NOTE: To avoid destroying the finish, do not put the parts on the ground directly.
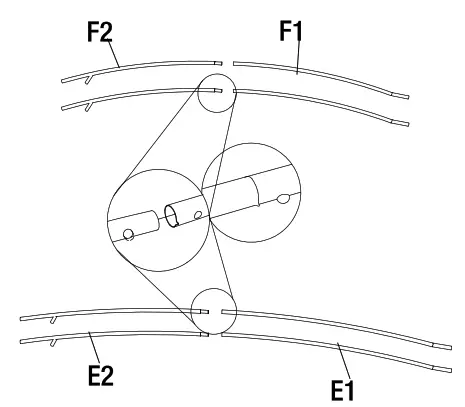
- Assembling the Middle Tubes❑ Connect the Bottom long middle tube (E2) and Upper long middle tube (El) using the spring button on the parts. Connect the Bottom short middle tube (F2) and Upper short middle tube (Fl) using the spring button on the parts. NOTE: To avoid destroying the finish, do not put the pails on the ground directly.
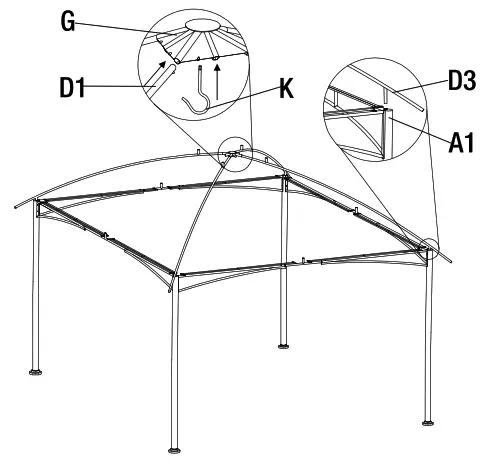
- Attaching the Oblique Tube and Hook❑ Inset the Upper oblique tubes (D1) to the Big roof connector (G), then Screw the Hook (K) to the Big roof connector (G). Insert the Bottom oblique tube (D3) to the Post 1 (A1).NOTE: To avoid destroying the finish, do not put the parts on the ground directly.
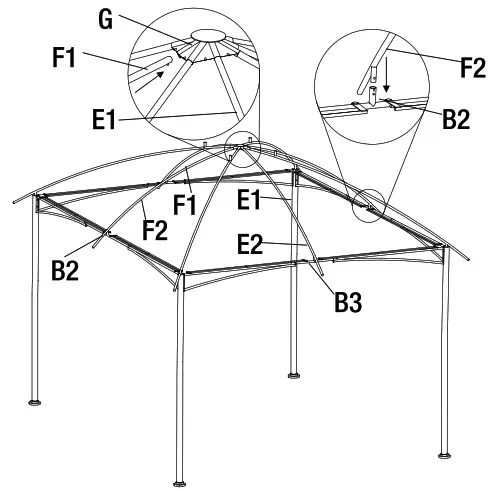
- Attaching the Middle Tubes❑ Insert the assembled Long middle tube (El) to the Big roof connector (G), insert the Bottom long middle tube (E2) to the Short cross beam (83).❑ Insert the assembled Short middle tube (11) to the Big roof connector (G), insert the Bottom short middle tube (F2) to the Long cross beam (82). NOTE: To avoid destroying the finish, do not put the pails on the ground directly.
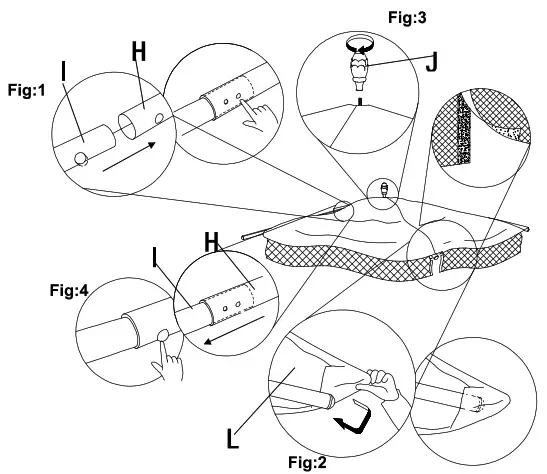
- Assembling the Small Roof❑ Deeply inert the Small roof oblique tube (I) to the Small roof connector (H) to the end (Pepsi), but the small canopy on the small roof and align the corners (Fig.2). Screw the Top decoration (J) on the roof (Fig.3), pull the Small roof oblique tube (I) back to fit the Noll. NOTE: To avoid destroying the finish, do not put the parts on the ground directly.
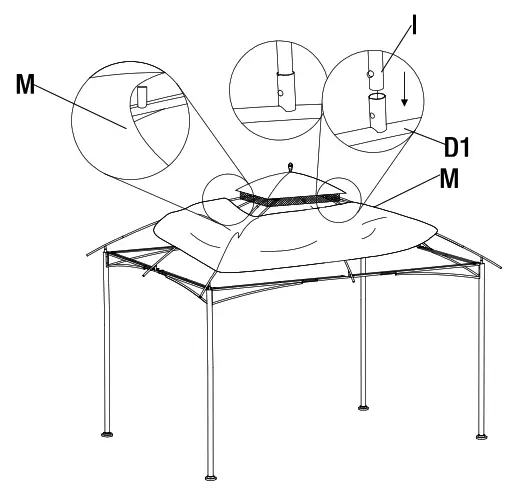
- Attaching the Small Roof❑ Put the big canopy (M) on the assembled big roof (D1), connect the assembled small roof (I) with the big roof (D1) using the spring button on the parts before spread the big canopy (M). NOTE: To avoid destroying the finish, do not put the parts on the ground directly.
- Spreading the Big Canopy❑ Spread the Big canopy (M), and first aligning the 4 corners to the Oblique Tubes (D3). Then aligning the big canopy to the middle tube (El &E2). NOTE: To avoid destroying the finish, do not put the parts on the ground directly.
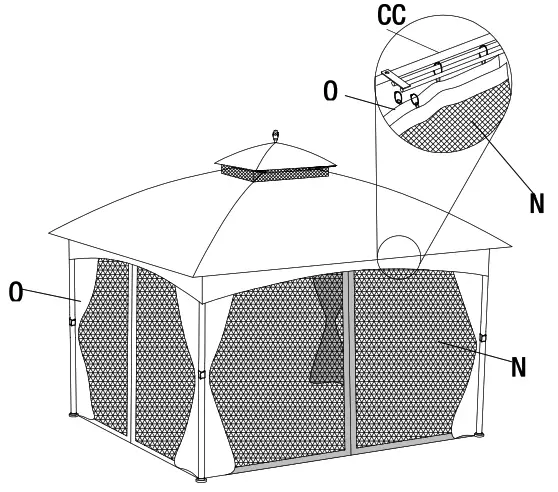
- Attaching the Curtain and Netting❑ Hang the Private Curtain (0) and the Mosquito Netting (N) on the Mosquito Netting Bar (C1, C2, C3, C4) using Plastic Ring (CC). NOTE: To avoid destroying the finish, do not put the parts on the ground directly.
- Securing the Gazebo❑ Secure the assembled gazebo to the lawn with the Stakes (BB).❑ It is recommended for anchoring on wood or concrete surface for more stability using setscrew (Purchased separately) NOTE: To avoid destroying the finish, do not put the parts on the ground directly.


Care and Maintenance
- Our steel components for garden accessories and furniture are treated with rust-inhibiting paint that protects it from rusting. However, due to the nature of steel, surface oxidation (rusting) will occur once these protective coatings are scratched. This is not a defect and thus not covered by the warranty.
- To minimize this condition, we recommend care when assembling & handling the product to prevent scratching the paint. Should any scratching or damage occur, we recommend immediate touch-up with rust-inhibiting paint.
- Surface rust can also be easily removed with a very light application of common cooking oil. If surface oxidation (rusting) occurs and if no measure is taken to prevent this, the oxidation may start dripping on to deck or patio and caused damaging stains, which may be difficult to remove. This can be prevented if the above-mentioned measures are taken to keep the product from oxidizing.
- Use a damp cloth to wipe off the stains as quickly as possible.
- If necessary, wash with a mild solution of soap and water; rinse thoroughly and dry completely.
- Periodically check and ensure that all bolts are well-tighten during use.
Limited Manufacturer’s Warranty
Sunjoy Group warrants to the original purchaser that this item is free from defects in workmanship and materials for a period of 6 months from the date of purchase, provided the item was factory-sealed at the time of purchase and is maintained with care and used only for personal, residential purposes. Should any manufacturing defect arise within this warranty period, Sunjoy Group will replace (at our option) any defective merchandise or parts upon proof of purchase; however, transportation and delivery costs, as well as payments to a third party for assembly or disassembly of the item, remain the responsibility of the purchaser. A purchaser of an “open box,” previously-returned, or “clearance” item, as well as original purchasers outside of the warranty period, may obtain replacement parts from Sunjoy Group for products in current production, at nominal cost.
Exclusions
Items used for commercial, contract, or other non-residential purposes, or items damaged due to acts of nature, vandalism, misuse, or improper assembly are not covered. Corrosion or rusting of hardware is not covered. Proof of purchase (dated register receipt) is required for warranty claims. Warranty is to the original purchaser and is non-transferable. Any replacement of warranted items will be in the original style and color, or a similar style and color if the original is unavailable or has been discontinued. As some states do not allow exclusions or limitations on an implied warranty, the above exclusions and limitations may not apply. This warranty gives you specific rights, and you may also have other rights, which vary from state to state.
Country of Origin: China
[xyz-ips snippet=”download-snippet”]